


28
Colortrac SmartLF Ci 24 / Ci 40 Installation and Operating Manual
PAS171 P/N: P005500 Colortrac Ltd © 2010
Using the Ci Utilities program to change or check the scanner IP address
NOTE: To avoid operator confusion and possible interface mal-function do not connect the
Ethernet and USB interfaces at the same time.
Start by running Ci Utilities with
ONLY
the USB cable connected. From the Utilities button go to the Ethernet tab.
Next identify an available IP address for the scanner. You may need to consult your IT administrator for this. You can
check if the address is currently unused and available by checking for a failed ping return using
ping IP address *
<ENTER>
from the DOS prompt on the computer/ network you intend to use.
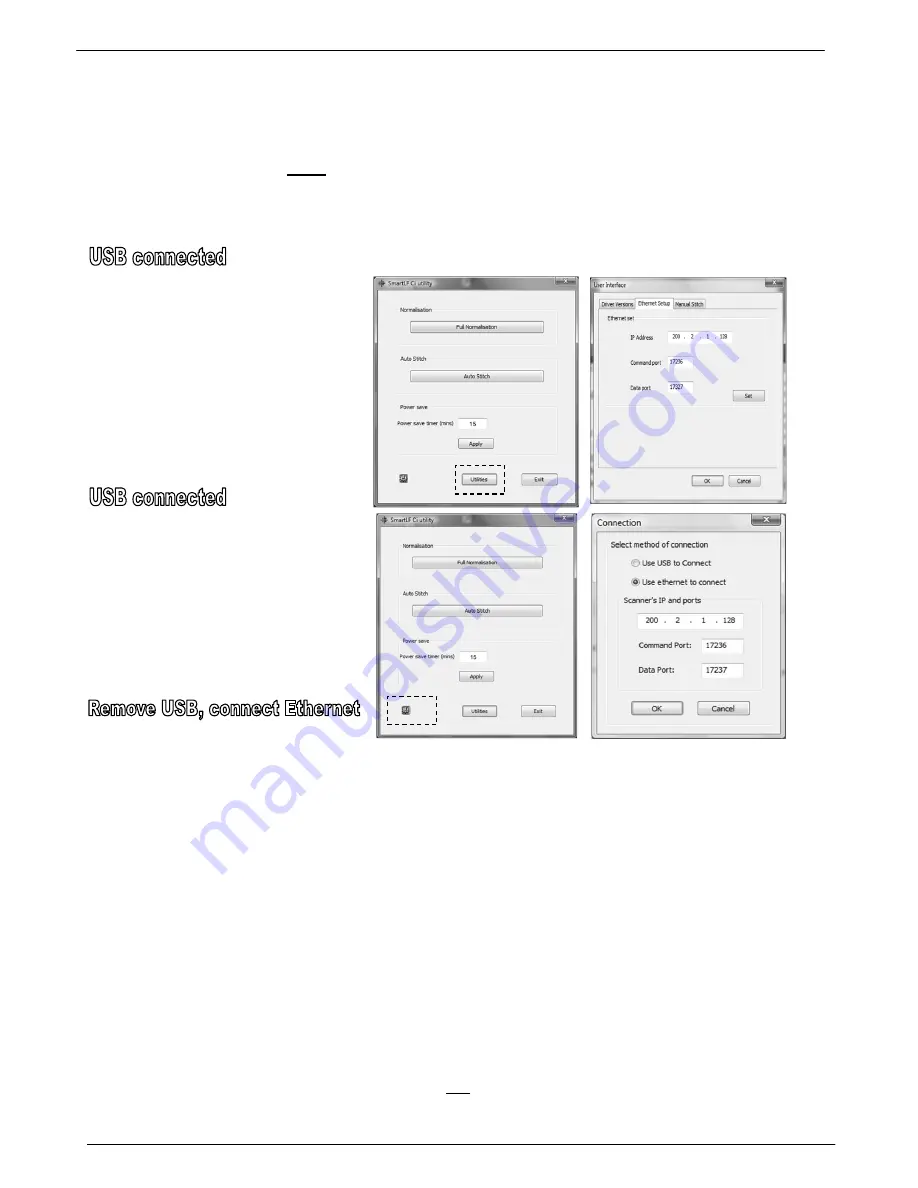
Configuring the IP address in the scanner
Activate the scanner if in Sleep Mode
click the Utilities button on the first screen
of the Ci Utilities application (dotted)
Click the Ethernet Setup tab
Type in the IP address you will be using *
Type in the Command and Data port
numbers. These will normally be as
shown
Click OK.
Switching Ci Utilities to Ethernet (IP)
Click the Utilities button (dotted) to access
the Connection selector
Click the Ethernet radio button
Type in the address you will be using
Type in the Command and Data ports
Press OK
Exit the Ci Utilities application
Using Ethernet with Ci Utilities
Turn off the scanner
Remove the USB2 cable
Insert the Ethernet cable
Switch the scanner ON
Start Ci Utilities to check for an IP connection.
The connection can also be checked from the DOS prompt
by typing
netstat
– a
followed by
<ENTER>
. The IP
address of the host computer (200.2.1.210), scanner
(200.2.1.128) and the ports shown here as 17236 and
17237 should all be visible.
An example of a successful PING to the scanner
configured as 200.2.1.128 after the scanner has been
connected.
IMPORTANT: If the scanner is switched on with the USB and Ethernet interface connected, the USB interface will
become the active interface. If a USB cable is plugged into a working Ethernet configured scanner it will automatically
TCP 200.2.1.210:57726 213.120.163.168:http ESTABLISHED
TCP 200.2.1.210:57751 wy-in-f100:http ESTABLISHED
TCP 200.2.1.210:57752 wy-in-f100:http ESTABLISHED
TCP 200.2.1.210:57755 200.2.1.128:17236 ESTABLISHED
TCP 200.2.1.210:57756 200.2.1.128:17237 ESTABLISHED
Pinging 200.2.1.128 with 32 bytes of data:
Reply from 200.2.1.128: bytes=32 time<1ms TTL=64
Reply from 200.2.1.128: bytes=32 time<1ms TTL=64
Reply from 200.2.1.128: bytes=32 time<1ms TTL=64
Reply from 200.2.1.128: bytes=32 time<1ms TTL=64
Ping statistics for 200.2.1.128:
Packets: Sent = 4, Received = 4, Lost = 0 (0% loss),
Approximate round trip times in milli-seconds:
Minimum = 0ms, Maximum = 0ms, Average = 0ms


