


Colortrac SmartLF Ci 24 / Ci 40 Installation and Operating Manual 23
PAS171 P/N: P005500 Colortrac Ltd © 2010
4.4 Checking and setting scanner stitch (Ci Utilities)
The Ci is designed for use with paper of thickness similar to the Automatic Stitch target that ships with the scanner.
When scanning thicker documents it may be necessary to use the Speed and Media Thickness Controls. See
sections 3.06 and 4.6 for more information. The Ci Utilities program and the stitch target (supplied) may be needed to
restore optimum alignment of the five sensors after transporting the scanner. Scanning thick documents at high
speed can cause temporary loss of sensor alignment which may be visible at the top of the scanned image
– see
Troubleshooting section 6.1 (scanning heavy media).
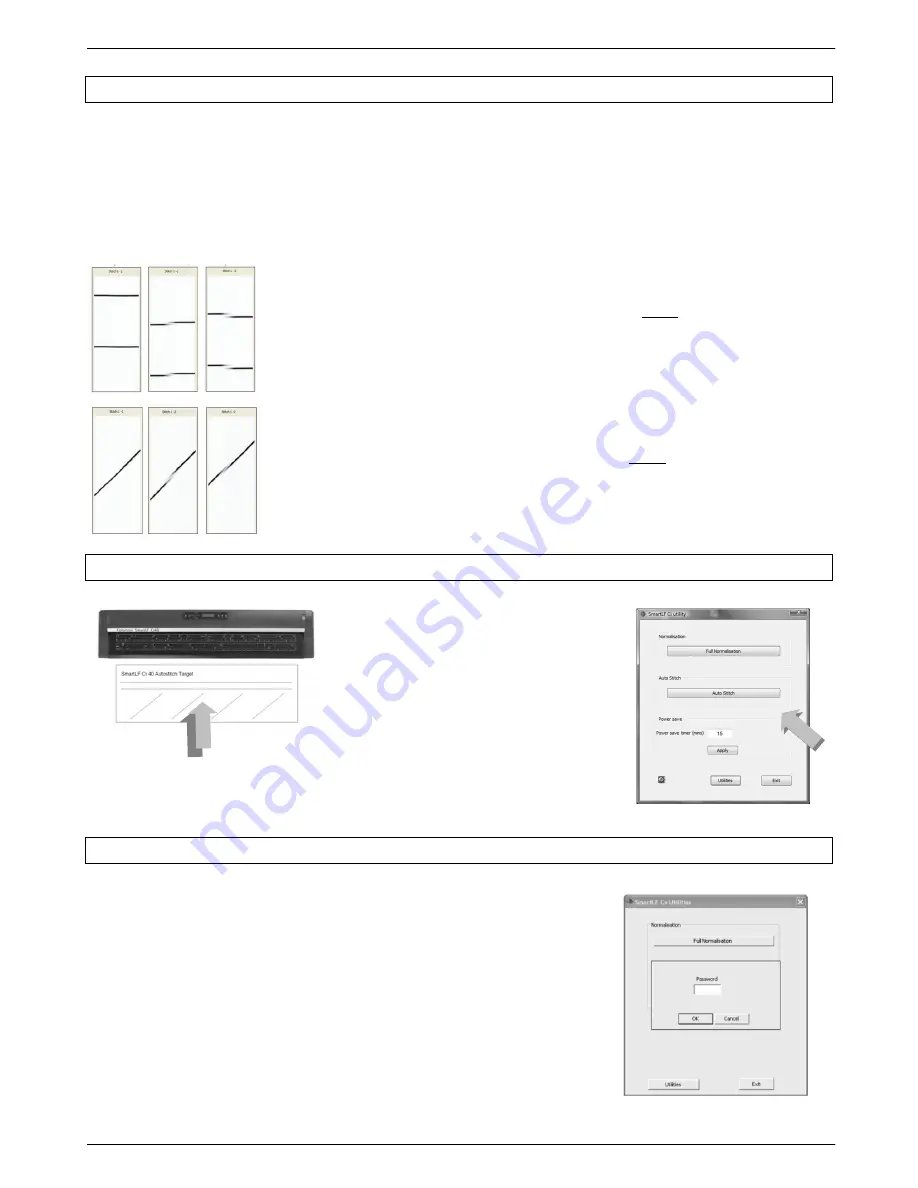
Checking the stitching (visual check)
HORIZONTAL or F/ B (front-back)
LEFT picture
– shows perfect front-back stitch at a single CIS1:CIS2 intersection
MIDDLE picture
– shows a rising stitch problem at the CIS1:CIS2 intersection
RIGHT picture
– shows a falling stitch problem at the CIS1:CIS2 intersection
VERTICAL or L/R (left-right)
LEFT picture
– shows perfect left-right stitch at a single CIS1:CIS2 intersection
MIDDLE picture
– shows a rising stitch problem at the CIS1:CIS2 intersection
RIGHT picture
– shows a falling stitch problem at the CIS1:CIS2 intersection
4.4.1 Running the automatic stitch routine
Load the Automatic Stitch Target
(included) into the scanner face-up and
centred. Auto Stitch calibrates the scanner
for
THIN
or low Paper Weight media.
From the Ci Utilities screen click the Auto
Stitch button. Auto Stitch should complete
in 1-2 minutes.
Your scanner is now re-stitched.
Sometimes the scanner may fail to stitch
automatically if the target has been
damaged. In this case the scanner can be
Manually Stitched.
4.4.2 Manually stitching the scanner
The Manual Stitch Target is provided in .pdf form on the scanner installation
CD and will need to be printed onto at least 36” (915mm) wide paper. Ci 24
scanner users should
produce a 24” version by trimming the target vertically
along the „3‟ line which passes through the letter h in the word stitch.
Place the Manual Stitch Target centrally into the scanner then use SmartLF-
All-In-One or ScanWorks to view the target using grayscale at 600 dpi. From
the Ci Utilities program right-click the screen and type in the password
(obtainable from your distributor) to access the manual stitch screen data.
Make a note of the settings by hand or by clicking PrtSc then use CNTRL+V to
paste the screen into MS Paint before proceeding. This way there will be a
record of the settings in case of difficulty. Always correct any F/B (front-back)
stitch error first.
Auto Stitch Target


