71
Reassembly
17 690 15 Rev. --
KohlerEngines.com
Install Crankshaft
Carefully slide fl ywheel end of crankshaft through main
ball bearing and seal.
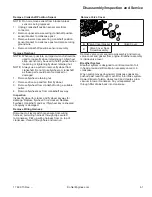
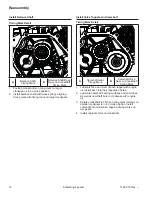
Install Connecting Rod with Piston and Rings
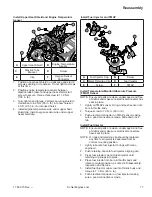
Connecting Rod Details
A
C
D
A
B
A
Match Marks
B
Off set
C
Dipper
D
Oil Hole
1. Make sure these are correct before installing.
a. Locating mark on piston is down.
b. Connecting rod off set is down and oil hole is in 4
o’clock position shown. Match marks should align
as shown with dipper down.
2. If piston rings were removed, see Disassembly/
Inspection and Service procedure to install rings.
3. Lubricate cylinder bore, piston, piston pin, and piston
rings with engine oil. Compress rings using a piston
ring compressor.
4. Lubricate crankshaft journal and connecting rod
bearing surfaces with engine oil.
5. Ensure ▼ stamping on piston is facing down toward
base of engine. Use a hammer handle or rounded
wood dowel and gently tap piston into cylinder. Be
careful oil ring rails do not spring free between
bottom of ring compressor and top of cylinder.
6. Install connecting rod cap to connecting rod so
dipper is down and match marks are aligned.
7. Torque both screws in increments to 20 N·m
(177 in. lb.).
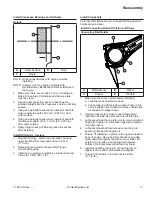
Install Crankcase Bearings and Oil Seals
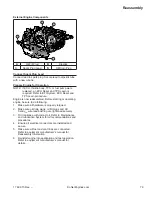
Details
A
B
C
A
Outer Surface
B
Seal
C
Depth
NOTE: Oil bearings liberally with engine oil when
installing.
NOTE: In steps 3 and 4, position oil seals with
manufacturer’s identifi cation marks visible and
facing you.
1. Make sure there are no nicks, burrs, or damage in
bores for bearings. Crankcase and closure plate
must be clean.
2. Use an arbor press to make sure bearings are
installed straight into their respective bores, until fully
seated.
3. Using an appropriate seal driver, install oil seal into
closure plate to depth of 8.2 mm (0.323 in.) from
outer surface.
4. Using an appropriate seal driver, install oil seal into
crankcase to depth of 0.0-1.0 mm (0.0-0.039 in.)
from outer surface.
5. Apply a light coating of lithium grease to seal lips
after installing.
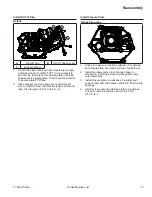
Install Oil Sentry
™
System
1. Mount Oil Sentry
™
switch into crankcase housing
using two M6x18 screws and torque to 8 N·m
(71 in. lb.).
2. Route wire lead grommet assembly through
crankshaft housing.
3. Install nut on grommet assembly external stud and
torque to 10 N·m (89 in. lb.).
Содержание Carryall 300 2021
Страница 2: ......
Страница 16: ......
Страница 54: ...Pagination Page 4 Floor Mat BODY AND TRIM Page 4 20 2021 Carryall 300 Maintenance and Service Manual...
Страница 112: ...8 Tires WHEELS AND TIRES Figure 8 2 Inflate Tire Page 8 4 2021 Carryall 300 Maintenance and Service Manual...
Страница 118: ...Pagination Page 9 Jounce Bumpers REAR SUSPENSION Page 9 6 2021 Carryall 300 Maintenance and Service Manual...
Страница 406: ...Pagination Page 20 Snubber GASOLINE VEHICLE ENGINE Page 20 10 2021 Carryall 300 Maintenance and Service Manual...
Страница 454: ...Pagination Page 23 Driven Clutch GASOLINE VEHICLE CLUTCHES Page 23 20 2021 Carryall 300 Maintenance and Service Manual...
Страница 470: ...Pagination Page 24 Shifter Cable GASOLINE VEHICLE TRANSAXLE Page 24 16 2021 Carryall 300 Maintenance and Service Manual...
Страница 551: ...80 2018 by Kohler Co All rights reserved KohlerEngines com 17 690 15 Rev...
Страница 552: ...Pagination Page 25 Shifter Cable KOHLER ENGINE SERVICE MANUAL Page 25 2 2021 Carryall 300 Maintenance and Service Manual...
Страница 565: ...GASOLINE ENGINE HARNESS Wiring Diagrams Gasoline Engine Harness 26...
Страница 566: ...Page intentionally left blank...
Страница 567: ...GASOLINE KEY START MAIN HARNESS Wiring Diagrams Gasoline Key Start Main Harness 26...
Страница 568: ...Page intentionally left blank...
Страница 569: ...GASOLINE PEDAL START MAIN HARNESS Wiring Diagrams Gasoline Pedal Start Main Harness 26...
Страница 570: ...Page intentionally left blank...
Страница 571: ...GASOLINE INSTRUMENT PANEL HARNESS Wiring Diagrams Gasoline Instrument Panel Harness 26...
Страница 572: ...Page intentionally left blank...
Страница 573: ...GASOLINE FNR HARNESS Wiring Diagrams Gasoline FNR Harness 26...
Страница 574: ...Page intentionally left blank...
Страница 575: ...ELECTRIC MAIN HARNESS Wiring Diagrams Electric Main Harness 26...
Страница 576: ...Page intentionally left blank...
Страница 577: ...ELECTRIC INSTRUMENT PANEL HARNESS Wiring Diagrams Electric Instrument Panel Harness 26...
Страница 578: ...Page intentionally left blank...
Страница 579: ...ELECTRIC ACCESSORIES HARNESS Wiring Diagrams Electric Accessories Harness 26...
Страница 580: ...Page intentionally left blank...
Страница 588: ...NOTES...
Страница 589: ...NOTES...
Страница 590: ...NOTES...
Страница 591: ...NOTES...
Страница 592: ...NOTES...
Страница 593: ...NOTES...
Страница 594: ...NOTES...
Страница 595: ......
Страница 596: ......

