Contents
Page 136
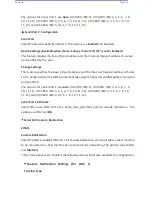
Use this feature to select the target terminal emulation type for Console Redirection. Select
VT100 to use the ASCII Character set. Select VT100+ to add color and function key support.
Select ANSI to use the Extended ASCII Character Set. Select VT-UTF8 to use UTF8 encoding
to map Unicode characters into one or more bytes. The options are ANSI, VT100,
VT100+
,
and VT-UTF8.
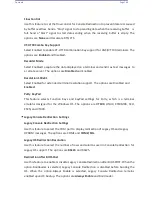
Bits Per second
Use this feature to set the transmission speed for a serial port used in Console Redirection.
Make sure that the same speed is used in the host computer and the client computer. A
lower transmission speed may be required for long and busy lines. The options are 9600,
19200, 38400, 57600, and
115200
(bits per second).
Data Bits
Use this feature to set the data transmission size for Console Redirection. The options are 7
(Bits) and
8 (Bits)
.
Parity
A parity bit can be sent along with regular data bits to detect data transmission errors. Select
Even if the parity bit is set to 0, and the number of 1's in data bits is even. Select Odd if the
parity bit is set to 0, and the number of 1's in data bits is odd. Select None if you do not
want to send a parity bit with your data bits in transmission. Select Mark to add a mark as a
parity bit to be sent along with the data bits. Select Space to add a Space as a parity bit to
be sent with your data bits. The options are
None
, Even, Odd, Mark, and Space.
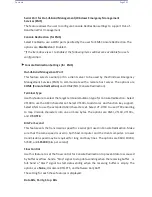
Stop Bits
A stop bit indicates the end of a serial data packet. Select 1 Stop Bit for standard serial data
communication. Select 2 Stop Bits if slower devices are used. The options are
1
and 2.
Flow Control
Use this feature to set the flow control for Console Redirection to prevent data loss caused
by buffer overflow. Send a "Stop" signal to stop sending data when the receiving buffer is
full. Send a "Start" signal to start sending data when the receiving buffer is empty. The
options are
None
and Hardware RTS/CTS.
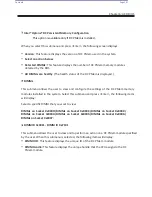
VT-UTF8 Combo Key Support
Select Enabled to enable VT-UTF8 Combination Key support for ANSI/VT100 terminals. The
options are
Enabled
and Disabled
.
Recorder Mode
Select Enabled to capture the data displayed on a terminal and send it as text messages to
a remote server. The options are
Disabled
and Enabled.
Содержание UCS C890 M5
Страница 15: ...Contents Page 15 Location of the C890 M5 BMC Card ...
Страница 19: ...Contents Page 19 Five 5 C890 M5 PCIEBOARD on the Rear side of Midplane ...
Страница 25: ...Contents Page 25 C890 M5 BPLANE Midplane Layout Rear Side ...
Страница 26: ...Contents Page 26 Front View of the C890 M5 BPLANE Midplane ...
Страница 27: ...Contents Page 27 Rear View of the C890 M5 BPLANE Midplane ...
Страница 28: ...Contents Page 29 2 3 14 Location of the C890 M5 BPLANE Midplane The CPU Board ...
Страница 33: ...Contents Page 34 2 6 1 System Block Diagram This section provides a detailed block diagram of the system ...
Страница 44: ...Contents Page 46 ...
Страница 48: ...Contents Page 50 Mixed DIMM DC PMem Population Table ...
Страница 55: ...Contents Page 57 6 Pull the card out of the PCI E board Removing a PCI E Module 3 4 ...
Страница 56: ...Contents Page 58 Removing a PCI E Card from a PCIE Module 5 6 ...
Страница 59: ...Contents Page 61 Installing a PCI E Card in a CPU Module ...
Страница 60: ...Contents Page 62 Installing a PCI E Card in a CPU Module cont ...
Страница 62: ...Contents Page 64 Installing a PCI E Card in a Storage Module ...
Страница 64: ...Contents Page 66 Installing the Battery 3 2 ...
Страница 66: ...Contents Page 68 Mounting a Drive in a Carrier ...
Страница 70: ...Contents Page 72 Removing the Storage Module Cover ...
Страница 71: ...Contents Page 73 Installing Removing 2 5 HDDs with bracket ...
Страница 86: ...90 Contents Page 90 ...
Страница 90: ...95 Contents Page 95 ...
Страница 162: ...Contents Page 167 Change the Option ROM setting to EFI Press ESC to return to return to the main screen ...
Страница 163: ...Contents Page 168 Save changes and Reset ...
Страница 165: ...Contents Page 170 ...
Страница 167: ...Contents Page 172 ...
Страница 168: ...Contents Page 173 ...
Страница 169: ...Contents Page 174 Emulex FC ...
Страница 171: ...Contents Page 176 ...
Страница 177: ...BIOS PCIe Configuration Page 182 Change the Option ROM setting to EFI Press ESC to return to the main screen ...
Страница 178: ...BIOS PCIe Configuration Page 183 Save changes and Reset ...
Страница 179: ...BIOS PCIe Configuration Page 184 Confirm by selecting yes ...
Страница 182: ...BIOS PCIe Configuration Page 187 ...
Страница 183: ...BIOS PCIe Configuration Page 188 ...
Страница 184: ...BIOS PCIe Configuration Page 189 ...
Страница 185: ...BIOS PCIe Configuration Page 190 ...
Страница 186: ...BIOS PCIe Configuration Page 191 ...
Страница 187: ...BIOS PCIe Configuration Page 192 Another default setting is in regards the network stack in the PCIE section ...
Страница 188: ...BIOS PCIe Configuration Page 193 Default is enabled ...
Страница 190: ...BIOS PCIe Configuration Page 195 ...
Страница 191: ...BIOS PCIe Configuration Page 196 ...


