background image


3-6

Cisco 1120 Connected Grid Router Hardware Installation Guide

OL-26438-02

Chapter 3      Router Hardware Description

  Hardware Features

Mounting Procedures

For instructions on how to mount the router using the mounting bracket kit, see the chapter 

Mounting 

the Router

.

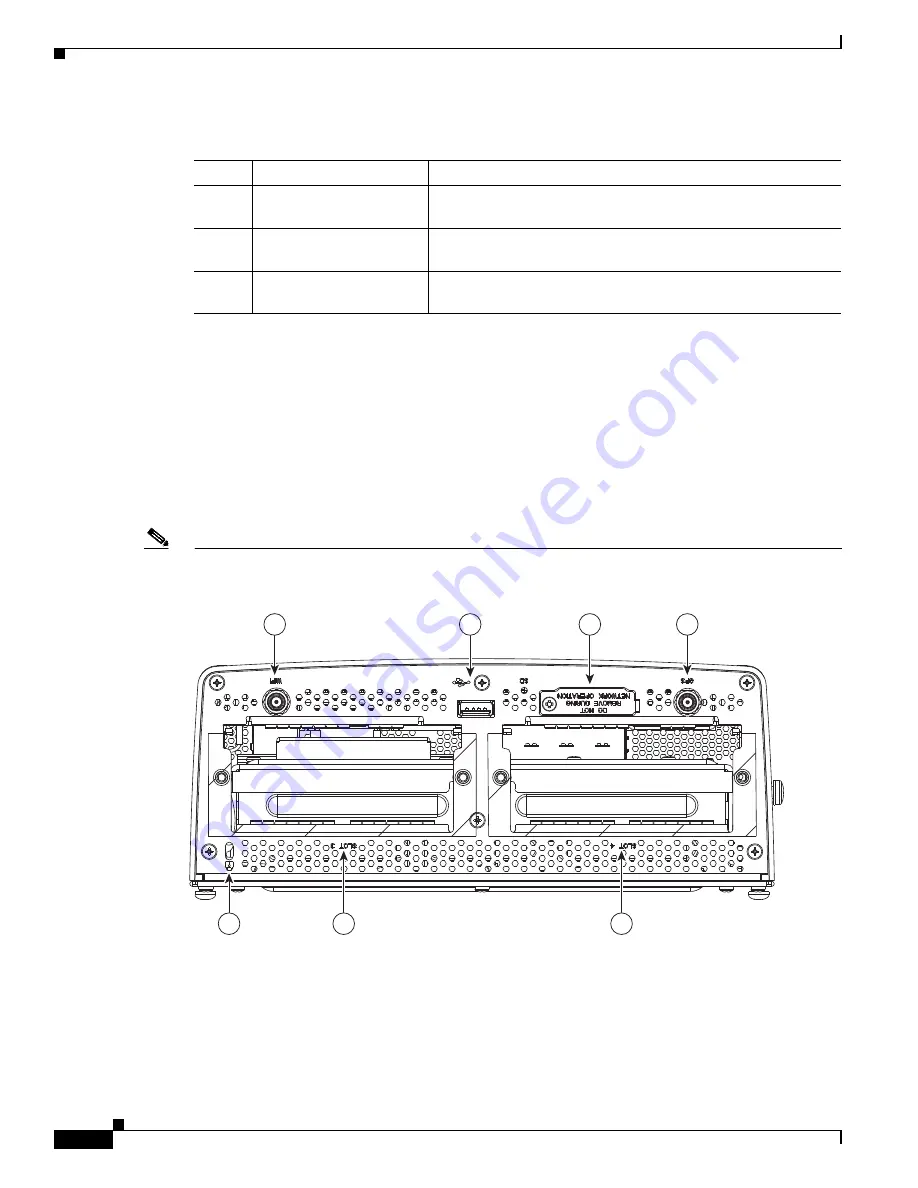
Module Panel (Front Panel) Features

Figure 3-4

Module Panel (Front Panel) Features

Note

The module panel labels appear inverted when the router rests on its base (see 

Figure 3-4

). The label 

orientation is designed to be read when the router is installed on a DIN rail.

Table 3-2

Mounting Features (Shown in 

Figure 3-3

)

Item

Feature

Description

1

DIN rail

Standard rail type used for mounting industrial control 
equipment on an equipment rack.

2

Mounting keyhole (2)

Use the mounting keyholes on the mounting bracket to mount the 
router on a wall.

3

Mounting bracket

Included as part of the mounting kit. Use this bracket when 
mounting the router on a wall or DIN rail.

302208

1

2

3

4

5

6

7

Содержание Firepower 1120

Страница 1: ...nc 170 West Tasman Drive San Jose CA 95134 1706 USA http www cisco com Tel 408 526 4000 800 553 NETS 6387 Fax 408 527 0883 Cisco 1120 Connected Grid Router Hardware Installation Guide Last updated February 2013 Text Part Number OL 26438 02 ...

Страница 2: ...G WITHOUT LIMITATION THOSE OF MERCHANTABILITY FITNESS FOR A PARTICULAR PURPOSE AND NONINFRINGEMENT OR ARISING FROM A COURSE OF DEALING USAGE OR TRADE PRACTICE IN NO EVENT SHALL CISCO OR ITS SUPPLIERS BE LIABLE FOR ANY INDIRECT SPECIAL CONSEQUENTIAL OR INCIDENTAL DAMAGES INCLUDING WITHOUT LIMITATION LOST PROFITS OR LOSS OR DAMAGE TO DATA ARISING OUT OF THE USE OR INABILITY TO USE THIS MANUAL EVEN I...

Страница 3: ...4 Power Guidelines and Requirements 2 4 Network Cabling Specifications 2 5 Preparing for Network Connections 2 5 Ethernet Connections 2 5 Serial Connections 2 5 Required Tools and Equipment for Installation and Maintenance 2 7 C H A P T E R 3 Router Hardware Description 3 1 Router Overview 3 1 Applications Overview 3 1 Hardware Compliance 3 2 Router Hardware Overview 3 2 Hardware Features 3 4 Chas...

Страница 4: ... GPS Module 3 19 Short Range Access Point 3 20 Real Time Clock RTC 3 21 Temperature Sensor 3 21 C H A P T E R 4 Mounting the Router 4 1 Router Mounting Kit 4 1 Mounting Kit Contents 4 1 Prepare to Mount the Router 4 2 Materials and Tools You Supply 4 3 Router Orientation When Mounting 4 3 General Safety Information for Mounting 4 3 Mounting Instructions 4 4 Attach the Mounting Bracket to the Route...

Страница 5: ...twork Connections 6 1 Before Installing 6 1 Installation Site Preparation 6 1 Installation Safety Information 6 2 Connecting the Router to Power 6 2 Preventing Electrostatic Discharge Damage 6 2 Cabling Guidelines 6 2 Basic Network Connections 6 2 Connect to the Ethernet Network 6 3 Connecting the Ethernet Ports 6 3 Connecting the SFP Ports 6 4 Verify Ethernet Connection with System Software CLI 6...

Страница 6: ...4 Where to Find Additional Module Information 7 4 C H A P T E R 8 About Connected Grid Antennas 8 1 Router Antennas Overview 8 1 GPS Antenna 8 2 WiFi Antenna 8 4 Connected Grid Module Antennas 8 4 Installing or Replacing Module Antennas 8 5 Where to Find Antenna Installation Information 8 5 Antenna Specifications 8 6 GPS Antenna Specifications 8 6 WiFi Antenna Specifications 8 7 C H A P T E R 9 Us...

Страница 7: ...rt States 10 5 GE LEDs Gigabit Ethernet Port States 10 5 FE LEDs Fast Ethernet Port States 10 5 SD Card LED Location 10 6 SD LED SD Card Status 10 6 Related Commands 10 6 show led 10 7 A P P E N D I X A Starting a Router Terminal Session A 1 Before You Begin A 1 About the Console Port A 1 Console Port Settings A 1 Using the Ctrl C Command A 1 Connecting to the Console Port with Microsoft Windows A...

Страница 8: ...120 Connected Grid Router Hardware Installation Guide OL 26438 02 SFP Ports B 3 SFP Interface Combination Port SFP and GE Ethernet B 3 Serial Port B 4 Power Connectors B 4 Cable and Adapter Specifications B 4 SFP Cable B 4 ...

Страница 9: ...packing the Router Tip When you unpack the router do not remove the foam blocks attached to antennas and antenna connectors The foam protects the antennas and connectors during installation Follow these steps to unpack the router Step 1 Open the shipping container and carefully remove the contents Step 2 Return all packing material to the shipping container and save it Step 3 Ensure that all items...

Страница 10: ...er enclosure with the following components installed Connected Grid Modules 1 to 2 depending on configuration ordered with required antennas 1 GB SD Flash Memory Module AC power supply integrated 1 DIN Rail Mounting Kit Includes DIN rail mounting bracket All required hardware to attach bracket to router 2 Power connectors adapters Use these mating connectors for wiring the router power connectors ...

Страница 11: ...Equipment for Installation and Maintenance page 2 7 Note To see translated warnings that appear in this publication see the Regulatory Compliance and Safety Information document that came with the router Warning Only trained and qualified personnel should be allowed to install replace or service this equipment Statement 1030 Warning Ultimate disposal of this product should be handled according to ...

Страница 12: ...voltages and currents inside the chassis they contain electromagnetic interference EMI that might disrupt other equipment and they direct the flow of cooling air through the chassis Do not operate the system unless all cards faceplates front covers and rear covers are in place Statement 1029 Warning Read the installation instructions before connecting the system to the power source Statement 1004 ...

Страница 13: ...therwise assess the victim s condition and then call for help Determine if the person needs rescue breathing or external cardiac compressions then take appropriate action Warning Do not work on the system or connect or disconnect cables during periods of lightning activity Statement 1001 Preventing Electrostatic Discharge Damage Electrostatic discharge ESD can damage equipment and impair electrica...

Страница 14: ...gether inadequate ventilation and inaccessible panels can cause malfunctions and shutdowns and can make maintenance difficult Install the router so that you can access both the module side and the cable side panels When planning your site layout and equipment locations refer to General Site Requirements page 2 4 If you are currently experiencing shutdowns or an unusually high number of errors with...

Страница 15: ...Ethernet implementations 1000BASE X 1000 Mb s full duplex transmission over a Category 5 or better unshielded twisted pair UTP cable IEEE 802 3z Supports the Ethernet maximum length of 328 feet 100 meters 1000BASE T 1000 Mb s full duplex transmission over a Category 5 or better unshielded twisted pair UTP cable IEEE 802 3ab Supports the Ethernet maximum length of 328 feet 100 meters 100BASE TX 100...

Страница 16: ...lable with a connector appropriate for the standard you specific The synchronous serial port can be configured as DTE or DCE depending on the attached cable All serial ports configured as DTE require external clocking from a CSU DSU or other DCE device Distance Limitations Serial signals can travel a limited distance at any given bit rate generally the slower the data rate the greater the distance...

Страница 17: ...ition depending on the type of modules you plan to use you might need the following equipment to connect a port to an external network Cables for connection to the WAN and LAN ports dependent on configuration Ethernet hub or PC with a network interface card for connection to an Ethernet LAN port Console terminal an ASCII terminal or a PC running HyperTerminal or similar terminal emulation software...

Страница 18: ...2 8 Cisco 1120 Connected Grid Router Hardware Installation Guide OL 26438 02 Chapter 2 Installation Safety and Site Preparation Required Tools and Equipment for Installation and Maintenance ...

Страница 19: ...r and Making Network Connections This chapter contains the following sections Router Overview page 3 1 Hardware Features page 3 4 Router Overview This section contains the following topics Applications Overview page 3 1 Hardware Compliance page 3 2 Router Hardware Overview page 3 2 Applications Overview The Cisco 1120 Connected Grid Router is a ruggedized communication platform designed for use in...

Страница 20: ...go cgr1000 docs Router Hardware Overview The Cisco 1120 Connected Grid Router is a modular ruggedized router that features 2 Connected Grid Module Slots Ruggedized Connected Grid modules provide connectivity to network endpoints such as smart meters and DA devices 6 Fast Ethernet Ports 2 Gigabit Ethernet Ports Ethernet connections to the backhaul network and other IP network devices 2 Integrated S...

Страница 21: ...3 3 Cisco 1120 Connected Grid Router Hardware Installation Guide OL 26438 02 Chapter 3 Router Hardware Description Router Overview Figure 3 1 Module Panel Cisco 1120 Connected Grid Router 302204 ...

Страница 22: ...ter hardware features including mounting brackets network ports device ports and module slots Chassis The router chassis is ruggedized to withstand harsh indoor operating environments such as power substations and utility boxes Note For a complete list of regulatory and compliance standards supported by the router see the Regulatory Compliance and Safety Information for the Cisco 1000 Series Route...

Страница 23: ...ing option for substation devices and equipment See Figure 3 3 Mounting on a wall using the mounting keyholes on the mounting bracket Figure 3 3 Mounting Features Router Shown Mounted on a DIN Rail Table 3 1 Router Chassis Specifications Specification Description Dimensions 8 9 cm x 22 9 cm x 20 cm 3 5 in x 9 0 in x 7 8 in Weight With 2 modules installed 8 pounds 3 6 kg Operating temperature 40 C ...

Страница 24: ...els appear inverted when the router rests on its base see Figure 3 4 The label orientation is designed to be read when the router is installed on a DIN rail Table 3 2 Mounting Features Shown in Figure 3 3 Item Feature Description 1 DIN rail Standard rail type used for mounting industrial control equipment on an equipment rack 2 Mounting keyhole 2 Use the mounting keyholes on the mounting bracket t...

Страница 25: ...ange Access Point For more information see WiFi Antenna Port page 3 7 2 USB port Connect this USB port to a supported external USB device For more information see USB Port page 3 8 3 SD Flash Memory module slot Contains an external flash memory card that stores the operating system software image For more information see SD Flash Memory Module page 3 8 4 GPS antenna port Install a GPS antenna orde...

Страница 26: ...B device with a locking mechanism designed for this purpose You must provide any locking device or mechanism Specifications SD Flash Memory Module The router supports one Cisco Secure Digital SD flash memory module SD card which stores router software configurations and network data For detailed information about the SD card see the chapter Using the SD Flash Memory Module Supported SD Cards Table...

Страница 27: ...more detailed information about supported antennas including specifications and installation instructions see these documents About Connected Grid Antennas chapter in this guide Connected Grid Antennas Installation Guide on Cisco com Specifications Kensington Compatible Security Slot See Figure 3 4 for the Kensington compatible security slot location The front panel features one Kensington compati...

Страница 28: ...d Grid modules in the router see the corresponding installation and configuration guide for each module at www cisco com go cg modules Module Numbering The router uses module numbering to identify the integrated and modular router components Some system software commands refer to the following module numbers Module 1 is the integrated router supervisor engine located on the CPU motherboard Module ...

Страница 29: ...et ports For more information see Ethernet Ports page 3 13 Gigabit Ethernet GE ports GE ports ETH 2 1 and ETH 2 2 are WAN ports for connectivity to a primary substation or a control center Fast Ethernet FE ports FE ports ETH 2 3 to ETH2 8 are LAN ports for local network devices 4 Serial ports Connect the router to legacy devices using these two serial ports For more information on these ports and ...

Страница 30: ...tton for at least 5 seconds to power cycle the router Power cycling the router turns the router off then immediately back on The router will temporarily stop operating on the network during the power cycle then resume operating when power cycle process is complete Small Form Factor Pluggable SFP Ports The router features two fiber optical SFP ports that support optional Cisco rugged SFP modules fo...

Страница 31: ...et 100 meters 100BASE T 100 Mbps full duplex transmission over a Category 5 or higher shielded twisted pair UTP cable Supports the Ethernet maximum length of 328 feet 100 meters 10BASE T 10 Mbps full duplex transmission over a Category 5 or higher shielded twisted pair UTP cable Supports the Ethernet maximum length of 328 feet 100 meters Table 3 6 Supported SFP Modules Cisco Product ID Description...

Страница 32: ... are also used by the Small Form Factor Pluggable SFP Ports For more information about how these ports are used together see Combo Ports page 3 15 The GE ports automatically detect the type of any connected cable fiber or copper and then switch to the corresponding mode fiber or copper When both cables types are connected to the router the first cable that establishes a link is enabled Specificati...

Страница 33: ... GE connections These ports automatically detect the type of any connected cable fiber or copper and then switch to the corresponding mode fiber or copper Note If connections are made to both interfaces of the same name ETH 2 1 or ETH 2 2 the first connection that establishes a link is the only connection enabled Figure 3 6 GE Ports and SFP Ports Share Interfaces ETH 2 1 and ETH 2 2 Serial Ports S...

Страница 34: ...h an internal Short Range Access Point Console Port Default Settings The console port does not support hardware flow control The default settings for the port are 9600 baud 8 data bits no parity and 1 stop bit Connecting to the Console Port Detailed information about connecting to the console port is in the chapter Making Network Connections Specification RS232 RS485 Connector type DB 9 Cable You ...

Страница 35: ...r to Power DC Input for Battery Backup See Figure 3 5 for the external DC power input connector The router supports an external battery backup DC power connection You must provide the battery backup connection or unit For detailed information about the DC power input including how to connect the router to a DC power input source see the chapter Connecting the Router to Power Power Specifications S...

Страница 36: ...cal current is detected DRY contact closed an alarm is generated Output Alarm Trigger Settings Normally Open NO This setting depends on the pinout of the cable that is connected to the alarm port See the appendix Connector and Cable Specifications for details Normally Closed NC This setting depends on the pinout of the cable that is connected to the alarm port See the appendix Connector and Cable ...

Страница 37: ... Flash Memory Module for information about the router SD card which stores the router configuration and system data DDR2 SDRAM The router features 1 GB of double data rate DDR2 SDRAM Boot Flash The router features 16 MB of boot flash memory consisting of two 8 MB Serial Peripheral Interface SPI flash devices The boot flash supports the Common Flash Interface CFI standard Internal GPS Module The ro...

Страница 38: ...ftware is operating If the system software is not operating you cannot use the WiFi connection to connect to or administer the router Related Commands To display WiFi configuration information enter any or all of the following commands show interface wifi slot port associations brief description statistics Summarizes the status of the interface as up or down the five second input and output rate a...

Страница 39: ...ery backup for the date and time when the router is not receiving any power Specifications Temperature Sensor The router hardware features an internal temperature sensor used by the router software to monitor the system operating temperature The router can be configured to generate alerts when the temperature falls outside of a user defined temperature range The router can also be configured to st...

Страница 40: ...3 22 Cisco 1120 Connected Grid Router Hardware Installation Guide OL 26438 02 Chapter 3 Router Hardware Description Hardware Features ...

Страница 41: ...age 4 1 Prepare to Mount the Router page 4 2 Mounting Instructions page 4 4 Ground the Router page 4 8 Router Mounting Kit The router ships with a mounting kit that contains all the parts required to mount the router on a DIN rail or on a wall The Mounting Kit Contents section includes a detailed description of the mounting parts shipped with your router Mounting Kit Contents The mounting bracket ...

Страница 42: ... Prepare to Mount the Router Read the topics in this section before mounting the router Materials and Tools You Supply page 4 3 Router Orientation When Mounting page 4 3 General Safety Information for Mounting page 4 3 Item Description Qty 1 Mounting bracket 1 2 Split lock washer M8 4 3 Nut M8 4 4 Mounting stud M8 1 Included Hardware Qty 4 Qty 4 Qty 1 1 2 3 4 302214 ...

Страница 43: ... this chapter read the safety warnings in this section and in the Installation Safety and Site Preparation chapter One person is required to properly and safely mount the router Caution All mounting methods at any location are subject to the acceptance of local jurisdiction Caution Personnel mounting the router must understand grounding methods Warning Do not locate the antenna near overhead power...

Страница 44: ...uter on a Wall page 4 7 Attach the Mounting Bracket to the Router Before you begin disconnect the router from power and any network connections Step 1 Place the router on a stable surface with the base of the router facing up and the module panel at the top as shown in Figure 4 2 Step 2 Use the 2 Phillips screwdriver to remove the four large screws Item 1 Figure 4 2 from the chassis base Keep the ...

Страница 45: ...acing the router cable panel Align the bracket mounting holes Item 2 Figure 4 3 with the router bracket connectors Item 1 Figure 4 3 The screws were removed from the bracket connectors in Step 2 Figure 4 3 Align the Bracket Mounting Holes 2 over the Router Bracket Connectors 3 Step 5 Replace the screws you removed in Step 2 to secure the mounting bracket to the chassis Step 6 Evenly hand tighten t...

Страница 46: ...outer on a DIN rail Step 1 Tilt the chassis bracket assembly about 10 to 30 degrees and the bracket handle facing down Do not mount the router with the bracket handle facing up Step 2 Place the top lip of the bracket Item 2 in Figure 4 5 over the top of the DIN rail Item 3 in Figure 4 5 Step 3 Firmly pull the bracket handle Item 1 in Figure 4 5 down and rotate the unit until it is parallel to the ...

Страница 47: ...s that you can use to mount the router directly on a wall To mount the router on a wall you must provide the hardware that can be used with the wall material in the installation environment Caution The wall material and hardware that you use to mount the router must be able to support the weight of the router with two modules installed 8 0 pounds 3 6 Kg Wall Mount Orientation See Router Orientatio...

Страница 48: ...ts Wall Mount Hardware Distance The hardware you provide should be mounted the correct distance apart so that the router wall mount holes Item 1 Figure 4 6 can be hung on the hardware 7 30 inches 185 4 mm Figure 4 6 Distance for Wall Mounting Hardware Ground the Router You must ground the router with the grounding lug on the chassis exterior as described in this section Warning This equipment must...

Страница 49: ... grounding lug on the router exterior You must provide the wire Figure 4 6 shows the grounding lug location Step 2 Connect the other end of the wire to the router grounding connectors using the supplied grounding screws Tighten the grounding screws to 10 to 12 foot pounds of torque Do not overtighten Step 3 If necessary strip the other end of the ground wire and connect it to a reliable earth grou...

Страница 50: ...4 10 Cisco 1120 Connected Grid Router Hardware Installation Guide OL 26438 02 Chapter 4 Mounting the Router Ground the Router ...

Страница 51: ...nal page 5 9 Power Cycling the Router page 5 10 Before You Begin Before you connect power to the router read the following topics in this section Verify Router Hardware Readiness page 5 1 Tools and Materials You Supply page 5 2 EMC Class A Notices and Warnings US and Canada page 5 2 Safety Information page 5 3 Verify Router Hardware Readiness Before connecting the router to power verify the follow...

Страница 52: ...quirements of greater than 30 feet of cabling EMC Class A Notices and Warnings US and Canada Tip For a complete listing of all EMC Class A Notices and Warnings refer to following document Regulatory Compliance and Safety Information for the Cisco 1000 Series Connected Grid Routers Class A Notice for FCC Modifying the equipment without Cisco s authorization may result in the equipment no longer com...

Страница 53: ...ion must be accessible at all times because it serves as the main disconnecting device Statement 1019 Warning Only trained and qualified personnel should be allowed to install replace or service this equipment Statement 1030 Warning Installation of the equipment must comply with local and national electrical codes Statement 1074 Caution Before connecting or disconnecting the power cord you must re...

Страница 54: ...pics Router Power Source Input Terminals page 5 4 Electrical Wire Color Codes page 5 5 Terminal Blocks and Mating Connectors for Power Input Wiring page 5 6 Router Power Source Input Terminals The Cisco CGR 1120 Router has two sets of terminals for power input see Figure 5 1 A set of five terminals for AC input power source wires A set of two terminals for DC input power source wires Figure 5 1 Ro...

Страница 55: ...escription 1 AC Input Power Source Terminals Ground terminal To provide a protected earth ground terminate either a green yellow or green wire region specific from the AC power cable on the external screw on the left side of the router See Table 5 2 for details on wiring colors by region N Neutral wire terminal L3 Line terminal L2 Line terminal L1 Line terminal 2 DC Input Power Source Terminals Ne...

Страница 56: ...s to the power input mating connectors on the router Figure 5 2 shows the AC input terminal block Figure 5 3 show the DC input terminal block Figure 5 2 AC Input Terminal Block Table 5 3 DC Power Electrical Wiring Colors Color Description Black Negative Red Positive Item Description Quantity 1 Captive screws for connecting terminal block to mating connector on the router 2 2 Terminal openings for ...

Страница 57: ...ctors on Router Chassis Connect to AC Power This section describes how to make two the following types of AC power connections to the router Single phase AC Three phase AC Item Description Quantity 1 Terminal openings for inserting DC input source wires 2 2 Captive screws for connecting terminal block to mating connector on the router 2 3 Screws for tightening wires into terminal openings 2 302219...

Страница 58: ...rminal block openings that correspond to the labeled AC terminals shown in Figure 5 1 and described in Table 5 1 Insert wires that correspond to your installation three phase or single phase as shown here Step 4 After the wires are inserted in the terminal block use the screwdriver to tighten the terminal block wire screws to keep the wires in place The screws are shown in Figure 5 2 Step 5 Taking...

Страница 59: ...compliant with the installation site requirements To connect a DC input power source to the router follow these steps Step 1 Turn off power to the DC power source at the designated circuits Step 2 Using a wire stripping tool to strip both of the wires from the DC input power source Expose the wire to the appropriate length for the terminal block about 0 25 inches Step 3 Insert the wires into the t...

Страница 60: ...ng connector The terminal screws are shown in Figure 5 2 Torque the terminal block screws to 11 lbf in Step 7 Enable DC power by plugging in the DC power supply cord to the power source or by enabling power at the designated circuit Power Cycling the Router There are two reset buttons on the router cable panel which can be used to power cycle the router and to reset the router system software to t...

Страница 61: ...back on The router will temporarily stop operating on the network during the power cycle then resume operating when the power cycle process is complete 2 PWR RESET Press the PWR RESET button for at least 5 seconds to power cycle the router Power cycling the router turns the router off then immediately back on The router will temporarily stop operating on the network during the power cycle then res...

Страница 62: ...5 12 Cisco 1120 Connected Grid Router Hardware Installation Guide OL 26438 02 Chapter 5 Connecting the Router to Power Power Cycling the Router ...

Страница 63: ...13 Note This chapter describes router installation procedures For detailed technical information about the router hardware including hardware specifications and connector and cable descriptions see the Router Hardware Description chapter and the Connector and Cable Specifications appendix Before Installing Before following any installation procedures in this chapter read the following topics in th...

Страница 64: ...ood skin contact Connect the equipment end of the strap to an unfinished chassis surface Place a removed memory card on an antistatic surface or in a static shielding bag If the card will be returned to the factory immediately place it in a static shielding bag Avoid contact between the card and clothing The wrist strap protects the card from ESD voltages on the body only ESD voltages on clothing ...

Страница 65: ...cting the router to an Ethernet network through a hub or switch See Figure 6 1 for the Ethernet port locations One or two Ethernet cables are typically provided with the router Additional cables and transceivers can be ordered from Cisco For ordering information contact your reseller or Cisco customer service The GE ports ETH 2 1 and ETH 2 2 have identical labels to the SFP ports because the SFP p...

Страница 66: ...P module port or the rubber caps from the fiber optic cable until you are ready to connect the cable The plugs and caps protect the SFP module ports and cables from contamination and ambient light Caution Cisco recommends that you not install or remove the SFP module while the fiber optic cable is attached to it because of the potential damage to the cables to the cable connector or to the optical...

Страница 67: ...d other devices To install SFP modules follow these steps Step 1 Attach an ESD preventive wrist strap to your wrist and to a bare metal surface Step 2 For fiber optic SFP modules remove the dust plugs and store them in a clean location for reuse Step 3 Position the SFP transceiver module in front of the socket opening and insert the SFP into the socket until you feel the connector latch into place...

Страница 68: ...5 75 32 drops 5 minute input rate 10000 bits sec 27 packets sec 5 minute output rate 10000 bits sec 26 packets sec 16076431 packets input 1280716531 bytes 27 no buffer Received 1809290 broadcasts 0 runts 0 giants 1105 input errors 0 CRC 0 frame 0 overrun 1105 ignored 0 abort 0 input packets with dribble condition detected 16196175 packets output 1011044938 bytes 0 underruns 19 output errors 184 co...

Страница 69: ...lures 0 output buffers swapped out 0 carrier transitions DCD down DSR down DTR down RTS down CTS down For more information about using the show interface command see the Cisco 1000 Series Connected Grid Routers Software Configuration Guide Additional Router Connections This section provides information about making other additional router cable connections Follow the procedures in this section bas...

Страница 70: ...is section describes how to connect a PC terminal to the console port When a terminal is connected to the console port you can connect directly to the router and configure it You can connect a PC terminal to this port while the router is operating normally To connect a PC terminal to the router you must provide RJ 45 to RJ 45 rollover cable One of the following adapters depending on the port type ...

Страница 71: ... to the device Signaling standard required by the device These are the most common devices connected to the router serial ports Connecting You must provide or purchase separately the correct serial cable The cable does not ship with the router Contact your Cisco reseller to purchase the correct cable from Cisco You can connect a device to this port while the router is operating normally The serial...

Страница 72: ...dapter or batteries Connecting You can connect devices to the USB port while the router is operating normally The USB port is labeled with universal USB icon Depending on the USB devices you connect to these ports you might require a USB extension cable to connect devices to these ports To prevent connected USB devices from being stolen or accidently removed secure any connected USB device with a ...

Страница 73: ...tor ROMmon or watchdog reset state the relay contacts close The closing contacts alert the alarm annunciator or monitor that a Cisco CG OS crash has occurred If interfaces fail or other non fatal errors occur the alarm port does not respond Continue to use SNMP to manage these types of errors Connecting You can connect this port while the router is operating normally If you use an alarm system on ...

Страница 74: ...D Flash Memory Module Card For detailed information about the router SD Flash Memory Module card including specifications supported SD cards and installation procedures see the chapter Using the SD Flash Memory Module For information about the antennas that ship with the router see the chapter Using the SD Flash Memory Module Figure 6 7 SD Card Slot Item 1 302335 1 302227 1 ...

Страница 75: ...ach module requires one or two antennas which are installed on the module or near the router Related Information For information about supported router antennas see the chapter About Connected Grid Antennas For information about supported modules see the chapter About Connected Grid Modules For detailed installation instructions for all Connected Grid modules and antennas see the documentation on ...

Страница 76: ...6 14 Cisco 1120 Connected Grid Router Hardware Installation Guide OL 26438 02 Chapter 6 Making Network Connections Installing Modules and Antennas ...

Страница 77: ...h as smart meters and from the router to the utility or data management center Depending on the configuration your router could arrive in the shipping container with all required modules already installed However you might need to install a module when you Add modules to your current installation Must replace a faulty module Installing Modules in the Router This section provides general instructio...

Страница 78: ... or installing a module in the router you must update the label on the router exterior that lists the module types contained in the router The label must list the FCC ID number and the IC Certification number for each module installed in the router Installation Warning Statements This section includes the installation warning statements Translations of these warning statements appear in the Regula...

Страница 79: ...a module in an available router slot follow these steps Step 1 Power down the router as described in the router hardware installation guide on Cisco com at www cisco com go cgr1000 docs Step 2 Insert the module in the slot as shown in Figure 7 1 Step 3 Using a screwdriver secure the module captive screws two per module into the connectors on the router front panel Step 4 Power on the router as des...

Страница 80: ... at www cisco com go cgr1000 docs Where to Find Additional Module Information For instructions on how to install replace and configure the modules see these installation and configuration guides on Cisco com at www cisco com go cg modules Item Description 1 Module captive screws 2 per module 2 Router captive screw connectors 4 Table 7 1 Connected Grid Modules for CGR 1000 Series Routers Documentat...

Страница 81: ...o Connected Grid antennas This chapter includes these sections Router Antennas Overview page 8 1 Installing or Replacing Module Antennas page 8 5 Antenna Specifications page 8 6 Router Antennas Overview This section describes the antennas used with the router Router Antennas The router ships with two antennas that support router functionality GPS Antenna page 8 2 WiFi Antenna page 8 4 Module Anten...

Страница 82: ...he substation or utility cabinet exterior This antenna provides connectivity to the GPS system from which the router derives precise time and location information while operating on the network GPS Antenna Information Caution If the antenna is mounted outside the antenna assembly must be grounded either at the bracket or at the external building point where the cabling enters the building This is ...

Страница 83: ...y or death For proper installation and grounding of the antenna please refer to national and local codes for example U S NFPA 70 National Electrical Code Article 810 Canada Canadian Electrical Code Section 54 Statement 1052 The GPS antenna is a field replaceable component For detailed technical information about the GPS antenna see GPS Antenna Specifications page 8 6 For information about the GPS ...

Страница 84: ...eable component For detailed technical information about the WiFi antenna seeWiFi Antenna Specifications page 8 7 For information about the WiFi status LED see the chapter Router LED Locations and States For more information about the Short Range Access Point which provides the WiFi connection to the router see the chapter Router Hardware Description Figure 8 3 4G LTE WiFi Antenna and Male QMA Ada...

Страница 85: ...eparately to replace a faulty or damaged antenna The antenna form factor prevents requires that it be installed after the router has shipped Where to Find Antenna Installation Information For instructions on how to install or replace antennas on the router see the Cisco Connected Grid antenna documentation on Cisco com at www cisco com go cg modules Table 8 2 Connected Grid Modules for CGR 1000 Se...

Страница 86: ...om go cg modules GPS Antenna Specifications Specification Value Dimensions Cable length 15 feet 460 8 cm Diameter of antenna rodome 1 97 inches 50 cm Connector cable to router TNC male Frequency 1575 42 MHz 5MHz Nominal Impedance 50 Ohms nominal VSWR 2 0 Max in band Peak Gain 4 0 dBi min zenith Minimum Gain 1 dBi 10 degrees elevation Pattern Type Hemispherical Polarization Circular RHCP LNA Gain 2...

Страница 87: ... 30 5 x 15 mm Weight 1 73 ounces 49 grams Connector TNC male Frequency 698 to 806 MHz 824 to 894 MHz 880 to 960 MHz 1710 to 1880 MHz 1850 to 1990 MHz 1920 to 2170MHz 2100 to 2500 MHz 2500 to 2690 MHz Nominal Impedance 50 ohms VSWR 2 5 1 Peak Gain 0 5 dBi 698 960 MHz 2 2 dBi 1710 2700 MHz Average Efficiency 55 698 960 MHz 73 1710 2700 MHz Polarization Linear Max Input Power 3W Operating Temperature...

Страница 88: ...8 8 Cisco 1120 Connected Grid Router Hardware Installation Guide OL 26438 02 Chapter 8 About Connected Grid Antennas Antenna Specifications ...

Страница 89: ...d Status page 9 5 Related Commands page 9 6 SD Card Overview The router features an SD card connector which supports a single Cisco SD card The SD card stores router data and software including Router operating software Running configurations Network management software configuration Network registration data Router firmware Billing data Outage data Event data SD Card File System The SD card uses ...

Страница 90: ...the router SD card port shown in Figure 9 1 Caution Removing the SD card during normal router operation will cause the router to stop operating Do not remove the SD card while the router is operating Figure 9 1 SD Card Slot with Cover on Router Exterior Inserting the SD Card Depending on the configuration the router could arrive in the shipping container with the SD card already installed However ...

Страница 91: ...ponents are handled improperly results in complete or intermittent failures To prevent ESD damage follow these guidelines Always use an ESD wrist or ankle strap and ensure that it makes good skin contact Connect the equipment end of the strap to an unfinished chassis surface Place a removed the memory card on an antistatic surface or in a static shielding bag If the card will be returned to the fa...

Страница 92: ...rd so that it projects from the slot b Pull the SD card out of the slot c Place the SD card in an antistatic bag to protect it from static discharge Step 4 To install an SD card in the router a Insert the SD card by sliding it into the SD card slot with the connector first and the notched corner facing up The card is keyed so that you cannot insert it the wrong way b Ensure that the card is seated...

Страница 93: ...em 1 Figure 9 3 SD LED SD Flash Memory Module LED States 302344 1 Label Description Color and State Description SD0 SD flash card status Green solid SD flash card is installed and operating normally Green blinking A data transfer between the router and the SD card is in progress Amber solid An error occurred when the router accessed the SD flash card The router could not find a system software ima...

Страница 94: ...pter 9 Using the SD Flash Memory Module Related Commands Related Commands Use the copy running config startup config command to save the router current software configuration to the SD card cgr1120 copy running config startup config 100 Copy complete now saving to disk please wait ...

Страница 95: ...n use the router command line interface as described in the section Related Commands page 10 6 to check the system status LED state from remote locations This chapter includes the sections Rear Panel LED Locations page 10 2 Power Supply LED page 10 2 SYS LED System Status page 10 3 ACT LED System Activity page 10 3 WIFI LED WiFi Link Status page 10 3 GPS LED GPS Link Status page 10 3 ALM LEDS Alar...

Страница 96: ...wn in Figure 10 1 The SD card status LED is located on the router module panel front panel See SD Card LED Location page 10 6 Figure 10 1 Cable Panel Rear Panel LEDs Power Supply LED The power supply LED indicates the operating state of the router 302343 Power Supply LED LED Label Color Description Location Drvr AC DC Power Supply Green Red Off PSU no present Green DC output is OK Red DC output fa...

Страница 97: ...en the router and the GPS satellite System LED LED Label Color and State Description SYS Green Normal system operating status Green blinking The system is starting up or power cycling and loading system software including BIOS and operating system Amber System receiving power but there is an error condition Off System not receiving power Activity LED LED Label Color and State Description ACT Green...

Страница 98: ...page 10 5 GE LEDs Gigabit Ethernet Port States page 10 5 FE LEDs Fast Ethernet Port States page 10 5 GPS LED LED Label Color and State Description GPS Green GPS link established Yellow blinking Establishing link with GPS in progress Yellow solid No GPS link CONSOLE LED LED Label Color and State Description CONSOLE Green Active console connection to the router Off No console connection Alarm LEDs L...

Страница 99: ...ETH 2 8 Each FE port has a corresponding LED that indicates the FE link speed for the port SFP LEDs LED Label Color and State Description SPD Green 2 blinks pause 100 MB s link speed on the corresponding SFP port Green 3 blink pause 1000 MB s link speed Off No link established EN Green SFP is installed in the port and the link is active Amber SFP is installed but there is an error condition Green ...

Страница 100: ... LED described in the section SYS LED System Status page 10 3 During normal operation the router can be installed in a substation utility box or other hard to access location and you might not be able to view SYS LED In this case you can view the status of the LED from a remote location using the router CLI Label Color and State Description SD0 Green SD flash card installed and operating normally ...

Страница 101: ...mode to view the status of the router SYS LED The SYS LED is located on the router exterior see Figure 10 1 The values displayed in the System LED field are described in the section SYS LED System Status page 10 3 This example shows the show led command output CGR 1120 show led System LED green solid Summary of LED status provider Client State cellular 3 1 Blinking end of list CGR 1120 ...

Страница 102: ...10 8 Cisco 1120 Connected Grid Router Hardware Installation Guide OL 26438 02 Chapter 10 Router LED Locations and States Related Commands ...

Страница 103: ...pter Making Network Connections About the Console Port The console port is an asynchronous serial port that allows you to connect to the device for initial configuration through a standard RS 232 port with an RJ 45 connector Any device connected to this port must be capable of asynchronous transmission Console Port Settings Configure the following parameters for the console port Using the Ctrl C C...

Страница 104: ...ows HyperTerminal included with some versions of Windows OS or PuTTY www putty org Step 2 Configure the terminal emulation software with the parameters described in About the Console Port page A 1 Step 3 Connect to the router Connecting to the Console Port with Mac OS X This procedure describes how to connect a Mac OS X system USB port to the console using the built in OS X Terminal utility Step 1...

Страница 105: ...utility Step 1 Open the Linux Terminal window Step 2 Connect the Linux USB port to the router Step 3 Enter the following commands to find the Linux USB port number root usb suse cd dev root usb suse dev ls ltr ACM crw r r 1 root root 188 0 Jan 14 18 02 ttyACM0 root usb suse dev Step 4 Connect to the USB port with the following command followed by the router USB port speed root usb suse dev screen ...

Страница 106: ...A 4 Cisco 1120 Connected Grid Router Hardware Installation Guide OL 26438 02 Appendix A Starting a Router Terminal Session Connecting to the Console Port with Linux ...

Страница 107: ...r Specifications page B 1 Cable and Adapter Specifications page B 4 Connector Specifications Alarm Port page B 1 Console Port page B 2 Combo Ports page B 2 SFP Ports page B 3 Serial Port page B 4 Power Connectors page B 4 Alarm Port For detailed information about the alarm ports see the chapter Router Hardware Description Table B 1 Alarm Port Specification Pin Signal Description 1 Alarm1_IN 2 Alar...

Страница 108: ...out the combination ports see the chapter Router Hardware Description Copper Interface Combination Port SFP and GE Ethernet Table B 2 Console Auxiliary Port Specification Pin Signal Name Signal Description 1 RTS Output 2 DTR Output 3 TXD Output 4 GND 5 GND 6 RXD Input 7 DSR DCD Input 8 CTS Input Table B 3 Combination Port Specification Copper Interface Pin 1000Base T 100Base TX 10Base T 1 TX A TX ...

Страница 109: ...t Output Connects to GPIO 3 TxDisable Input Driven from GPIO 4 MOD DEF 2 Bidir Bidirectional Connects to I2C data 5 MOD DEF 1 Input Connects to I2C Clock 6 MOD DEF 0 Output Grounded in SFP indicates SFP is present 7 Rate Select1 1 Rate Select is an optional SFP input that controls receiver bandwidth when used with Fibre Channel applications This pin is unconnected 8 LOS Output Connects to GPIO 9 V...

Страница 110: ...ort Specification RS 2321 1 The RS232 pinouts use the EIA 561 standard RS 485 Full Duplex RS 485 Half Duplex Ethernet Pin Signal Description Abbreviation DTE DCE Signal Dir Signal Dir 10 100 10000 1 DCE ready ring indicator DSR RI RX TX RX1 2 Received line signal detector DCD RX TX RX1 3 DTE ready DTR TX TX RX2 4 Signal ground COM COM COM TX RX3 5 Received data RxD TX TX RX TX RX3 6 Transmitted da...

Страница 111: ...000BASE LX LH SFP modules and a short link distance can cause transceiver saturation and an elevated bit error rate BER When using the LX LH SFP module with 62 5 micron diameter MMF you must also install a mode conditioning patch cord between the SFP module and the MMF cable on both the sending and receiving ends of the link The mode conditioning patch cord is required for link distances greater t...

Страница 112: ...B 6 Cisco 1120 Connected Grid Router Hardware Installation Guide OL 26438 02 Appendix B Connector and Cable Specifications Cable and Adapter Specifications ...

Отзывы: