


page 21
www.centsys.com
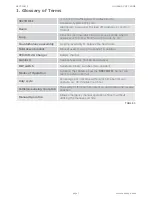
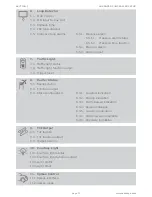
DIP switch settings:
For the settings and descriptions,
see the pocket-guide provided with
the FLUX SA.
4.4.2. Installing dual FLUX SA
loop detectors
If a free-exit loop is required in
addition to the safety-loop, a second
FLUX SA must be installed.
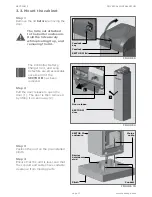
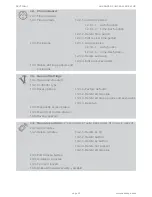
Step 1
Fit the second FLUX SA onto the
electronics tray, and secure in place
using the screws provided.
(Figure 29).
Step 2
Wire the second FLUX SA to the
controller using the supplied harness
as per the wiring diagram
(Figure 31).
Step 3
Run the TWISTED loop wires up
inside the enclosure through the
wiring clips to the second FLUX SA
(Figure 30). Wire the twisted loop
wires to the second FLUX SA.
Take note of the wiring channel
provided for the twisted loop wires.
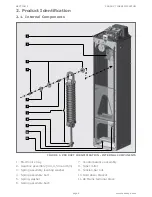
FIGURE 28
FIGURE 29
FIGURE 30
FLUX SA
DIP switch
access cover
FLUX SA
(Safety / Closing loop)
FLUX SA
(Free exit loop)
FLUX SA
screws
FLUX SA
(Free-exit loop)
Connection
terminals
Twisted
loop wires
Wiring
channels
Wiring clips
Twisted
loop wires
running
through
opening
ONSITE ELECTRICAL WIRING
SECTION 4
Содержание SECTOR II
Страница 82: ...page 82 www centsys com Notes...
Страница 83: ...page 83 www centsys com Notes...


