
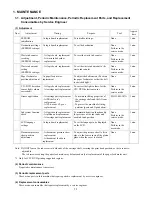


2-5. Warnings
2-6. Troubleshooting by Symptom
memory is full.
paper in their fax machine or free up space in
their fax machine
'
s memory.
Warning
Message on the LCD
Solution
The message <INK
LOW> appears on the
LCD when the ink level
becomes low during
printing.
INK LOW
Press [OK] to continue printing.
Press [Stop/Reset] to cancel the current print job.
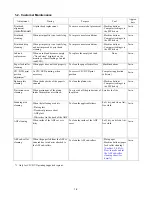
Print head temperature
rise
If the print head temperature does not fall, the error
code "5200" is displayed, indicating the print head
temperature rise error.
When the print head temperature falls, the error is
automatically cleared.
Note:
If the print head temperature exceeds the specified
limit when the scanning unit (printer cover) is
opened, the carriage does not move to the ink tank
replacement position.
Protection of excess rise
of the print head
temperature
If the print head temperature does not fall, the error
code "5200" is displayed, indicating the print head
temperature rise error.
If the print head temperature exceeds the specified
limit, an intermission is inserted during printing.
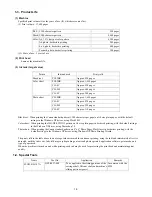
Symptom
Solution
Faulty operation
The power does not turn on.
The power turns off immediately after
power-on.
- Confirm the connection of
- the power cord, and
- between the logic board and the power supply unit.
- Replace the
- power supply unit, or
- logic board.
A strange noise occurs.
- Remove foreign material.
- Attach a removed part if any.
- Check the operation of the moving parts (such as purge
unit, carriage unit, and paper feeding mechanism)
- Replace a faulty part, if any.
Nothing is displayed on the LCD.
- Confirm the connection between the operation panel, the
scanner unit, and the logic board.
- Replace the
- LCD, or
- logic board.
A portion of the LCD is not displayed.
- Perform the button and LCD test in the service mode, and
confirm that the LCD is displayed without any segments
missing.
- Confirm the connection between the operation panel, the
scanner unit, and the logic board.
- Replace the
- LCD, or
- logic board.
Paper feed problems (multi-feeding,
skewed feeding, no feeding).
- Examine the inside to confirm that no parts are damaged,
and the rollers are clean.
- Remove foreign material.
- Adjust the paper guide properly.
- Confirm the connection of each harness and the logic
1-13
Содержание PIXMA MP530
Страница 5: ...Part 1 MAINTENANCE ...
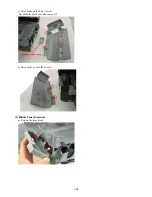
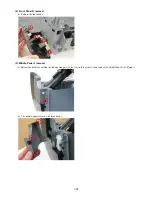
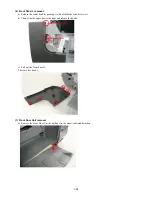
Страница 34: ... Right side c Disconnect the connector for the solenoid 1 29 ...
Страница 51: ... Service test print sample 1 46 ...
Страница 56: ... System data list sample 1 51 ...
Страница 57: ... Error transmission report sample 1 52 ...
Страница 60: ...Part 2 TECHNICAL REFERENCE ...
Страница 73: ...Part 3 APPENDIX ...