Setting Up a Computer for Printing (Windows)
2-19
2
Using a
TCP/IP Netw
or
k
3
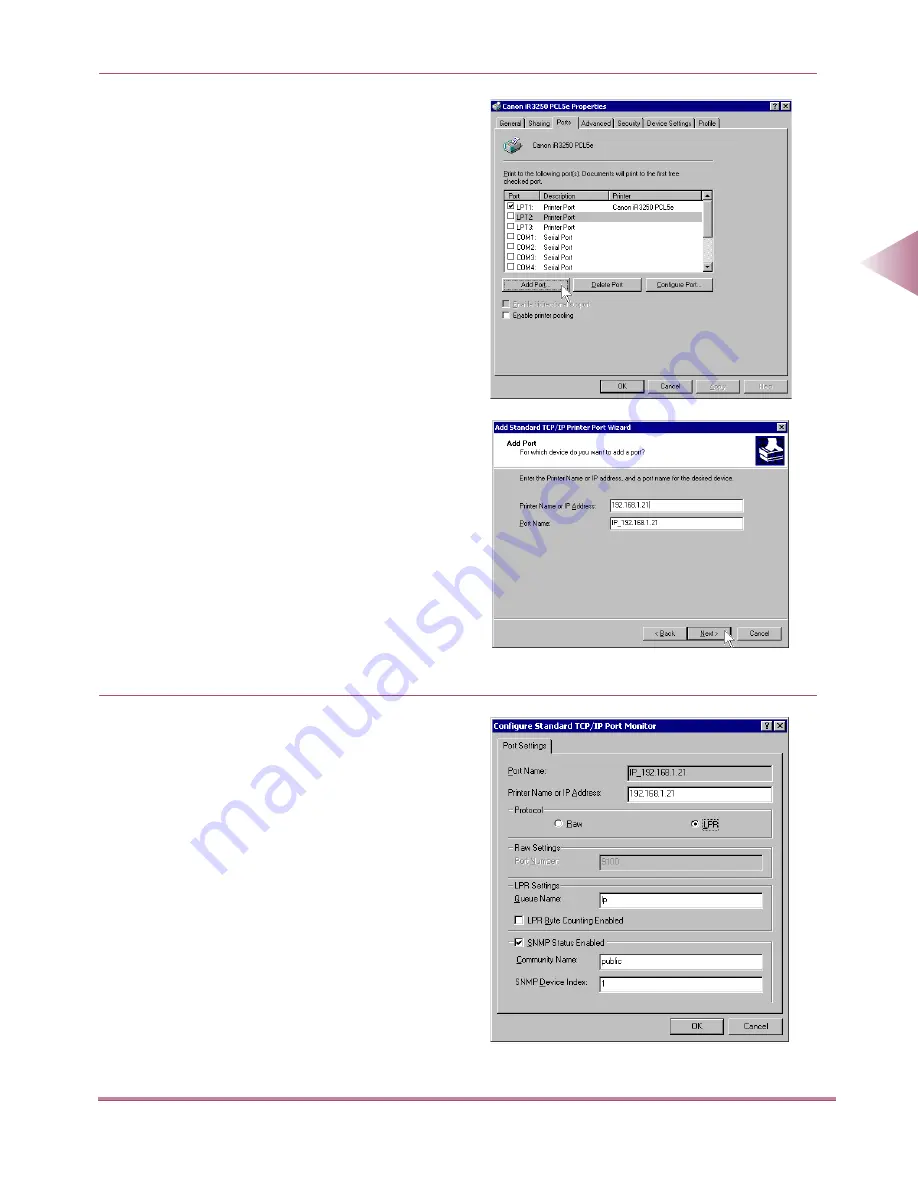
Set up the printing destination.
●
Click Ports tab to open the Ports sheet.
●
Click the Add Port... button to open the
Printer Ports dialog box.
●
From the Available Printer Ports Types
list box, select Standard TCP/IP Port,
and click the New Port... button.
●
The Add Standard TCP/IP Printer Port
Wizard will open. Click the Next button.
●
In the Printer Name or IP Address
space enter the printer IP address, and
click the Next button.
●
If the computer has confirmed that
there is a printer at the IP address you
entered, the Exit Add Standard TCP/IP
Printer Port Wizard window will open.
Click the Done button.
●
If you see a window called the Addi-
tional Port Information Required, follow
the instructions on the screen to search
again or select the device type Stan-
dard-Canon Network Printing Device
with P9100, and click the Next button to
exit the Wizard.
●
Click the Close button to close the
Printer Port dialog box.
4
If you are using LPD, it is necessary to
change the port configuration informa-
tion.
(This is not necessary if you are using
RAW.)
●
Click the Configure Port... button.
●
Under Protocol, select LPR, and under
LPR Settings set Queue Name to the
printer name, “Ip”, and then click the
OK button.
00̲MFPNG.book 19 ページ 2000年4月26日 水曜日 午後5時11分
Содержание IR3250
Страница 2: ...iR3250 Network Guide...
Страница 9: ...Table of Contents 8 Hardware Specifications 6 10 Software Specifications 6 10 Index 6 11...
Страница 25: ...Protocol Settings 2 8 2 Using a TCP IP Network 3 Press the Network Settings key 4 Press the TCP IP Settings key...
Страница 77: ......
Страница 105: ...Index 6 16 6 Appendix...


