


Chapter 3
3-11
F-3-73
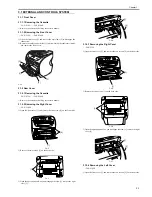
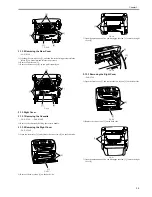
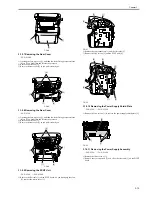
3) As you remove the bosses on both sides [1], lower the front part of the
power supply assembly [2]. Then pull it to remove the power supply
assembly.
F-3-74
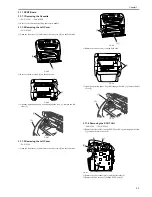
3.1.8.12 Removing the Power Supply Board
0011-4735
/ / FAX-L390 / / / FAX-L380S
1) Remove the flat cable [1].
2) Remove the four screws [2], and remove the power supply board [4] while
releasing the two spacers [3].
F-3-75
3.1.9 High-voitage Power Supply PCB
3.1.9.1 Removing the Cassette
0011-4736
/ / FAX-L390 / / / FAX-L380S
1) Remove the cassette by holding the cassette handle.
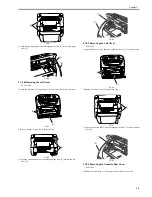
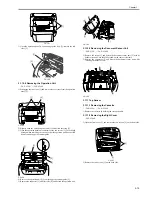
3.1.9.2 Removing the Right Cover
0011-4737
/ / FAX-L380S
1) Open the front cover [1], and remove the two screws [2] on the front side.
F-3-76
2) Remove the two screws [1] on the back side.
F-3-77
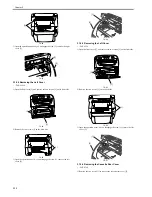
3) Open the operation panel. As you disengage the claw [1], remove the right
cover [2].
F-3-78
3.1.9.3 Removing the Right Cover
0011-6244
/ / FAX-L390
1) Open the front cover [1], and remove the two screws [2] on the front side.
F-3-79
2) Remove the two screws [1] on the back side.
[1]
[2]
[2]
[1]
[3]
[1]
[2]
[2]
[4]
[3]
[3]
[2]
[1]
[2]
[1]
[1]
[1]
[2]
[2]
[1]
Содержание FAX-L380S Series
Страница 1: ...Jan 19 2006 Service Manual FAX L380S Series ...
Страница 2: ......
Страница 6: ......
Страница 14: ...Contents ...
Страница 15: ...Chapter 1 PRODUCT DESCRIPTION ...
Страница 16: ......
Страница 18: ......
Страница 30: ......
Страница 31: ...Chapter 2 TECHNICAL REFERENCE ...
Страница 32: ......
Страница 34: ......
Страница 44: ......
Страница 45: ...Chapter 3 DISASSEMBLY AND ASSEMBLY ...
Страница 46: ......
Страница 52: ......
Страница 111: ...Chapter 4 MAINTENANCE AND INSPECTION ...
Страница 112: ......
Страница 114: ......
Страница 127: ...Chapter 5 TROUBLESHOOTING ...
Страница 128: ......
Страница 167: ...Chapter 6 APPENDIX ...
Страница 168: ......
Страница 170: ......
Страница 175: ...Jan 19 2006 ...
Страница 176: ......