36
| CAV 4.1 Operation Manual
2.
Plug the USB to Ethernet adapter into a USB 2.0 port on the PC. Windows® attempts to
automatically install the required drivers. If necessary, a copy of the driver is provided on the USB
flash drive.
3.
Connect a CAT cable from the Ethernet adapter to the network switch.
4.
Connect CAT cables from each CAV 4.1 to the network switch.
Install VISCPRO II
There are no configurable options in the VISCPRO installation routine. Insert the USB and follow the on-
screen prompts.
1.
Uninstall any previous version of VISCPRO software.
2.
Insert the USB drive into an open USB port on the PC.
3.
Run
USB Flash Drive > VISCPRO > setup.exe
.
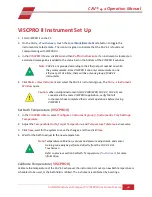
The following registry keys are set to default values during installation of VISCPRO. These cannot be
edited from within the VISCPRO software. The only way to change these values is by directly editing the
registry. Refer to Table 11.
Caution:
Editing registry entries may be hazardous to the operation of your
Windows® system.
Table 11 — VISCPRO II Registry Entries
Registry Key
Default value
Description
EthernetPortNumber
1982
TCP port on which VISCPRO listens
EthernetServerIPAddress
10.0.1.2
IP address of the Ethernet connection that VISCPRO
uses
MaxAllowedInstruments
4
Maximum number of instrument to which VISCPRO
will connect. VISCPRO polls for instruments in
sequential order of the InstrumentAddress. Once the
maximum number of allowed instrument has been
reached, it stops polling.
MaxPollResponseWaitTime
2000
(2 seconds)
Maximum time in milliseconds that VISCPRO waits for
an instrument response when polling.
MaxResponseWaitTime
20000
(20 seconds)
Maximum time in milliseconds that VISCPRO waits for
an instrument response.
Setup Network Adapter
1.
Open
Network and Sharing Center
on the PC.


