background image

f

 Selecting the AF Mode

N

66

* About Predictive AF

If the subject approaches or retreats from the camera at a constant rate, 
the camera tracks the subject and predicts the focusing distance 
immediately before the picture is taken. This is for obtaining correct 
focus at the moment of exposure.

¡

When the AF point selection is automatic, the camera first uses the 
center AF point to focus. During autofocusing, if the subject moves 
away from the center AF point, focus tracking continues as long as 
the subject is covered by another AF point.

¡

With a manually selected AF point, the selected AF point will focus 
track the subject.

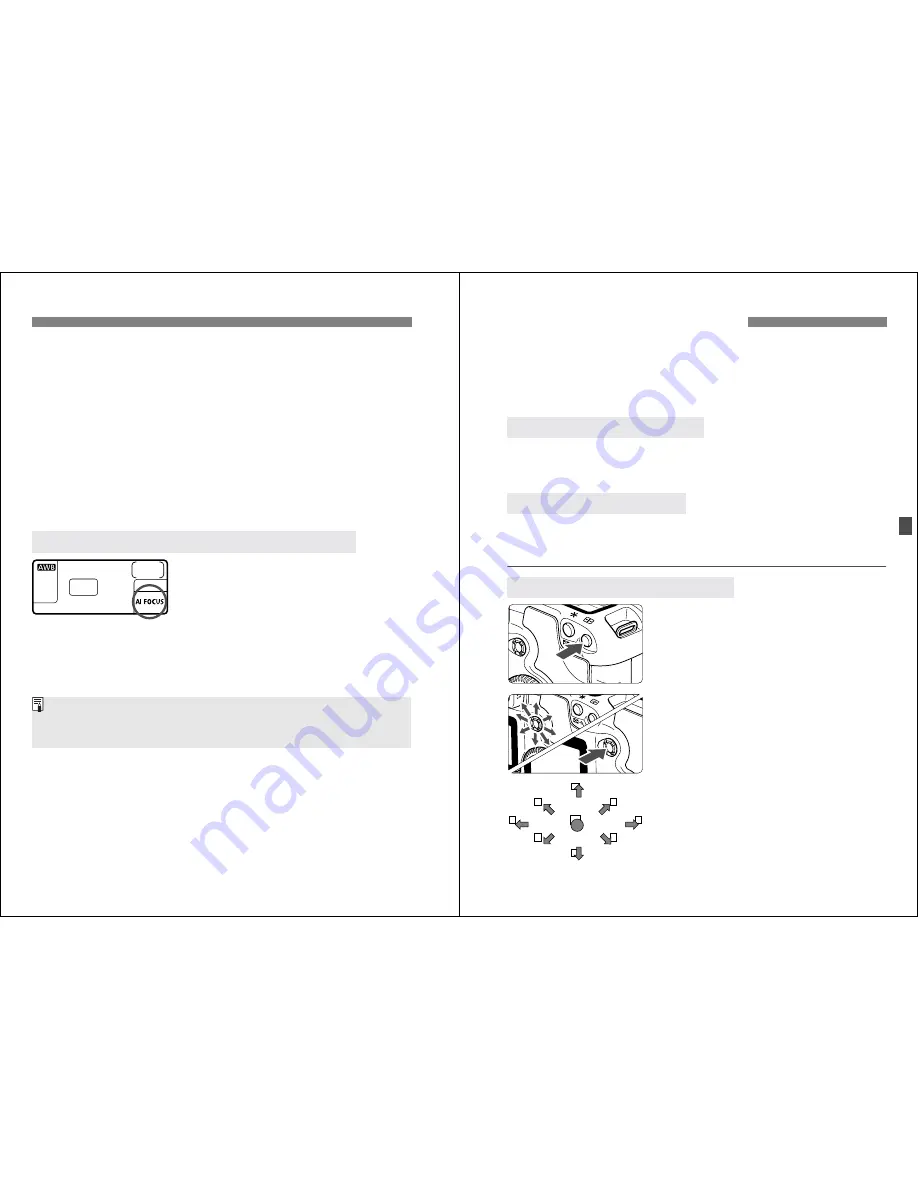
AI Focus AF switches the AF mode from 
One-Shot AF to AI Servo AF 
automatically if the still subject starts 
moving.
After the subject is focused in the One-
Shot AF mode, if the subject starts 
moving, the camera will detect the 
movement and change the AF mode 
automatically to AI Servo AF. 

AI Focus AF for Automatic Switching of AF Mode

When focus is achieved in the AI Focus AF mode with the Servo mode 
active, the beeper will sound softly. The focus confirmation light <

o

> in the 

viewfinder will not light.

67

The AF point is used for focusing. The AF point can be selected 
automatically by the camera or manually by you.
Automatic AF point selection is set in the Basic Zone modes and 
<

8

8

8

8

>. In the <

d

> <

s

> <

f

> <

a

> modes, you can switch 

between automatic and manual AF point selection.

The camera selects the AF point automatically according to the 
shooting conditions. 

All the AF points in the viewfinder will light in 

red.

You can select any of the nine AF points manually. This is best when 
you want to focus on a particular subject, or autofocus quickly while 
composing the shot.

1

Press the <

S

> button. 

(

9

)

s

The selected AF point will be 
displayed in the viewfinder and on the 
LCD panel.

2

Select the AF point.

¡

While looking at the viewfinder or 
LCD panel, use <

9

>.

¡

The AF point in the direction where 
you press the <

9

> will be selected.

¡

If you press <

9

> straight down, the 

center AF point will be selected.

¡

If you push the <

9

> in the same 

direction as the currently-selected AF 
point, all the AF points will light and 
automatic AF point selection will be 
set.

S

Selecting the AF Point

N

Automatic AF point selection

Manual AF Point Selection

Selecting with the Multi-controller

Содержание EOS 20D Digital

Страница 1: ...E INSTRUCTION MANUAL E INSTRUCTION MANUAL ...

Страница 2: ...rademark of Apple Corporation in the United States and other countries All other corporate names and trademarks mentioned in this manual are the property of their respective owners This digital camera supports Design rule for Camera File System 2 0 and Exif 2 21 also called Exif Print Exif Print is a standard that enhances compatibility between digital cameras and printers By connecting to an Exif...

Страница 3: ... the AF Metering and Drive Modes 63 Selecting the AF Mode 64 Selecting the AF Point 67 Contents 5 Contents 8 9 10 11 5 6 7 Focusing an Off Center Subject 69 When Autofocus Fails Manual Focusing 70 Selecting the Metering Mode 71 Selecting the Drive Mode 72 Advanced Operations 73 Program AE 74 Shutter Priority AE 76 Aperture Priority AE 78 Depth of Field Preview 79 Manual Exposure 80 Automatic Depth...

Страница 4: ...shock heat generation and fire Do not use the equipment where there is flammable gas This is to prevent an explosion or fire 7 If you drop the equipment and the casing breaks open to expose the internal parts do not touch the internal parts due to the possibility of electrical shock Do not disassemble or modify the equipment High voltage internal parts can cause electrical shock Do not look at the su...

Страница 5: ...en while the camera is in storage press the shutter button a few times once in a while to check that the camera is still working Avoid storing the camera where there are corrosive chemicals such as a darkroom or chemical lab If the camera has not been used for an extended period test all its functions before using the camera If you have not used the camera for some time or if there is an important...

Страница 6: ...selection button p 64 50 R Drive mode selection ISO speed button p 72 49 Q Metering mode selection Flash exposure compensation button p 71 96 D Flash button p 92 6 Main Dial p 27 Body cap p 23 EF S Lens mount index p 23 11 Nomenclature Tripod socket Battery compartment cover p 20 Battery compartment cover release lever p 20 9 Multi controller p 28 Viewfinder eyepiece Eyecup p 89 Dioptric adjustmen...

Страница 7: ...y 37 Large Fine 38 Large Normal 47 Medium Fine 48 Medium Normal 67 Small Fine 68 Small Normal 1 RAW hAEB yFlash exposure compensation Battery check z xn White balance Q Auto W Daylight E Shade R Cloudy Y Tungsten light U White fluorescent light I Flash O Custom P Color temperature 0Monochrome shooting 2 White balance correction CF card writing status 13 Nomenclature Viewfinder Information The actua...

Страница 8: ...it p 42 3 Landscape p 42 4 Close up p 42 5 Sports p 43 6 Night Portrait p 43 7 Flash Off p 43 w Creative Zone Set the camera as you wish d Program AE p 74 s Shutter priority AE p 76 f Aperture priority AE p 78 a Manual exposure p 80 8 Automatic Depth of field Preview p 82 15 Nomenclature Battery Charger CG 580 This is a battery pack charger p 18 Battery Charger CB 5L This is a battery pack charger ...

Страница 9: ...ndicates a warning to prevent shooting problems The Note symbol gives supplemental information Conventions Used in this Manual In the text the 4 icon indicates the power switch All operations described in this manual assume that the 4 switch is set to 1 or J The 6 icon indicates the Main Dial The 5 icon indicates the Quick Control Dial Operations with the 5 dial assume that the 4 switch is already...

Страница 10: ...75 90 Blinks three times per second 90 or higher Lights on Do not recharge any battery pack other than Battery Pack BP 511A BP 514 BP 511 or BP 512 If the battery is left in the camera for a prolonged period without the camera being used a low electrical current may be discharged excessively and the battery s service life may be affected When not using the camera remove the battery and attach the ...

Страница 11: ...CIPA Camera Imaging Products Association testing criteria 1 Open the battery compartment cover Slide the lever as shown by the arrow and open the cover 2 Remove the battery Slide the battery lock lever as shown by the arrow and remove the battery Temperature Shooting Conditions No Flash 50 Flash Use At 20 C 68 F Approx 1000 Approx 700 At 0 C 32 F Approx 750 Approx 550 Removing the Battery The actu...

Страница 12: ...tlet Do not connect or disconnect the power cord while the camera s 4 switch is set to 1 or J 23 1 Remove the caps Remove the rear lens cap and the body cap by turning them as shown by the arrow 2 Attach the lens Align the EF S lens with the camera s white EF S lens mount index and turn the lens as shown by the arrow until it clicks in place When attaching a lens other than an EF S lens align the ...

Страница 13: ...ard and the ISO speed setting 25 Installing and Removing the CF Card 1 Open the cover Turn the 4 switch to 2 Check that the buSY message is not displayed on the LCD panel Make sure the access lamp is off then open the cover 2 Remove the CF card Press the Eject button s The CF card will be ejected Close the cover Removing the CF Card Access lamp A blinking access lamp indicates that data is being r...

Страница 14: ...ressing a button turn the 6 dial When you press a button its function remains active for 6 seconds 9 During this time you can turn the 6 dial to set the desired setting When the timer runs out or if you press the shutter button down halfway the camera will be ready to shoot In this way you can set the AF mode drive mode and metering mode and select or set the AF point 2 Turn the 6 dial only While ...

Страница 15: ...d a button at the center Use it to select an AF point set white balance correction scroll around a magnified image display and move the trimming frame for direct printing Operating the 5 Dial Operating the 9 You can also operate 1 when the 4 switch is set to 1 29 By setting various optional settings with the menus you can set the image recording quality processing parameters the date time Custom Fu...

Страница 16: ...4 76 86 RAW RAW 73 83 74 84 76 86 46 Red eye On Off Off On 94 Beep On Off 90 Shoot w o card On Off 90 AEB 1 3 stop increments 2 stops 84 WB SHIFT BKT 9 levels of B A M G color bias B A and M G bias 1 level 3 levels 53 54 Custom WB Manual setting of white balance 51 Color temp Set to 2800K 10000K 100K increments 52 Color space sRGB Adobe RGB 56 Parameters Parameter 1 2 Set 1 2 3 B W 57 58 Protect P...

Страница 17: ...pace sRGB White balance Q Color temperature 5200K WB correction Off WB BKT amount Off Parameters Parameter 2 Shooting Settings Image Recording Settings 33 The LCD monitor s interface language can be set to one of twelve languages 1 Select Language Turn the 5 dial to select c Language then press 0 s The Language screen will appear 2 Set the desired language Turn the 5 dial to select the langauge th...

Страница 18: ...nd time are not properly set the wrong date time will be recorded Make sure you set the date and time correctly 35 The date time back up battery maintains the camera s date and time The battery s service life is about 5 years If the date time is reset when the battery is replaced replace the back up battery with a new CR2016 lithium battery as described below The date time setting will also be res...

Страница 19: ...ning the CMOS sensorN 37 3 Cleaning the CMOS sensorN 4 Clean the image sensor Use a rubber blower to carefully blow away any dust etc on the surface of the image sensor 5 Stop the cleaning Turn the 4 switch to 2 s The camera will turn off the shutter will close and the mirror will go back down Set the 4 switch to 1 The camera will then be ready to shoot During the sensor cleaning never do any of t...

Страница 20: ...eft hand Press the camera against your face and look through the viewfinder To maintain a stable stance place one foot in front of the other instead of lining up both feet Holding the Camera Horizontal shooting Vertical shooting 39 2 Fully Automatic Shooting This chapter explains how to use the Basic Zone modes on the Mode Dial for quick and easy shooting In each mode 1 2 3 4 5 6 7 the AF mode driv...

Страница 21: ...the CF card press the x button p 103 While focusing with AF do not touch the focusing ring at the front of the lens If you want to zoom do it before focusing Turning the zoom ring after achieving focus may throw off the focus When the CF card becomes full the CF Full warning FuLL CF will appear in the viewfinder and on the LCD panel and shooting will be disabled Replace the CF card with one that ha...

Страница 22: ... 3 Landscape 4 Close up 43 Basic Zone Modes This is for fast moving subjects when you want to freeze the action The camera will first track the subject with the center AF point Focus tracking will then continue with any of the nine AF points covering the subject While you press the shutter button focusing will continue for continuous shooting Using a telephoto lens is recommended When focus is achi...

Страница 23: ... operation the LCD panel counts down the seconds until the picture is taken jSelf timer Operation Do not stand in front of the camera when you press the shutter button to start the self timer Doing so will throw off the focus Use a tripod when you use the self timer To cancel the self timer after it starts press the R button When using the self timer to shoot only yourself use focus lock p 69 for ...

Страница 24: ...t printing and print ordering are possible 47 3 Setting the Image recording Quality The RAW format assumes that the image will undergo post processing with a personal computer Special knowledge is required but you can use the bundled software to obtain the desired effect 1 images are processed according to the white balance color space and processing parameters set at the time of shooting Image pr...

Страница 25: ...nd take pictures immediately During continuous shooting you pop up or retract the built in flash or turn the external Speedlite on or off After all the captured images are processed and written to the CF card the above table s figures for the maximum burst will apply With white balance bracketing p 54 the maximum burst will be 6 The maximum burst is displayed even when the drive mode is set to u Sin...

Страница 26: ...MOS sensor for auto white balance BSetting the White BalanceN Display Mode Color temperature Approx K Q Auto 3000 7000 W Daylight 5200 E Shade 7000 R Cloudy twilight sunset 6000 Y Tungsten 3200 U White fluorescent light 4000 I Flash 6000 O Custom 2000 10000 P Color temperature 2800 10000 About White Balance 51 With custom white balance you shoot a white object that will serve as the basis for the w...

Страница 27: ...e standard color temperature for the white balance setting This adjustment will have the same effect as using a color temperature conversion or color compensating filter Each color can be corrected to one of nine levels Users familiar with using color temperature conversion or color compensating filters will find this feature handy 1 Select WB SHIFT BKT Turn the 5 dial to select z WB SHIFT BKT then p...

Страница 28: ... the bracketing level is also displayed Press 0 to exit the setting and return to the menu 3White Balance Auto BracketingN B A bias 3 levels M G bias 3 levels 55 3 White Balance Auto BracketingN 4 Take the picture s When B A bracketing has been set the three images will be recorded onto the CF card in the following sequence Standard WB B blue bias and A amber bias If M G bracketing has been set th...

Страница 29: ... described in the EOS 20D Software Instruction Manual 57 The image you capture can be processed to look more vivid and sharp or more subdued The processing parameters can be set according to the preset Parameter 1 or Parameter 2 or to Set 1 2 or 3 that you can set yourself Monochrome can also be set In the Basic Zone modes Parameter 1 will be set automatically 1 Select Parameters Turn the 5 dial t...

Страница 30: ...harpness Less sharp outline Sharp outline Saturation Low saturation High saturation Color tone Reddish skin tone Yellowish skin tone 59 3 Setting the Processing ParametersN When you capture images with the processing parameter set to Monochrome the camera will process and record the images as black and white images onto the CF card 1 Select B W In step 3 on page 58 select B W then press 0 2 Select...

Страница 31: ...nuous and Auto reset The images you take are automatically assigned a file number from 0001 to 9999 and saved in a folder created automatically that can hold up to 100 images 1 Select File numbering Turn the 5 dial to select c File numbering then press 0 2 Select the file numbering method Turn the 5 dial to select Continuous or Auto reset then press 0 The file numbering continues in sequence even aft...

Страница 32: ...y For details on the image info during playback see Shooting Information Display p 104 63 4 Setting the AF Metering and Drive Modes The viewfinder has 9 AF points By selecting a suitable AF point you can shoot with autofocus while framing the subject as desired You can also set the AF mode to suit the subject or obtain the desired effect Evaluative partial and centerweighted average metering modes ...

Страница 33: ...on light o in the viewfinder is displayed s With evaluative metering the exposure setting shutter speed and aperture will be set when focus is achieved The exposure setting and focus will be locked as long as the shutter button is pressed halfway p 69 You can then recompose the shot while retaining the exposure setting and point of focus While you press the shutter button halfway the camera focuses...

Страница 34: ... beeper will sound softly The focus confirmation light o in the viewfinder will not light 67 The AF point is used for focusing The AF point can be selected automatically by the camera or manually by you Automatic AF point selection is set in the Basic Zone modes and 8 8 8 8 In the d s f a modes you can switch between automatic and manual AF point selection The camera selects the AF point automatical...

Страница 35: ...ist beam with the Built in Flash Lens Maximum Aperture and AF Sensitivity When looking at the LCD panel to select the AF point note the following Automatic selection center right top If focus cannot be achieved with an EOS dedicated external Speedlite s AF assist beam select the center AF point In the 3 5 7 modes the AF assist beam does not light The built in flash s AF assist beam is effective up ...

Страница 36: ... when focus is achieved 71 The camera has three metering modes Evaluative partial and centerweighted average metering In the Basic Zone modes evaluative metering will be set automatically 1 Press the Q button 9 2 Select the metering mode While looking at the LCD panel turn the 6 dial q Evaluative Metering w Partial Metering e Centerweighted Average Metering q Evaluative Metering This is the camera...

Страница 37: ...d images are transferred to the CF card you will be able to capture more images Press the shutter button halfway to check in the viewfinder s bottom right the current remaining shots of the maximum burst If FuLL CF is displayed in the viewfinder and on the LCD panel wait until the access lamp stops blinking then replace the CF card When the battery level is low the maximum burst will be slightly low...

Страница 38: ...peed and aperture combination program In the d mode you can set or use the functions below but not in the 1 mode Shifting the Program In Program AE mode you can freely change the shutter speed and aperture value combination program set by the camera while maintaining the same exposure value This is called program shift To do this press the shutter button down halfway then turn the 6 dial until the...

Страница 39: ... aperture value is set automatically 4 Check the viewfinder display and shoot As long as the aperture value is not blinking the exposure will be correct s Shutter Priority AE Fast shutter speed Slow shutter speed 77 s Shutter Priority AE If the maximum aperture blinks it indicates underexposure Turn the 6 dial to set a slower shutter speed until the aperture value stops blinking If the minimum aper...

Страница 40: ... blinks it indicates underexposure Turn the 6 dial to set a larger aperture smaller f number until the blinking stops or set a higher ISO speed If the 8000 shutter speed blinks it indicates overexposure Turn the 6 dial to set a smaller aperture larger f number until the blinking stops or set a lower ISO speed Aperture Value Display The larger the f number the smaller the aperture opening will be T...

Страница 41: ...lfway s The exposure setting will be displayed in the viewfinder and on the LCD panel The exposure level icon s lets you see how far you are from the standard exposure level a Manual Exposure Exposure level mark Standard exposure index 81 a Manual Exposure 5 Set the exposure Check the exposure level and set the desired shutter speed and aperture value 6 Take the picture Standard exposure level To s...

Страница 42: ...sets a slow shutter speed hold the camera steady or use a tripod If you use flash the result will be the same as using d with flash 83 Exposure compensation is used to alter the standard exposure setting set by the camera You can make the image look lighter increased exposure or darker decreased exposure You can set the exposure compensation up to 2 stops in 1 3 stop increments 1 Turn the Mode Dial ...

Страница 43: ...eting AEB N Standard exposure Decreased exposure Increased exposure AEB amount Standard exposure Decreased exposure Increased exposure 85 3 Auto Exposure Bracketing AEB N Follow steps 1 and 2 to set the AEB amount to AEB will also be canceled automatically if you turn the 4 switch to 2 change lenses have flash ready replace the battery or replace the CF card Canceling AEB Neither flash nor bulb expo...

Страница 44: ...or details see AE lock p 149 87 When bulb is set the shutter stays open while you hold down the shutter button fully and closes when you let go of the shutter button This is called bulb exposure Use bulb exposures for night scenes fireworks the heavens and other subjects requiring long exposures 1 Set the Mode Dial to a 2 Set the shutter speed to buLb Look at the LCD panel and turn the 6 dial to se...

Страница 45: ...ngle shooting regardless of the current drive mode single or continuous If you use the self timer and mirror lockup the shot will be taken 2 sec after the mirror goes up when you press the shutter button completely The mirror locks up and after 30 seconds it will go back down automatically Pressing the shutter button completely again locks up the mirror again For bulb exposures using Remote Switch...

Страница 46: ...ard then press 0 2 Select Off Turn the 5 dial to select Off then press 0 If Off has been set and you press the shutter button while there is no CF card in the camera no CF will be displayed in the viewfinder 91 6 Flash Photography The built in flash or an EOS dedicated EX series Speedlite enables E TTL II autoflash evaluative flash metering with preflash making flash photography as easy as normal shooti...

Страница 47: ...Built in Flash in the Basic Zone Using the Built in Flash in the Creative Zone 93 Using the Built in Flash Built in Flash Range With EF S17 85mm f 4 5 6 IS USM m ft ISO speed Wide angle 17mm Telephoto 85mm 100 Approx 1 3 3 3 3 10 8 Approx 1 2 3 3 3 7 5 200 Approx 1 4 6 3 3 15 1 Approx 1 3 3 3 3 10 8 400 Approx 1 6 5 3 3 21 3 Approx 1 4 6 3 3 15 1 800 Approx 1 9 2 3 3 30 2 Approx 1 6 5 3 3 21 3 160...

Страница 48: ...indicator goes off You can shoot anytime by pressing the shutter button down fully even if the red eye reduction lamp is still on The effectiveness of red eye reduction varies from subject to subject Red eye reduction is more effective in brighter rooms or when the camera is closer to the subject Red eye reduction lamp On indicator 95 Using the Built in Flash FE flash exposure lock obtains and lock...

Страница 49: ...ce information making it more precise than the previous E TTL evaluative flash metering with preflash system The camera can execute E TTL II autoflash with any EX series Speedlite High speed sync FP flash With high speed sync you can set a sync speed faster than 1 250 sec FE Flash Exposure Lock Press the camera s A button to lock the flash exposure at the desired part of the subject Flash exposure comp...

Страница 50: ... is provided for flash units having a sync cord The PC terminal is threaded to prevent inadvertent disconnection The camera s PC terminal has no polarity so you can connect any sync cord regardless of its polarity Sync Speed PC Terminal If the camera is used with a flash unit or flash accessory dedicated to another camera brand the camera may not operate properly and malfunction may result Also do no...

Страница 51: ...d selecting OK To view images captured so far see Image Playback p 103 101 Vertical shots can be rotated automatically so that they are displayed upright during playback 1 Select Auto rotate Turn the 5 dial to select c Auto rotate then press 0 2 Select On Turn the 5 dial to select On then press 0 3 Take a vertical shot For the image review right after image capture the image will not be displayed ...

Страница 52: ... Select the image To playback images starting with the last image turn the dial counterclockwise To playback images starting with the first captured image turn the 5 dial clockwise Press the B button to switch the display format To quit the playback press the x button The LCD monitor will turn off Image Playback xSingle image display Single image display with basic info Shooting information Single ...

Страница 53: ...gain Shooting Information Display File No Histogram Color space Shooting mode Metering mode ISO speed WB correction White balance Shooting time Color temperature Image Flash exposure compensation amount Shooting date Aperture Image protect Shutter speed Images recorded Total images recorded Image recording quality Exposure compensation amount Original image verification data appended Monochrome Sa...

Страница 54: ...ayback During the single image image with shooting information index or magnified image display you can jump forward or back to images stored on the CF card 1 Display the image Display a single image image with shooting information index or magnified image 2 Go to the jump display Press the C button s The jump bar will appear at the bottom of the screen 3 Jump forward or back Turn the 5 dial During ...

Страница 55: ...ring auto play you can press the B button to change the display format During pause you can turn the 5 dial to view another image 109 Image Playback You can rotate an image by 90 or 270 clockwise Images will then be displayed in the correct orientation during playback 1 Select Rotate Turn the 5 dial to select x Rotate then press 0 s The Rotate screen will appear 2 Rotate the image Turn the 5 dial ...

Страница 56: ...stem format with c Video system Depending on your TV the image periphery may be cut off 111 This prevents the image from being erased accidentally 1 Select Protect Turn the 5 dial to select x Protect then press 0 s The protect setting screen will appear 2 Protect the image Turn the 5 dial to select the image to be protected then press 0 s When an image is protected the K icon will appear below the...

Страница 57: ...you want to select repeat steps 2 to 4 LErasing Images Erasing a Single Image 113 LErasing Images 1 Display the image Press the x button 2 Display the erase menu Press the L button s The Erase menu will appear at the bottom of the screen 3 Select All Turn the 5 dial to select All then press 0 s The confirmation dialog will appear 4 Erase the images Turn the 5 dial to select OK then press 0 s All un...

Страница 58: ...F error is displayed on the LCD panel it indicates that a problem with the CF card is preventing the image data from being recorded or read Use another CF card instead Or if you have a commercially available CF card reader that can read the CF card use it to transfer all the images in the card to a personal computer After transferring all the image data to a personal computer format the CF card It...

Страница 59: ...ble with direct printing Do not disconnect the cable during direct printing 117 Preparing to Print 3 Connect the camera to the printer Refer to the table Printers and Cables below to select the proper cable to connect the camera to printer When connecting the cable plug to the camera s C terminal the cable plug s D icon must face the front side of the camera To connect to the printer refer to the ...

Страница 60: ... printer Pull out the cable while holding the plug not the cord When connecting the camera to the printer do not use any cable other than the dedicated interface cable For direct printing using AC Adapter Kit ACK E2 optional to power the camera is recommended 119 The setting options will differ depending on the printer Some settings might be disabled For details refer to your printer s instruction...

Страница 61: ... Pro Default Photo Paper Plus Glossy U U U USetting the Layout 121 wPrinting with PictBridge About Layout 4 Set the other options If desired also set the H date imprinting E printing effects and R number of copies Turn the 5 dial to select the menu item then press 0 Turn the 5 dial to select the desired setting then press 0 Depending on the BJ printer the E Printing effects setting may enable you ...

Страница 62: ...or Press 0 to stop printing After resolving the problem resume printing For details on how to resolve a printing problem refer to the printer s instruction manual Paper Error Check whether the paper is properly loaded in the printer Ink Error The printer has run out of ink or the waste ink tank is full Hardware Error Check for any printer problems other than paper and ink problems File Error You a...

Страница 63: ...rinting Turn the 5 dial to select Print then press 0 s The printing will start When the printing ends the screen will return to step 1 To stop the printing press 0 while Stop is displayed then turn the 5 dial to select OK and press 0 The date may look light if it is imprinted on a bright background or border If Multiple is selected Borders and Date cannot be selected Borderless and Date will be se...

Страница 64: ... step 1 Starts the printing The printing style settings are displayed H is the date icon 127 SPrinting with Bubble Jet Direct 4 Set the options as desired Turn the 5 dial to select the menu item then press 0 Turn the 5 dial to select the desired setting then press 0 Paper is the size of the paper loaded in the printer Check the Borders and Date settings and set them if necessary When you are done ...

Страница 65: ... be displayed if an error occurs To resolve the respective error refer to the BJ printer s instruction manual 129 You can trim the image and print only the trimmed portion as if the image was recomposed Do the trimming right before printing If you set the trimming and then set the print settings you may have to set the trimming again 1 Select Trimming Turn the 5 dial to select Trimming then press ...

Страница 66: ...ings 131 9 DPOF Digital Print Order Format With DPOF Digital Print Order Format you can use the camera to specify which images in the CF card are to be printed and the quantity This feature is very convenient when you make prints with a DPOF compatible printer or photo lab About DPOF DPOF Digital Print Order Format is a standard for recording print ordering instructions to the CF card It is for im...

Страница 67: ...utton s The Print Order screen will reappear Next select Order or All to select the images to be printed Print Type Date File No RAW images cannot be selected for printing Even if Date and File No are set to On the date or file No might not be imprinted depending on the print type setting and printer type With Index prints both the Date and File No cannot be set to On at the same time When printing...

Страница 68: ...ch image for standard type prints Press 0 then turn the 5 dial to select the print quantity Then press 0 Selecting Individual Images for Printing Three image view 135 3 Print Ordering For Index If you want to include the image in the index print checkmark X the box Otherwise leave the box unchecked Press 0 to checkmark the box X or press 0 again to remove the checkmark If there are other images yo...

Страница 69: ...e saved to the CF card and the menu will reappear Selecting All images Note that RAW images cannot be selected for printing even when you set Mark all When using a PictBridge printer print no more than 500 images for one print order If you specify more than this all the selected images might not be printed 137 With a printer compatible with direct printing you can easily print images specified with...

Страница 70: ...index images with Bubble Jet Direct see the BJ printer s instruction manual If you stopped the printing and want to resume printing the remaining images select Resume Note that printing will not resume if you stop the printing and any of the following occurs Before resuming the printing you changed the print order settings Before resuming the printing you erased an image that was to be printed In ...

Страница 71: ...SettingsN C Fn 01 SET function when shooting You can change the function assigned to 0 With C Fn 01 1 2 you can press 0 then look at the LCD panel and set 5 directly 0 Default no function 1 Change quality Enables you to select the recording quality directly 2 Change parameters Enables you to select the processing parameter directly PA P1 P2 stand for Parameter 1 and 2 and PA 1 to PA 3 stand for Se...

Страница 72: ... AF start stop and AE lock functions If you have set both these Custom Functions and you execute both Custom Function operations the latter operation will not work The only exception will be when AF stop is executed after AF start 143 3 Custom Function SettingsN C Fn 07 Flash firing You can enable the built in flash external Speedlite and non Canon flash connected to the PC terminal to fire 0 Fires 1 ...

Страница 73: ...ly without pressing the S button By holding down the S button and turning the 6 dial you can set the exposure compensation 145 3 Custom Function SettingsN C Fn 14 E TTL II 0 Evaluative Fully automatic flash photography for all conditions from low light to daylight fill flash 1 Average The flash is averaged for the entire area covered by the flash Since automatic flash exposure compensation will not be e...

Страница 74: ...nter AF point instantly 4 ONE SHOT AI SERVO In the One Shot AF mode the button switches to the AI Servo AF mode only while you hold it down In the AI Servo AF mode the button switches to the One Shot AF mode only while you hold it down Convenient when you need to keep switching between One Shot AF and AI Servo AF for a subject which keeps moving and stopping 5 IS start With the lens IS switch alre...

Страница 75: ...ns focus mode switch is set to MF AE lock is applied at the center AF point AF Modes and Drive Modes Drive modes One Shot AF AI Servo AF AI Focus AF uSingle shooting An image cannot be taken unless focus is achieved When focus is achieved it is locked With evaluative metering the exposure setting is also locked The exposure setting is stored in memory before the shot is taken The focus tracks the ...

Страница 76: ...th a new one Troubleshooting Guide Power Source The battery cannot be recharged The camera does not operate even when the 4 switch is set to 1 or J The access lamp blinks even when the 4 switch is set to 2 The battery becomes exhausted quickly 151 Troubleshooting Guide Auto power off is in effect s Press the shutter button halfway If you do not want auto power off to take effect set c Auto power o...

Страница 77: ...ed No image appears on the TV screen 153 If a camera error occurs Err xx will be displayed on the LCD panel Follow the instruction below to resolve the problem for respective error code If the same error occurs often something is probably wrong with the camera Jot down the xx error code and take your camera to the nearest Canon Service Center If an error occurs after you take a picture the camera ...

Страница 78: ...s Macro Lites two models are ideal for close up flash photography You can fire only one or both flash tubes and control the flash ratio to easily obtain sophisticated lighting effects with E TTL II autoflash Remote Switch RS 80N3 This is a remote switch to prevent camera shake for super telephoto shots macroshooting and bulb exposures The cord is 80 cm 2 6 ft The switch provides the same effect as pres...

Страница 79: ... BP 514 Compact Power Adapter CA PS400 AC Adapter Kit ACK E2 Bundled Accessories 157 System Map Data Verification Kit DVK E2 Ver 2 1 PictBridge compatible printer Bubble Jet Direct compatible printer CP Printer EF lenses Timer Remote Controller TC 80N3 Remote Switch RS 80N3 Wireless Controller LC 4 PC card slot CF card CF Card reader TV Video PC card adapter EOS DIGITAL Solution Disk Digital Photo...

Страница 80: ...d Normal PTP selectable Video output NTSC PAL Specifications 159 Specifications White Balance Type Auto daylight shade cloudy tungsten white fluorescent light flash custom color temperature setting Auto white balance Auto white balance with the image sensor Color temperature correction White balance correction 9 stops in full stop increments White balance bracketing 3 stops in full stop increments B...

Страница 81: ...sh metering E TTL II autoflash Guide No 13 43 ISO 100 in meters feet Recycle time Approx 3 sec Flash ready indicator Flash ready icon lights in viewfinder Flash coverage 17mm lens focal length covered FE lock Provided Flash exposure compensation 2 stops in 1 3 or 1 2 stop increments 161 Specifications External Speedlite EOS dedicated Speedlite E TTL II autoflash with EX series Speedlite PC terminal P...

Страница 82: ... 100 min BP 511 BP 512 Approx 90 min Rated input AC 100 240 V Rated output DC 8 4 V Working temperature range 0 C 40 C 32 F 104 F Working humidity 85 or less Dimensions W x H x D 91 x 67 x 31 mm 3 6 x 2 6 x 1 2 in Weight 115 g 4 0 oz Battery Charger CB 5L Compatible battery Battery Pack BP 511A BP 514 BP 511 or BP 512 Temperature Shooting Conditions No Flash 50 Flash Use At 20 C 68 F Approx 1000 A...

Страница 83: ... to comply with Class B limits in Subpart B of Part 15 of the FCC rules Do not make any changes or modifications to the equipment unless otherwise specified in the manual If such changes or modifications should be made you could be required to stop operation of the equipment Canon U S A Inc One Canon Plaza Lake Success NY 11042 U S A Tel No 516 328 5600 165 Index A AC Adapter Kit 22 154 Access lamp 2...

Страница 84: ...umber of copies 121 124 127 134 O One Shot AF 65 P P Program 74 PAL 31 110 167 Index Paper settings 119 Partial Metering 71 PC terminal 98 PictBridge 119 Playback 103 Playback menu 29 31 Portrait 42 Possible Shots 21 47 Power Outlet 22 Power Switch 16 26 Pressing completely 26 Pressing halfway 26 Print Ordering 131 Processing Parameters 57 58 Program AE 74 Program Shift 75 Protect 111 Protection 1...

Страница 85: ...an Donato Milanese Milano Italy CANON Schweiz AG Geschäftsbereich Wiederverkauf Industriestrasse 12 CH 8305 Dietlikon Switzerland CANON G m b H Oberlaaerstrasse 233 4th floor 1100 Wien Austria CANON Españ a S A C Joaquín Costa 41 28002 Madrid Spain SEQUE Soc Nac de Equip Lda Praça da Alegria 58 2 1269 149 Lisboa Portugal CENTRAL CANON LATIN AMERICA INC DEPTO DE VENTAS SOUTH AMERICA 703 Waterford W...

Отзывы: