


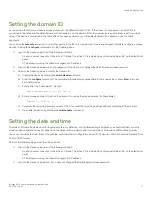


Setting the domain ID
Each device in the fabric must have a unique domain ID. The default domain ID is 1. If the device is not powered on until after it is
connected to the fabric and the default domain ID is already in use, the domain ID for the new device is automatically reset to a unique
value. If the device is connected to the fabric after it has been powered on and the default domain ID is already in use, the fabric
segments.
You can use the
fabricshow
command on another device in the fabric to view domain IDs already assigned. Manually configure a unique
domain ID using the
configure
command as in the following steps:
1. Log into the device using one of the following methods:
•
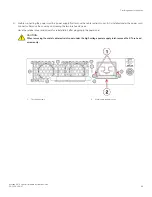
A serial console connection to the active CP blade. The active CP is indicated by an illuminated blue LED on the blade front
panel.
•
A Telnet session using the chassis management IP address.
2. Log into the device using
admin
as your password. If you have not changed the default password, use
password
.
3. Perform the following steps to modify the Domain ID.
a)
Disable the device by entering the
switchdisable
command.
b) Enter the
configure
command. The command prompts display sequentially. Enter a new value or press
Enter
to accept
each default value.
c)
Enter
y
after the "Fabric param" prompt.
Fabric param (yes, y, no, n): [no] y
d) Enter a unique domain ID (such as the domain ID used by the previous device, if still available).
Domain: (1..239) [1] 3
e)
Complete the remaining prompts or press Ctrl+D to accept the remaining settings without completing all the prompts.
f)
Re-enable the device by entering the
switchenable
command.
Setting the date and time
The date and time settings are used for logging events, error detection, and troubleshooting, and hence you should set them correctly.
However, device operation does not depend on the date and time; a device with incorrect date or time values still functions properly.
You can synchronize the local time of the principal or primary fabric configuration server (FCS) device to that of an external Network Time
Protocol (NTP) server.
Perform the following steps to set the date and time.
1. Log into the device using one of the following methods:
•
A serial console connection to the active CP blade. The active CP is indicated by an illuminated blue LED on the blade front
panel.
•
A Telnet session using the chassis management IP address.
2. Log into the device using
admin
. If you have not changed the default password, use
password
.
Setting the date and time
Brocade X6-4 Director Hardware Installation Guide
53-1004106-07
77
Содержание X6-4
Страница 12: ...Brocade X6 4 Director Hardware Installation Guide 12 53 1004106 07...
Страница 20: ...Brocade X6 4 Director Hardware Installation Guide 20 53 1004106 07...
Страница 28: ...Brocade X6 4 Director Hardware Installation Guide 28 53 1004106 07...
Страница 64: ...Brocade X6 4 Director Hardware Installation Guide 64 53 1004106 07...
Страница 86: ...Brocade X6 4 Director Hardware Installation Guide 86 53 1004106 07...
Страница 102: ...Brocade X6 4 Director Hardware Installation Guide 102 53 1004106 07...
Страница 130: ...Brocade X6 4 Director Hardware Installation Guide 130 53 1004106 07...
Страница 140: ...Brocade X6 4 Director Hardware Installation Guide 140 53 1004106 07...
Страница 166: ...Brocade X6 4 Director Hardware Installation Guide 166 53 1004106 07...
Страница 196: ...Brocade X6 4 Director Hardware Installation Guide 196 53 1004106 07...
Страница 200: ...Brocade X6 4 Director Hardware Installation Guide 200 53 1004106 07...
Страница 204: ...Brocade X6 4 Director Hardware Installation Guide 204 53 1004106 07...
Страница 210: ...Brocade X6 4 Director Hardware Installation Guide 210 53 1004106 07...
Страница 224: ...Brocade X6 4 Director Hardware Installation Guide 224 53 1004106 07...
Страница 238: ...Brocade X6 4 Director Hardware Installation Guide 238 53 1004106 07...