


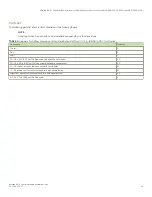


TABLE 8
Torque requirements for mounting screws
Screw size
Torque
6-32 x .25 in. (.635 cm) Phillips screw
8.75 in-lb (10 cm-kg)
10-32 x .63 in. (1.60 cm) Phillips screw
32 in-lb (36.86 cm-kg)
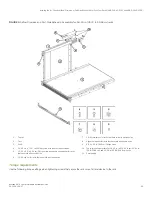
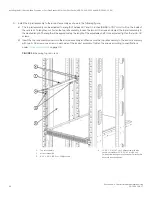
Assembling the rack hardware
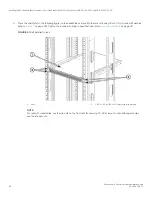
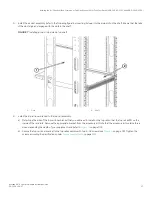
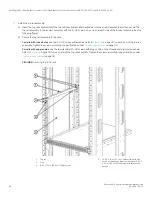
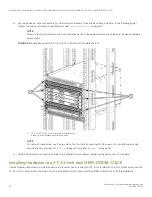
1. Determine how the device can be oriented in the rack so that the non-port side has access to intake air (cool).
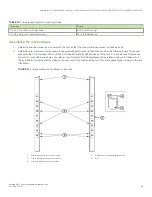
2. Install clip nuts (8 in
on page 33) or retainer nuts (9 in
on page 33) in rack rail locations shown in the following
figure. These nuts will secure the 10-32 screws that mount the rack kit's shelf and the device to the rack. For rails with round
holes, use clip nuts. For rails with square holes, use retainer nuts. Note that the following figure shows relative positions for these
nuts in the rack rails to mount the shelf and device. You may mount the shelf and device in 9U of rack space higher or lower in
the rack than shown.
FIGURE 4
Clip and retainer nut locations on rack rails
1.
Attaching clip nuts for round hole rails
2.
Clip or retainer nut locations for device
3.
Clip or retainer nut locations for shelf
4.
Retainer nut for rails with square hole
5.
Rail
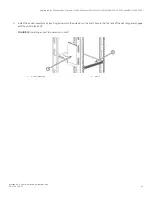
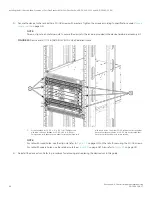
Installing the 8U Chassis Airflow Diversion or Port Side Exhaust Kit for Four-Post Racks (XBR-DCX4S-0121 and XBR-DCX4S-0130)
Brocade X6-4 Director Hardware Installation Guide
34
53-1004106-07
Содержание X6-4
Страница 12: ...Brocade X6 4 Director Hardware Installation Guide 12 53 1004106 07...
Страница 20: ...Brocade X6 4 Director Hardware Installation Guide 20 53 1004106 07...
Страница 28: ...Brocade X6 4 Director Hardware Installation Guide 28 53 1004106 07...
Страница 64: ...Brocade X6 4 Director Hardware Installation Guide 64 53 1004106 07...
Страница 86: ...Brocade X6 4 Director Hardware Installation Guide 86 53 1004106 07...
Страница 102: ...Brocade X6 4 Director Hardware Installation Guide 102 53 1004106 07...
Страница 130: ...Brocade X6 4 Director Hardware Installation Guide 130 53 1004106 07...
Страница 140: ...Brocade X6 4 Director Hardware Installation Guide 140 53 1004106 07...
Страница 166: ...Brocade X6 4 Director Hardware Installation Guide 166 53 1004106 07...
Страница 196: ...Brocade X6 4 Director Hardware Installation Guide 196 53 1004106 07...
Страница 200: ...Brocade X6 4 Director Hardware Installation Guide 200 53 1004106 07...
Страница 204: ...Brocade X6 4 Director Hardware Installation Guide 204 53 1004106 07...
Страница 210: ...Brocade X6 4 Director Hardware Installation Guide 210 53 1004106 07...
Страница 224: ...Brocade X6 4 Director Hardware Installation Guide 224 53 1004106 07...
Страница 238: ...Brocade X6 4 Director Hardware Installation Guide 238 53 1004106 07...