142
Brocade FastIron X Series Chassis Hardware Installation Guide
53-1001723-02
Installing or replacing a power supply
6
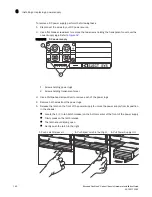
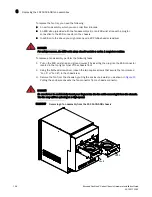
1. Use a Phillips-head or flathead screwdriver to loosen the latch screw in the front upper right
corner of the power supply. Once the screw is loosened, the latch will spring gently forward and
down.
2. Insert the new power supply into the empty power supply slot as shown in
DANGER
Do not attempt to install the power supply without first loosening the retaining screw on the front
of the power supply. Attempting to install the power supply with a closed latch will result in
mechanical damage to the power supply and power supply slot.
CAUTION
Make sure the power supply is properly inserted in the slot. Never insert the power supply upside
down.
3. When the power supply is almost fully seated in the chassis, press firmly on the power supply
latch until it locks into place. Refer to
DANGER
Use caution when closing the latch. Your fingers could get caught or pinched between the latch
and the front of the power supply.
4. When the power supply is fully seated, tighten the retaining screw as shown in
.
5. Connect power to the chassis. Refer to
Содержание FastIron SX 1600
Страница 8: ...viii Brocade FastIron X Series Chassis Hardware Installation Guide 53 1001723 02 ...
Страница 96: ...68 Brocade FastIron X Series Chassis Hardware Installation Guide 53 1001723 02 Verifying proper operation 2 ...
Страница 114: ...102 Brocade FastIron X Series Chassis Hardware Installation Guide 53 1001723 02 Removing MAC address entries 4 ...
Страница 200: ...188 Brocade FastIron X Series Chassis Hardware Installation Guide 53 1001723 02 Detailed procedure A ...
Страница 204: ...192 Brocade FastIron X Series Chassis Hardware Installation Guide 53 1001723 02 Russia B ...


