184
Brocade FastIron X Series Chassis Hardware Installation Guide
53-1001723-02
Detailed procedure
A
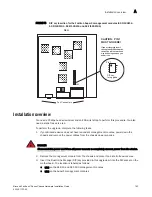
CAUTION
Make sure you insert the DIP key so that lead pin 1 goes into the correct hole as shown in
,
, depending on the management
module type. If you accidentally insert the DIP key backwards, the device will not work and may
be damaged when you power it on.
4. Replace the management module.
5. Install the full Layer 3 software. Note the precautions in
“Before installing the software”
6. Reboot the device.
Detailed procedure
This section describes how to install the hardware and software contents in the Layer 3 upgrade
kit.
Hardware installation
You need a Phillips-head screwdriver and an ESD wrist strap to perform this procedure. You also
need a static-free work area.
To perform the upgrade, complete the following tasks.
1. If your Brocade device does not have redundant management modules, power down the
chassis and remove the power cables from the chassis power supplies.
DANGER
Disconnect the power cord from all power sources to completely remove power from the device.
2. Put on the supplied ESD wrist strap and attach the clip end to the ESD connector on the
chassis, or a metal surface (such as an equipment rack), to act as ground.
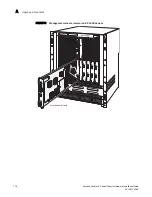
3. Disassemble the management module on which the DIP key will be installed (refer to
for the SX 1600).
•
Use a Phillips-head screwdriver to loosen and remove the two screws on the ends of the
module.
•
Pull the card ejectors towards you, and away from the module front panel. This action
unseats the module from the backplane.
•
Slide the management module out of the chassis and place it on a static-free work area.
4. Remove the DIP key from the package and align the lead pins over the DIP socket in the
following location:
•
U63 on SX 800 and SX 1600 management modules
•
U53 on SuperX management modules
Содержание FastIron SX 1600
Страница 8: ...viii Brocade FastIron X Series Chassis Hardware Installation Guide 53 1001723 02 ...
Страница 96: ...68 Brocade FastIron X Series Chassis Hardware Installation Guide 53 1001723 02 Verifying proper operation 2 ...
Страница 114: ...102 Brocade FastIron X Series Chassis Hardware Installation Guide 53 1001723 02 Removing MAC address entries 4 ...
Страница 200: ...188 Brocade FastIron X Series Chassis Hardware Installation Guide 53 1001723 02 Detailed procedure A ...
Страница 204: ...192 Brocade FastIron X Series Chassis Hardware Installation Guide 53 1001723 02 Russia B ...

