Addressable Radio Link System
www.bolid.ru
46
Connecting and Programming
Connect the detector to the ARR32 and set its parameters in the configuration of the polling loop
controller as discussed in Sections 6, 7, and 8 of this Manual.
When the detector has been connected on the ARR32, put the protective cover on it.
Mounting Location Considerations
Considering the mounting location for the S2000R-IP, please follow:
The instructions from Section 9 of this Manual.
All your applicable local codes, standards, regulations, and ordinances.
Testing Link Quality
The Link Quality Test procedure is designed to estimate stability of radio link between the detector
and the ARR32 at their current locations and when obstructions exist on the path of radio signals. You
are recommended to carry out the Link Quality Test before the devices are attached at their locations.
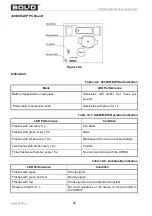
A Link Quality Test is started by a short press on the Prog button (see Figure 10-1) or by a short
press on the detector light guide or lighting this one by the laser beam of a laser test tool. The
procedure lasts 60 seconds, the detector being indicating the results of the test as shown in Table
10-4.
As testing the detector is in progress you can move the detector and the ARR32 to find the best
locations for them.
You can also estimate quality of the link using S2000R Configurator as discussed in Section 7.
Mounting
The detector’s base is to be mounted on a flat surface using the two screws provided.
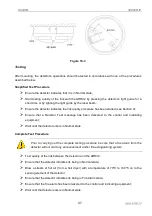
To attach the detector to the mounting base, place the detector into the base and rotate clockwise
until the detector drops into place and the matchmark moulded on the detector lines up with the short
mark 1 on the mounting base. Continue rotating clockwise until the matchmark on the detector lines
up with the matchmark 2 as shown in Figure 10-3 and the detector locks into place.


