page 134
page 134
page 134
page 134
page 134
160B&C TM
800-00140
GRAPPLE SERVICE & INSTALLATION CONTINUED...
GRAPPLE SERVICE & INSTALLATION CONTINUED...
GRAPPLE SERVICE & INSTALLATION CONTINUED...
GRAPPLE SERVICE & INSTALLATION CONTINUED...
GRAPPLE SERVICE & INSTALLATION CONTINUED...
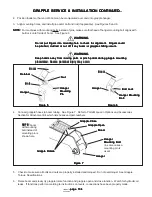
4. Connect grapple hoses to boom tubing. See Figure 7. Refer to Parts Manual in Options and Accessories
Section for Attachment Kit, which lists hoses and part numbers.
Hanger
Hanger
Hanger
Hanger
Hanger
Mounting Bolt
Mounting Bolt
Mounting Bolt
Mounting Bolt
Mounting Bolt
(in some cases a
mounting pin is
used)
Hanger
Hanger
Hanger
Hanger
Hanger
Boom
Boom
Boom
Boom
Boom
Grapple Open
Grapple Open
Grapple Open
Grapple Open
Grapple Open
Grapple Close
Grapple Close
Grapple Close
Grapple Close
Grapple Close
Boom
Boom
Boom
Boom
Boom
Hanger
Hanger
Hanger
Hanger
Hanger
Bolt Lock
Bolt Lock
Bolt Lock
Bolt Lock
Bolt Lock
Hanger Mounting
Hanger Mounting
Hanger Mounting
Hanger Mounting
Hanger Mounting
Bolt
Bolt
Bolt
Bolt
Bolt
Figure 5
Figure 5
Figure 5
Figure 5
Figure 5
Figure 6
Figure 6
Figure 6
Figure 6
Figure 6
Nut
Nut
Nut
Nut
Nut
Hanger
Hanger
Hanger
Hanger
Hanger
Mounting
Mounting
Mounting
Mounting
Mounting
Pin
Pin
Pin
Pin
Pin
Bolt
Bolt
Bolt
Bolt
Bolt
Retainer
Retainer
Retainer
Retainer
Retainer
Boom
Boom
Boom
Boom
Boom
Hanger
Hanger
Hanger
Hanger
Hanger
Grapple Rotate
Grapple Rotate
Grapple Rotate
Grapple Rotate
Grapple Rotate
NOTE:
NOTE:
NOTE:
NOTE:
NOTE: boom
with mounting
bolt instead of
mounting pin is
shown here.
Figure 7
Figure 7
Figure 7
Figure 7
Figure 7
5. Check to make sure all bolts and nuts are properly installed and torqued. Do not overtorque! See Grapple
Torque Specifications.
6. Raise boom and slowly try grapple rotate function and grapple open and close function. Watch for hydraulic oil
leaks. If functions perform according to instructions on levers, connections have been properly made.
2. Position loader so that end of boom can be manipulated over and onto grapple hanger.
3. Align mounting holes, and install pin and/or bolt and nut (if applicable). See Figures 5 and 6.
NOTE:
NOTE:
NOTE:
NOTE:
NOTE: For machines with mounting bolts instead of pins, make sure that head of hanger mounting bolt aligns with
bolt lock on left side of boom. See Figure 6.
WARNING
WARNING
WARNING
WARNING
WARNING
Do not put fingers into mounting hole to check for alignment. Fingers could
Do not put fingers into mounting hole to check for alignment. Fingers could
Do not put fingers into mounting hole to check for alignment. Fingers could
Do not put fingers into mounting hole to check for alignment. Fingers could
Do not put fingers into mounting hole to check for alignment. Fingers could
be pinched, crushed or cut off if any boom or grapple shifting occurs.
be pinched, crushed or cut off if any boom or grapple shifting occurs.
be pinched, crushed or cut off if any boom or grapple shifting occurs.
be pinched, crushed or cut off if any boom or grapple shifting occurs.
be pinched, crushed or cut off if any boom or grapple shifting occurs.
WARNING
WARNING
WARNING
WARNING
WARNING
Keep hands away from moving parts or pinch points during grapple mounting
Keep hands away from moving parts or pinch points during grapple mounting
Keep hands away from moving parts or pinch points during grapple mounting
Keep hands away from moving parts or pinch points during grapple mounting
Keep hands away from moving parts or pinch points during grapple mounting
procedures. Severe personal injury may occur.
procedures. Severe personal injury may occur.
procedures. Severe personal injury may occur.
procedures. Severe personal injury may occur.
procedures. Severe personal injury may occur.

