Using the Optional Bobbin Winder
239
7
—————————————————————————————————————————————————————————————————————————————————————
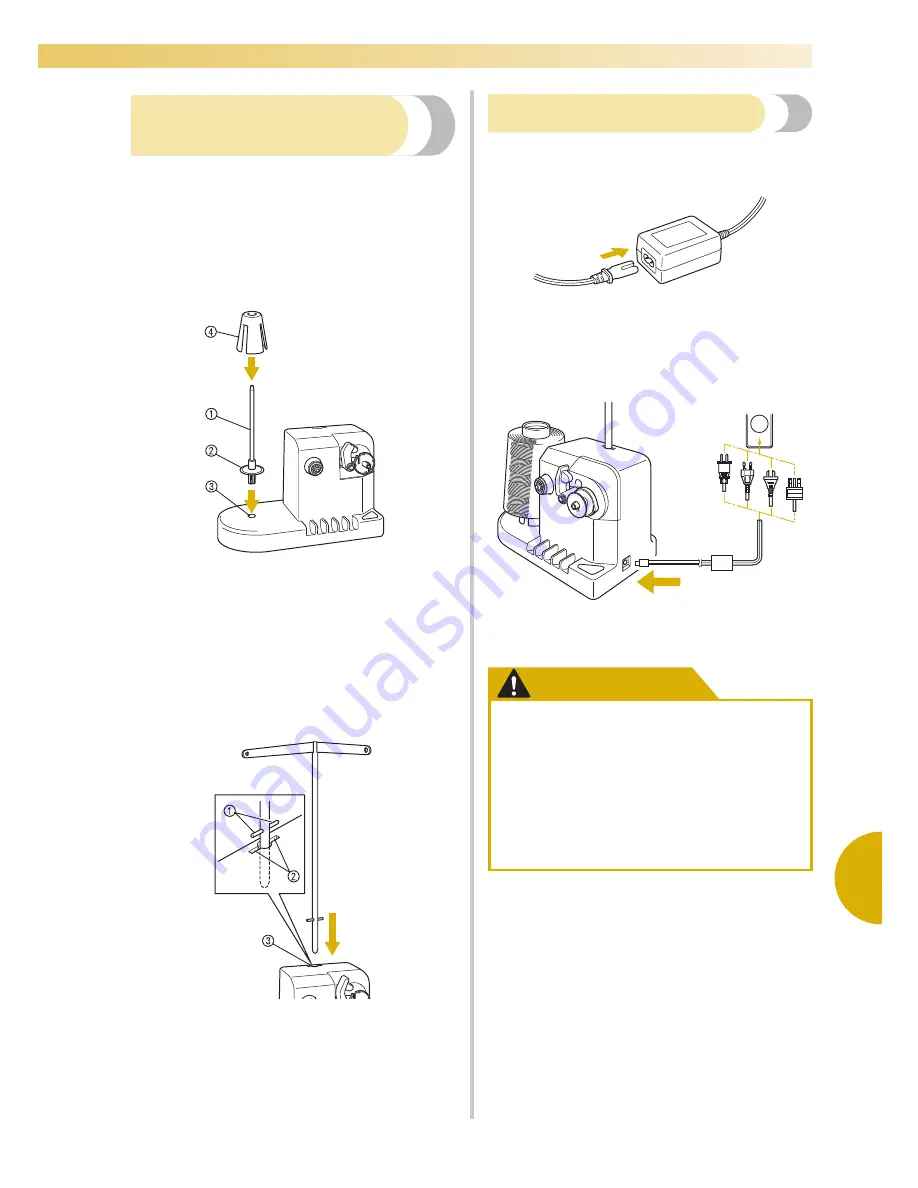
Setting up the optional
bobbin winder
Attach the spool pin, spool cushion and thread
guide to the bobbin winder.
1
Insert the spool pin and the spool cushion.
Lower the holder, and then insert the spool
pin straight into the hole. And insert the spool
cushion.
1
Spool pin
2
Spool pin holder
3
Hole for spool pin
4
Spool cushion
2
Insert the thread guide.
Insert the thread guide straight into the hole
with the pins on the thread guide aligned
with the notches on the sides of the hole.
1
Pins on thread guide
2
Notches on hole for thread guide
3
Hole for thread guide
• Firmly insert the thread guide as far as
possible and make sure that it is secure.
Connecting the AC adapter
1
Insert the plug of the power supply cord into
the AC adapter.
2
Plug the cord on the AC adapter into the DC
input connector of the bobbin winder, and
then insert the plug of the power supply cord
into a household electrical outlet.
• Be sure to firmly insert the plug on the AC
adapter into the DC input connector of the
bobbin winder.
CAUTION
●
Be sure to use the included AC adapter.
Using any other AC adapter may result
in damage.
●
Before connecting or disconnecting the
AC adapter, be sure that the unit is not
operating.
●
After using the bobbin winder,
disconnect it from the electrical outlet.
Содержание Embroidery Professional PLUS BMP9
Страница 1: ......
Страница 20: ...18...
Страница 136: ...EMBROIDERING SETTINGS 134...
Страница 192: ...SELECTING EDITING SAVING PATTERNS 190...
Страница 267: ...Troubleshooting 265 7 If any of the following messages appear consult your nearest Baby Lock retailer...
Страница 268: ...APPENDIX 266...
Страница 276: ...English 885 T05 XE6418 001 Printed in Taiwan...


