APPENDIX
————————————————————————————————————————————————————————————————————————————
226
4
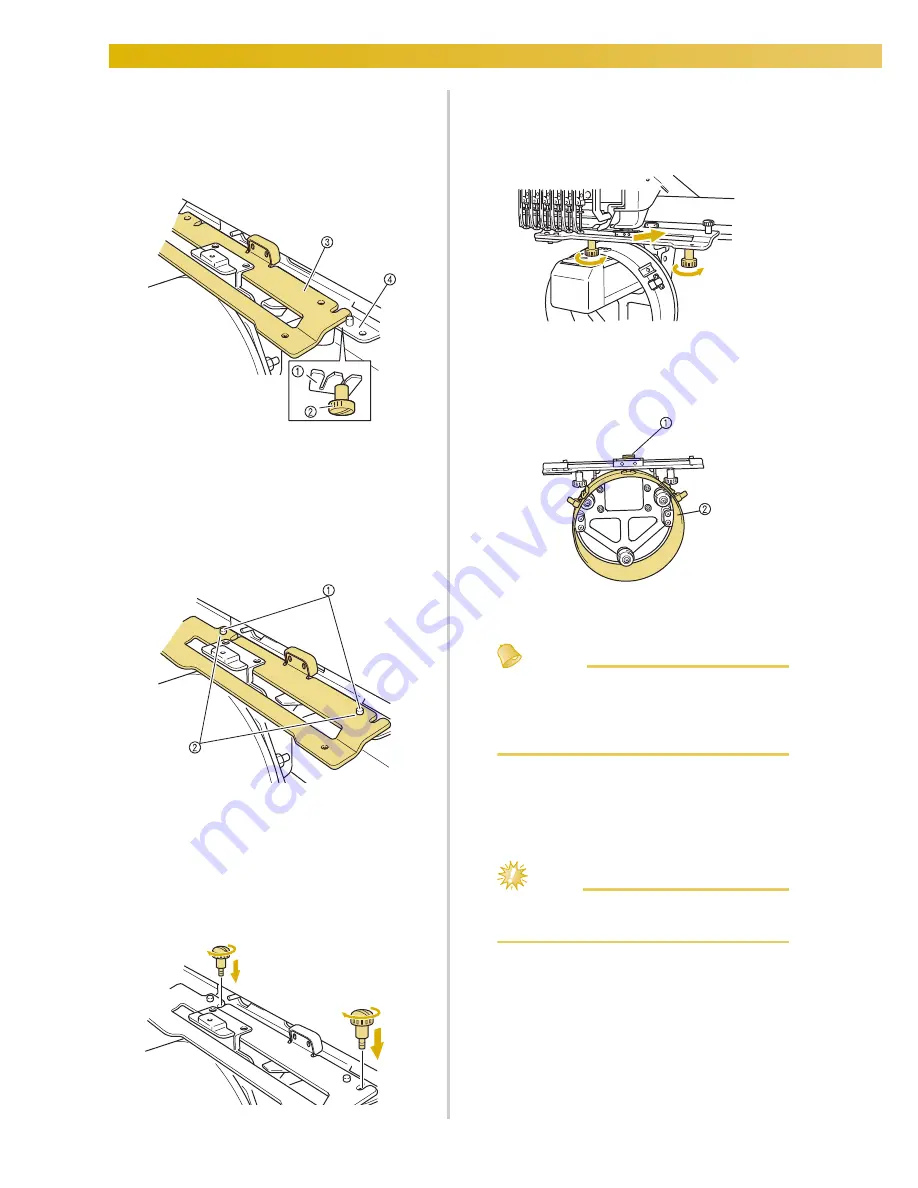
Insert the two thumb screws at the bottom
of the cap frame driver into the v-cuts in the
carriage, and then place the mounting plate
of the cap frame driver on top of the frame-
mounting plate of the carriage.
1
Notch in the carriage
2
Thumb screw of the cap frame driver
3
Mounting plate of the cap frame driver
4
Frame-mounting plate of the carriage
5
Insert the pins on the frame-mounting plate
of the carriage into the holes in the
mounting plate of the cap frame driver.
1
Pins on the frame-mounting plate of the
carriage
2
Holes in the mounting plate of the cap frame
driver
6
Insert and tighten the two upper thumb
screws in outer holes of mounting plate of
cap frame driver.
7
While pushing in the cap frame driver
toward the machine so that it is fully
inserted, tighten the two lower thumb
screws to secure the cap frame driver.
X
This completes the installation of the cap
frame driver.
■
Adjusting the cap frame driver
1
L-shaped bracket
2
Ring
Memo
●
If the same machine is being used, the
adjustment to the cap frame driver is only
required the first time that the machine is
used.
1
Turn on the machine. After the carriage
moves to its initial position, turn off the
machine.
Note
●
Be sure to adjust the cap frame driver with
the carriage at its initial position.
Содержание Embroidery Professional PLUS BMP9
Страница 1: ......
Страница 20: ...18...
Страница 136: ...EMBROIDERING SETTINGS 134...
Страница 192: ...SELECTING EDITING SAVING PATTERNS 190...
Страница 267: ...Troubleshooting 265 7 If any of the following messages appear consult your nearest Baby Lock retailer...
Страница 268: ...APPENDIX 266...
Страница 276: ...English 885 T05 XE6418 001 Printed in Taiwan...


