background image


47 


5.3.1


Load Settings 

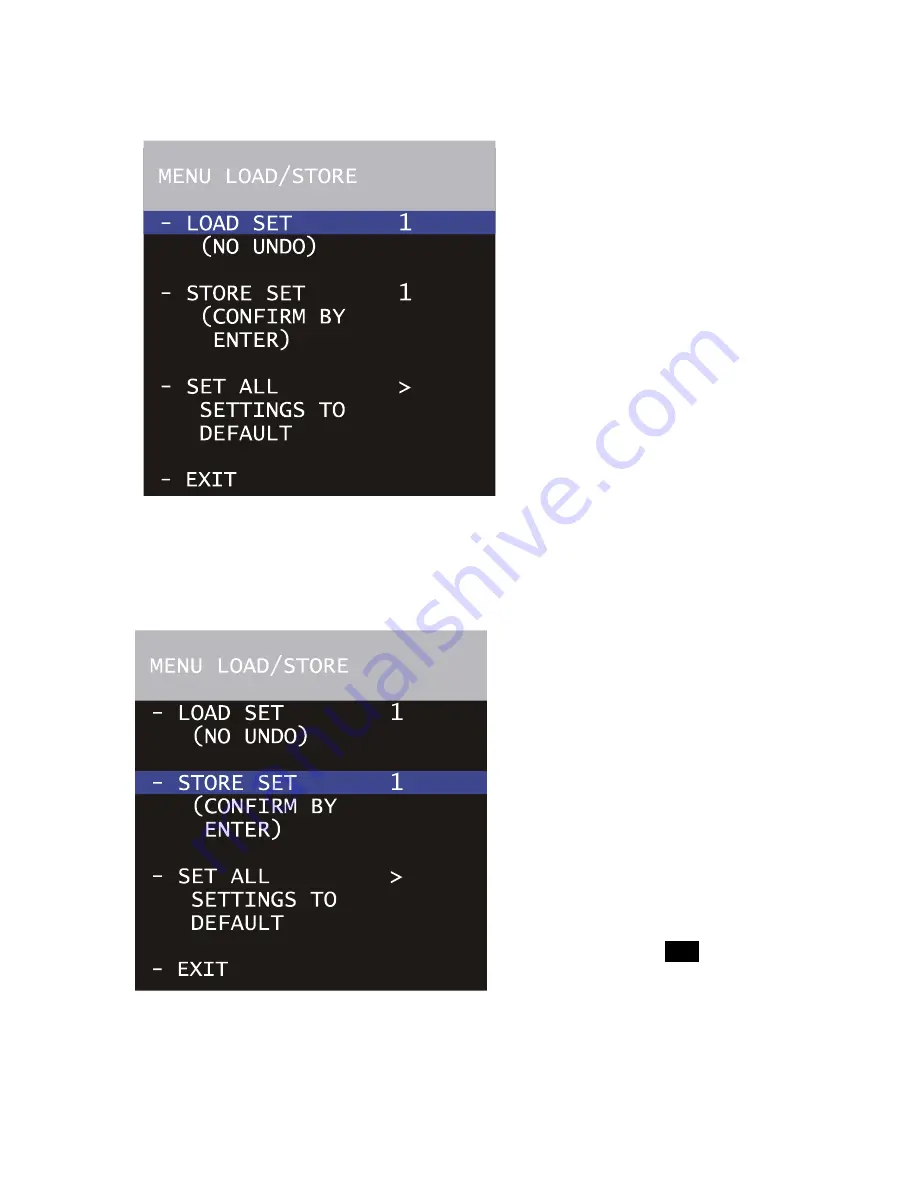
It is possible to load one out of 
six settings. Those new settings 
will influence all adjustments 

which can be made 
electronically. 
 

Note: The new settings will 

immediately replace the 
previous settings. If the 

old settings might be 
needed, store them first 

as described in the next 
chapter 


5.3.2 Store 

Settings. 


Move the cursor by using the 
keys 

Ê

 and 

Ë

 to the line - 

LOAD SET 

 Photo

. Pressing 

the key 

Í

 will switch from 1 to 

2 all the way up to 6 and back to 1, the key 

Ì

 will switch in the opposite 

order. Pressing either the key 

Í

 or 

Ì

 will immediately load the new 

settings. 

 
5.3.2


Store Settings 

The set of settings, that are 

currently active, can be stored 
as one out of six settings. 
 
Move the cursor with the keys 

Ê


and 

Ë

 to the line - STORE SET 

 Photo

. Pressing the key 

Í


will switch from 1 to 2 all the 
way up to 6 and back to 1, the 
key 

Ì

 will switch in the 

opposite order. 
 
When the demanded number 
was reached, press the 
Enter/Insert key 

Ñ

 to store 

this setting under the given 
number. The word 

DONE

 will 

appear for three seconds to 
indicate that the setting was 
stored. After this, the display 

will return to its normal mode.


Содержание K2.47050.0

Страница 1: ...1 HD IVS for ARRICAM ST K2 47050 0 Instruction Manual May 18th 2010 K5 40803 0 0035 64 00 00 01 K7601 ...

Страница 2: ...Image Position X Y and Rotation 26 4 4 Focus 27 4 5 White Balance WB 28 4 6 Gain Control 32 4 7 Changing Format marking number 34 4 8 Ground Glass Cancellation GGC On Off 36 4 9 Ground Glass Cancellation Iris Setting 37 4 10 HD Link Speed 40 4 11 HD Link Mode 41 4 12 Storing a Video Image to Internal Memory 42 5 Inserter Facilities 43 5 1 Setting the On Screen Displays 43 5 2 Main Menu 45 5 3 Load...

Страница 3: ...3 1 Quick Reference ...

Страница 4: ...4 MENU EDIT TEXT ...

Страница 5: ...ructions Read and understand all safety and operating instructions before you operate or install the system Retain all safety and operating instructions for future reference Heed all warnings on the system and in the safety and operating instructions before you operate or install the system Follow all installation and operating instructions Do not use accessories or attachments not recommended by ...

Страница 6: ...utomatically move The antennas must always be kept screwed on to their bushing to protect the highly precise antenna bushing Reverse SMA In order to ensure optimal radio connection the bushing must be free of dust and dirt at all times If necessary remove the antenna and clean antenna and bushing using pressured air Do not use any tools that can harm antenna or bushing Specific safety instructions...

Страница 7: ...ange without notice For current design in refer to the latest publications of ARRI data sheets or data books etc for the most up to date specifications Not all products and or types are available in every country Please check with an ARRI sales representative for availability and additional information ARRI and its subsidiaries do not assume any liability for infringement of patents copyrights or ...

Страница 8: ... and so on or under any other legal theory In the case one or all of the forgoing clauses are not allowed by applicable law the fullest extent permissible clauses by applicable law are validated ARRI is a registered trademark of Arnold Richter Cine Technik GmbH Co Betriebs KG ...

Страница 9: ...9 2 3 Declaration of Conformity ...

Страница 10: ...tes a higher dynamic resulting in more details in shadow areas Anamorphic de squeeze To de squeeze anamorphic images the HD IVS comes with software options for a de squeeze factor of 2 and 1 3 Screen capture Individual still images can be stored on a standard USB stick in a standard bitmap format Ground Glass Cancellation GGC for a clean image The structure of the ground glass in the optical syste...

Страница 11: ...onditions The area outside the frame lines can be darkened electronically in three different steps to emphasize the important image area Camera status display Camera status information e g camera speed and film counter data are passed on a bus interface from the camera to the video assist and can be displayed in a camera status line on the monitor System display Camera system information is availa...

Страница 12: ...t manually Mini monitor connector The HD IVS has a BNC connector for an HD IVS Mini Monitor The mini monitor needs to get power on a separate power cable 3 1 Order Numbers ARRICAM ST HD IVS order number K2 47050 0 HD IVS for ARRICAM ST K2 64200 0 IVS Lens for 4 3 Format K2 64201 0 IVS Lens for 16 9 Format K0 60096 0 Set HD IVS ARRICAM ST plus IVS Lens for 4 3 Format K0 60096 A Set HD IVS ARRICAM S...

Страница 13: ...and right but also top and bottom of the monitor screen The usable image on the monitor will be too small Vice versa if a 16 9 IVS lens is installed together with a 4 3 ground glass the image will be cropped on top and bottom Both situations are not recommendable Please use an appropriate combination of ground glass and IVS lens This operation should be carried out only by an experienced technicia...

Страница 14: ...tion to reassemble the lens Turn the focus ring as shown Photo until it reaches end stop then turn it back a quarter of a revolution Insert the connector through the hole and insert the lens into the optics assembly Photo Make sure that the small key on the lens is aligned with the keyway in the optics assembly Photo ...

Страница 15: ... connector through the housing and connect it by using a pair of tweezers Photo Attach the cover by using a 1 5 mm hex key Photo Insert and close the 3 screws S1 to S3 by using a Phillips PH1 screwdriver to open the top of the optics assembly Photo Insert and close the 5 screws S1 to S5 by using a Phillips PH1 screwdriver and open the back of the HD IVS ST Photo ...

Страница 16: ...th a 16 9 ground glass black areas will appear not only left and right but also top and bottom of the monitor screen The usable image on the monitor will be too small Vice versa if a 16 9 IVS lens is installed together with a 4 3 ground glass the image will be cropped on top and bottom Both situations are not recommendable Please use an appropriate combination of ground glass and IVS lens This ope...

Страница 17: ... optics assembly Photo Remove the cover by using a 1 5 mm hex key Photo Disconnect the connector Photo by using a pair of tweezers and pull out the cable carefully through the top of the optics assembly Photo Turn the focus screw S1 Photo clockwise by using a 1 5 mm hex key until the lens comes loose and pull it out carefully Make sure the connector slips through the housing without being pulled ...

Страница 18: ...ugh the hole and insert the lens into the optics assembly Photo Make sure that the small key on the lens is aligned with the keyway in the optics assembly Photo Push the lens gently against IVS and turn the focus screw S1 counter clockwise by using a 1 5 mm hex key until the lens gets pulled in Photo Carefully feed the connector through the housing and connect it by using a pair of tweezers Photo ...

Страница 19: ...s assembly Photo Screw on the 5 screws S1 to S5 by using a Phillips PH1 screwdriver and open the back of the HD IVS ST Photo Make sure to mount the correct Lens Type Marker on the HD IVS so that the type of lens is visible from the outside For this unscrew the two screws S1 and S2 attach the Lens Type Marker and screw the two screws on again Photo ...

Страница 20: ...ter off a 3 mm hex key is used Remove the lens cap Photo To take the view finder cover off loosen the captive screw S1 with a 3 mm hex key and remove the view finder cover Photo To take the adapter off the HD video assist loosen the captive screws S1 and S2 with a 3 mm hex key To have access to screw S2 use the hole as marked and remove the adapter Photo Attach the adapter onto the ARRICAM ST view...

Страница 21: ...ve access to screw S2 use the hole as marked Photo Take out the screws S1 and S2 with a 3 mm hex key and remove the old support Mount the new handle adapter with the same crews Photo Attach the handle back onto the camera Attention The handle adapter has to be used otherwise a solid support is not guaranteed To remove the handle from the camera loosen the screws S1 S2 and S3 with a 3 mm hex key Ph...

Страница 22: ...video output marked with the È symbol Photo no graphic information is inserted The outputs are standard BNC sockets for 75 Ω terminated video signals All outputs can be used simultaneously In order to ensure appropriate image quality make sure to use cables which are capable to handle the 1 5 GB s data rate of the HD SDI signal We recommend cables according to RG 59 standard 3 7 HD SDI Output With...

Страница 23: ...rding to RG 59 standard 3 8 Mini Monitor Output The HD IVS has a BNC connector for a standard mini monitor This delivers the HD SDI signal to the mini monitor Photo Power needs an additional cable from the RS connector of the film camera to the power in of the mini monitor The RS output pinning is Pin Outs RS Connector seen from outside GND Pin 1 24 V 1 6 A max Pin 2 ...

Страница 24: ... the Enter Insert key Ñ for more than three seconds Go to sub menu VIDEO ADJUST Move the cursor with the keys Ê and Ë to the line MINI MON DATA Photo The key Í or Ì will switch the video overlay in the mini monitor output on and off See chapter 5 Inserter Facilities for information on the on screen program mode In order to ensure appropriate image quality make sure to use cables which are capable ...

Страница 25: ...ff the film camera will also shut the HD IVS down Photo The OFF position switches the HD IVS off without affecting the film camera The ON position activates the HD IVS Check Menu If the on screen program mode is off during normal operation the Menu M position shows an overview of the HD IVS settings Photo Hide Menu If the on screen program mode is on in order to change the settings the Menu M posi...

Страница 26: ...ght level exceeds the range for electronic gain In this case the motor closes the iris In manual gain control mode MGC on neither the electronic gain nor the iris changes unless the keys MGC Ê or MGC Ë are used First the electronic gain is reduced Only if the electronic gain is all the way down will the iris close In automatic gain mode MGC off it works the same way First the electronic gain is re...

Страница 27: ...mage around a point which is located in the middle of the right image border and screw S 3 rotates the image around a point which is located in the middle of the left image border Photo Therefore the screw S 2 and screw S 3 work as a y adjustment as well as an adjustment for rotation 4 4 Focus Do not use force Focus can be changed using the screw S 4 which is marked with the F Symbol Photo ...

Страница 28: ...WB key Ï Photo the setting will be changed from AWB IND OTD to MAN The corresponding LED is lit The next click on the WB key Ï will cause the MAN LED to blink Photo Now it is possible to change the red and blue channel using the color coded Ê Ë Í and Ì keys The next click on the WB key Ï or waiting longer than 5 seconds without pressing any key will cause the MAN LED to be constantly on Another cl...

Страница 29: ... the normal range If the image is over or underexposed one push white will not work Note Changing red blue and gain will change green The video signal is the addition of red green and blue and amplified by the gain Decreasing red and blue and increasing gain can increase green 4 5 2 Using the On Screen Menu Please see chapter 5 Inserter Facilities for basics on the On Screen display Parallel to th...

Страница 30: ...o use the one push white facility or to adjust the red and blue saturation of the video image manually Move the cursor by using the keys Ê and Ë to the line ONE PUSH WHITE Photo Point with the camera to a white surface e g hold a sheet of white paper in front of the camera and ensure proper lighting Press the key Í to start the ONE PUSH WHITE facility thus adjusting the white balance to the white ...

Страница 31: ...essed briefly the value changes by one increment measure if the keys are pressed longer the value will continue to change The LED on the keyboard will follow the changes which are made in the menu and vice versa if this setting is changed via the keyboard the on screen menu will follow Manual White Balance blue increase decrease Note Manual WHITE BALANCE BLUE increase decrease is only available if...

Страница 32: ...htness impression remains almost unchanged Gain control can be adjusted in two different ways It is possible to control it using the keyboard on the HD IVS or using the on screen control menu 4 6 1 Using the Keyboard Although all settings are done on the HD IVS please always check all the changes on the connected monitor as well By pressing the key À the setting alters between manual and automatic...

Страница 33: ...Enter the main menu by pressing the Enter Insert key Ñ for more than three seconds Go to sub menu WB GAIN BARS Photo Move the cursor with the keys Ê and Ë to the line MANUAL GAIN Pressing the key Í or Ì will switch manual gain control off and on If manual gain control is on the display will change A dash will appear before VALUE indicating that the gain can be changes manually The LED on the keybo...

Страница 34: ...r the value will continue to change The LED on the keyboard will follow the changes which are made in this menu and vice versa if this setting is changed via the keyboard the on screen menu will follow 4 7 Changing Format marking number The HD IVS can insert different format markings It is possible to have No format marking OFF Format marking number one 1 Format marking number two 2 Or both format...

Страница 35: ...switch from OFF 1 2 to 1 2 The key Ì will switch in opposite order Photo 4 7 2 Using the On Screen Menu Please see chapter 5 Inserter Facilities for basics on the On Screen display Parallel to the control via keyboard the format marking number can also be programmed via the on screen menu Enter the main menu by pressing the Enter Insert key Ñ for more than three seconds Go to sub menu FORMAT MARKI...

Страница 36: ... ground glass texture and can use its powerful image processor to remove it from the images This Ground Glass Cancellation GGC technology delivers a clean preview image without any distracting texture 4 8 1 Using the Keyboard Note The setup of the GGC can be done only in the on screen menu as described in chapter 5 10 CCG Control The Ground Glass Cancellation can be switched on and off using the k...

Страница 37: ... or Ì will switch GGC off and on If manual GGC is on the LED on the keyboard will be on The LED on the keyboard will follow the changes which are made in this menu and vice versa if this setting is changed via the keyboard the on screen menu will follow 4 9 Ground Glass Cancellation Iris Setting If Lens Data Lenses are used the iris value will be passed onto the HD IVS automatically No manual inpu...

Страница 38: ... blink showing that it is now possible to change the GGC value for iris Use the keys Ê and Ë to increase or decrease the GGC value for iris Photo Note Pressing the key longer than 3 seconds will switch the GGC software on and off See last chapter 4 8 Ground Glass Cancellation On Off for details The LED on the keyboard will follow the changes which are made in this menu and vice versa if this setti...

Страница 39: ...ribed in the chapter 5 10 2 Iris Enter the main menu by pressing the Enter Insert key Ñ for more than three seconds Go to sub menu CCG Move the cursor by using keys Ê and Ë to the line IRIS Photo Pressing the key Í will increment the iris value by one f stop Pressing the key Ì will decrease the iris value by one f stop The LED on the keyboard will follow the changes which are made in this menu and...

Страница 40: ... keyboard is always possible The LED on the keyboard will follow the changes which are made in this menu and vice versa if this setting is changed via the keyboard the on screen menu will follow 4 10 2 Using the on screen menu Please see chapter 5 Inserter Facilities for basics on the On Screen display Move the cursor with the keys Ê and Ë to the line HD LINK SPEED Photo Pressing the key Í will sw...

Страница 41: ... selected link speed Therefore control via the keyboard is always possible The LEDs on the keypad will follow the changes which are made in the menu and vice versa if the setting is changed via the keypad the on screen menu will follow 4 11 2 Using the On Screen Menu Move the cursor by using the keys Ê and Ë to the line HD LINK MODE Photo Pressing the key Í will switch from progressive P to interl...

Страница 42: ...ter Insert key Ñ are briefly pressed a new image is stored The previous image will be overwritten To view the stored image or to compare it against a live image please enter the on screen program mode as described in chapter 5 7 1 View Mode 4 12 2 Using the On Screen Menu Please see chapter 5 Inserter Facilities for basics on the On Screen display Enter the main menu by pressing the Enter Insert k...

Страница 43: ...ble at the outputs Video with graphic overlay Note All engravings from the ground glass e g TV Safe etc are visible at all times at all outputs Note All currently used settings are stored even if the HD IVS or the camera is switched off or disconnected from the power supply After restarting the HD IVS the settings are unchanged except for the image stored mode which will always come up in live mod...

Страница 44: ...efly To go from a sub menu back to the main menu position the cursor by using the keys Ê and Ë on the line EXIT and press the key Í or Ì Active lines are marked with a dash symbol They can be reached with the cursor within a menu using the keys Ê and Ë Lines may not be active because the currently selected mode does not support this feature E g when gain is not in manual control mode the line valu...

Страница 45: ... An illuminated LED indicates that the on screen programming is activated Note Pressing the Enter Insert key Ñ for more than three seconds will cause the system to exit the on screen programming mode completely regardless of which menu is activated with the exception of the positioning mode The keys Ê or Ë move the cursor up or down Pressing the key Í or Ì will lead into a sub menu ...

Страница 46: ... as previously One set of settings consists of all set ups in the HD IVS Everything which can be set electronically will be stored and recalled All video adjustments such as manual gain control white balance flicker free outputs with or without data as well as all inserter setups e g user text insertion off or on frame lines and so on are stored and recalled The adjustment of the white level of th...

Страница 47: ...back to 1 the key Ì will switch in the opposite order Pressing either the key Í or Ì will immediately load the new settings 5 3 2 Store Settings The set of settings that are currently active can be stored as one out of six settings Move the cursor with the keys Ê and Ë to the line STORE SET Photo Pressing the key Í will switch from 1 to 2 all the way up to 6 and back to 1 the key Ì will switch in ...

Страница 48: ... Pressing the key Í or Ì recalls the default values It is necessary to re confirm the reset as all settings will be cleared This window will appear with the cursor in the line NO Photo Pressing the key Í or Ì will cancel this procedure To clear everything move the cursor by using the keys Ê and Ë to the line YES Photo Pressing the key Í or Ì sets all settings to default If the cursor is in positio...

Страница 49: ... Ë to the line EXIT Photo and press the key Í or Ì Note Pressing the Enter Insert key Ñ for more than three seconds will cause the system to exit the on screen programming mode completely regardless of which menu is activated with the exception of the positioning mode and the color bars ...

Страница 50: ...Color Bars Menu WHTE BALANCE and MANUAL GAIN control allow to change the color appearance and brightness of the video image All changes are immediately active Check all settings on the connected monitor Enter the WB Gain submenu from the main menu ...

Страница 51: ... front of RED and BLUE will appear dashes indicating that the red and blue saturation of the video image can now be changed The LEDs on the keypad will follow the changes which are made in the menu and vice versa if the setting is changed via the keypad the on screen menu will follow One push white Note One push white is only available when white balance is set to manual If manual white balance is...

Страница 52: ...saturation of the video image manually Move the cursor by using the keys Ê and Ë to the line RED Photo Pressing the key Í will increase the red in the video image the key Ì will decrease it The range for this is from 0 lowest to 63 highest If the key Í or Ì is pressed briefly the value is changes by one increment if the keys are pressed longer the value will continue to change The LED on the keybo...

Страница 53: ... cursor by using the keys Ê and Ë to the line BLUE Photo Pressing the key Í will increase the blue in the video image the key Ì will decrease it The range is from 0 lowest to 63 highest If the key Í or Ì is pressed briefly the value changes by one step if the keys are pressed longer the value will continue to change The LED on the keyboard will follow the changes which are made in this menu and vi...

Страница 54: ...f an automatic mode is active Move the cursor by using the keys Ê and Ë to the line MANUAL GAIN Photo Pressing the key Í or Ì will switch MANUAL GAIN control off and on If manual gain control is on the display will change A dash will appear in front of VALUE indicating that the gain can be changes manually The LED on the keyboard will follow the changes which are made in the menu and vice versa if...

Страница 55: ...ine VALUE Photo Pressing the key Í will increase the gain the key Ì will decrease it The range is from 0 lowest gain to 63 highest gain If the key Í or Ì is pressed briefly the value changes by one increment if the key is pressed longer the value will continue to change The LED on the keyboard will follow the changes which are made in this menu and vice versa if this setting is changed via the key...

Страница 56: ...ain it will always start in the mode COLOR BARS OFF to avoid accidental use of this mode Move the cursor by using the keys Ê and Ë to the line COLOR BARS Photo Pressing the key Í or key Ì will switch the on and off Note The color bars will fill the entire screen of the monitor and the on screen program menu will not visible any more Pressing the key Í or key Ì will switch the color bars on and off...

Страница 57: ...and Ë to the line EXIT Photo and press the key Í or Ì Note Pressing the Enter Insert key for more than three seconds will cause the system to exit the on screen programming mode completely regardless of which menu is activated with the exception of the positioning mode and the color bars ...

Страница 58: ... at a different link speed than the video assist For example the film camera runs at 24 FPS and the HD link speed is at 25 FPS This would normally cause different brightness from one video image to the next one To eliminate this so called flicker video images are stored at the speed of the film camera into the video frame storage and recalled in the speed of the video system This storage might cau...

Страница 59: ...hieved The mirror shutter of the film camera consist of a reflective part which will always send light for 180 of one exposure cycle into the view finder system and a plate which can optionally reduce the exposure time of the film to get different resolution of motion The video assist can now be programmed to work the same way The option 180 will set the video assist to be exposed for the maximum ...

Страница 60: ... Speed The HD IVS allows setting the HD link speed to 23 976 FPS 24 FPS 25 FPS 29 97 FPS and 30 FPS Please make sure that the selected HD link speed is supported by your recording device and monitor Move the cursor with the keys Ê and Ë to the line HD LINK SPEED Photo Pressing the key Í will switch from 23 976 FPS to 30 FPS and back to 23 976 FPS The key Ì will switch in opposite direction The LED...

Страница 61: ...hanges which are made in the menu and vice versa if the setting is changed via the keypad the on screen menu will follow 5 5 5 Anamorphic De Squeeze The HD IVS can de squeeze images from anamorphic lenses in a morphing factor of 2 or 1 3 If a factor 2 anamorphic lens is used the IVS will squeeze the image by a factor of 2 center it on the monitor screen and fills the rest with black lines For this...

Страница 62: ... 6 Image Flip The HD IVS can flip the image on the screen vertically and horizontally if necessary Move the cursor by using the keys Ê and Ë to the line IMAGE FLIP Photo Pressing the key Í will switch from OFF to horizontal H vertical V 180 rotated H V and back to OFF The key Ì will switch in opposite direction Note To avoid confusion the HD IVS will always power up in the mode IMAGE FLIP OFF ...

Страница 63: ...er Insert key Ñ is on there will always be data in this output This is necessary because if the output is switched to data off no insert would be available and therefore it would be impossible to go back into the on screen menu to change the settings Move the cursor by using the keys Ê and Ë to the line MINI MON DATA Photo Pressing the key Í or Ì will switch insertion of data in the mini monitor O...

Страница 64: ...ng form 1 to 3 and after that back to 1 The key Ì will decrease in the opposite direction 5 5 9 Inverse This menu changes the appearance of all manually readable windows The format markings are not changed If inverse OFF is selected the characters will appear white If the background is BOXED it will appear black in this case If inverse ON is selected the characters will appear black If the backgro...

Страница 65: ...and Ë to the line EXIT Photo and press the key Í or Ì Note Pressing the Enter Insert key for more than three seconds will cause the system to exit the on screen programming mode completely regardless of which menu is activated with the exception of the positioning mode and the color bars ...

Страница 66: ...immediately active Check all settings on the connected monitor Enter the Format Marking submenu from the main menu 5 6 1 Activate Format Markings If the electronic format markings are not parallel to the ground glass format markings readjust the CCD chip with the alignment screw as shown in chapter 4 3 Alignment of the Image Position X Y and Rotation Note Only active frame lines can be positioned ...

Страница 67: ... format 2 make sure that FORMAT 2 or FORMAT 1 2 is selected To match the electronic format markings with the ground glass markings proceed as follows Point the film camera towards a bright object so that the format markings on the ground glass are clearly visible Move the cursor by using the keys Ê and Ë to the line POSITION 1Ö Photo or POSITION 2Ö Photo depending on whether format 1 or format 2 s...

Страница 68: ...dark gray 1 and light gray 2 or white 3 Note This function is only available if at least one format marking is activated Move the cursor by using the keys Ê and Ë to the line WHITE LINE Photo Pressing the key Í will switch the settings form 0 to 1 to 2 to 3 and back to 0 pressing the key Ì will switch the settings in the opposite direction 5 6 4 Outside Darkening the Area outside of the Format Mar...

Страница 69: ...he settings in the opposite direction 5 6 5 Exit Use exit to return to the main menu Move the cursor by using the keys Ê and Ë to the line EXIT Photo and press the key Í or Ì Note Pressing the Enter Insert key for more than three seconds will cause the system to exit the on screen programming mode completely regardless of which menu is activated with the exception of the positioning mode and the c...

Страница 70: ...e connected monitor Enter the Compare Store submenu from the main menu 5 7 1 View Mode VIEW MODE allows selecting whether a live image a stored image or both images alternating are displayed Please see next chapter 5 7 2 Store Image how to store an image onto the internal memory A stored image can only be an image on the internal memory If an image on the USB stick is to be used either for the sto...

Страница 71: ...s always in the LIVE mode after power up in order to avoid a frozen image on the screen 5 7 2 Store Image to Internal Memory The HD IVS can store an image to its internal memory display that or overlay it against the live image in front of the camera to compare both images Parallel to pressing the Enter Insert key Ñ shortly less than 1 5 seconds the STORE IMAGE command in the on screen program mod...

Страница 72: ...1 5 seconds the store image command in the on screen program mode will grab an image independently of the selected display mode Please see last chapter 5 7 1 View Mode for information on different display modes e g Live Store and Compare Make sure that an USB stick is inserted in the USB port Move the cursor by using the keys Ê and Ë to the line STORE IMAGE Pressing the key Í or Ì will store the i...

Страница 73: ...e set between 01 and 10 Move the cursor by using the keys Ê and Ë to the line IMAGE NUMBER Photo Pressing the key Í or Ì will increase or decrease the file number The information whether the file is FREE or already USED on the USB stick is displayed IMAGE FORMAT This setting will set the file format either to JPG or to TIF Move the cursor by using the keys Ê and Ë to the line IMAGE FORMAT Photo Pr...

Страница 74: ...it from the USB stick into the internal memory first and apply the stored or compare software in a second step See chapter 5 7 1 View Mode for details For this the files in the YUV format raw format of the image sensor have to be used which are stored on the USB stick parallel to the selected file format TIF or JPG See chapter 5 7 3 Store image to USB stick The line READ FROM USB will transfer one...

Страница 75: ...ll determine the file which will be loaded It can be set between 01 and 10 Move the cursor by using the keys Ê and Ë to the line IMAGE NUMBER Photo Pressing the key Í or Ì will increase or decrease the file number EXIT This setting will cause the software to return to the menu compare store Move the cursor by using the keys Ê and Ë to the line EXIT Photo and press the key Í or Ì Note Pressing the ...

Страница 76: ...and Ë to the line EXIT Photo and press the key Í or Ì Note Pressing the Enter Insert key for more than three seconds will cause the system to exit the on screen programming mode completely regardless of which menu is activated with the exception of the positioning mode and the color bars ...

Страница 77: ...s Data LDS and status information into the video image The setting SYSTEM INFO inserts information from the film camera such as Movement open Async Inching Low Battery Dust Check etc When the status line is switched on an additional line will appear similar to this MOVEMENT OPEN ...

Страница 78: ... F Film Counter Counter is meter M foot FT or seconds s The film counter gets its data from the film camera Therefore the data on the HD IVS is identical to the data in the film camera If the film counter is in the take mode the data in meter foot or seconds of the last take are displayed In the mode footage the added length of the film through the camera in meter or feet is displayed Note During ...

Страница 79: ...Level an inverse display is described in chapters 5 5 9 Inverse All changes are immediately active Check all settings on the connected monitor Enter the System LDS Status submenu from the main menu 5 8 1 System Info This sub menu setting switches the insertion of camera system data ON and OFF independently of other inserted data Move the cursor by using the keys Ê and Ë to the line SYSTEM LINE Pho...

Страница 80: ...lar to the one below will appear UP65MM 65MM 12 0 7 17M 4 20M 22 10M Placement Position and Background is only available if at least one of the three lines is on Film Counter is only available if the Status Line is on 5 8 3 Status Info This sub menu setting switches the insertion of camera status data ON and OFF independently of other inserted data Move the cursor by using the keys Ê and Ë to the ...

Страница 81: ... either as lines on the screen mode LINE or on the right hand side of the screen mode BLOCK which is particularly helpful if a 4 3 image is used POSITION is only available if at least one of the three lines is on Move the cursor by using the keys Ê and Ë to PLACEMENT Photo Change the placement mode from LINE to BLOCK and back with the keys Í or Ì The text layout in mode BLOCK is designed so that t...

Страница 82: ...ng menu is displayed on the screen POSITION v E The keys Ê and Ë move the info window up and down When the desired position has been set confirm by pressing the Enter Insert key Ñ 5 8 6 Background The background of the info window can be set electronically to black in normal display mode or to white in inverse mode BOXED to improve the readability If this is not activated the area around the text ...

Страница 83: ...l switch in the reverse order Note The scale units meter or feet is taken over from the setting of the camera If meters are selected in the camera the data in the HD IVS will also be displayed in meters 5 8 8 Exit Use EXIT to return to the main menu Move the cursor by using the keys Ê and Ë to the line EXIT Photo and press the key Í or Ì Note Pressing the Enter Insert key for more than three secon...

Страница 84: ...a rental house to store information which is then available to the production team This might for example be the production name Like all manually readable information the data is inserted as a window on the monitor image The user text window can be switched on and off independently Background position and character format can be altered without affecting the settings of other windows This additio...

Страница 85: ...ntly of other inserted data Move the cursor by using the keys Ê and Ë to the line USER TEXT LINE Photo The keys Í or Ì switch the insertion on and off The default text is in dotted characters 5 9 2 Edit Text The text can be edited on the HD IVS without the use of additional devices Move the cursor by using the keys Ê and Ë to the line EDIT TEXT Photo Activate the edit menu with the keys Í or Ì Thi...

Страница 86: ...s found move the text inserter cursor X to the next position To leave the text edit mode press the Enter Insert key Ñ This will lead back to the user text menu 5 9 3 Clear Text The user text line can be cleared on the HD IVS without an external device When the text is cleared the default line a dotted line will appear A cleared line cannot be recalled any more Move the cursor by using the keys Ê a...

Страница 87: ... a 4 3 image is used POSITION is only available if at least one of the three lines is on Move the cursor by using the keys Ê and Ë to the line PLACEMENT Photo Using the keys Í or Ì will change the placement mode from LINE to BLOCK and back The text layout in mode BLOCK is designed so that the readability is best Therefore the order of information is different than in the LINE mode ...

Страница 88: ...splayed on the screen POSITION v E The keys Ê and Ë move the window up and down When the desired position has been set confirm by pressing the Enter Insert key Ñ 5 9 6 Background The background of the window can be set electronically to black in normal display mode or to white in inverse mode BOXED in order to improve readability If it is not activated the area around the text is the normal video ...

Страница 89: ...d Ë to the line EXIT Photo and press the keys Í or Ì Note Pressing the Enter Insert key Ñ for more than three seconds will cause the system to exit the on screen programming mode completely regardless of which menu is activated with the exception of the positioning mode and the color bars ...

Страница 90: ...GC technology delivers clean and sharp preview images without any distracting texture The visibility of the ground glass texture depends on the f stop of the film camera lens It is more visible if the camera lens is stopped down To get the best possible cancellation of the texture it is necessary to record a series of three calibration images at different f stops and to apply one of the three cali...

Страница 91: ...N OFF Parallel to the control via the keyboard the CCD software can be switched on and off via the on screen menu Move the cursor by using the keys Ê and Ë to the line GGC Photo Pressing the keys Í or Ì will switch GGC off and on If manual GGC is on the LED on the keyboard will be on The LED on the keyboard will follow the changes which are made in this menu and vice versa if this setting is chang...

Страница 92: ...e film camera lens It is more visible if the lens is stopped down In order to allow a choice between best results and easy operation the HD IVS offers two different modes for GGC Advanced mode In the advanced mode a series of three calibration images is recorded on different f stops 2 8 8 and 16 In this operation mode the HD IVS switches between those three calibration images if the iris is change...

Страница 93: ...m the initial situation e g the calibration image was taken at T stop 5 6 and the used T stop is 2 the results will be below the best possible result As this mode is mainly used if no Lens Data Lenses or Lens Control Motors are used there is no software support to record the calibration image There is however a wizard which guides the user through the process In live mode there is a difference whe...

Страница 94: ...and Lens Control Motors Move the cursor by using the keys Ê and Ë to the line ADJUST Photo Pressing the keys Í or Ì will activate the wizard depending on the setting GGC MODE and if LDS Lenses and Lens Control Motors are used If there is not enough or too much light for this procedure or if the chart is unevenly lit the wizard will stop and a warning will appear Increase or decrease the light on t...

Страница 95: ... using the keys Ê and Ë to the line GGC MODE Photo Pressing the keys Í or Ì will switch between BASIC and ADVANCED ADV Move the cursor by using the keys Ê and Ë to the line START WIZARD Photo Pressing the keys Í or Ì will start the wizard Follow the instructions Note EXIT will cancel the procedure Start wizard Confirm with key Í or Ì ...

Страница 96: ... Ë to the line GGC MODE Photo Pressing the key Í or Ì will switch between BASIC and ADVANCED ADV Move the cursor by using the keys Ê and Ë to the line START WIZARD Photo Pressing the key Í or Ì will start the wizard Follow the instructions Note EXIT will cancel the procedure Confirm with keys Í or Ì Start wizard Confirm with keys Í or Ì Repeat for T8 and 16 ...

Страница 97: ...nd Ë to the line EXIT Photo and press the keys Í or Ì Note Pressing the Enter Insert key Ñ for more than three seconds will cause the system to exit the on screen programming mode completely regardless of which menu is activated with the exception of the positioning mode and the color bars ...

Страница 98: ...of the previous image because of the compensation of the different frame rates between the film camera and the HD link speed This additional line shows the Time Code User Bit and Pull down information 29012009 12 34 56 A1 Note The frame information the last two digits of the time code display is only active if time code is actually recorded on film If there is no time code recording on film becaus...

Страница 99: ...s a reference between an image of the HD IVS and an image on the film Therefore Edit Decision Lists EDL based on HD IVS images can be used to edit the film This setting switches the insertion of Time Code information ON and OFF independently of other inserted data Move the cursor by using the keys Ê and Ë to the line TIME CODE TIME Photo The keys Í or Ì switch the insertion on and off Note The ins...

Страница 100: ...n information displays that in manually readable form The HD Link speed of the HD IVS can be set to one of the following five speeds 23 976 24 25 29 97 and 30 FPS The ARRICAM ST can run anywhere between 1 and 60 FPS Sometimes it is necessary to use a different HD Link speed than the standard 24 FPS frame rate of a film camera e g because of recording or post production requirements In that case th...

Страница 101: ...ition of A1 B2 would be the first repetition of B1 and B3 would be the second repetition In spite of the fact that the name Pull Down comes from the working practice in the NTSC systems where on a telecine the film is running on 23 976 fps and gets converted to 29 97 fps the definition of Pull Down information on the IVS can also be applied to any combination between HD Link speed and film camera ...

Страница 102: ...visible if at least one of the three items is ON 5 11 4 Placement Placement is only available if at least one of the three items Time Code User Bits or Pull Down is on Note The Time Code window can be positioned either as lines on the screen LINE mode or on the right hand side of the screen BLOCK mode which is particularly helpful if a 4 3 image is used Move the cursor by using the keys Ê and Ë to...

Страница 103: ...n mode LINE see last chapter 5 11 4 Placement The Time Code window can be positioned anywhere on the monitor screen Move the cursor by the keys Ê and Ë to the line POSITION Photo Activate the positioning mode with the keys Í or Ì The following menu is displayed on the screen POSITION v E The keys Ê and Ë move the window up and down When the desired position has been set confirm by pressing the Ent...

Страница 104: ... code In this mode the frame counter of the time code the last two digits of the time code display is increased by 1 if the film is advanced by one frame e g 24 times a second at 24 fps By this it is easy to identify one particular film frame by looking at the video image On the other hand this mode will create an unusual time code count because some video images are repeated to cope with the diff...

Страница 105: ... Photo The keys Í or Ì switch between FILM and VIDEO 5 11 8 Exit Use exit to return to the main menu Move the cursor by using the keys Ê and Ë to the line EXIT Photo and press the key Í or Ì Note Pressing the Enter Insert key Ñ for more than three seconds will cause the system to exit the on screen programming mode completely regardless of which menu is activated with the exception of the position...

Страница 106: ...Time Code ON OFF Time Code is a method of identifying individual film frames For this every image gets a time stamp as HH MM SS FF H hours M minutes S seconds and F frames Therefore a Time Code might be 12 23 32 02 showing when the film frame was recorded the so called time of day system The same time code can be recorded on the film inside the film camera and on the image of the HD IVS This creat...

Страница 107: ...tches the insertion of Variframe Flags in the HD SDI signal ON and OFF independently of other inserted data Move the cursor with the keys Ê and Ë to the line VARIFRAME FLAG Photo The keys Í or Ì switch the insertion on and off 5 12 3 Exit Use EXIT to return to the main menu Move the cursor by using the keys Ê and Ë to the line EXIT Photo and press the keys Í or Ì Note Pressing the Enter Insert key...

Страница 108: ...he software of the HD IVS and to compensate defect pixels on the CCD Sensor When software updates become available they will be sent by ARRI It is then necessary to transfer the software onto an USB stick prior to update of the HD IVS All changes are immediately active Check all settings on the connected monitor Enter the Service submenu from the main menu ...

Страница 109: ... SW VERSIONS Photo Pressing the keys Í or Ì will check for software on the USB stick and display the version number 5 13 2 UPDATE This line starts the software update procedure Software from the USB stick is loaded into the HD IVS and replaces the current software Move the cursor with the keys Ê and Ë to the line UPDATE Photo The keys Í or Ì will start the software update procedure It is necessary...

Страница 110: ...on about the update process is displayed e g DELETING I FLASH PLEASE WAIT or I FLASH WRITE STATUS 17 The HD IVS will restart at the end of the update procedure automatically 5 13 3 PIXEL CORRECTION High definition image sensors with a resolution of 1920 x 1080 pixels contain more than two million individual photo receivers It is almost impossible to produce sensors where all pixels function correc...

Страница 111: ...have the HD IVS running for at least 45 minutes and make sure that the HD IVS does not get any light e g by closing all camera apertures using lens caps closing the ocular and applying all other covers The HD IVS will look for all pixels which do not show the average black level and cover them up Move the cursor with the keys Ê and Ë to the line AUTODETECT Photo The keys Í or Ì will start the proc...

Страница 112: ...e control menu is on the left side of the screen overlaying the image Therefore dead pixels beneath this menu can not be seen To show them it is possible to move the menu to the right side of the screen Move the cursor with the keys Ê and Ë to the line MOVE MENU Photo The keys Í or Ì will move the menu EXIT Use EXIT to return to the service menu Move the cursor with the keys Ê and Ë to the line MO...

Страница 113: ...nd Ë to the line EXIT Photo and press the keys Í or Ì Note Pressing the Enter Insert key Ñ for more than three seconds will cause the system to exit the on screen programming mode completely regardless of which menu is activated with the exception of the positioning mode and the color bars ...

Страница 114: ... off switch see chapter 4 1 it is possible to get a summary of the settings in use Check all settings on the connected monitor Enter the Check information from the main menu An overview similar to this Photo will appear No adjustments can be made within this menu ...

Страница 115: ...put HD SDI switchable with or without graphic overlay Internal processing bit depth 12 Output bit depth 10 Color sampling 4 2 2 Output modes progressive progressive segmented frame or interlaced HD SDI Link speeds 23 976 24 25 29 97 and 30 FPS Options IVS lenses for 4 3 or 16 9 image content on HD monitor White balance indoor outdoor automatic manual and One Push White Gain Automatic and Manual ...

Страница 116: ... 59 F Film Counter 83 Film Related Time Code 104 Flicker Free On Off 58 Focus Adjustment 27 Format Marking 43 Format Marking Menu 66 Activate 66 Brightness 68 Darkening the outside Area 68 Exit 69 Positioning 67 White Level 68 Frame Information 98 Frame Store and Compare 70 Framecounter 104 Film 104 Video 104 G Gain Control 32 33 Automatic 32 Manual increase decrease 32 34 Gain Control On OFF 54 G...

Страница 117: ...ame Flag ON OFF 107 META DATA Menu 106 Mini Monitor Output 23 63 Move Menu 112 O One push white 51 One Push White 28 30 On Screen Displays 43 Program Menu 45 Order Numbers 12 OTD 28 Outdoor 28 Outputs 22 115 General 22 HD SDI Outputs with overlay 22 HD SDI Outputs without overlay 22 Mini Monitor 23 P Pixel Correction 110 111 Power Consumption 115 Product Identification 7 Pull Down ON OFF 100 Pull ...

Страница 118: ...9 User Text Menu 84 Background 88 Clear Text 86 Edit Text 85 Exit 89 Position 88 User Text Line 85 V Variframe Flag 107 Video Standard Controls 25 Video Adjust Menu Anamorphic De Squeeze 61 Exit 65 Exposure 59 Flicker Free On Off 58 HD Link Speed 60 Image FlipMini 62 Invers 64 Mini Monitor Output 63 White Level 61 64 Video Adjustment Menu 58 Video Related Time Code 104 W Warning Signs 5 WB Gain Ba...

Страница 119: ...ord Road Uxbridge Middlesex UB8 1LX phone 0 1895 457 000 fax 0 1895 457 001 e mail service arri gb com Italy ARRI ITALIA S R L Viale Edison 318 20099 Sesto S Giovanni Milano phone 02 26 22 71 75 fax 02 242 1692 e mail info arri it ARRI ITALIA S R L Via Placanica 97 00040 Morena Roma phone 06 79 89 021 fax 06 79 89 02 206 e mail info arri it Asia ARRI ASIA Ltd Room 290 3B 29 F The Centrium 60 Wyndh...

Отзывы: