189
7-6.
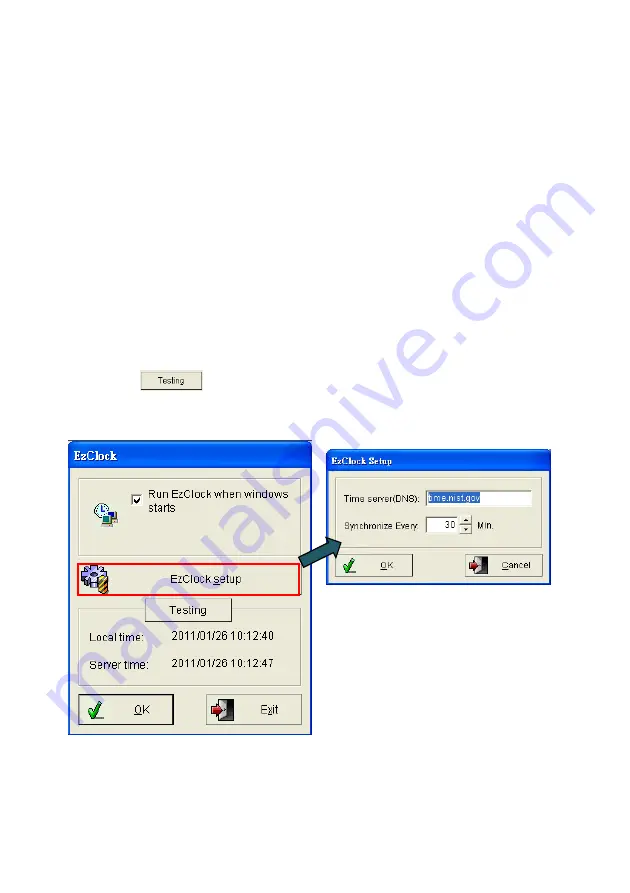
Auto-synchronized time - EzClock
Sometimes the NVR’s clock time can become behind or forward compared to the actual time.
“
ezClock
” will automatically adjust the user’s NVR’s clock every once in a while, depending on the
user’s setting in the ezClock setup. This section will show the user how to set up ezClock.
Step 1.
Click “
ezClock
” from “
ezTools
”
Step 2.
Check “
Run ezClcok when windows starts
” to automatically run ezClock when the user turns
on the PC.
Step 3.
Click “
ezClock Setup
“ button and type the user’s favorite Time Server’s DNS address or IP
address that the user would like to use to synchronize the NVR’s clock, or simply keep the
default Standard Time Server as it is.
Step 4.
Type the duration to synchronize the clock of Witness Pro with the selected Time Server in the
“
Synchronize Every
” field.
Step 5.
Click “
” to test the local time and Server time.
Step 6.
Click “
OK
” to complete the setup.
Step 7.
Содержание AnyNet-12824
Страница 1: ...1 Version 5 3 Doc No 2020031501...
Страница 18: ...18 Step 6 Click Yes to confirm the Raid parameters setting and then the Raid mode will show as below...
Страница 19: ...19 Step 7 Click the Finish icon and Ok to confirm the Raid setting...
Страница 37: ...37 3 2 NVR Main Program 3 2 1 System Configuration Diagram...
Страница 47: ...47...


