


Control Panel
79
Enova Digital Media Switchers - Hardware Reference Manual
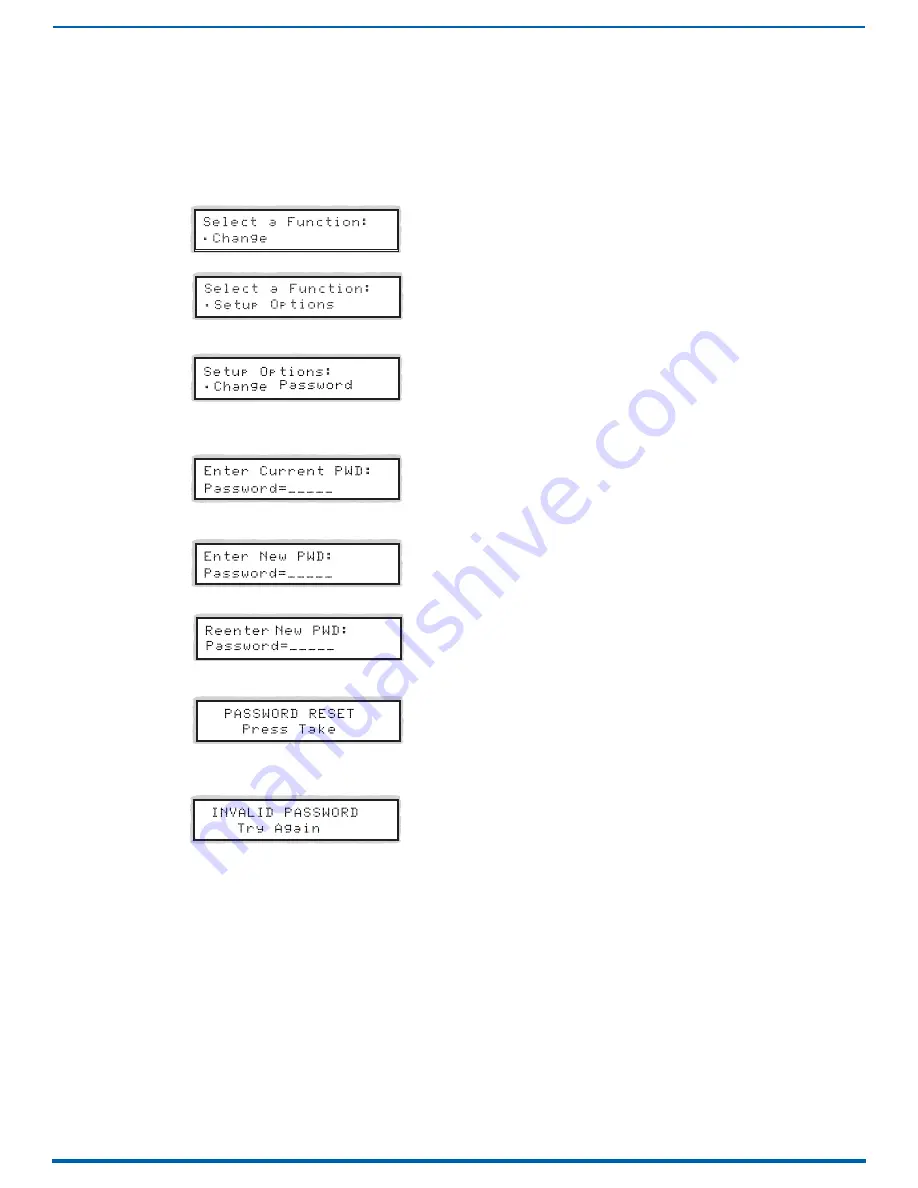
Setting the Password
The Enova DGX Control Panel’s default password is "
1 2 3 4 5
" entered using the first five input keys. A new password can
be set using any combination of five of the Input keys 1 through 8 when the LCD displays "
Enter New PWD
" (Step 5 in the
following procedure).
CAUTION:
Record the new password in a secure place; the Control Panel cannot be used to retrieve a lost password.
If the password is lost while the system is locked, contact technical support.
1.
Press the
Function
key. The Function menu appears.
2.
Locate
Setup Options
by scrolling with the Control Dial.
3.
Press the
Select
key. The Setup Options sub-menu appears. Locate
Change Password
by scrolling with the Control
Dial.
4.
Press the
Select
key. The LCD displays the prompt
Enter Current PWD
. Using the illuminated keys, input the current
password.
The default password is
1 2 3 4 5
.
5.
The LCD displays the prompt
Enter New PWD
. Using any combination of the illuminated keys, input the new password.
To change any entries, press the Cancel key – restarting the process – and reenter from the start.
The LCD displays
Reenter New PWD
.
6.
Re-enter the new password. If the re-entered password matches, the system accepts it as the new password, and
the LCD displays
Password Reset
. Press the
Take
key and go to Step 7.
- or -
If the re-entered password does not match, the LCD displays
Invalid Password
. Press the
Cancel
key to return to Enter
New PWD screen and repeat Steps 5 and 6.
7.
When the new password is successfully reset, press the
Cancel
key to return to the Setup Options sub-menu.
- or -
Press the
Function
key to return to the Function menu.
System Error Codes and Troubleshooting
This section provides an overview of the most common error codes that may appear on an Enova DGX Control Panel. The
table below lists the error code, the name of the code, the meaning of the code, and some basic troubleshooting
strategies (additional error code troubleshooting strategies are included on page 80).
The codes in the table are not intended to be comprehensive.
NOTE:
If an error code appears that is not listed, note the specific number and contact technical support.
The first letter of the error code indicates the following:
E = Error
W = Warning
A = Alarm
*
(requires immediate attention)
I = Information
*


