Goliath PCI Pentium Pro EISA System User’s Guide
22
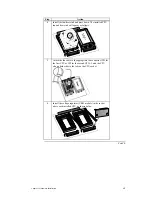
Step 4 Install the Baseboard
The baseboard mounting hole pattern is the same as the mounting hole pattern
on the standard full-size AT baseboard. The chassis manufacturer should
supply standoffs and screws.
Step
Action
1
Place the chassis on an anti-static mat. Connect the chassis to ground to
avoid static damage during installation. Connect an alligator clip with a
wire lead to any unpainted part of the chassis. Ground the other end of
the lead at the same point as the mat and the wristband.
2
Rotate the chassis so the front is to the right. The side facing you is
where the baseboard is mounted. The power supply is mounted at the
far end of the chassis.
3
Hold the baseboard, component-side up, with the edge with the power
supply connector away from you. The keyboard and mouse should be to
the left.
4
Carefully slide the baseboard into the chassis. Make certain the edge
connectors fit the ports in the rear of the chassis. The baseboard should
rest level with the chassis.
5
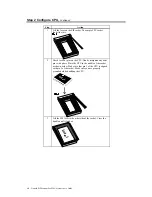
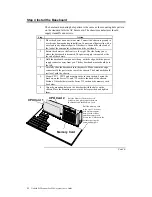
Mount CPU 1, CPU 2 and memory cards in their sockets. Fasten the
brackets on the Series 731 and 732 cards to the back of the chassis.
Fasten a U-bracket between the Series 732 card and the memory card.
See below.
6
Align the mounting holes on the baseboard with the holes on the
chassis. Place the mounting screws in the holes provided and tighten
them.
CPU Card 1
CPU Card 2
Memory Card
Bolt the Memory Card to the steel
bracket with a plastic spacer between
the bracket and the Memory Card.
Bolt the memory card
to the steel U bracket
with a plastic spacer
between the bracket
and the memory card.
Secure the U bracket to the
baseboard using the
screw and nut pair.
Cont’d
Содержание Goliath
Страница 1: ...Goliath PCI Quad Pentium Pro EISA System User s Guide MAN 730 6 7 96 ...
Страница 45: ......
Страница 71: ...Goliath PCI Pentium Pro EISA System User s Guide 66 ...
Страница 77: ...Goliath PCI Pentium Pro EISA System User s Guide 72 ...
Страница 78: ...Chapter 3 Programming the Flash ROM 73 A Mechanical Drawings ...
Страница 79: ...Goliath PCI Pentium Pro EISA System User s Guide 74 ...
Страница 80: ...Chapter 3 Programming the Flash ROM 75 ...

