


AMI Baby Voyager User's Guide
19
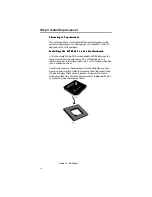
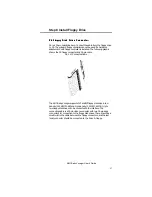
Step 5 Connect the Power Supply
The power supply should match the physical configuration of the
chassis. Make sure that the power switch is Off. Before attaching all
components, make sure that the proper voltage has been selected.
Power supplies often can run on a wide range of voltages, but must
be set (usually with a switch) to the proper range. Use at least a 200
watt (or larger) power supply, which should have built-in filters to
suppress radiated emissions. The filters can help the system pass the
appropriate FCC certification testing.
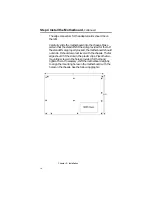
The power supply is connected to P1 and P2 on the motherboard.
The connectors should be keyed to prevent connecting the plugs to
the wrong connectors. The keys on the connector must be cut to fit
on some power supplies.
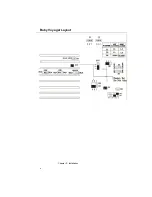
See the following figure for the location of connectors P1 and P2. AT-
compatible power supplies have two 6-pin connectors that are
inserted in P1 and P2. The 6-pin connector with 3 red wires and 2
black wires is connected to P2 and the remaining 6-pin connector is
connected to P1.
Содержание 39 Series
Страница 6: ...Preface vi ...
Страница 12: ...Chapter 1 Introduction 6 ...
Страница 14: ...Chapter 2 Installation 8 Baby Voyager Layout ...
Страница 26: ...Chapter 2 Installation 20 ...
Страница 69: ...AMI Baby Voyager User s Guide 63 ...