108
801683
Section 5 Service Procedures
© Copyright, Alliance Laundry Systems LLC – DO NOT COPY or TRANSMIT
To reduce the risk of electric shock, fire, explosion, serious injury or death:
• Disconnect electric power to the washer before servicing.
• Never start the washer with any guards/panels removed.
• Whenever ground wires are removed during servicing, these ground wires must be
reconnected to ensure that the washer is properly grounded.
• Motor not grounded! Disconnect electric power before servicing motor.
W485
WARNING
49. FRONT PANEL
a.
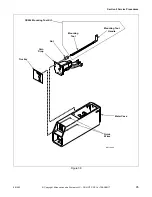
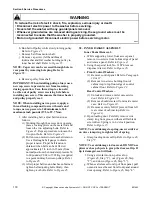
Front Control Washers –
(1) Unlock control panel. Refer to
,
Step “1”.
(2) Pull top of control panel away from control
cabinet far enough to allow lifting control
panel up and off the rail support of the
control cabinet. Refer to
, Step
“2”.
(3) Remove control panel away from control
cabinet as far as wires permit. Refer to
, Step “3”.
(4) Working through control panel opening,
remove two screws holding bottom flange
of control cabinet front to top flange of
front panel. Refer to
.
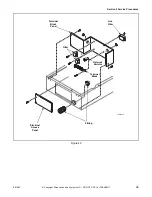
b. While supporting lower access panel, Remove
two screws from bottom edge of panel and
remove panel. Refer to
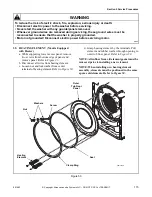
c. Using the special tool, No. 318P4, remove
dispenser drawer. Refer to
.
d. Remove bottom two front panel corner screws.
.
e. Open loading door. Carefully remove wire
clamp ring from groove with small flat blade
screwdriver. Spring is in 6 o’clock position.
Refer to
.
NOTE: To avoid damage to spring, use screwdriver
on wire clamp ring to right or left of spring.
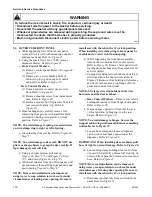
f. Grasp loading door seal lip. Refer to
Step “1”.
NOTE: To avoid damage to door seal, DO NOT use
pliers or sharp objects to grasp the door seal lip. If
lip is damaged, seal will leak.
g. Using a circular motion, pull seal up
(
, Step “1”), out (
, Step
“2”), and down (
, Step “3”).
h. When seal releases from lip of front panel, pull
out and remove the seal from front panel around
door opening. Refer to
, Step “4”.
NOTE: The ease of installation of the loading door
can be improved using water or soapy solution to
work seal around circumference of loading door. Be
sure to install seal with the tab in the 12 o’clock
position when installing the wire clamp ring to front
panel. Be careful not to overstretch tension spring.
i. Remove front panel (with loading door
attached) away from washer as far as wires
permit.
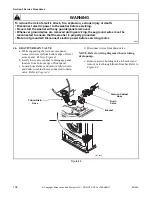
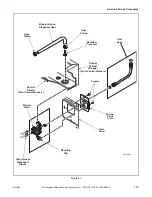
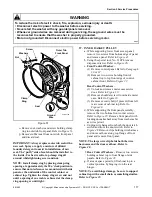
j. Unplug wire harness from both the door latch
switch and from the door switch. Refer to
. Remove clips holding wire harness
and door seal hose along top flange of front
panel and remove front panel.
NOTE: Door seal hose and wire harness must be
reinstalled in the appropriate clips and holes along
top flange of front panel. Refer to Figure 48.
Содержание HWFB61QN1102
Страница 2: ......
Страница 14: ...12 801683 Section 2 Introduction Copyright Alliance Laundry Systems LLC DO NOT COPY or TRANSMIT Notes ...
Страница 70: ...68 801683 Section 4 Grounding Copyright Alliance Laundry Systems LLC DO NOT COPY or TRANSMIT Notes ...
Страница 138: ...136 801683 Section 6 Adjustments Copyright Alliance Laundry Systems LLC DO NOT COPY or TRANSMIT Notes ...

