Alan MAP600 Скачать руководство пользователя страница 20

MAP 600 – User’s Manual 

Page 20 


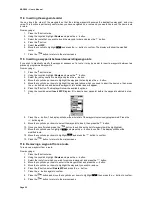
c)  Once the information has been displayed, press the 

 button to return to the main menu. 

8.8.b 

Files in CF 

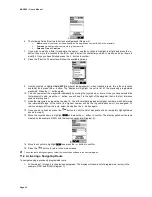
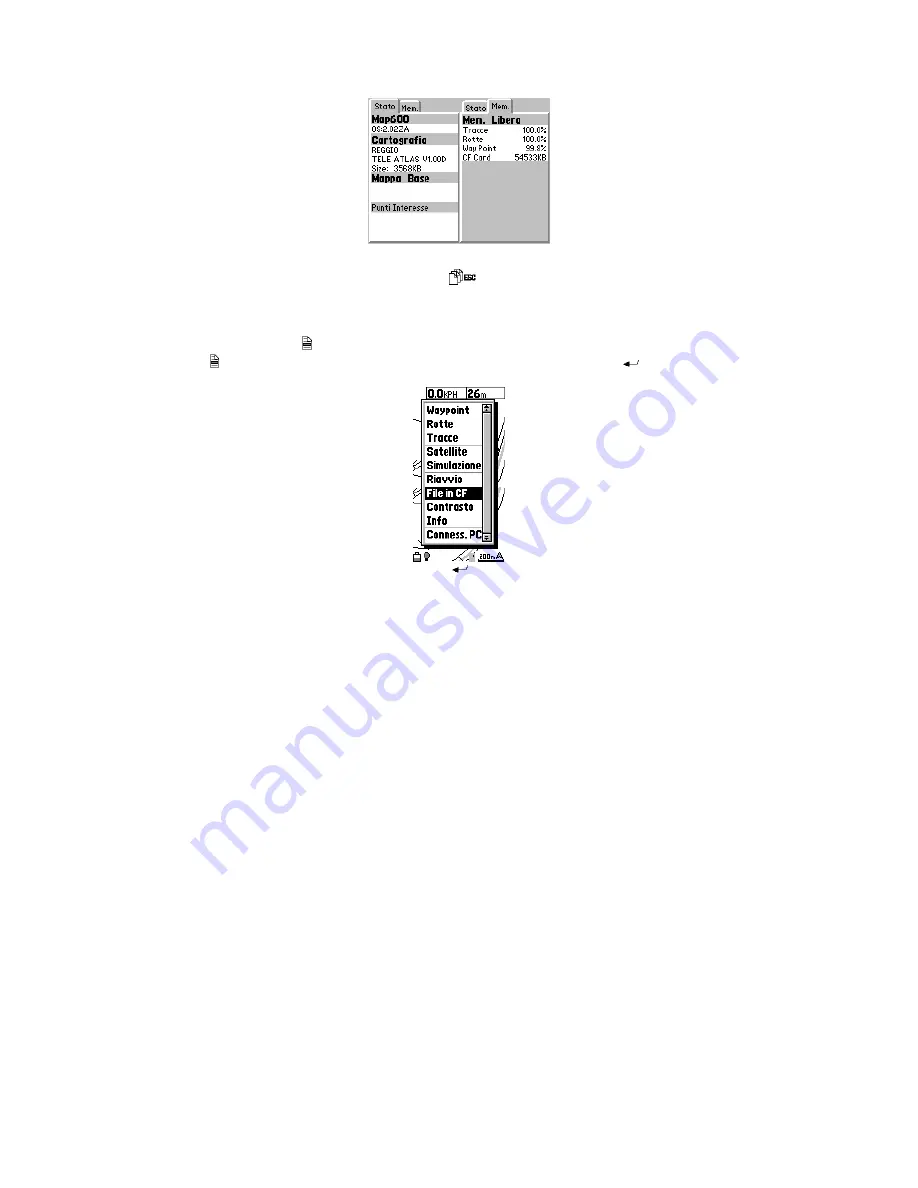
This menu allows displaying and selecting the files in the CF card: 

a)  From any page, press the   button twice, or  

press the   button once, then highlight 

Main Menu

 with the Joystick and press the 

 button. The display will 

show: 


b)  With the Joystick, highlight Files in CF and press the 

 button. A page will appear showing the files contained in 

the CF, their size, the creation date and time. 

c)  From this page, it is possible to modify the *.arl file that Alan MAP600 shows on the display, and delete file or 

format the CF card. 

Содержание MAP600

Страница 1: ......

Страница 2: ...t 12 7 Main pages 12 7 1 Selecting the main pages 13 7 2 Rotating the main pages 13 7 3 Display backlight 14 7 4 Adjusting the display contrast 14 8 Navigating the Command Menus 15 8 1 System Setting...

Страница 3: ...nserting a waypoint between two existing waypoints 35 11 6 Removing a waypoint from a route 35 11 7 Removing all the waypoints from a route and creating a new route 36 12 Navigator AutoRoute 37 12 1 a...

Страница 4: ...ing pay attention to your driving When the sockets are not in use cover them with the rubber cover to protect them Observe all precautions regarding use of the batteries as described further in Chapt...

Страница 5: ...l information correction obtained by the use of the WAAS and EGNOS technology Fully waterproof Alan MAP 600 is suitable for the most extreme conditions such as outdoors or over a motorcycle use Please...

Страница 6: ...ages exit to select the main pages screens and going backwards through the command menus without creating or changing settings 6 direction Joystick to use different functions such as scrolling through...

Страница 7: ...nsufficient visibility of the sky e g inside a vehicle 15 Beeper Acoustic signaling that indicates the approaching to a turn by a beep please refer to par 8 2 e Do not connect the battery charger when...

Страница 8: ...ve the lever of the battery well cover to the centre and pull it out diagram 1 b Remove the battery well cover c Install 2 fully charged AA batteries paying attention to the polarities as shown on the...

Страница 9: ...ning battery charge a full icon indicates the higher battery charge an empty icon indicates a low battery charge To switch to the Satellite page please refer to par 7 1 2 Similar to fuel indicators on...

Страница 10: ...car For a better GPS signal acquisition we suggest to use it in conjunction with an external antenna 3 Data Cable It is possible to connect MAP600 to a PC through two different cables a Serial Cable R...

Страница 11: ...ion survey as described in par 5 2 c This procedure consists of three steps that have to be executed with the following order Positioning and first start up Initialization Establishing of position 5 2...

Страница 12: ...ditional Routes consist of at least two or more waypoints that specify a route to a destination You can specify up to 50 routes each of them with up to 150 waypoints This function drives you from the...

Страница 13: ...her information about the details of each page please refer to Chapt 9 7 2 Rotating the main pages You can rotate the display visualization by 90 degrees in order to take advantage of using the longer...

Страница 14: ...display contrast can be adjusted in two ways as explained below MODE 1 From the Satellite page a Move the Joystick left or right respectively to reduce or increase the contrast During this operation...

Страница 15: ...and quickly access to the functions geographical reference settings routes etc more frequently used Please refer to par 8 1 and 8 8 for details about using the System Setting and Main Menu menus 2 You...

Страница 16: ...interface e g transceiver mapping instrument etc is able to process the data The available settings are Off interface excluded MAP 600 works normally without sending data to the interface On interfac...

Страница 17: ...nglo Saxon countries 8 3 b Language This setting specifies the default language English Dutch Italian German French Spanish 8 3 c DMS Format This setting specifies the DMS display format of degrees mi...

Страница 18: ...to avoid highways if possible Auto Zoom In With this setting MAP600 enables a 50m zoom when a distance of 200mfrom a turn is reached in order to allow you to better understand the route to drive throu...

Страница 19: ...to choose which map file load Please refer to Chapt 5 2 for more information about the use LCD Level By selecting this option it is possible to adjust the display contrast Please refer to Chapt 5 2 f...

Страница 20: ...ss the button twice or press the button once then highlight Main Menu with the Joystick and press the button The display will show b With the Joystick highlight Files in CF and press the button A page...

Страница 21: ...lites at least three dark bars must appear as described in the above description 5 Battery icon indicates the remaining battery power For further details please refer to par 4 3 a 6 Backlight icon ind...

Страница 22: ...own but as soon as you move the Joystick it will appear close to your current position View map mode the display shows an area as you wish not related to your position The cursor is always visible to...

Страница 23: ...two pages will appear Fast and Wildcard From the Fast page it is possible to select the desired Road from a list of all the available roads in the city chosen while from the Wildcard page you can ente...

Страница 24: ...in Autoroute mode i e Start Point End Point etc a Append This function allows to MAKE a Start Point a Middle Point or an end point by selecting one of this options From GPS Current user position Sear...

Страница 25: ...p is automatically oriented towards the direction wherein you are moving Map rotates with 45 steps in order to maintain this orientation In this mode the icon on the upper left corner of the display s...

Страница 26: ...The symbol shows the new position 9 2 h Navigator Menu diagram 6 In order to access to all navigator functions as well as the settings described in par 9 2 e you can enter this convenient menu by pres...

Страница 27: ...ng the button you can access to the following options that can be highlighted with the Joystick and selected by pressing the button Trip Reset It allows to reset the trip start timer Please refer to p...

Страница 28: ...ing to the settings menu For further details please refer to par 8 1 Main Menu It allows accessing to the main menu For further details please refer to par 8 8 To select a desired option use the comma...

Страница 29: ...or press once highlight Main Menu with the Joystick and press the button diagram 1 1 2 Using the Joystick highlight Waypoints and press the button A list of previously programmed waypoints if existin...

Страница 30: ...llow the step 4 described in par 10 1 a this time selecting the Edit command 10 3 Deleting one or more waypoints If you wish to delete a previously programmed waypoint 1 Follow steps 1 through 3 as de...

Страница 31: ...same characters in the same position on the list The character _ underscore in any position automatically accepts any character Example you have 5 waypoints with these names W001 W002 PORT HOME LIGHT...

Страница 32: ...cu late a straight virtual route b Navigator AutoRoute Differently from the traditional routes this function allows to calculate the route following the roadmap It is possible to enter a number of int...

Страница 33: ...the first waypoint to add press the button you will see 1 to the right of the waypoint that is the first reference used as starting point 11 Add other waypoints by repeating the step 10 You will note...

Страница 34: ...route 2 If you wish to turn off the navigation of all routes follow again the above procedure selecti ng Cancel Navi at step 3 11 3 Adding a waypoint to a route To add waypoints to a route 1 Follow st...

Страница 35: ...the button above and below the waypoint two dotted lines will appear 6 Press the button The display will show the available options 7 Using the Joystick select Insert WP Diagram 5 to insert a new way...

Страница 36: ...you wish to remove all the waypoints then press the button 3 Move the Joystick up or down to enter the waypoint list 4 Press the button select Delete All and then press the button 5 Press the button...

Страница 37: ...At this point the page as shown in Diagram 1 will appear 1 2 Select GOTO MAP600 will start to calculate a AutoRoute from the point you are that becomes the start point to the selected point that becom...

Страница 38: ...he three options below a The GPS will start to calculate an AutoRoute to this point b The display will show the selected point c It cancels the search and the GPS will return to the Menu Moreover in t...

Страница 39: ...hown under Tracking Off excluded Fill recording of points until the memory space is filled up to 2500 positions Wrap continuous recording of points when the memory is full new points will substitute t...

Страница 40: ...ected track i e the number of saved points the date and the area of interest to modify the track name and add a comment 13 3 Edit Info Once a track is saved you can edit it and display all the related...

Страница 41: ...4 A completely blank screen will appear Attention MAP600 might seem turned off but it is not 5 Press the menu button to access to a menu 3 6 Select Factory Reset then press the Enter button Diagram 3...

Страница 42: ...lect the correct unit of measurement depending on your current needs and or select the correct reference system 8 3 a GPS has acquired 3 or more satellites but is not displaying your position The acqu...

Страница 43: ...time is multiplied by the speed of light the result is the satellite range distance from satellite to receiver The navigation information provided by each satellite consists of orbital and clock data...

Страница 44: ...0 seconds on average Already warm 15 seconds on average Speed of satellite acquisition every 0 1 second Speed of data update every second Precision Position 5 25 meters Speed within 0 1m second Time 1...

Страница 45: ...ual Every effort has been made to ensure that the information in this document is complete accurate and up to date The manufacturer assumes no responsibility for their real correspondence with the pro...

Страница 46: ...Navigating the command menus 15 Navigation mode 16 NMEA data output 16 On Off 11 Reset Trip Timer 27 Rotating of main pages 13 Route See Routes Routes activating 34 adding a waypoint 35 creating 33 in...

Отзывы: