


6.
Select
which
voltage
or
current
regulation
by
enter
the
number
according
to
instructions
.
Then
press
4
x1
5 .
7.
Enter
the
required
stimulus
start
value
in
volts
or
amps
,
then
press
4
x1
5 .
(Do
not
use
the
hard
key
for
units
,
4
k/m
5
4
M/
5
4
G/n
5 )
8.
Enter
the
required
stimulus
stop
value
in
volts
or
amps
,
then
press
4
x1
5 .
9.
After
the
tens-seconds
measurement
is
completed,
the
message
\complete"
is
displayed.
10.
The
measurement
result
of
channel
1
is
displayed
on
the
User
Trace
1
and
the
meausrement
result
of
channel
2
is
displayed
on
the
User
Trace
2.
11.
Press
4
Ma
rk
er
5
to
display
the
marker
.
12.
When
you
want
to
move
the
marker
to
another
trace
,
press
4
Displa
y
5
NNNNNNNNNNNNNNNNNNNNNNNNNNNNNNNNNNNNNN
DEFINE
TRACE
NNNNNNNNNNNNNNNNNNNNNNNNNNNNNNNNNNNNNNNNNNNN
SELECT
UTRC
[]
and
select
required
user
trace
number
.
13.
When
you
want
to
switch
the
user
trace
to
the
measurement
trace
(data
trace),
toggle
NNNNNNNNNNNNNNNNNNNNNNNNNNNNNNNNNNNNNN
TRACE
[USER]
to
NNNNNNNNNNNNNNNNNNNNNNNNNNNNNNNN
[DATA&MEM]
under
4
Displa
y
5
NNNNNNNNNNNNNN
MORE
.
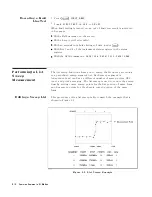
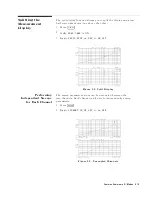
Placing
Characters
on
the
Screen
The
label
function
allows
you
to
place
any
characters
that
the
analyzer
provides
,
anyplace
on
the
screen.
Figure
6-7.
Label
Function
Features
Common
to
All
Modes
6-13
Содержание 4291B
Страница 20: ......
Страница 24: ...Figure 2 1 Contents 2 4 Installation and Set Up Guide ...
Страница 26: ...Figure 2 2 Agilent Part Numbers of Power Cables 2 6 Installation and Set Up Guide ...
Страница 34: ...Figure 2 7 Connecting a Keyboard 2 14 Installation and Set Up Guide ...
Страница 60: ......
Страница 104: ......
Страница 130: ......
Страница 152: ......
Страница 158: ......


