55 Chapter3
•
Click
Apply
button to apply the configuration.
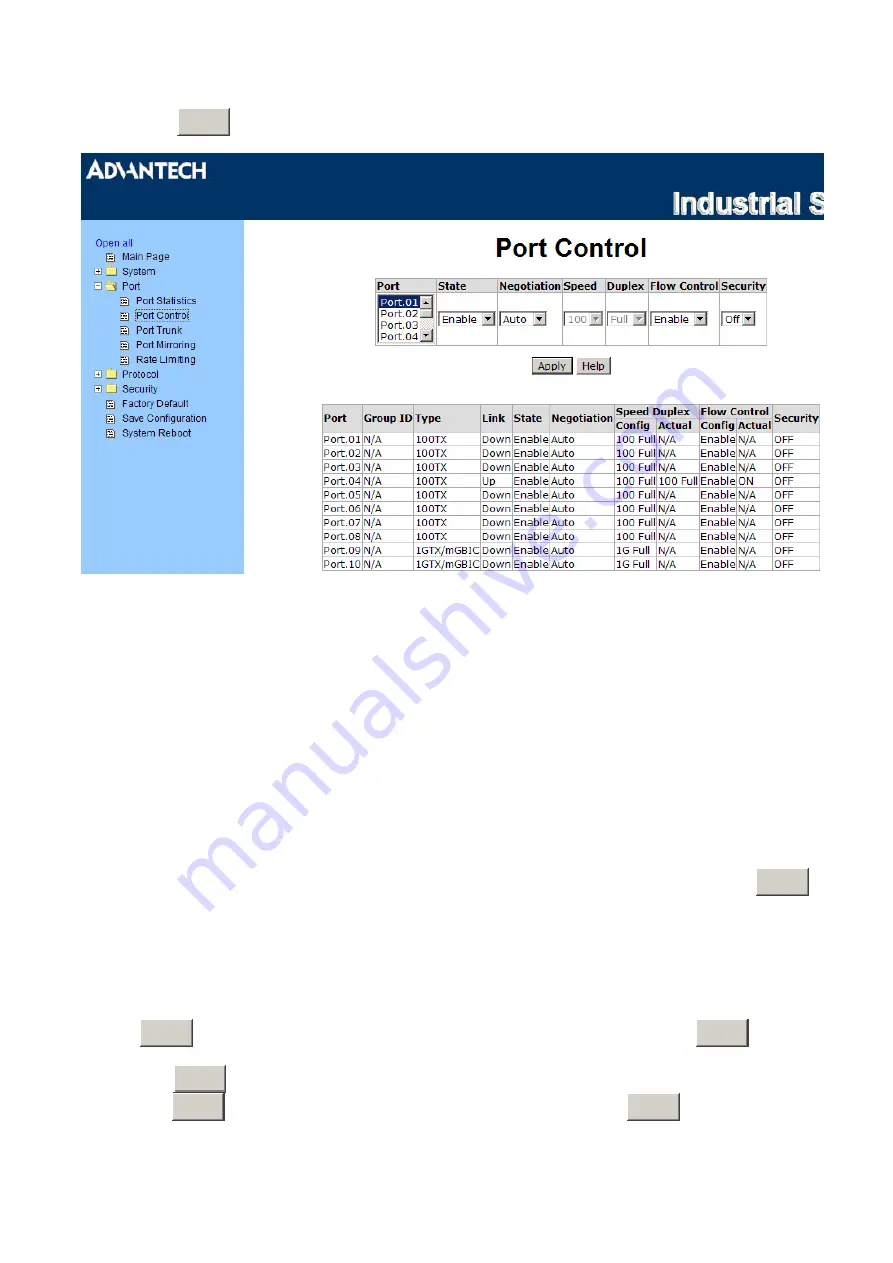
Figure 3.23: Port Control
Port Trunk
The Link Aggregation Control Protocol (LACP) provides a standardized means for exchanging
information between Partner Systems on a link to allow their Link Aggregation Control instances to reach
agreement on the identity of the Link Aggregation Group to which the link belongs, move the link to that
Link Aggregation Group, and enable its transmission and reception functions in an orderly manner. Link
aggregation lets you group up to 4 consecutive ports into two dedicated connections. This feature can
expand bandwidth to a device on the network. LACP operation requires full-duplex mode, more detail
information refers to IEEE 802.3ad.
Aggregator setting
•
System Priority:
a value used to identify the active LACP. The switch with the lowest value has the
highest priority and is selected as the active LACP.
•
Group ID:
There are four trunk groups to provide configure. Choose the "Group ID" and click
Select
.
•
LACP:
If enable, the group is LACP dynamic trunk group. If disable, the group is static trunk group.
All ports support LACP dynamic trunk group. If connecting to the device that also supports LACP, the
LACP dynamic trunk group will be created automatically.
•
Work ports:
allows max four ports to be aggregated at the same time. With LACP dynamic trunk
group, the exceed ports are standby and can be aggregated if work ports fail. If it is static trunk group,
the number of ports must be the same as the group member ports.
•
Select the ports to join the trunk group. Allows max four ports to be aggregated at the same time. Click
Add
button to add the port. To remove unwanted ports, select the port and click
Remov
button.
•
If LACP enable, you can configure LACP Active/Passive status in each ports on State Activity page.
•
Click
Apply
.
•
Use
Apply
button to delete Trunk Group. Select the Group ID and click
Delete
button.
Содержание EKI-7659C
Страница 1: ...EKI 7659C Industrial 8 2G Combo Ports Managed Redundant Gigabit Ethernet Switch User Manual ...
Страница 12: ...EKI 7659C User Manual xii C 7 System Reboot 135 Figure C 68 System Reboot 135 ...
Страница 20: ...EKI 7659C User Manual 8 ...
Страница 23: ...11 Chapter2 2 2 Dimensions units mm Figure 2 1 Front View of EKI 7659C ...
Страница 24: ...EKI 7659C User Manual 12 Figure 2 2 Side View of EKI 7659C ...
Страница 25: ...13 Chapter2 Figure 2 3 Rear View of EKI 7659C ...
Страница 26: ...EKI 7659C User Manual 14 Figure 2 4 Top View of EKI 7659C ...
Страница 34: ...EKI 7659C User Manual 22 ...
Страница 35: ...23 Chapter3 Configuration Sections include z RS 232 Console z Web Browser z Mounting z Self Diagnosis CHAPTER ...
Страница 65: ...53 Chapter3 Figure 3 21 User Authentication ...
Страница 71: ...59 Chapter3 Figure 3 28 Rate Limiting ...
Страница 94: ...EKI 7659C User Manual 82 ...
Страница 95: ...83 Troubleshooting CHAPTER ...
Страница 97: ...85 Pin Assignment Wiring APPENDIX ...
Страница 100: ...EKI 7659C User Manual 88 ...
Страница 101: ...89 Compatible SFP Modules APPENDIX ...
Страница 103: ...91 APPENDIX X View ...
Страница 141: ...129 when the X Ring function enable And then click Apply to apply the configuration Figure C 61 X Ring ...


