132
Chapter 4
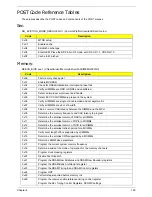
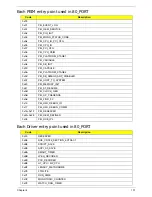
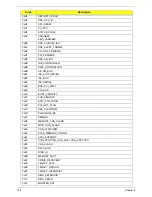
0xC4
SECURITY_STUB
0xC5
DXE_CPU_IO
0xC6
CF9_RESET
0xC7
PC_RTC
0xC8
STATUS_CODE
0xC9
VARIABLE
EMU_VARIABLE
0xD9
DXE_CHIPSET_INIT
0x45
DXE_ALERT_FORMAT
0xD6
PCI_HOST_BRIDGE
0xD7
PCI_EXPRESS
0xD5
DXE_SB_INIT
0xDA
IDE_CONTROLLER
0xDB
SATA_CONTROLLER
0xDD
0xE7
SB_SM_BUS
ISA_ACPI_DRIVER
0xE8
ISA_BUS
0xE9
ISA_SERIAL
0xED
BUS_PCI_UNDI
0xEC
PCI_BUS
0xF6
BOOT_PRIORITY
0xF7
FVB_SERVICE
0xF8
ACPI_PLATFORM
0xFB
PCI_HOT_PLUG
0xFC
DXE_PLATFORM
0xFD
PLATFORM_IDE
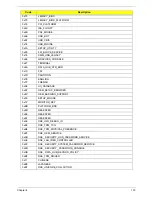
0x97
SMBIOS
0x98
MEMORY_SUB_CLASS
0x99
MISC_SUB_CLASS
0x82
CON_PLATFORM
0x83
SAVE_MEMORY_CONFIG
0x84
ACPI_SUPPORT
0x85
CON_SPLITTER_UGA_VGA / CON_SPLITTER
0x88
VGA_CLASS
0x89
DATA_HUB
0x60
DISK_IO
0x8B
MEMORY_TEST
0x62
0x8D
CRISIS_RECOVERY
LEGACY_8259
0x8E
LEGACY_REGION
0x8F
LEGACY_INTERRUPT
0x70
BIOS_KEYBOARD
0x71
BIOS_VEDIO
0x72
MONITER_KEY
Code
Description
Содержание Aspire One AOD150
Страница 6: ...VI ...
Страница 10: ...X Table of Contents ...
Страница 28: ...18 Chapter 1 ...
Страница 42: ...32 Chapter 2 5 Flash is complete when the message Flash programming complete displays ...
Страница 55: ...Chapter 3 45 4 Lift the Memory cover up to remove 5 Lift the WLAN cover up to remove ...
Страница 67: ...Chapter 3 57 7 Lift the Upper Cover clear of the computer ...
Страница 78: ...68 Chapter 3 4 Lift the USB Board clear of the computer rear edge first ...
Страница 80: ...70 Chapter 3 4 Turn the Bluetooth Module over and disconnect the Bluetooth cable ...
Страница 83: ...Chapter 3 73 9 Turn the Mainboard over and disconnect the Power Cable ...
Страница 85: ...Chapter 3 75 5 Remove the Speaker Module from the Lower Cover ...
Страница 106: ...96 Chapter 3 3 Press down around the edges of the bezel to secure it in place 4 Replace the four screws and screw caps ...
Страница 110: ...100 Chapter 3 4 Secure the Speaker Module cable in place with the adhesive strips ...
Страница 116: ...106 Chapter 3 8 The Lower Cover appears as follows when all the LCD cables are correctly placed ...
Страница 220: ...Appendix A 210 ...
Страница 228: ...218 Appendix C ...

