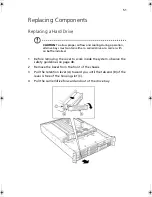


65
7
Remove any processors and DIMMs that you wish to use with the
new board. (See the documentation that shipped with your server
board.)
8
Remove the three mounting screws that secure the server board to
the chassis.
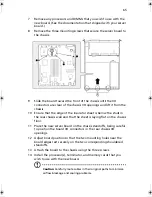
9
Slide the board toward the front of the chassis until the I/O
connectors are clear of the chassis I/O openings and lift it from the
chassis.
10 Ensure that the edge of the insulator sheet is below the studs in
the rear chassis wall and that the sheet is laying flat on the chassis
floor.
11 Place the new server board on the chassis standoffs, being careful
to position the board I/O connectors in the rear chassis I/O
openings.
12 Adjust board position so that the two mounting holes near the
board edges rest securely on the two corresponding shouldered
standoffs.
13 Attach the board to the chassis using the three screws.
14 Install the processor(s), terminator, and memory cards that you
wish to use with the new board.
Caution
: Carefully route cables in their original paths to minimize
airflow blockage and cooling problems.
AR700-e.book Page 65 Tuesday, September 10, 2002 2:31 PM
Содержание Altos R700 Series
Страница 1: ...Altos R700 Chassis Subassembly Product guide...
Страница 9: ...1 Chassis Description...
Страница 22: ...1 Chassis Description 14...
Страница 23: ...2 Assembling the System...
Страница 51: ...3 Installing the System in a Rack...
Страница 54: ...3 Installing the System in a Rack 46...
Страница 55: ...4 Working Inside Your Server...
Страница 75: ...Appendix A Equipment Log and Worksheets...
Страница 77: ...69 DAT TApe Drive Item Manufacturer Name and Model Name Serial Number Date Installed...


