


57
6
The power supply module is now functional and the power supply
fault indicator should not be lit.
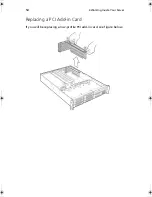
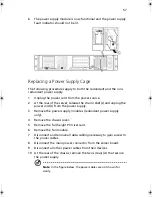
Replacing a Power Supply Cage
The following procedures apply to both the redundant and the non-
redundant power supply.
1
Unplug the power cord from the power source.
2
At the rear of the server, release the strain relief(s) and unplug the
power cord(s) from the power supply.
3
Remove the power supply modules (redundant power supply
only).
4
Remove the chassis cover.
5
Remove the full-height PCI riser card.
6
Remove the fan module.
7
Disconnect and remove all data cabling necessary to gain access to
the power cables.
8
Disconnect the main power connector from the server board.
9
Disconnect all other power cables from their devices.
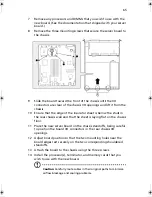
10 At the rear of the chassis, remove the two screws (A) that secure
the power supply.
Note
: In the figure below, the power cables are not shown for
clarity.
AR700-e.book Page 57 Tuesday, September 10, 2002 2:31 PM
Содержание Altos R700 Series
Страница 1: ...Altos R700 Chassis Subassembly Product guide...
Страница 9: ...1 Chassis Description...
Страница 22: ...1 Chassis Description 14...
Страница 23: ...2 Assembling the System...
Страница 51: ...3 Installing the System in a Rack...
Страница 54: ...3 Installing the System in a Rack 46...
Страница 55: ...4 Working Inside Your Server...
Страница 75: ...Appendix A Equipment Log and Worksheets...
Страница 77: ...69 DAT TApe Drive Item Manufacturer Name and Model Name Serial Number Date Installed...


