PROBOIL.2X user & installation guide v1e-2
33
1.
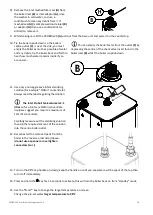
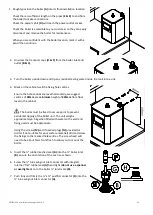
Roughly position the boiler
(A)
into its final installation location.
Check there is sufficient length on the pipes
(E & K)
to and from
the boiler to make connections.
Check the power cable
(D)
will reach the power outlet socket.
Check the boiler is accessible to your customer so they can easily
disconnect and remove the boiler for maintenance.
When you are confident with the boiler location, mark it with a
pencil then continue.
2.
Unscrew the transport caps
(O & P)
from the boiler inlet and
outlet
(B & C)
.
3.
Turn the boiler upside down and tip any residual testing water inside the tank into a sink.
4.
Mark on the cabinet wall the fixing hole centres.
Ensure the hole centres are level horizontally, we suggest
centres of
90mm
at a
minimum
height of
245mm
from floor
level in the cabinet.
⚠
The boiler must be fixed to secure point to prevent
accidental tipping of the boiler unit. The unit weighs
approximately 6.5
kg when filled with water so the wall and
fixing used must be appropriate.
Using the screws
(M)
and if needed plugs
(N)
provided (or
similar if not suitable for your surface material) drill and screw
the fixings to the marked hole centres. The screw head will
need to be about 5mm from flush to allow you to mount the
boiler.
5.
Insert the ½” rubber meshed seal
(H)
into the ½” boiler inlet
(B)
, ensure the orientation of the seal is as shown.
6.
Screw the ½” blue wingnut inlet connector with integral/
internal “flat” rubber seal
(G)
hand tight (
do not use a spanner
or overtighten
) on to the boiler ½” inlet male
(B).
7.
Push fully and firmly the ¼” x ¼” pushfit connector
(F)
onto the
½” blue wingnut inlet connector
(G)
.

