background image

Connecting the Remote Wake-Up Cable

37

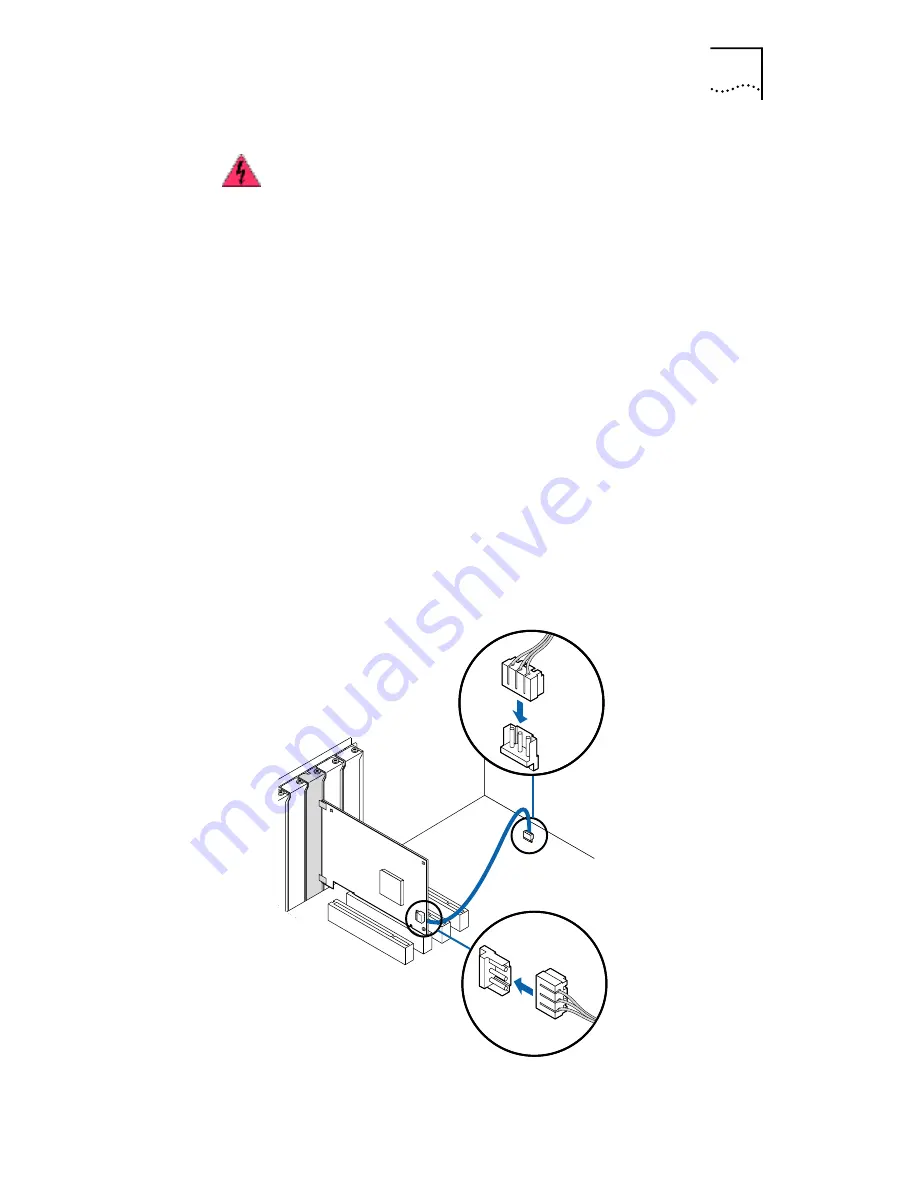
To connect the Remote Wake-Up cable:

1 Make sure that the NIC is properly installed in a PCI slot. 

2 Insert the Remote Wake-Up cable into the 

RWU connector on the NIC.

Twist the cable twice before attaching the cable to the PC.

3 Attach the other end of the cable to the connector on 

the PC motherboard.

Refer to your PC documentation if you need help locating 
the connector.

4 Replace the PC cover and plug in the power cord.

Do not turn on the power to the PC. Continue at step 3 in 
Installing and Connecting the NIC.

WARNING:

 Make sure that the PC power cord is 

unplugged. Only properly trained and authorized 
personnel should perform service. Contact your PC 
manufacturer for information about safe service 
techniques.

Содержание EtherLink 3CR990-TX-95

Страница 1: ...therLink 10 100 PCI Network Interface Card with 3XP Processor User Guide 3CR990 TX 95 3CR990 TX 97 3CR990SVR95 3CR990SVR97 10 100 Mbps PCI client and server network interface cards with DynamicAccess technology Part No 09 1742 001 Published May 2000 ...

Страница 2: ...ded in DFAR 252 227 7015 Nov 1995 or FAR 52 227 14 June 1987 whichever is applicable You agree not to remove or deface any portion of any legend provided on any licensed program or documentation contained in or delivered to you in conjunction with this User Guide Unless otherwise indicated 3Com registered trademarks are registered in the United States and may or may not be registered in other coun...

Страница 3: ...ling Drivers 18 Failover 18 VLANs 19 Traffic Prioritization 20 Server Features Using Other NICs 21 Remote Wake Up 21 Remote Wake Up Requirements 21 Remote Wake Up Cable 22 Remote Wake Up and Multiple NIC Installations 22 Integrated Boot ROM with Managed PC Boot Agent MBA 22 Desktop Management Interface DMI 2 0 23 DHCP Server Prevention 24 Remote System Alerts 24 Hot Plug NIC Installation 24 Offlin...

Страница 4: ...the Remote Wake Up Cable 36 Installing Software 38 3 INSTALLING NIC DRIVERS IN WINDOWS Overview 39 Software Installation Requirements 39 Getting Help 40 Installing the Network Driver Using the EtherCD 40 Windows 2000 40 Windows NT 4 0 41 Windows 98 43 Windows 95 44 New Hardware Found 45 Update Device Driver Wizard 46 Verifying Successful Installation 48 Windows 2000 48 Windows NT 4 0 49 Windows 95...

Страница 5: ...ying a Dedicated IP Address 66 Changing an IP Address 67 Creating a VLAN 67 Specifying Traffic Priorities 68 Saving the Configuration 68 Disabling Load Balancing for a Group 69 Changing the Primary NIC 69 Removing a NIC from a Group 69 Deleting or Editing a VLAN 70 Displaying NIC Properties 70 Displaying Group Properties 70 Specifying Failover from Gigabit to 10 100 PCI 70 Troubleshooting a Load B...

Страница 6: ...bers for Multiple NICs 91 Obtaining Slot Numbers 92 Installing the NetWare 3 12 Server Driver 92 Installing the Server Driver for NetWare 4 11 and 5 0 Using INETCFG 93 Installing the Server Driver and DynamicAccess Technology Using AUTOEXEC NCF 95 Loading the 3Com EtherCD 96 Copying the Driver 96 Specifying the Slot Number 97 Loading the Driver 97 Setting Up Another NIC 97 Installing Multiple Serv...

Страница 7: ...ogram 117 Using the 3Com DOS Configuration Program 118 Configuring the Managed PC Boot Agent MBA 120 Enabling or Disabling the Boot ROM Setting 120 Booting From the Network 120 BBS BIOS Compatible PCs 121 Non BBS BIOS Compatible PCs 122 Disabling the 3Com Logo 122 7 CONFIGURING IP SECURITY Overview 123 Creating a Security Policy 124 Defining the Console 124 Creating the Policy 125 Creating a Filte...

Страница 8: ...leshooting a Network Connection 136 Troubleshooting Hubs 137 Cabling Pinouts 137 Removing the Network Driver 138 Windows 2000 138 Windows NT 4 0 139 Windows 95 and Windows 98 139 Removing DynamicAccess Server Features 140 Windows NT 4 0 140 Windows 2000 140 NetWare 141 9 RUNNING NIC DIAGNOSTICS Overview 143 Running the 3Com DOS Diagnostics Program 144 Running the NIC Diagnostics Tests 144 Running ...

Страница 9: ...LLING THE 3COM DMI AGENT Overview 159 About the 3Com DMI Agent 159 System Requirements 160 Client PC Requirements 160 Network Management Requirements 161 Installing the 3Com DMI Agent 161 D ETHERCD CONTENT AND NAVIGATION EtherCD Navigation 163 Root Subdirectories 164 Auto Insert 164 Text Files 164 E INSTALLING A 3COM NIC WHILE INSTALLING THE NOS Windows Fresh Installation 167 Windows NT 167 Window...

Страница 10: ...ital Modem 173 3Com Facts Automated Fax Service 173 Support from Your Network Supplier 173 Support from 3Com 174 Returning Products for Repair 175 INDEX FCC CLASS B STATEMENT FCC DECLARATION OF CONFORMITY INDUSTRY CANADA CLASS B EMISSION COMPLIANCE STATEMENT AVIS DE CONFORMITÉ À LA RÉGLEMENTATION D INDUSTRIE CANADA VCCI CLASS B STATEMENT 3COM END USER SOFTWARE LICENSE AGREEMENT PRODUCT REGISTRATIO...

Страница 11: ...om com NIC Description Model Number EtherLink 10 100 Mbps PCI with 3XP Processor Client NIC for DES 56 bit encryption 3CR990 TX 95 EtherLink 10 100 Mbps PCI with 3XP Processor Client NIC for 3DES 168 bit and DES 56 bit encryption 3CR990 TX 97 EtherLink Server 10 100 Mbps PCI NIC with 3XP Processor Server NIC for DES 56 bit encryption 3CR990SVR95 EtherLink 10 100 Mbps PCI server NIC with 3XP Proces...

Страница 12: ...scription Screen displays This typeface represents information as it appears on the screen Commands The word command means that you must enter the command exactly as shown and then press Return or Enter Commands appear in bold Example To launch the DOS diagnostics program enter the following command a install The words enter and type When you see the word enter in this guide you must type somethin...

Страница 13: ...are achieved through data encryption Product Name Description Model Number EtherLink 10 100 Mbps PCI with 3XP Processor Client NIC for DES 56 bit encryption 3CR990 TX 95 EtherLink 10 100 Mbps PCI with 3XP Processor Client NIC for 3DES 168 bit and DES 56 bit encryption 3CR990 TX 97 EtherLink Server 10 100 Mbps PCI NIC with 3XP Processor Server NIC for DES 56 bit encryption 3CR990SVR95 EtherLink 10 ...

Страница 14: ...ryption chip enables true end to end network security IPSec at the data capacity of the connected network cable wire speed without sacrificing performance LAN Encryption Software for Windows 95 98 3Com DynamicAccess LAN Encryption software is available on the EtherCD packaged with your NIC The LAN Encryption utility secures communication for individual computers by ensuring authentication encrypti...

Страница 15: ...re technology plus a powerful suite of DynamicAccess technology software features relieve network congestion and ensure high performance and maximum bandwidth availability The Windows 2000 High Encryption Pack is eligible for export from the U S to all customers worldwide except to U S embargoed destinations Please see http www microsoft com exporting for details Other countries may exercise separ...

Страница 16: ...ver VLANs Traffic Prioritization Remote Wake Up Lets you power on a computer remotely for after hours administration Integrated Boot ROM with Managed PC Boot Agent MBA Adds management capabilities by enabling the computer to boot from another computer rather than from its local drive Desktop Management Interface DMI 2 0 Enables managed computers and net computers to report details about themselves...

Страница 17: ...maximum bandwidth availability Load Balancing groups share the network load over resilient server links RSLs that keep traffic flowing even if a NIC in a group is temporarily disconnected Self Healing Drivers SHDs detect common error conditions and correct them while maintaining server link performance Failover fault tolerance provides a backup solution in the event of a NIC failure VLANs IEEE 802...

Страница 18: ...intain the network connection An SHD monitors the NIC continuously for error conditions and makes corrections These corrections can include resetting the NIC rebuilding software data structures temporarily disabling features or transferring all network traffic to secondary NICs termed a failover event An SHD can also continuously monitor the status of the physical NICs in a virtual NIC group befor...

Страница 19: ... are established with clients If any NIC in a bidirectional arrangement fails receive load balancing is disabled and the other NICs continue transmit only load balancing activity If the primary NIC fails a secondary NIC takes over packet reception for the group Bidirectional load balancing is restored after a failure when applications create new connections and new clients log in Figure 3 Bidirect...

Страница 20: ...eed only to specify that the new port is on VLAN 1 It helps to control traffic With traditional networks congestion can be caused by broadcast traffic that is directed to all network devices whether they require it or not Each VLAN can be set up to contain only those devices that need to communicate with each other increasing network efficiency It provides extra security Devices within each VLAN c...

Страница 21: ... up packet Magic Packet frame through the LAN the NIC turns on the power to the PC Remote Wake Up also requires using a desktop management application that is able to generate a Magic Packet Remote Wake Up signal If the computer complies with PCI 2 2 Remote Wake Up is automatically enabled through the PCI bus If the computer complies with PCI 2 1 Remote Wake Up support is enabled by connecting a R...

Страница 22: ...ity 001 510 226 4604 From other countries Enter the international access code followed by 510 226 4604 Remote Wake Up and Multiple NIC Installations To use multiple NICs as Remote Wake Up NICs in the same computer the computer must have a power supply that can support multiple Remote Wake Up devices See your computer documentation if you are unsure whether your computer power supply can accommodat...

Страница 23: ...d with the MBA software on the 3Com EtherCD For more information on the management features supported by the NIC go to http www 3com com managedpc Desktop Management Interface DMI 2 0 Desktop Management Interface DMI is a network management standard that is widely accepted for managing Intel based computers DMI 2 0 enables managed computers and net computers to report details about themselves and ...

Страница 24: ...nals a possible computer power loss or theft The NIC can also transmit a workgroup keep alive packet periodically while the computer is in a sleep state This packet prevents the computer s workstation address from being aged out of switch router tables Hot Plug NIC Installation If your computer supports PCI hot plug specifications you can add a new 3Com NIC or remove and replace a 3Com NIC without...

Страница 25: ...dedicated RMON probes throughout the network RMON SmartAgents are for use with the DynamicAccess network edge monitor or other remote monitoring applications Traffic prioritization IEEE 802 1p Q Ensures that business critical and delay sensitive traffic such as multimedia applications has priority over normal data Fast IP Eliminates router bottlenecks and improves performance in switched networks ...

Страница 26: ...on by allowing the 3XP processor on the NIC to perform segmentation of TCP packets IP and TCP Checksum Offload reduced CPU utilization by allowing the 3XP processor on the NIC to perform the checksum calculation of TCP IP and UDP IP packets 802 1P Packet Priority Offload reduces CPU utilization by allowing the 3XP processor on the NIC to perform the insertion of the 802 1Q tag header into the pack...

Страница 27: ...e lethal Before removing the cover turn off the computer and unplug it Disconnect all cables that are connected to the main system unit Remove jewelry from your hands and wrists Use insulated or nonconductive tools CAUTION The NIC is packed in an antistatic container to protect it during shipment Do not touch the components or any metal parts on the NIC except for the backplate To avoid damaging t...

Страница 28: ...r Drive CD ROM Cable Category 5 UTP included See cable specifications in Preparing the NIC and the Computer on page 32 Connector RJ 45 included Software One 3Com EtherCD with DynamicAccess technology software and network drivers included Operating system One of the following Microsoft Windows 2000 Microsoft Windows NT version 4 0 Microsoft Windows 95 98 CAUTION Install the NIC in a PCI slot that c...

Страница 29: ...the instructions in the WIN98 TXT file located in the HELP directory on the EtherCD Updating the Network Driver and NIC Software If you already have an EtherLink PCI NIC installed and want to update the network driver follow the instructions in Updating the Network Driver and NIC Software on page 51 Installing From Diskette If your computer does not have a CD ROM drive use a PC that has a CD ROM d...

Страница 30: ...EtherDisk 2 Creating Installation Diskettes To create installation diskettes from the EtherCD 1 Turn on the power to the PC and start Windows 2 Insert the EtherCD in the CD ROM drive The installation diskettes allow you to install the network driver only If you want to install the NIC diagnostics or desktop management software you must install them from the EtherCD To use the CD ROM drive on a PC ...

Страница 31: ...ck OK Files are copied EtherDisk 2 contains NetWare client and server drivers PACKET driver Help text files The diskette creation is complete Product Registration The United States government places registration requirements on using data encryption products To obtain customer support for the 3CR990 NIC you are required to register your NIC product with 3Com You can register electronically or by U...

Страница 32: ...Precautions on page 27 Follow these preparation steps 1 Decide whether you want to use Remote Wake Up If you want to use the Remote Wake Up feature on a computer that complies with PCI 2 1 you must obtain a Remote Wake Up cable for the NIC for details see Remote Wake Up on page 21 If the computer complies with PCI 2 2 Remote Wake Up is automatically enabled through the PCI bus and no Remote Wake U...

Страница 33: ...n a shared PCI slot Avoid any PCI slot next to an ISA slot This is often a shared slot and does not support bus mastering If you do not know how to identify a PCI slot check the computer documentation or ask the system administrator If you are planning to install the Remote Wake Up cable choose an empty PCI slot that is close to the Remote Wake Up connector on the computer motherboard The Remote W...

Страница 34: ...e small bar code label on the component side of the NIC The next step is to install the NIC in the computer and connect it to the network Installing and Connecting the NIC Observe the safety precautions listed in Safety Precautions on page 27 Prepare the NIC and the computer as described in Preparing the NIC and the Computer on page 32 The following instructions apply to installing the NIC in most...

Страница 35: ...cure the NIC with the screw if you removed one earlier 2 Replace the computer cover and plug in the power cord Do not turn on the power to the computer 1 Remove slot cover 2 Insert NIC PCI slots If you want to install the Remote Wake Up cable go to the next section Connecting the Remote Wake Up Cable to continue the installation If you do not want to connect the cable continue with step 2 ...

Страница 36: ...ction describes how to connect the Remote Wake Up cable from the NIC to the PC motherboard Connecting the Remote Wake Up cable is optional Connect this cable only if your NIC supports Remote Wake Up and you want to use this feature For information on obtaining a Remote Wake Up cable from 3Com see Remote Wake Up Cable on page 22 TX Data ACT 10 100 L N K If your site network installation procedures ...

Страница 37: ...he other end of the cable to the connector on the PC motherboard Refer to your PC documentation if you need help locating the connector 4 Replace the PC cover and plug in the power cord Do not turn on the power to the PC Continue at step 3 in Installing and Connecting the NIC WARNING Make sure that the PC power cord is unplugged Only properly trained and authorized personnel should perform service...

Страница 38: ...are in various operating systems Installing NIC Drivers in Windows on page 39 Updating the Network Driver and NIC Software on page 51 Installing NetWare Client and Server Drivers on page 89 The next step is to install the network driver Go to Installing NIC Drivers in Windows on page 39 or Installing NetWare Client and Server Drivers on page 89 ...

Страница 39: ...e you may want to verify that the installed server NICs are functional or change their configuration settings by running DOS diagnostics Use the 3C99XCFG EXE program located on the EtherCD If you are installing the software during the installation of the network operating system see Installing a 3Com NIC While Installing the NOS on page 167 For a list of minimum installation prerequisites see Inst...

Страница 40: ...alled on your PC Windows 2000 This section describes how to install the network driver and NIC software in a PC or server running Windows 2000 Before you begin software installation Make sure that all software installation requirements are met See Installation Requirements on page 28 Install the hardware For instructions see Installing and Connecting the NIC on page 34 Use the following procedure ...

Страница 41: ...pears displaying the message Windows has finished installing the software for this device 8 Click Finish The software installation is complete Go to Verifying Successful Installation on page 48 to confirm that the NIC is properly installed To change configuration settings see Configuring the NIC on page 113 Windows NT 4 0 This section describes how to install the network driver and NIC software in...

Страница 42: ... in the entry box for example d 10 Click OK The Select OEM Option screen appears displaying two driver options 3Com EtherLink 10 100 Mbps PCI NIC with 3XP Processor 3Com EtherLink Server 10 100 Mbps PCI NIC with 3XP Processor 11 If you have installed a client NIC 3CR990 TX 95 or 3CR990 TX 97 select 3Com EtherLink 10 100 Mbps PCI NIC with 3XP Processor If you have installed a server NIC 3CR990SVR95...

Страница 43: ...ware in a PC or server running Windows 98 Before installing the NIC software Make sure that the NIC is installed in the PC and connected to the network Make sure that you have the Windows 98 installation files These files may be on a CD or diskettes or they may have been copied to your hard disk when Windows 98 was installed on your PC To install the software 1 Turn the PC power on Windows detects...

Страница 44: ...New Hardware Wizard displays a message informing you that Windows has finished installing the software 9 Click Finish The Systems Settings Change screen appears prompting you to restart your computer 10 Click Yes to restart your computer The software installation is complete Go to Verifying Successful Installation on page 48 to confirm that the NIC is properly installed Windows 95 This section des...

Страница 45: ...ed by hardware manufacturer option and then click OK The Install From Disk screen appears 2 Insert the EtherCD in the CD ROM drive enter the path to the CD ROM drive and click OK If networking has already been installed on your PC go to step 4 If this is the first time that networking is being installed on your PC the Identification tab of the Network screen appears Go to step 3 3 In the specified...

Страница 46: ... If the Windows 95 files were copied to your hard drive enter the path to the directory containing these files and then click OK Files are copied The Systems Settings Change screen appears prompting you to restart your computer 6 Click Yes The installation is complete To verify that the installation was successful see Verifying Successful Installation on page 48 Update Device Driver Wizard If the ...

Страница 47: ...If your computer is connected to a peer to peer network this entry must be exactly the same for all the PCs in your network Computer Description Displays additional details to other users on the network about this PC For example you could specify that the PC is connected to a printer Filling in this field is optional 4 The Insert Disk screen appears prompting you for the EtherCD Click OK The Copyi...

Страница 48: ... My Computer icon and then click Properties 2 Select the Hardware tab and then click Device Manager in the middle panel 3 Double click Network Adapters and make sure that the name of the 3Com EtherLink NIC appears If a red X or a yellow exclamation point appears by the name of the NIC the installation was not successful See Troubleshooting the NIC on page 129 for troubleshooting help After Windows...

Страница 49: ...k OK to close the Network screen Close the Control Panel screen and the My computer screen You can also use the following alternative method to verify successful NIC installation 1 In the Windows task bar click Start Programs Administrative Tools and then Windows NT Diagnostics The Windows NT Diagnostics screen appears 2 Select the Resources tab If ELPPx appears in the displayed list in the Device...

Страница 50: ...hat determine the status of your network and the NIC It also allows you to configure the NIC view network statistics and LEDs and access support databases To install the 3Com NIC Diagnostics program 1 Turn on the power to the PC and start Windows 2 Insert the EtherCD in the CD ROM drive The EtherCD Welcome screen appears 3 Click NIC Software 4 Click NIC Drivers and Diagnostics 5 Click Update NIC D...

Страница 51: ...agnostics icon is displayed on right side of the Windows task bar 1 Double click the 3Com NIC Diagnostics icon The 3Com NIC Diagnostic screen appears For instructions on using the program see Running the NIC Diagnostics Tests on page 144 Updating the Network Driver and NIC Software The latest 3Com network drivers can be downloaded from http support 3com com infodeli tools nic To update the network...

Страница 52: ...w to install multiple EtherLink PCI NICs in a PC running Windows 2000 Windows 98 Windows 95 or Windows NT 4 0 Windows 2000 Windows 98 and Windows 95 To install multiple NICs in a PC running Windows 2000 Windows 98 or Windows 95 install and configure each NIC individually following these steps 1 Install the first NIC in your PC and connect it to the network as described in Installing and Connecting...

Страница 53: ... Windows Windows detects the second NIC The second NIC uses the same network driver as the first NIC You are not prompted for the EtherCD When Windows starts the second NIC appears under Network adapters in the Device Manager 9 Repeat the process for each additional NIC to be installed Windows NT 4 0 To install multiple NICs in a PC running Windows NT 4 0 1 Install the NICs in your PC and connect ...

Страница 54: ... Only one NIC appears on this screen 9 Click OK Files are copied The Network screen appears with the name of the first installed NIC 10 Close the Network screen If you are prompted for network information enter the requested information 11 Restart the PC 12 When Windows NT starts repeat steps 3 through 11 for each NIC that is installed in the PC You will not be prompted for the EtherCD when you in...

Страница 55: ... how to install and configure the DynamicAccess LAN agent on a client PC running Windows 95 Windows 98 or Windows NT 4 0 Client PC Requirements The DynamicAccess LAN agent can be installed on a PC running Windows 95 Windows 98 or Windows NT 4 0 The DynamicAccess LAN agent is not supported on a PC running Windows 2000 For an overview of the DynamicAccess LAN agent see DynamicAccess LAN Agent on pag...

Страница 56: ... Click NIC Software 5 Click DynamicAccess Technology 6 Click Install DynamicAccess Technology 7 Select the appropriate menu option for your operating system Windows 95 98 or Windows NT 4 0 Operating System Requirements for Running DynamicAccess Technology on a Client PC Recommended Microsoft Service Pack Windows 2000 486 66 MHz CPU 32 MB RAM 5 MB available hard drive space None required Windows NT...

Страница 57: ...C entry appears in the list of network adapters All protocols are re bound to the virtual NIC The bindings to the physical NIC are still intact A 3Com DynamicAccess LAN agent entry appears as a protocol A 3Com DynamicAccess LAN agent icon is installed in the Windows Control Panel Configuring the DynamicAccess LAN Agent Contact your system administrator about using DynamicAccess technology at your ...

Страница 58: ...control and enable the prioritizing of traffic Removing the DynamicAccess LAN Agent For instructions on removing the DynamicAccess LAN agent from your client PC see the DynamicAccess software user guide You can download the user guide from http www 3com com dynamicaccess Installing DynamicAccess Software for a Server NIC Follow these steps to install DynamicAccess software for a server NIC install...

Страница 59: ...nd real protocols bind to the DynamicAccess Miniport Do not modify these bindings If you selected Windows NT 4 0 click Install DynamicAccess Technology for Windows NT 4 0 Servers When DynamicAccess server features are installed for Windows NT NICs bind to the DynamicAccess protocol and real protocols bind to the DynamicAccess Miniport Do not modify these bindings The DynamicAccess Software Install...

Страница 60: ...cing groups and virtual LANs VLANs The features are described in Advanced Server Features on page 17 The following DynamicAccess technology server features are available for NIC groups in Windows load balancing RSL failover multiple VLANs The examples in this section illustrate typical actions you might take in the course of maintaining a DynamicAccess server configuration in Windows Planning the ...

Страница 61: ...om a 3Com Gigabit EtherLink Server 1000 PCI NIC to a 3Com EtherLink 10 100 PCI NIC you must disable load balancing for that group to achieve the best performance For the best failover performance turn the spanning tree feature off at switches that are connected directly to the server If the spanning tree feature is turned on a failover may be delayed up to 30 seconds while the switch processes the...

Страница 62: ...nd to TCP IP must exist on a separate IP subnet DHCP servers used to allocate IP addresses must be located on the same IP subnets as the VLANs Each VLAN bound to the IPX SPX protocol must use a unique network number To avoid problems associated with blocked multicast streams configure end stations that support the IEEE 802 1p GARP Multicast Registration Protocol specification GMRP on separate swit...

Страница 63: ...s follows 1 Log in to Windows 2000 with administrator privileges 2 Launch the Windows 2000 Network and Dial up Connections window 3 Select a Local Area Connection icon 4 Click the right mouse button and select Properties The Local Area Connections Properties window appears 5 Click the General tab 6 In the General window select DynamicAccess Protocol and click Properties The DynamicAccess Protocol ...

Страница 64: ...ING DYNAMICACCESS SOFTWARE IN WINDOWS Windows NT Start DynamicAccess server features under Windows NT as follows 1 Log in to the Windows NT Administrator account 2 From the Windows Start menu select Settings Control Panel ...

Страница 65: ...k box and check the Transmit Load Balance Enabled box To enable bidirectional load balancing Check both the Transmit Load Balance Enabled box and the Receive Load Balance Enabled box Enter only the Host ID bytes required for a dedicated IP address For example See Specifying a Dedicated IP Address on page 66 for more information on the dedicated IP address To disable all load balancing Clear the Re...

Страница 66: ...cing requires that you specify a dedicated IP address for the load balancing group This address specifies a Network ID and a Host ID and it must be unique not used elsewhere on the network For example You can specify the dedicated IP address in the Create Group or Group Properties dialog boxes You cannot specify the bytes for the Network ID they are fixed Specify the bytes for the Host ID for vari...

Страница 67: ...VLAN as follows Right click My Network Places and select Properties from the menu In the next window right click a VLAN and select Properties from the menu Click Configure In the NIC Properties window click TCP IP Changing the Other Device s IP Address After you change the other device s address restart receive load balancing as follows 1 In the Load Balancing RSL window select the group that had ...

Страница 68: ...ns to take network precedence You can turn traffic prioritization on or off independently for Each NIC that is not in a group and does not have VLANs Each group that does not have VLANs Each VLAN Each virtual NIC NIC group or VLAN shown in the Traffic Prioritization control panel Administration Set DynamicAccess control panel access set VLAN options enable efficient multicast control and enable th...

Страница 69: ...mary NIC The first NIC added to an empty group is automatically designated the primary NIC NICs added subsequently are designated as secondary NICs If a foreign non 3Com NIC is used it must be designated the primary NIC Primary status is indicated by a P icon at the beginning of the NIC name When there are more than one NIC in a group you can change the primary NIC as follows 1 Click the Load Bala...

Страница 70: ...The NIC Properties window appears showing the properties of the selected NIC Displaying Group Properties Follow these steps to display group properties 1 Click the Load Balance RSL tab 2 In the Load Balance RSL window select a group in the Load Balancing RSL Groups list box 3 Click Properties The Group Properties window appears showing the properties of the selected group Specifying Failover from ...

Страница 71: ...go to http knowledgebase 3com com Table 1 Troubleshooting Load Balancing In Windows Symptom Tip Receive load balancing fails to begin functioning Check the Group Properties to verify that the dedicated IP address has been entered If no address appears in the Group Properties dialog box enter one to enable receive load balancing Receive load balancing stops functioning Cables may be disconnected or...

Страница 72: ...Select the appropriate property from the list for example 802 1p Support 7 Use the scroll list to change the property value 8 Exit the Device Manager Identifying Windows 2000 Miniport and LAN Connections DynamicAccess miniport connections and NIC Local Area Connections are listed in the Network and Dial up Connections window If a group or VLAN is associated with a miniport the group name and VLAN ...

Страница 73: ...ng system capabilities by off loading key TCP IP networking and security tasks from the Windows 2000 operating system IPSec Offload reduces CPU utilization by allowing the 3XP processor and a crypto chip on the NIC to perform data encryption operations TCP Segmentation Offload reduces CPU utilization by allowing the 3XP processor on the NIC to perform segmentation of TCP packets IP and TCP Checksu...

Страница 74: ...load features The default setting for these features is enabled To enable or disable individual offload settings in Windows 2000 1 Right click the My Network Places desktop icon and select Properties The Network and Dial up Connections screen appears 2 Right click the Local Area Connection icon and select Properties The Local Area Connection Properties screen appears ...

Страница 75: ... Checksum cksum ipsec TCP Checksum and IPSec cksum tcpseg TCP Checksum and TCP Segmentation cksum tcpseg ipsec TCP Checksum and TCP Segmentation and IPSec ipsec IPSec tcpseg TCP Segmentation tcpseg ipsec TCP Segmentation and IPSec 802 1p Packet Priority 802 1p cksum Packet Priority and TCP Checksum 802 1p cksum ipsec Packet Priority and TCP Checksum and IPSec 802 1p cksum tcpseg Packet Priority an...

Страница 76: ...loads If you add a NIC to an existing group and that NIC has offload capabilities that differ from those of the group then you must reconfigure the group that is you must delete the group recreate the group and restart the computer If you do not delete and recreate the group DynamicAccess will not bind to the NIC Similarly if you replace a NIC that has been configured as part of a group with anoth...

Страница 77: ...tion Overview The 3Com EtherLink 10 100 PCI NIC must be installed and connected to the network before you install DynamicAccess LAN Encryption software See Installing and Connecting the NIC on page 27 for instructions Installing the DynamicAccess LAN Encryption software involves the following tasks 1 Installing the software using the Custom option to download the DynamicAccess LAN Encryption Softw...

Страница 78: ...amicAccess Technology 7 Click Install DynamicAccess LAN Encryption Software Windows 95 98 The setup wizard launches for either 56 bit LAN DES encryption or 168 bit LAN 3DES encryption depending on the model of your installed EtherLink 10 100 PCI NIC and the EtherCD inserted in your computer A message prompts you to exit all Windows applications The installation process installs the following requi...

Страница 79: ...tware Administrator s Guide 10 Select Custom Installation to install the DynamicAccess LAN Encryption software and to download the user guide to your computer s hard drive Click Next to continue The Select Components screen appears allowing you to choose the components to be installed 11 Select both components DynamicAccess LAN Encryption Software and Admin Documentation Click Next The DynamicAcce...

Страница 80: ...start the 3Com LAN Encryption installation If prompted to insert the Windows CD insert it so that certain Windows files can be copied Prompting for the Windows CD depends on your PC configuration Follow the displayed prompts 14 With the Winsock2 Setup screen displayed click OK A warning message appears regarding the Dial Up Networking Upgrade 15 Click OK The Microsoft Dial Up Networking screen app...

Страница 81: ...et up the registry built drivers and updated bindings If you have not yet created one or more connection profiles you may be prompted to use the DynamicAccess LAN Client dialog box to create the profiles See the Creating a Connection Profile topic in the administrator s guide for more information After you have successfully installed the DynamicAccess LAN Encryption client the physical adapters NI...

Страница 82: ...Turn on the power to the PC and start Windows 2 Insert the EtherCD in the CD ROM drive The EtherCD Welcome screen appears 3 Click NIC Software The NIC Software screen appears 4 Click DynamicAccess Technology The 3Com DynamicAccess Technology screen appears 5 Click Install DynamicAccess Technology The 3Com DynamicAccess Technology menu appears 6 Click Install 3Com DynamicAccess Technology for Windo...

Страница 83: ...tware Administrator s Guide 10 Select Custom Installation to install the DynamicAccess LAN Encryption software and to download the user guide to your computer s hard drive Click Next to continue The Select Components screen appears allowing you to choose the components to be installed 11 Select both components DynamicAccess LAN Encryption Software and Admin Documentation Click Next The DynamicAcce...

Страница 84: ...ur PC configuration Follow the displayed prompts The setup program continues once the appropriate Windows files have been located and copied to the appropriate Windows folders The Setup Complete dialog box appears 14 Select Yes I want to restart my computer now and click Finish to restart your computer If you have not yet created one or more connection profiles you will be prompted to use the Dyna...

Страница 85: ...find a copy of the entrust ini file on the EtherCD After installing the DynamicAccess LAN Encryption software before rebooting the system manually copy the entrust ini file to the Windows directory on the client computer and then reboot During installation the policy files tssecmap cfg and tssecdes cfg are automatically copied from the EtherCD to your PC See the 3Com LAN Encryption Secure Network ...

Страница 86: ... the system to which you are connecting to secure the data communication 3 To switch to a different secure profile right click the padlock icon in the taskbar and select a different profile The profile in use displays a check mark next to it You will be prompted to enter your user name and password for certificate authorization or provide a shared secret when you switch to a different secure profi...

Страница 87: ...cryption Software Admin Guide Uninstalling LAN Encryption Software To uninstall DynamicAccess LAN Encryption software from a Windows 95 98 computer follow these steps 1 Click the Start button in the taskbar on your Windows desktop 2 Select Settings 3 Select Control Panel 4 Double click the Add Remove Programs icon The Add Remove Program Properties screen appears 5 In the Install Uninstall tab sele...

Страница 88: ......

Страница 89: ...dules NLMs that are required for servers running NetWare are on the EtherCD in the NWSERVER directory or they can be obtained from Novell Using the Latest Support Packs The 3CR990 NIC does not support NetWare 3 11 or 4 0x servers The 3CR990 NIC does not support NetWare 3 12 or 4 11 servers that are not updated to the latest Novell Support Pack NetWare 3 12 does not support 3CR990 NIC load balancin...

Страница 90: ...ion Support Pack 7 or higher is required for proper operation of the failover mechanism for the 3CR990 server NIC 5 0 Support Pack 2 or later NetWare Version Required Support Pack continued The required support pack must be loaded before you install the driver for the 3CR990 NIC NetWare Server NLM Name NetWare 3 12 ETHERTSM NLM MSM31X NLM NBI31X NLM NetWare 4 11 5 0 ETHERTSM NLM TCPIP NLM NBI NLM ...

Страница 91: ...ments on page 28 Netware Packet Receive Buffers Follow these guidelines for NetWare 4 11 and 5 0 The driver requires 200 packet receive buffers for each installed NIC You must increase the minimum and maximum packet receive buffers values by 200 for each installed NIC For example if you install two NICs increase the parameters in the STARTUP NCF file by 400 as follows Slot Numbers for Multiple NIC...

Страница 92: ...this chapter to load the EtherCD copy the driver and load the driver You need not specify a slot number when only one NIC is installed 3 In the NetWare Console issue a CONFIG command 4 Write down the slot number that is listed for the installed NIC 5 Install the second 3CR990 NIC 6 Follow the installation instructions in this chapter to install the driver on the second NIC Each time you load the d...

Страница 93: ...e MSM NLM ETHERTSM NLM and NBI NLM files from the NWSERVER directory on the EtherCD to the directory on your hard drive where other NLM files are located The NLM file location is typically in the sys system directory You need a NetWare client system to copy the NLM files to the server 2 Insert installation diskette 2 in drive A 3 At the server prompt type load inetcfg If you copy the NLM files to ...

Страница 94: ...x_1 11 Type the name of the NIC and press Enter You are prompted for the slot number For information on how to verify the slot number see Verifying the PCI Slot Number on page 99 12 Enter the slot number and then press Enter 13 Press Esc Enter to save and then Esc The Internetworking Configuration screen appears 14 Select Bindings and then press Enter The configured protocols for installed NICs ap...

Страница 95: ...appears 20 Press Esc to Exit The main menu appears NetWare 4 11 Restart the server NetWare 5 0 Select Reinitialize System Press Enter to reinitialize Press Esc to exit from the program Installing the Server Driver and DynamicAccess Technology Using AUTOEXEC NCF You can also install the server driver by editing or adding new LOAD commands in the AUTOEXEC NCF file With NetWare installed and the serv...

Страница 96: ...is the first installation of the 3Com server NIC driver it does not appear in this list 5 Press Insert A system message for selecting a disk drive appears 6 Press F3 7 Enter a path to the volume that contains the driver For example 3C99XC_TXM nwserver The Select a Driver to Install screen appears with the 3Com EtherLink Server NIC driver name highlighted 8 Press Enter to select the driver NetWare ...

Страница 97: ...er parameters in this screen Loading the Driver 1 Select Save parameters and load driver The installation program loads the configured driver and then writes the appropriate LOAD and BIND commands to the AUTOEXEC NCF file The system assigns a network number 2 Enter a network number or press Enter to select the system assigned number If no errors are encountered the installation program asks whethe...

Страница 98: ...nostic program for DOS See Verifying the PCI Slot Number on page 99 for instructions The values name1 and name2 are unique names assigned to each NIC by your system administrator The values name1 and name 2 must be different The frame parameters frametype1 and frametype2 can be one of the following Ethernet_802 2 Ethernet_802 3 Ethernet_II Ethernet_SNAP Make sure that the frametype for the server ...

Страница 99: ...ou should use Example After you issue the command a message appears At the end of the message additional text similar to the following appears Total of 2 3C99x PCI adapter card s found Supported slot values are 2 3 Slot 2 Installing Server Features Two drivers are associated with DynamicAccess technology server features under NetWare SE and LBRSL 1 From the Configuration Options screen select Prod...

Страница 100: ...creen 2 From the Configuration Options screen select NCF files options create edit server startup files 3 Select Edit AUTOEXEC NCF file 4 Make the following changes to the AUTOEXEC NCF file a Add a command to load the SE and LBRSL drivers before any commands to load LAN drivers For example load se load lbrsl b Add or verify the LOAD commands for the LAN drivers for all slot frame instances c For e...

Страница 101: ...s on page 108 For more information on maintaining the group configuration see Maintaining Groups on page 104 5 Save the AUTOEXEC NCF file and return to the server prompt The sample AUTOEXEC NCF file in Figure 6 shows a group of two NICs The primary NIC in slot 10001 is bound to a secondary NIC in slot 10002 CAUTION If you are connecting the 3CR990 NIC to a spanning tree enabled hub or switch it is...

Страница 102: ...received To verify that the server is communicating over the network complete the following procedure 1 Set up a NetWare client on a LAN supported by the server to be tested load se load lbrsl Define primary NIC slot frame instances load 3c990 slot 10001 frame ethernet_802 2 name p1_802 2 load 3c990 slot 10001 frame ethernet_ii name p1_ii Define secondary NIC slot frame instances load 3c990 slot 1...

Страница 103: ... Values Description Slot Number All PCI slot numbers valid to the system Represents the PCI slot number of the physical NIC to be configured Node Address Default is factory assigned MAC address Leave blank to use factory assigned default ENABLE_CHKSUM Enable DISABLE NetWare 5 0 only Enter the parameter on the load line to enable TCP IP checksum offload Do not enable TCP IP checksum offload if you ...

Страница 104: ...ready installed and configured Two drivers are associated with DynamicAccess technology server features in NetWare SE and LBRSL Planning the Configuration Plan the cable changes required to connect each primary NIC and all secondary NICs to the same network segment For optimum failover performance turn the spanning tree feature off at switches that are connected directly to the server If the spann...

Страница 105: ...stalling more than one NIC See Obtaining Slot Numbers on page 92 for instructions Adding a Secondary NIC to a Group 1 Install the new secondary NIC Follow the procedures in Installing and Connecting the NIC on page 34 Connect the new secondary NIC to the network that is used by the group 2 Make the following changes to the AUTOEXEC NCF file Add or verify the LOAD commands for the LAN drivers for a...

Страница 106: ...rimary and all secondary NICs Place this command after the LAN driver LOAD commands or the SYS ETC INITSYS NCF command To specify a load balancing group with resilient load se load lbrsl Define primary NIC slot frame instances load 3c990 slot 10001 frame ethernet_802 2 name p1_802 2 load 3c990 slot 10001 frame ethernet_ii name p1_ii Define secondary NIC slot frame instances load 3c990 slot 10002 f...

Страница 107: ...e p2_802 2 load 3c990 slot 10002 frame ethernet_ii name p2_ii load 3c990 slot 10003 frame ethernet_802 2 name p3_802 2 load 3c990 slot 10003 frame ethernet_ii name p3_ii Define Group 2 primary NIC slot frame instances load 3c990 slot 10004 frame ethernet_802 2 name p4_802 2 load 3c990 slot 10004 frame ethernet_ii name p4_ii Define Group 2 secondary NIC slot frame instances load 3c990 slot 10005 fr...

Страница 108: ...parameter is specified only about the specified group A separate message is displayed for each loaded frame type Board numbers are also displayed Information about the relationship between the board numbers and the frame types is shown in the NetWare 5 Console Monitor On the Available Options screen select LAN WAN drivers for this information Syntax lbrsl group lb addr RxIPAddr pri_slot sec_slot s...

Страница 109: ...here pri_slot is the PCI slot number of the primary NIC in the group for which information is to be displayed If this parameter is not specified information for all groups is displayed An example of the type of information displayed follows Group NNN LB group Primary board id Original NNN Current NNN Load balancing on incoming IP packets Enabled IP Rx Addr NN NN NN NN Primary node address XX XX XX...

Страница 110: ...ts the timeout value in seconds that the software waits before retransmitting a probe packet when a send request to the link support layer LSL is not acknowledged A message is displayed for each loaded frame type Syntax lbrsl probe interval seconds where seconds is the interval in seconds Example lbrsl set probe interval 1 Default 1 second If the delay is longer than 1 second NIC or link failures ...

Страница 111: ... failed see retry count If no argument is specified or if the specified argument is invalid the current value is displayed Otherwise the new value is displayed Syntax lbrsl send timeout pri_slot seconds where pri_slot is the PCI slot number of the primary NIC seconds is the time in seconds Example lbrsl send timeout 1001 10 Default 10 Syntax lbrsl ungroup pri_slot where pri_slot is the PCI slot nu...

Страница 112: ...n help you diagnose and solve NIC installation configuration and upgrade problems go to http knowledgebase 3com com Table 3 Troubleshooting Groups In NetWare Symptom Tip More than one non 3Com server NIC has been detected in one or more groups on this server You can use only one NIC that is not a 3Com server NIC in one 3Com load balancing RSL group per server Check the groups and remove all but on...

Страница 113: ...ings for the NIC The default setting is shown in uppercase in the Settings column Before you change the NIC configuration settings contact your system administrator Option Description Settings NetBoot ROM Provides the ability to boot a PC over the network Enables or disables the Netboot ROM if a boot ROM is installed on the NIC ENABLED Disabled ...

Страница 114: ...t full duplex You must also manually set the NIC Media Type setting Half Duplex sets the NIC to operate in half duplex mode You must also set the NIC Media Type setting Note If you are running Windows 2000 changes made to the Duplex setting though the 3Com NIC Diagnostics are not reflected in the registry unless you also change the Media Select property setting in Windows 2000 1 In the Device Mana...

Страница 115: ...elect the Advanced tab 4 Select Media Select in the property list and make the appropriate setting change in the Value list AUTO SELECT 100BASE TX 100 Mbs 10BASE T 10 Mbs Self Healing Monitors firmware heartbeat and interrupt stalls and tries to automatically reset the NIC Also monitors link status and reports changes ENABLED Disabled Self Healing Enhanced Checks for transmit receive errors and tr...

Страница 116: ...stalling the 3Com NIC Diagnostics Program on page 50 for installation instructions See Using the 3Com NIC Diagnostics Program on page 117 for usage instructions 2 Open the Windows Start menu 3 Select Programs and then 3Com NIC Utilities 4 Click 3Com NIC Doctor Windows 2000 Windows NT 4 0 Windows 98 or Windows 95 3Com Configuration and Diagnostics program for DOS Configure the NIC locally using the...

Страница 117: ... configure the NIC make sure that The NIC is installed in the PC and is connected to the network The network driver is installed The 3Com NIC Diagnostics program is installed To change the NIC general configuration settings such as network driver optimization duplex mode and media type 1 Open the Windows Start menu 2 Select Programs and then 3Com NIC Utilities DMI 2 0 or 2 0s Configure the NIC rem...

Страница 118: ... of available options Repeat the process to change any other configuration setting To undo changes and return the settings to their previous values click Undo Changes To return the settings to the factory default settings click Set Factory Defaults 8 Click OK to save the changes and exit the program Using the 3Com DOS Configuration Program This section describes NIC configuration for computers run...

Страница 119: ...dure for other options For more information on a specific option select the option and press F1 If you do not have a DOS bootable diskette see Making a DOS Bootable Diskette on page 30 for instructions On the Configuration screen when you choose the Auto Select setting for Media Type the setting for Duplex is automatically changed to Auto Select Selecting Auto Select for Duplex automatically chang...

Страница 120: ...een appears 6 Under Network Parameter select NetBoot ROM 7 Open the Set Value list box and select Enabled to enable the boot ROM or Disabled to disable the boot ROM 8 Click OK to save the setting and exit the program Booting From the Network The boot process for the MBA boot ROM varies depending on the type of PC you have BBS BIOS compatible or non BBS BIOS compatible If your PC was purchased rece...

Страница 121: ...PC The MBA attempts to boot from the network using the default boot method PXE To change the default method or any other MBA configurations press Ctrl Alt B when the following message appears Initializing MBA Press Ctrl Alt B to configure If the network boot fails the following message appears Network boot aborted press any key to continue The BIOS continues to the next device in the boot order fo...

Страница 122: ...ppears Initializing MBA Press Ctrl Alt B to configure Disabling the 3Com Logo To disable the 3Com logo that appears during startup 1 Make sure that the NIC the network driver and the 3Com NIC Diagnostics program are installed 2 Open the Windows Start menu 3 Select Programs and then 3Com NIC Utilities 4 Click 3Com NIC Doctor The 3Com NIC Diagnostics General screen appears 5 On the General screen ma...

Страница 123: ...cy and then enable encryption on the NIC The security policy establishes and defines how encrypted network traffic between your PC and a specified server occurs Authentication enables the receiver to verify the sender of a packet by adding key fields to a packet without altering the packet data content The following table shows the available levels of encryption Data encryption is available for Wi...

Страница 124: ...s Custom varies This provides encryption and an extra authentication that includes the IP header Custom allows you to select options for both AH and ESP such as MD SHA 1 and DES 3DES And you can select the rate at which new keys are negotiated Microsoft uses IKE key exchange to renew keys every x seconds or y bytes However this practice is computationally very high in overhead Some users may set t...

Страница 125: ...IP Security Policies on Local Machine 2 Right click inside the right pane below the list items 3 From the pop up menu select Create IP Security Policy The IP Security Policy Wizard Starts 4 Click Next The IP Security Policy Name screen appears 5 Enter a name for the new security policy that you are creating You can enter a description to help you identify this policy 6 Click Next The Requests for ...

Страница 126: ...quence creates a filter for the policy The IP Filter List screen appears 1 Click Add A new IP Filter List screen appears 2 Enter a name for the filter and then click Add The IP Filter Wizard starts 3 Click Next The IP Traffic Source screen appears 4 Click Next The IP Traffic Destination screen appears 5 Select A Specific IP Address in the pull down list The IP Address entry box appears on the IP T...

Страница 127: ... name for example 3DES to the Server and then click Next The Filter Action General Options screen appears 4 Accept the default and then click Next The screen Communicating with computers that do not support IPsec appears 5 Accept the default value and then click Next The IP Traffic Security screen appears 6 Select Custom and then click Settings The Custom Security Method Settings screen appears 7 ...

Страница 128: ... the previous step Enabling Encryption An encryption policy must exist in the Console Root IP Security Policies on the Local Machine screen before you can enable encryption on the 3CR990 NIC To enable encryption 1 Right click the desired policy icon in the right pane of the screen 2 Select Assign 3 A green plus symbol appears on the policy icon to indicate that encryption is toggled on Disabling E...

Страница 129: ...e following table that can assist with network troubleshooting Three LEDs are located below the cable connector The LEDs operate as follows To access a database of technical information that can help you diagnose and solve NIC installation configuration and upgrade problems go to http knowledgebase 3com com LED State Meaning 10 LNK link On If drivers are installed the 10BASE T connection is active...

Страница 130: ... valid connection between the NIC and the network Transmit lights if the NIC is transmitting information Receive lights if the NIC is receiving information Duplex indicates if the NIC is transmitting data across the network in half duplex mode half the LED lights or in full duplex mode the entire LED lights 100 LNK link On If drivers are installed the 100BASE TX connection is active If drivers are...

Страница 131: ...ver and the 3Com NIC Diagnostics program are installed See Installing the 3Com NIC Diagnostics Program on page 50 for instructions 2 Open the Windows Start menu 3 Select Programs and then 3Com NIC Utilities 4 Select 3Com NIC Doctor Help The main Help screen appears 5 Click Help Topics to display a list of Help topics or click Find to search for a Help topic Accessing Release Notes and Frequently A...

Страница 132: ...rror Messages A red X or a A yellow exclamation point appears by the name of the NIC in the Windows Device Manager The Network Neighborhood icon does not appear on the Windows desktop The NIC does not appear in the Network Configuration or Properties window Error This device is not present not working properly or does not have all of the driver installed Code 22 Error Windows was unable to locate ...

Страница 133: ...ICs have been removed from your system 6 Click OK 7 Exit the EtherCD and then exit Windows 8 Reboot the computer 9 Install the network driver as described in Installing the Network Driver Using the EtherCD on page 40 If you are prompted for 3Com files when Windows restarts open the drop down box and select the following path options cabs To verify successful installation see Verifying Successful I...

Страница 134: ...s contact the computer manufacturer to obtain the current version of the BIOS software Run the NIC diagnostic tests Run the NIC and Network Tests as described in Running NIC Diagnostics on page 143 If the tests fail replace the NIC with a known working NIC and run the tests again using the same configuration settings as those used on the failed NIC If the working NIC passes all tests the original ...

Страница 135: ...nter the BIOS For instructions on entering the BIOS consult the computer documentation or contact the computer vendor Locate the Wake Up on LAN event setting Verify that the setting is enabled 4 Check the Remote Wake Up cable connection If the computer complies with PCI 2 2 the Remote Wake Up cable is not required Remote Wake Up is automatically enabled through the PCI bus Turn off the power to th...

Страница 136: ...ge of possible causes of common network connection problems 1 Determine whether your equipment complies with the 10BASE T or 100BASE TX standard This is particularly important for data concentrators hubs or repeaters 2 Connect a straight through cable from the PC to the hub The hub performs an internal crossover so that the signal can go from TD to RD and TD to RD When you look at an RJ 45 connect...

Страница 137: ...ling Pinouts The following illustration compares the cabling pinouts for straight through and crossover cables If the file server and client PC function together as a small network then either the existing cabling or the hub is failing When a crossover cable is used the LED on the NIC functions differently than it would under normal operating conditions For example with a correct crossover connect...

Страница 138: ...The Device Manager screen appears 5 Double click Network Adapters 6 Right click on the name of the NIC 7 Select Uninstall on the pop up menu A warning message appears 8 Click OK to confirm the driver removal The network driver is removed The Device Manager screen appears 9 Exit the Device Manager and shut down Windows If you want to physically remove the NIC from the computer shut down the system ...

Страница 139: ... the NIC from the computer If you are reinstalling the NIC software click Yes to restart the computer Windows 95 and Windows 98 To remove the network driver 1 Double click the My Computer icon then the Control Panel icon and then the System icon 2 Click the Device Manager tab 3 Double click Network adapters 4 Highlight the name of the NIC 5 Click Remove 6 Click OK to confirm the device removal You...

Страница 140: ...cols tab 4 In the Protocols tab select DAPass Thru Driver Transport 5 Click Remove 6 Follow the prompts to remove the software and reboot the server Windows 2000 The Windows 2000 system does not allow you to uninstall the DynamicAccess technology miniport using the Device Manager To remove DynamicAccess technology server features 1 Launch the Windows 2000 Network and Dial up Connections window 2 S...

Страница 141: ...In the Other Installation Actions screen select View Configure Remove installed products The Currently Installed Products screen appears listing software products that are installed in the system 4 From the list of products select 3Com DynamicAccess Server Features and press Del Select Yes to remove the software For instructions on removing the 3Com NIC Diagnostics Program from your computer see R...

Страница 142: ......

Страница 143: ...gnostics program if you are running any of the following operating systems DOS NetWare This chapter explains how to Run the NIC diagnostic tests View the NIC LEDs in the NIC Diagnostics program View network statistics Use the 3Com icon in the Windows system tray Remove the 3Com NIC Diagnostics program Before starting any diagnostics program close all running applications The following sections exp...

Страница 144: ...ion Program on page 118 Running the NIC Diagnostics Tests The 3Com NIC Diagnostics program for Windows contains tests that can check the status of the following items Network NIC To run the NIC Test or Network Test 1 Make sure that the NIC the network driver and the 3Com NIC Diagnostics program are installed 2 Open the Windows Start menu 3 Select Programs and then 3Com NIC Utilities 4 Click 3Com N...

Страница 145: ...nfigured for the DNS server Click Help to obtain general information about the function of a screen To obtain specific information about any topic on a screen click the question mark in the upper right corner of the screen move it over a topic and click once Tab Description General Select the General tab to display the node address I O address and device ID for the installed NIC Configuration Sele...

Страница 146: ...s for your network Running the NIC Test Run the NIC Test to check the physical components connectors and circuitry on the NIC 1 On the Diagnostics screen click Run NIC Test The NIC Test screen appears 2 Click Perform NIC Test While the test is running a progress bar indicates test progress If the test passes the NIC is functioning correctly If the test fails a message indicates the error type Clic...

Страница 147: ...etwork 1 Make sure that the NIC the network driver and the 3Com NIC Diagnostics program are installed 2 Open the Windows Start menu 3 Select Programs and then 3Com NIC Utilities 4 Click 3Com NIC Doctor The 3Com NIC Diagnostics General screen appears 5 Click the Statistics tab The Statistics screen appears The information is updated by the NIC driver every 5 seconds For a description of each statis...

Страница 148: ...m NIC Diagnostics General screen appears 5 On the General screen select the check box next to Show Icon in System Tray 6 Close the 3Com NIC Diagnostic program The NIC icon appears in the Windows system tray When you double click the icon the 3Com NIC Diagnostics program starts Displaying Network Statistics When you drag the mouse pointer over the icon but do not double click the icon a network sta...

Страница 149: ...tructions on using the Add Remove Programs Wizard in Windows see your Windows documentation To remove the 3Com NIC Diagnostics program using the EtherCD 1 Start Windows 2 Insert the EtherCD in the CD ROM drive The EtherCD Welcome screen appears 3 Click NIC Software 4 Click NIC Drivers and Diagnostics 5 Click Installation Utilities 6 Click Remove Diagnostics 7 Click Proceed and then follow the prom...

Страница 150: ......

Страница 151: ... DRIVERS For a list of additional network drivers that are not included on the EtherCD and instructions on how to install them go to the following 3Com World Wide Web site http support 3com com infodeli tools nic ...

Страница 152: ......

Страница 153: ...r Supports bus master scatter gather DMAs Dimensions Length 13 31 cm 5 24 in Height 8 51 cm 3 35 in Power requirement 5 V 5 operating 1 26A maximum for normal operation 375 mA for low power mode Network Interface 10 Mbps Ethernet 10BASE T Ethernet IEEE 802 3 industry standard for a 10 Mbps baseband CSMA CD local area network 100 Mbps Ethernet 100BASE TX Ethernet IEEE 802 3u industry standard for a...

Страница 154: ...circuit that can transmit data A cable is a bundle of one or more twisted pairs surrounded by an insulator Unshielded twisted pair UTP is the most commonly used type of twisted pair cable Shielded twisted pair STP provides protection against crosstalk Twisted pair cable is now commonly used in Ethernet Fast Ethernet and other network topologies Standards Conformance IEEE 802 3x full duplex auto ne...

Страница 155: ...pulses rather than modulating them onto separate carrier frequencies A wiring topology using 10BASE T specifies a wiring hub cable arranged in a star configuration and unshielded twisted pair cable Each node has a separate cable run that must not exceed 100 meters 328 ft from the node to the hub Category Use 1 Traditional telephone cable 2 Data transmissions up to 4 MHz 3 Voice and data transmissi...

Страница 156: ...100 Mbps A broadcast architecture A specific media access control MAC scheme A wiring topology using 100BASE TX specifies a wiring hub cable arranged in a star configuration and Category 5 UTP or STP wiring Each node has a separate cable run that must not exceed 100 meters 328 ft from the node to the hub RJ 45 Connector Pin Assignments The following illustration shows the RJ 45 connector pin assig...

Страница 157: ...her pause frame to tell the transmitter to resume transmission or wait for transmission to resume at the end of the specified period With asymmetric flow control only one of two linked devices can receive pause frames With symmetric flow control both linked devices can send and receive pause frames Link Negotiation Related to flow control is the auto negotiation capability in which linked devices ...

Страница 158: ......

Страница 159: ...p www 3com com managedpc About the 3Com DMI Agent The 3Com DMI Agent allows you to obtain basic NIC information including Node address MAC address Driver version Additionally depending on the features of your NIC the 3Com DMI Agent allows you to view and configure advanced NIC features including Managed PC Boot Agent MBA software Remote Wake Up events Workgroup keep alive packet Remote system aler...

Страница 160: ...ion does not receive irrelevant information for the NIC For a description of each MIF that is supported by the 3Com DMI Agent see the 3Com DMI Agent User Guide included with the 3Com DMI Agent software on the EtherCD System Requirements This section lists the client PC and network management requirements for installing and using the 3Com DMI Agent Client PC Requirements Your PC requires the follow...

Страница 161: ...to install the 3Com DMI Agent on a PC running Windows NT 4 0 Windows 98 or Windows 95 To install the 3Com DMI Agent 1 Make sure that the PC meets the requirements listed in Client PC Requirements on page 160 2 Make sure that the EtherLink NIC is installed in the PC and is connected to the network 3 Insert the EtherCD in the CD ROM drive The EtherCD Welcome screen appears 4 Click NIC Software 5 Cli...

Страница 162: ...wser or a network management application that supports DMI 2 0 or 2 0s to verify that the 3Com NIC is present See the 3Com DMI Agent User Guide or contact your system administrator for instructions If you have 3Com DynamicAccess software and a foreign non 3Com NIC installed the foreign NIC is displayed as a 3Com NIC in the DMI browser ...

Страница 163: ...e describes the navigation links available on the Welcome screen Links Description User Guide Prints a PDF version of the user guide Copies the online version of the user guide to your desktop Views the user guide online with a web browser NIC Software Installs and configures the NIC in supported Windows operating systems Installs DynamicAccess technology Creates installation diskettes to install ...

Страница 164: ...reinsert the CD in the CD ROM drive Text Files The following table lists the text files that are included in the Help directory on the 3Com EtherCD Subdirectory Description English Each language subdirectory contains files specific to that language This subdirectory contains copies of Adobe Acrobat Reader 4 0 or 3 0 CMI Client installation files the Disk Copy utility PDF and HTML versions of the u...

Страница 165: ...s information about technical assistance services available from 3Com trouble txt Contains troubleshooting tips unt_nt4 txt Explains how to perform an automated installation of Windows NT 4 0 over the network unattended install unt_w98 txt Explains how to perform an automated installation of Windows 98 over the network unattended install w95ndis txt Provides instructions specific to Windows 95 for...

Страница 166: ......

Страница 167: ... NT For instructions see the WINNT TXT file in the HELP directory on the EtherCD Windows 2000 During the Windows 2000 installation the Hardware Wizard detects installed NICs and installs drivers it finds for them from the Windows 2000 CD If you want to install the latest software from the 3Com EtherLink Server CD after you finish installing Windows 2000 restart the server and follow the instructio...

Страница 168: ... In the Device Types screen Locate the Network Boards field and notice that there are no NICs listed From the Options menu select Modify 4 In the next screen select Network Boards and press Enter 5 Press Ins Add a Board 6 Press Ins Add Unlisted Driver 7 Remove the NetWare CD from the CD ROM drive 8 Insert the 3Com EtherLink Server CD in the CD ROM drive 9 Press F3 10 Enter the location of the driv...

Страница 169: ...indows appear Locate the Network Boards list in the Protocols window The installed NICs are listed in this window Select each installed NIC and configure its protocols Proceed with the installation and reboot when you are prompted to do so 16 When the installation is finished edit the STARTUP NCF file Specify receive buffers for each installed NIC ...

Страница 170: ......

Страница 171: ... 24 hours a day 7 days a week through the following online systems World Wide Web site 3Com Knowledgebase Web Services 3Com FTP site 3Com Bulletin Board Service 3Com BBS 3Com FactsSM Automated Fax Service World Wide Web Site To access the latest networking information on the 3Com Corporation World Wide Web site enter this URL into your Internet browser http www 3com com This service provides acces...

Страница 172: ...the following information into your FTP client Hostname ftp 3com com Username anonymous Password your Internet e mail address 3Com Bulletin Board Service The 3Com BBS contains patches software and drivers for 3Com products This service is available through analog modem or digital modem ISDN 24 hours a day 7 days a week Access by Analog Modem To reach the service by modem set your modem to 8 data b...

Страница 173: ...m service partners who are qualified to provide a variety of services including network planning installation hardware maintenance application training and support services When you contact your network supplier for assistance have the following information ready Product model name part number and serial number A list of system hardware and software including revision levels Diagnostic error messa...

Страница 174: ...erial number A list of system hardware and software including revision levels Diagnostic error messages Details about recent configuration changes if applicable Here is a list of worldwide technical telephone support numbers Country Region Telephone Number Asia Pacific Rim Australia Hong Kong India Indonesia Japan Malaysia New Zealand Pakistan Philippines P R of China Singapore S Korea From anywhe...

Страница 175: ...ance Germany Hungary Ireland Israel Italy Netherlands Norway Poland Portugal South Africa Spain Sweden Switzerland U K 0800 297468 0800 71429 800 17309 0800 113153 0800 917959 0800 1821502 00800 12813 1800 553117 1800 9453794 1678 79489 0800 0227788 800 11376 00800 3111206 0800 831416 0800 995014 900 983125 020 795482 0800 55 3072 0800 966197 Latin America Argentina Brazil Chile Colombia Mexico Pe...

Страница 176: ...ies you may call the toll free numbers select option 2 and then option 2 Austria Belgium Denmark Finland France Germany Hungary Ireland Israel Italy Netherlands Norway Poland Portugal South Africa Spain Sweden Switzerland U K 0800 297468 0800 71429 800 17309 0800 113153 0800 917959 0800 1821502 00800 12813 1800553117 1800 9453794 1678 79489 0800 0227788 800 11376 00800 3111206 0800 831416 0800 995...

Страница 177: ...port services accessing 131 3Com URL 171 3ComFacts 173 3CR990 NIC features 16 specifications 153 802 1p packet priority offload 26 73 802 1p support property 61 A accessing Help 131 ACT activity LED troubleshooting with 130 activity on the network verifying 147 148 adding NICs to a group NetWare 105 106 Windows 66 administration with DynamicAccess software 68 Alert Type 115 alerts remote system ov...

Страница 178: ...ddress 66 67 deleting or editing a VLAN Windows 70 Desktop Management Interface DMI overview 23 159 Diagnostics program starting 51 diagnostics program for DOS 116 Diagnostics tab 145 diagnostics tests running 144 disabling encryption 128 disabling load balancing for a group Windows 69 disk making a DOS boot 30 diskettes creating 30 obtaining 29 display status command 108 displaying group properti...

Страница 179: ...w 25 efficient multicast control configuring 68 EIA TIA 568 standards 154 ENABLE_CHKSUM 103 encryption binding a filter 127 binding a filter action 127 creating a policy 124 defining a Console 124 disabling 128 enabling 128 filter action creating a 127 filter creating a 126 installing LAN Encryption software 76 LAN Encryption software overview 14 error messages sending to NetWare console 103 Error...

Страница 180: ... fresh install NetWare 167 Windows 2000 167 Windows NT 167 hardware 34 multiple NICs 52 NetWare NOS 167 NetWare verifying 102 overview 27 Remote Wake Up cable 36 requirements hardware and software 28 38 server features NetWare 99 verifying 48 Windows 2000 NOS 167 Windows NT NOS 167 installation steps 27 installing drivers NetWare server 89 Windows 2000 40 Windows 95 44 Windows 98 43 Windows NT 4 0...

Страница 181: ...ort 61 miniport connections relating to LAN connections 72 multicast control configuring 68 multiple collisions viewing 147 multiple NICs configuring offloads for 76 in NetWare 91 in Windows 52 N NetBoot ROM default setting 113 description 113 NetWare adding a group 106 adding NICs to a group 105 changing settings using DOS Diagnostics program 119 configuration parameters 103 configuring server fe...

Страница 182: ...guring for a group of different NICs 76 disabling 74 enabling 74 enabling TCP IP checksum for NetWare 103 support 61 online Help 131 online Knowledgebase 131 online technical services 171 P packet priority 802 1p offload 26 73 packet receive buffers NetWare 91 packets viewing 147 148 PC requirements 28 PCI slot identifying 33 pin assignments 156 pinouts crossover cable 137 primary NIC 18 61 69 bin...

Страница 183: ...re 99 maintaining NetWare 104 Windows 60 removing 140 141 SHD_LEVEL 103 shielded twisted pair STP cable 154 single collisions viewing 147 Slot Number 103 slots multiple NICs NetWare 91 obtaining numbers NetWare 92 software 3Com NIC Diagnostics program installing 50 NetWare drivers installing 89 removing 138 updating 51 Windows network drivers installing 39 spanning tree 61 104 specifications cabli...

Страница 184: ...ver installation NetWare 102 successful installation 48 virtual NIC 18 VLANs 17 802 1p Support property 62 Windows 60 configuration guidelines 62 creating 67 deleting or editing 70 ID numbers legal ranges 67 number allowed in a server 62 window defined 63 W wait tmo command 111 warning messages sending to NetWare console 103 Windows adding NICs to a group 66 changing the primary NIC 69 creating a ...

Страница 185: ...T installing DynamicAccess 58 Windows NT 4 0 help driver installation 40 167 installing driver 48 multiple NIC installations 53 removing NIC software 139 verifying installation 49 Windows system tray 3Com icon 148 workgroup keep alive packet 24 World Wide Web WWW 171 172 Y Year 2000 compliance 2 yellow exclamation point in Windows Device Manager 132 ...

Страница 186: ......

Страница 187: ...ooklet prepared by the Federal Communications Commission helpful The Interference Handbook This booklet is available from the U S Government Printing Office Washington D C 20402 Stock No 004 000 00345 4 Tested to comply with the FCC Standards for home and office use NOTE In order to maintain compliance with the limits of a Class B digital device 3Com requires that you use quality interface cables ...

Страница 188: ... form the Software and accompanying documentation the Documentation subject to the terms and restrictions set forth in this Agreement You are not permitted to lease rent distribute or sublicense except as specified herein the Software or Documentation or to use the Software or Documentation in a time sharing arrangement or in any other unauthorized manner Further no license is granted to you in th...

Страница 189: ...OVERNMENT LEGENDS The Software Documentation and any other technical data provided hereunder is commercial in nature and developed solely at private expense The Software is delivered as Commercial Computer Software as defined in DFARS 252 227 7014 June 1995 or as a commercial item as defined in FAR 2 101 a and as such is provided with only such rights as are provided in this Agreement which is 3Co...

Страница 190: ... 326 5000 Copyright 2000 3Com Corporation All rights reserved PRODUCT REGISTRATION To ensure the very best service and support register your 3Com product now International Customers Visit http www 3com com productreg to register U S Customers Complete and mail the registration card or visit http www 3com com productreg to register ...

Отзывы: