background image

ZTE-J G730/G740/G750/G780 GoTa Digital Mobile Phone User Manual 

62 

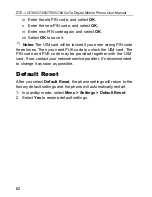
iv  Enter the old PIN code, and select 

OK

v  Enter the new PIN code, and select 

OK

vi  Enter new PIN code again, and select 

OK

vii Select 

OK

 to save it. 

 Notes:

The UIM card will be locked if you enter wrong PIN code 

three times. Then you need PUK code to unlock the UIM card. The 
PIN code and PUK code may be provided together with the UIM 
card. If not, contact your network service provider. It’s recommended 
to change it as soon as possible.   

Default Reset 

After you select 

Default Reset

, the phone settings will return to the 

factory default settings and the phone will automatically restart. 
1.  In standby mode, select 

Menu > Settings > Default Reset

2. Select 

Yes

 to restore default settings. 

Summary of Contents for -J G730

Page 1: ...ZTE J G730 G740 G750 G780 GoTa Digital Mobile Phone User Manual ...

Page 2: ...any form or by any means electronic or mechanical including photocopying and microfilm without the prior written permission of ZTE Corporation The manual is published by ZTE Corporation We reserve the right to make modifications on print errors or update specifications without prior notice Version No V 1 0 Manual No 079584500477 Edition Time 20090807 ...

Page 3: ...vices and Facilities 11 Mobile Phone 11 Precautions for Potentially Explosive Atmospheres 12 Precautions for Electronic Devices 13 Safety and General Use in Vehicles 13 Aircraft Safety 13 Battery Use 14 Getting Started 15 What re Included 15 Technical Parameters 15 Key Definition 16 Icon Introduction 18 Battery 19 Installing the Battery 19 Charging the Battery 19 Removing the Battery 21 Inserting ...

Page 4: ...ate Calls 26 Make Group Calls 27 Receive PTT Calls 28 End PTT Calls 28 Broadcast Call 29 PTT Emergency Calls 29 Functions during PTT Calls 30 Group Members Status Query 30 Group Members Management 30 Upgrade Ordinary Calls to Emergency Calls 30 Switch Sound 31 Watching Function 31 Accessory Mode 31 Call Attribute 32 Dynamic Management 32 Supplement Service 33 Make and Receive Normal Calls 35 Make ...

Page 5: ...uted 36 Switch Sound 36 Three way Call 37 Call Waiting 37 Setting 37 Call Forward 37 Call Waiting 38 Emergency 38 Call Answer 38 Dial Restrict 39 Free Dial 39 Phone Book 40 Personal Book 40 View 40 Add 41 Search 41 Delete 42 Set Ringtone 42 Rename 43 Move 43 Check Space 44 Delete All 44 Send Message 44 System Book 45 Call History 46 Call Icons 46 View 46 ...

Page 6: ... Calls 47 Send Message 48 View Phone Book Information 48 SMS 49 Compose 49 Send 49 Phrases 49 Save as Draft 49 Back 50 Inbox 50 View 50 Receive New Message 51 Outbox 51 Drafts 51 Delete All 52 Settings 52 Preset Messages 53 Assistant 54 Alarm Clock 54 Add 54 View Edit 54 Delete 54 Set Alarm Ring 55 Turn Off Alarm Ring 55 Calculator 55 ...

Page 7: ...56 World Time 57 Stopwatch 57 General Time Counting 57 Record Multiple Time Records in the Counting 57 Settings 58 Profiles 58 Change Profile 58 View Edit Profile 58 Phone 59 Idle Display 59 Backlight 59 LCD Contrast 60 Language 60 Shortcuts 60 Personal Info 60 Time Format 60 Security 61 Default Reset 62 Appendix 63 Fallback 63 Troubleshooting 63 ...

Page 8: ... condition please read this manual carefully and keep it for further use The pictures symbols and contents in this manual are just for your reference They might not be completely identical with your mobile phone Security To protect your mobile phone from illegal use take the security measures as follows Set PIN code of the UIM card if your mobile phone supports UIM card Set handset lock code Set c...

Page 9: ...be well below the maximum value because the device is designed to use only the power required to reach the network That amount changes depending on a number of factors such as how close you are to a network base station The highest SAR value when tested according to international testing procedures recommended by International Guidelines for Exposure to Radio Waves ICNIRP for use is 2 00 W kg SAR ...

Page 10: ...d to flashing lights such as when watching television or playing video games If you have experienced seizures or blackouts or if you have a family history of such occurrences please consult your doctor before playing video games on your phone or enabling a flashing light feature on your phone The video games and flashing light features are not available on all products Keep the phone out of the re...

Page 11: ...your device to determine if it is adequately shielded from RF energy In those facilities with special demand such as hospital or health care facilities please pay attention to the restriction on the use of mobile phone Switch off your phone if required Mobile Phone Please use original accessories or accessories approved by the phone manufacturer Using any unauthorized accessories may affect your m...

Page 12: ...disassemble the mobile phone or battery Do not store the phone with flammable or explosive articles Do not charge the mobile phone without battery Precautions for Potentially Explosive Atmospheres Switch off your phone prior to entering any area with potentially explosive atmospheres such as fueling areas fuel or chemical transfer or storage facilities Do not remove install or charge batteries in ...

Page 13: ...nt area Airbags inflate with great force If a phone is placed in the airbag deployment area and the airbag inflates the phone may be propelled with great force and cause serious injury to occupants of the vehicle Please turn off your mobile phone at a refueling point and the same to the place where the use of two way radio is prohibited Aircraft Safety Please turn off your mobile phone before the ...

Page 14: ...s of times but it will eventually wear out When the operating time talk time and standby time is noticeably shorter than normal it is time to replace it with a new one Please stop using the charger and battery when they are damaged or show evidence of aging Return the worn out battery to the provider or dispose of it in accordance with environment regulations Do not dispose of it in household rubb...

Page 15: ...tems are present Handset Battery Clip User manual and literature pack AC desktop charger Technical Parameters Model ZTE J G730 G740 G750 G780 Dimensions L W H 188 mm 65 mm 38 mm without clip Weight 350 g including battery Continuous Standby Time About 240 hours Continuous Talk Time About 600 minutes Notes The real continuous standby time and talk time data are subject to the real network condition...

Page 16: ...he words in the bottom right corner of the screen Send Key Used to dial or receive the calls Shortcut to view call history End Key Used to power on and off End calls Reject calls Back to standby mode Navigation Keys Up Down Left Right Key Used to move the highlight or cursor Use Up Down Key to change the system group without the speech play in standby mode Use Left Right Key to access your preset ...

Page 17: ...by mode Press the key to play the speech of current group numbers and rotate the Top Knob or Up Down Key at the moment to adjust the current volume of the phone Down Side Key Access to Set Watching Group interface by pressing it in standby mode Turn on or off the Watching Function in standby mode by holding it Turn on or off the screen display during calls by holding it Emergency Key Make emergenc...

Page 18: ...18 Icon Introduction Network signal strength Battery capacity Fallback Watching function Speaker New short message New short message and missed call Vibration status Silence mode Alarm clock Roaming Power off Away Call forwarding Out of service area Call restricted ...

Page 19: ... the battery into position 2 Push down on the lower section of the battery until it clicks into place 3 Install the battery cover Charging the Battery Your phone is powered by a rechargeable battery The battery is not fully charged when you purchase your phone but there may be enough power in the battery to switch the phone on ...

Page 20: ... battery in time when your phone automatically powers off or displays a warning Battery low Do not charge the battery more than 24 hours continuously The talk time and standby time of the phone lie on ideal working environments In practice the battery working time varies with different network conditions working environments and modes 1 Insert the phone or battery into the charger compartments 2 C...

Page 21: ...our phone and disconnect the charger with it before removing the battery 2 Pull down the battery cover lock and take out the battery cover 3 Lift the battery from the compartment and remove it Inserting and Removing UIM Card Switch off your phone disconnect the outer power source and remove the battery ...

Page 22: ...e the UIM card when it is on or connected to an outer power source Contact your operator to check whether your phone supports UIM card 3 Insert the UIM card into the slot by aligning the metal contacts area of the UIM card with the metal contacts in the slot on the phone 4 Pull the UIM card out from the slot ...

Page 23: ...a UIM card password has been set Notes The PIN code of UIM card will be provided to you with UIM card together If not please consult your network service provider It s recommended to change it as soon as possible Power Off Hold the End Key to power off the phone Locking Unlocking Your Phone You can lock your phone to avoid disoperation to your keypad when putting your phone in package or bag 1 Pre...

Page 24: ...y press The predictive text input is based on a built in dictionary To write a desired word press the keys 2 to 9 1 Select eziEn mode 2 Press keys to input desired words 3 Use the Up Down Key to select the desired predictive word 4 Select OK to input the desired word or press the 0 Key to input the word and a space at the same time 5 Press the Key to open a list of special characters and use the N...

Page 25: ...ce for the first letter Twice for the second letter And so on 2 Press the 0 key once to insert a space To delete letters select Clear 3 Press the Key to open a list of special characters and use the Number Keys to select a character Press the 2 key once to input a twice to input b three times to input c and four times to input 2 then continue pressing will start a new loop from a to 2 ...

Page 26: ... functions Each group has a unique group number to differentiate with other groups Dialing this number in PTT mode could make PTT group calls You could view the system name and number in System Book With regard to call priority levels PTT calls could fall under three categories Emergency Calls Pre emptive Priority Calls and Ordinary Calls among which Emergency Calls have the highest priority and P...

Page 27: ... for your current contact 3 Dial from Call History i Press the Send Key or select Menu Call History to display the call history list in standby mode ii Press the Up Down Key to select your desired private call record iii Hold the PTT Key to start dialing and talk after hearing a beep sound iv Release the PTT Key to listen to the other party Make Group Calls You could make group calls by the follow...

Page 28: ...ng system groups in standby mode ii Hold the PTT Key to make a group call iii Release the PTT Key to listen to the other members Receive PTT Calls 1 When receiving PTT calls you will firstly hear a short beep sound and then hear the other members speak without any operation 2 After the members finish speaking hold PTT Key and speak after hearing beep sound Release PTT Key to listen to the other me...

Page 29: ... talk after hearing a beep sound PTT Emergency Calls With the highest priority emergency calls could be made through the Emergency Key You can make the emergency call by the following means In standby mode input the emergency number for PTT private call or press the Key and input the emergency number for PTT group call then hold the Emergency Key to make the call In Call History interface select a...

Page 30: ...all members in the current group i Select Option GrMembStat to get into the group member status interface ii Select View to view the detailed list of members iii Select Next or press the Up Down Key to turn pages iv Select Back to return to the call interface Group Members Management During PTT calls you could manage the members in the group Select Option DynaManagement to perform corresponding op...

Page 31: ...hing Function Watching Status The default watching status is Off You should set the watching groups among all groups which the phone had joined in There are only four groups can be set as the watching groups at the same time 2 Set Watching Group i Select Watching Group to display the available groups you can watch or press the Down Side Key in standby mode to get into watching setting interface ii...

Page 32: ...ct Normal or Pre emptive 3 Select Save to save the setting Dynamic Management You could add or delete the group members set the priority of group members and set the talk time Notes Only the group leader has the authority to perform dynamic management Add Delete Group Member 1 In standby mode select Menu PTT Functions DynaManagement Add Delete Member 2 Enter the Group Number and Member Number or s...

Page 33: ...ivate Call Fwd is activated you could forward all incoming PTT private calls to the number you set You could perform the corresponding settings and query in the phone Notes The forward number you set should be a PTT call number 1 In standby mode select Menu PTT Functions Supplement Svc Private Call Fwd 2 Select On to activate this function if you select On you need to enter a forward number and se...

Page 34: ...elect Query and input the duty number to check if the function is activated or deactivated PTT Call Number Identity Restriction After PTT CNIR is activated other users could not see your number when you make a PTT call 1 In standby mode select Menu PTT Functions Supplement Svc PTT CNIR 2 Select On to activate this function 3 Select Off to deactivate this function 4 Select Query to check if the fun...

Page 35: ...ok i Select Book in standby mode to access the phone book and press the Up Down Key to select Personal Book ii Press the Up Down Key to select your desired contact iii If there are several phone numbers press the Up Down Key to select your desired number iv Press the Send Key to dial Notes If the dialed number is a short PTT private number pressing the Send Key will not dial this number 3 Dial fro...

Page 36: ...Rotate the Top Knob to adjust volume View Book During calls select Book to access to the phone book interface You could inquire add edit or delete phone numbers see Phone Book for details Set Muted Select Option Muted Unmute during calls If you select Muted the word Muted will appear on the screen and the other side could not hear your voice If you select Unmute you will exit from mute mode and th...

Page 37: ...st party join the conversation Call Waiting The call waiting feature enables you to receive new incoming calls when you are already in a call conversation Make sure that your network operator supports this service 1 You have a conversation with party A now 2 A new call from party B coming it will prompt a tip on your conversation screen 3 Press the Send Key to hold on the call with party A and get...

Page 38: ...s Call Call Waiting 2 Select On to activate the function and select Off to deactivate the function Emergency You could hold the Emergency Key to make emergency call in standby mode after the emergency number is set 1 In standby mode select Menu Settings Call Emergency 2 Press the Left Right Key to select the type as Group Private or Normal 3 Press the Down Key to move the cursor to Emergency No an...

Page 39: ...the Up Down Key to select Dial Restrict 4 Press the Up Down Key to select On or Off to activate or deactivate this function Free Dial You could set up to ten free dial numbers If Dial Restrict is activated these numbers are not restricted 1 In standby mode select Menu Settings Call Dial Restrict 2 Input the password and select OK to confirm 3 Press the Down Key to select Free Dial 4 Press the Up D...

Page 40: ...e numbers for each contact saved in phone such as PTT private number home number office number and mobile phone number Privt ID is PTT private number of the contact There is only one phone number for each contact saved in UIM card For easy search you could classify your contacts into several groups like Family Friends etc Icon Description Icon Description Name PTT Private Number Home Number Office...

Page 41: ...red number is set it will be dialed if you use the Send Key to dial from book When inputting contents press the Key to switch among input methods and press Key to input symbols Refer to Text Input for details on input methods In UIM i Press the Up Down Key to scroll the highlight and edit the contact name and number ii Select Save to save the contents Search The phone provides four methods for sea...

Page 42: ...Matching Search i Select Book Personal Book in standby mode ii Input the first letter of the contact name iii The highlighted name will be the first matching contact iv Press the Up Down Key to search your desired contact Delete 1 Firstly find the contact you want to delete see Search for details 2 Select Option Delete 3 Select Yes to confirm the deletion Set Ringtone Notes If the incoming call nu...

Page 43: ...the Up Down Key to select the contact record you want to move iii Select Option Move To UIM iv Select Yes to confirm v Select Yes to keep original entry Notes When there are several numbers in the record then each number will be saved as one single record in UIM card 2 Move the Record from UIM to Phone i Select Book Personal Book in standby mode ii Press the Up Down Key to select the contact recor...

Page 44: ...one iii Select Yes to confirm iv Select Yes to keep original entries v Press the Left Right Key to select the type of number Check Space 1 Select Book Personal Book in standby mode 2 Select Option Check Space 3 Select Phone to check the phone space and select UIM to check the UIM card space Delete All 1 Select Book Personal Book in standby mode 2 Select Option Delete All 3 Select Phone or UIM 4 Se...

Page 45: ...nly the group leader has the authority of dynamic group management in system book 1 Setting Watching Group i Highlight a group in the system book ii Select Option Mark to start the watching group or select Unmark to cancel the watching Notes You should apply for the watching authority before you use the function of setting watching group 2 Viewing the Group i Highlight a group in the system book i...

Page 46: ...lls Missed calls Outgoing calls PTT calls View There are two methods to view call history View from Menu 1 In standby mode select Menu Call History 2 Press the Up Down Key to select your desired category 3 Press the Up Down Key to select the record you want to view and select Option View to view the details Quick View 1 In standby mode press the Send Key to view the Call History list 2 Press the U...

Page 47: ...in the current category Save Number 1 Access to the list interface of call records see View for reference 2 Press the Up Down Key to select the record you want to save and select Option Save Number to save it in phone or UIM card Make Normal Calls 1 Access to the list interface of call records see View for reference 2 Press the Up Down Key to select the normal call record you want to dial 3 Press ...

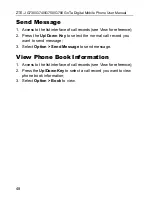
Page 48: ...ence 2 Press the Up Down Key to select the normal call record you want to send message 3 Select Option Send Message to send message View Phone Book Information 1 Access to the list interface of call records see View for reference 2 Press the Up Down Key to select a call record you want to view phone book information 3 Select Option Book to view ...

Page 49: ...e Up Down Key 4 After entering or selecting the recipient select Option Send to send the message Phrases 1 In standby mode select Menu SMS Compose Msg 2 Select Option Preset Msgs 3 Press the Up Down Key to select your desired preset message and select OK 4 Edit the short message in your need and select Send to to send the message see Send for details Save as Draft 1 In standby mode select Menu SMS...

Page 50: ...In standby mode select Menu SMS Inbox 2 Press the Up Down Key to select the message you want to view and select View to view it 3 In the viewing interface press the Up Down Key to view the whole message press the Left Right Key to view the next or previous message 4 Select Option Reply to reply the message 5 Select Option Forward to forward the message see Send for details 6 Select Option Save Num...

Page 51: ...n Key to select the message you want to view and select View to view it 3 During viewing press the Up Down Key to view the whole message press the Left Right Key to view the next or previous message 4 Select Option Forward to forward the message see Send for details 5 Select Option Delete and select Yes to delete the message 6 Select Option Save Number to save the receiver s number and the numbers...

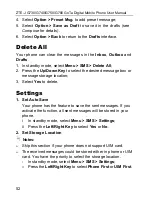
Page 52: ...message box or message storage location 3 Select Yes to delete Settings 1 Set Auto Save Your phone has the feature to save the sent messages If you activate the function all sent messages will be stored in your phone i In standby mode select Menu SMS Settings ii Press the Left Right Key to select Yes or No 2 Set Storage Location Notes Skip this section if your phone does not support UIM card The r...

Page 53: ...n Key to select the desired message iii Select View to view the message 2 Edit i Enter into the viewing interface refer to Preset Messages View for detail ii Edit the message and select Option Save to save the edited message 3 Send i Enter into the viewing interface refer to Preset Messages View for detail ii Select Option Send to to send the message refer to Send for details iii Select Option Bac...

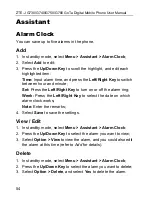
Page 54: ...t Right Key to turn on or off the alarm ring Week Press the Left Right Key to select the date on which alarm clock works Note Enter the remarks 4 Select Save to save the settings View Edit 1 In standby mode select Menu Assistant Alarm Clock 2 Press the Up Down Key to select the alarm you want to view 3 Select Option View to view the alarm and you could also edit the alarm at this time refer to Add...

Page 55: ...d use to perform basic math calculation 1 In standby mode select Menu Assistant Calculator 2 Input numbers with Number Keys press the Key to input the decimal and press Key to negative the numbers and press the Navigation Keys to input calculation symbols 3 Select Clear to clear the input contents one by one 4 Select to figure out the result Calendar View Event 1 In standby mode select Menu Assist...

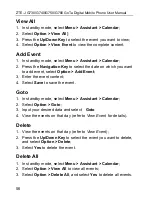
Page 56: ...select Option Add Event 3 Enter the event content 4 Select Save to save the event Goto 1 In standby mode select Menu Assistant Calendar 2 Select Option Goto 3 Input your desired data and select Goto 4 View the events on that day refer to View Event for details Delete 1 View the events on that day refer to View Event 2 Press the Up Down Key to select the event you want to delete and select Option D...

Page 57: ...d up to 10 records once General Time Counting 1 In standby mode select Menu Assistant Stopwatch 2 Select Start to start counting 3 Select Pause to stop counting 4 Select Cont to continue counting 5 Select Option Clear to clear the records Record Multiple Time Records in the Counting 1 In standby mode select Menu Assistant Stopwatch 2 Select Start to start counting 3 During the counting select Reco...

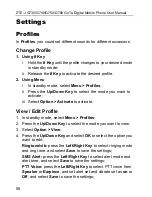
Page 58: ...elect Option Activate to activate View Edit Profile 1 In standby mode select Menu Profiles 2 Press the Up Down Key to select the mode you want to view 3 Select Option View 4 Press the Up Down Key and select OK to select the option you want to edit Ringtone vib press the Left Right Key to select ringing mode and ring tone and select Save to save the settings SMS Alert press the Left Right Key to se...

Page 59: ...all ringtone is the group ringtone you set in Book 5 Select Back to return to the option interface Phone Idle Display 1 In standby mode select Menu Settings Phone Idle Display 2 Select Wallpaper and press the Up Down Key to select the desired wallpaper and press Select to select it as the standby wallpaper 3 Select Banner edit the content and press OK to save 4 Select Date Time press the Left Righ...

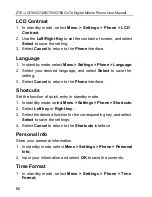
Page 60: ...to save the setting 3 Select Cancel to return to the Phone interface Shortcuts Set the function of quick entry in standby mode 1 In standby mode select Menu Settings Phone Shortcuts 2 Select Left key or Right key 3 Select the desired function for the corresponding key and select Select to save the settings 4 Select Cancel to return to the Shortcuts interface Personal Info Store your personal infor...

Page 61: ...andby mode select Menu Settings Security ii Input the password and select OK iii Select Require PIN iv Press the Up Down Key to select On or Off and input the PIN code and select OK to activate the function When it is set as On the phone requires PIN code of UIM card to power on 2 Change Password i In standby mode select Menu Settings Security ii Input the password and select OK iii Select Change ...

Page 62: ... code three times Then you need PUK code to unlock the UIM card The PIN code and PUK code may be provided together with the UIM card If not contact your network service provider It s recommended to change it as soon as possible Default Reset After you select Default Reset the phone settings will return to the factory default settings and the phone will automatically restart 1 In standby mode selec...

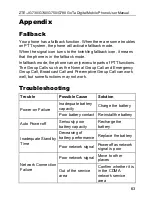
Page 63: ...ll and Emergency Group Call Broadcast Call and Pre emptive Group Call can work well but some functions may not work Troubleshooting Trouble Possible Cause Solution Inadequate battery capacity Charge the battery Power on Failure Poor battery contact Re install the battery Auto Power off Seriously poor battery capacity Recharge the battery Deceasing of battery performance Replace the battery Inadequ...

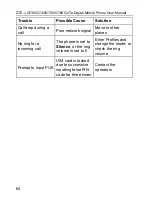
Page 64: ...g a call Poor network signal Move to other places No ring for a incoming call The phone is set to Silence or the ring volume is set to 0 Enter Profiles and change the mode or check the ring volume Prompt to input PUK UIM card is locked due to successive inputting false PIN code for three times Contact the operators ...

Reviews: