background image

3.2 Caution 

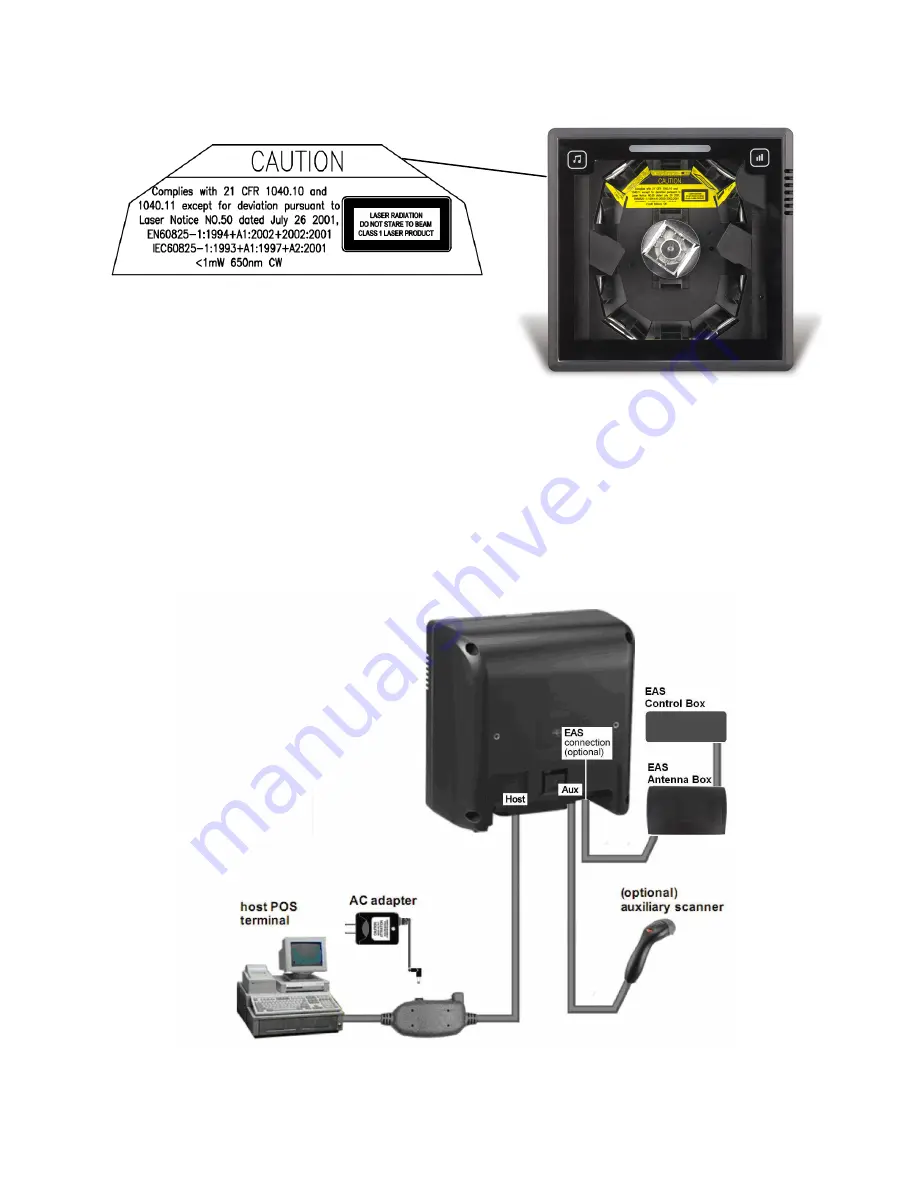
Label 


Figure 3: Label 

3.3 Cable 

Installation 

 
The scanner is to be connected to a host (e.g. POS). The use of external power is 
determined by your host but it is usually recommended. The scanner also supports 
an auxiliary scanner and EAS application. The figure below gives you an overview 
of the cable installation.   


Figure4: Cable Installation 


Summary of Contents for Z-6182

Page 1: ......

Page 2: ...iginal manual are listed below Version Date Description of Version 1 0 Apr 30 2010 Initial release 1 1 Dec 27 2010 Changed procedures in host connection and mounting plate installation 1 2 Mar 14 2011...

Page 3: ...language or computer language in any form or by any means electronic mechanical magnetic optical chemical manual or otherwise without express written consent and authorization We reserve the right to...

Page 4: ...anner motor while the laser diode continues to emit a laser beam may cause emission levels to exceed those for safe operation The scanner has safeguards to prevent this occurrence If however a station...

Page 5: ...unting Plate Installation 12 Auxiliary Handheld Scanner Connection Optional 14 Back Mounting 15 Site Preparation Configuring the Scanner 16 Scan Test 16 Set Up 17 Controlling the Scanner from POS Syst...

Page 6: ...in field the scanner has a two color LED to provide immediate visual feedback It also has two advanced touch control sensors in the front allowing beeping tone and volume adjustment With a built in EA...

Page 7: ...lly but not always supplied Model depends on customer needs 1 ea 9V power adapter Model depends on electrical requirements of your geographic location 1 ea User s manual programming guide in CD ROM a...

Page 8: ...3 Finding Your Way Around 3 1 Outline Figure 1 Outline 3...

Page 9: ...sound indication tone Volume Adjustment Adjusting sound indication volume Back Mounting Holes For permanent fixture optional Cable Release Hole Connecting interface cable Interface Cable Connection F...

Page 10: ...be connected to a host e g POS The use of external power is determined by your host but it is usually recommended The scanner also supports an auxiliary scanner and EAS application The figure below gi...

Page 11: ...h on the scanner itself Use only an AC DC power adapter approved for the scanner Use of other power supplies may cause damage to the product and void the factory warranty Follow the steps below when y...

Page 12: ...Guide 4 4 Connecting EAS The scanner s integrated EAS deactivation antenna requires an EAS host cable 1 Make sure that the power of the EAS system is off 2 Plug the cable to the appropriate connector...

Page 13: ...he cable release hole of the mounting plate as shown Make sure the flat side of the bracket goes in first 8 Figure 7 Cable Holder 4 Insert the latches of the mounting plate into the latch holes of the...

Page 14: ...ain red This is normal when the keyboard wedge is not connected to a live host terminal The LED would flash red and read no barcode if the scanner is programmed in USB interface but not connected to a...

Page 15: ...nector at the back of the scanner until it clicks 6 Insert the connecting cable in the slot of the mounting plate 7 Mate the scanner and the mounting plate engaging the tab on the underside Be careful...

Page 16: ...ed with 2 mounting holes at the back and 4 mounting holes at bottom Refer to the figure below for detailed information Back View Unit mm inch Figure 10 Diagrams for Mounting Back Bottom View Unit mm i...

Page 17: ...t in place Figure 12 Mounting Hole Positions 2 Insert the interface cable in the cable release hole of the mounting plate Figure 13 Position the interface cable 3 Insert the 10 pin modular plug of the...

Page 18: ...4 Move the scanner into position on the mounting plate engaging the tab on the underside Be careful not to pinch the cable Figure 14 Slide the mounting plate into scanner 13...

Page 19: ...10 pin modular plug of scanner cable into the Host connector at the back of the scanner until a firm click is heard 2 Take a knife to cut open the rectangular reserved hole Figure 15 Routing Hole for...

Page 20: ...screws to a depth of 6 0 mm face cable connection but requires that e cable exits from the back of the unit If desired the scanner may be mounted to your own custom bracket by using the threaded moun...

Page 21: ...s required The scanner is either pre programmed to sui the situation or it automatically detects and is ready to go In other cases the scanner must be informed about what kind of system it is connecte...

Page 22: ...which parameters are required and find their barcodes in the Programming Guide 3 Cover unwanted codes with your hand and present the desired codes one by one to the scanner the scanner beeps once as...

Page 23: ...When the scanner is disabled unable to scan the motor of the scanner will stay on until the scanner goes into sleep mode 6 5 Setting EAS System e s Th canner supports the use of an EAS antenna and can...

Page 24: ...ignal is held in its active state for a good read indication To set the timeout 1 Scan the Enter Exit Programming barcode to begin the setup 2 Scan 3 ASCII number barcodes Please see Programming Guide...

Page 25: ...ht This indicates the scanner has a motor or laser failure For motor failure a periodic beep is sounded In this case return the unit for repair Flashing red light The scanner is programmed in USB inte...

Page 26: ...touching till the desired tone is heard On the other hand there are three levels of volumes to choose from To change the volume gently touch the volume sign and the scanner would cycle to its next lev...

Page 27: ...second step is the motor switching off after 30 minutes The time period is programmable To wake up the scanner simply present an object into the IR detection range in front of the scan window or touch...

Page 28: ...th a 10 direction scan field with a 40 line scan pattern The scan volume extends approximately 20cm 8 in front of the scan window Barcode labels can be easily read when presented towards the scanning...

Page 29: ...Left to right right to left top to bottom bottom to top etc are all okay Sweep Mode is usually used for high throughput and reduced product handling Figure 21 Sweep Mode Presentation Mode is used whe...

Page 30: ...rints It can be cleaned while the scanner is running When cleaning the scan window wipe the scan window with a soft lint free cloth and a non abrasive cleaner to avoid scratching and damaging the scan...

Page 31: ...red up The red and blue LED would both light on appearing the color purple when the scanner fails the self test When it happens disconnect the scanner from its power source immediately and contact you...

Page 32: ...eyboard wedge RS 232C HID USB Physical Height 152 mm Depth 88 mm Width 152 mm Weight 685 g without cable Mounting Option Integral mounting plate Cable Standard 2 0M straight Power Input Voltage 9VDC 1...

Page 33: ...12 Dimension Unit mm inch 28...

Page 34: ...13 Decode Zone 29...

Page 35: ...CLK RTS_TTL N C 5 Ground 6 N C TX_TTL N C 7 N C RX_TTL N C 8 KB_DATA D 9 PC_DATA CTS_TTL N C 10 N C N C N C Auxiliary Port RS 232 IN Only Pin Function 1 RX_TTL 2 N C 3 5V output 300mA max 4 RTS_R 5 Gr...

Page 36: ...FUNCTION 1 PC Data 1 KB Data 2 N C 2 N C 3 GND 3 GND 4 5V 4 5V 5 PC Clock 5 KB Clock 6 N C 6 N C RS 232C Cable DTE Pin Out DB 9 F FUNCTION 2 TX 3 RX 7 CTS 8 RTS 9 5V 5 GND RS 232C Cable DCE Pin Out D...

Reviews: