RM1x SEQUENCE REMIXER
53
PA
TTERN MODE
1
After completing the “Preparing to Record” procedure
described above, select the track to record via the
RM1x keyboard as described on page 27.
2
Press the PLAY
p
button to begin recording. The
STEP record display shown above will appear.
3
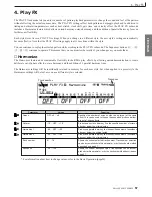
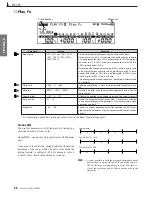
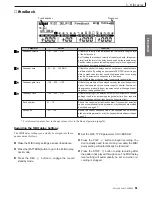
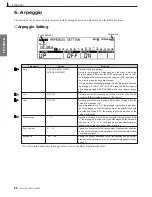
Use the display knobs to set the STEP, PAD VELO,
and GATE TIME parameters as required.
4
Enter a note.
Once the note parameters have been specified, the
note can be entered simply by playing the appropri-
ate key on the RM1x keyboard (or on your external
MIDI keyboard). A dot corresponding to the entered
note will appear on the note display and the note
pointer will advance to the next note position.
Chords can be entered simply by moving the note
pointer back to a note and entering another note at
the same location (this can be repeated as many
times as necessary). See “Moving Around In the Note
Display”, below.
During STEP recording you can press the PLAY
p
button to start playback and monitor the material be-
ing recorded.
5
Repeat steps 3 and 4 until the current track is com-
plete, then press STOP
s
to stop recording.
n
• Under step recording, note registration occurs when you
release the key(s), rather than when you press them. This
makes it easy to enter a block chord: you can pick out the
notes one by one and then release them all at the same
time.
The Note Display
The note display shows up to four 1/4-notes worth of data
at once (that’s one measure in 4/4 time). Each triangle on
the display equals a 32nd-note step. If the selected time
signature results in more than four 1/4 notes per measure,
then the display will scroll to show the extra notes.
Moving Around In the Note Display
Use Display Knob 1 to move the note pointer to any posi-
tion at which you want to enter a note, or to any note that
you want to delete. You will actually hear the appropriate
note or chord when the note pointer is moved to an exist-
ing note symbol. When you move the note pointer past the
end of the note display, the next measure will appear. If
you move past the last measure in the phrase, the first
measure of the phrase will appear.
2. Recording
The Numeric POINTER Display
The POINTER area of the step record display shows the
current position of the note pointer in measures, 1/4-note
beats, and clocks (there are 480 clocks per 1/4 note). If
you’re not sure what measure you’re seeing on the note
display while recording, check the POINTER display.
PAD Entry of Non-note Values
When an event type other than “Note” is selected during
step recording, values can be entered via the RM1x key-
board when the VALUE parameter is set to PAD.
• PB Events
When the Pitch Bend (PB) event type is selected and the
VALUE parameter is set to PAD, the full -8192 … +8191
parameter range is assigned to the RM1x keyboard.
While holding the [OCT UP] button, pressing the leftmost
key enters the value “
±
0000,” and each key to the right
increases the value by approximately 341 per semitone.
The rightmost key enters “+8191.”
While holding the [OCT DOWN] button, pressing the
rightmost key enters the value “
±
0000,” and each key to
the left decreases the value by approximately 341 per semi-
tone. The leftmost key enters “-8192.”
The keyboard can be used without holding the [OCT UP]
or [OCT DOWN] button, but in this case the center key
produces a value of “
±
0000” while keys to the left and
right decrease and increase the value by approximatyely
341 per semitone, respectively. The leftmost key enters
“-4096” while the rightmost key enters “+4096.”
• CC Events
When the Control Change (CC) event type is selected and
the VALUE parameter is set to PAD, the full 000 … 127
parameter range is assigned to the RM1x keyboard.
The leftmost key enters a value of “000,” and each key to
the right increases the value by 5 or 6 per semitone. The
rightmost key enters “127.”

