110
RM1x SEQUENCE REMIXER
PA
TTERN CHAIN MODE
1. PATTERN CHAIN Playback
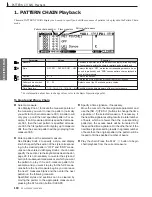
The main PATTERN CHAIN display can be used to specify and edit the sequence of patterns to be played in the Pattern Chain
mode.
Pattern chain number
Time signature
Pattern chain name
1. PATTERN CHAIN Playback
Parameter
Values
Function
Measure
Positions the pointer (on the left side of the display) at the beginning
of any measure within the chain for pattern entry or playback.
Style
OFF, P01 ... P60, END, U01 ... U50
Selects the style. “OFF” mutes the corresponding measure (i.e. no
sound is produced), and “END” causes pattern chain playback to
stop at that measure.
Section
A ... P
Selects the section.
CLEAR!
-
Deletes the style or section at the current cursor location.
Pattern chain number/
01 ... 20
Selects one of the 20 available pattern chains.
Pattern chain name
Time Signature
1/16 ... 16/16; 1/8 ... 16/8; 1/4 ... 8/4
Specifies the the time signature of the current measure.
To Create and Play a Chain
1
Select a measure.
Use Display Knob 1 to locate the measure pointer at
the measure you want to insert a pattern (normally
you will start a chain at measure 001). A pattern will
only play up until the next specified pattern. For ex-
ample, if an 8-measure pattern is specified at meas-
ure 001, then the next pattern is specified at meas-
ure 005, the first pattern will only play up to measure
004 then the second pattern will begin playing from
measure 005.
2
Enter a pattern at the selected measure.
Use Display Knob 2 to specify a style, and display
knob 4 to specify the section of the style correspond-
ing to the desired pattern. “OFF” and “END” meas-
ures can be entered via Display Knob 2. You can also
specify the section via the keyboard as described on
page 28. It is not necessary to re-enter the style and
section for subsequent measures over which you want
the pattern to play. If it is an 8-measure pattern, for
example, and you want it to play for the full 8 meas-
ures before the next measure begins, you can leave
the next 7 measures blank and then enter the next
pattern on the following measure.
Specfified styles and sections can be cleared by
moving the pointer to the appropriate measure and
pressing the F4 function button (CLEAR!).
3
Specify a time signature, if necessary.
Move the cursor to the time signature parameter and
use the [NO -1]/[YES +1] buttons to change the time
signature of the selected measure, if necessary. If
the new time signature setting results in a total number
of beats which are fewer than the corresponding
pattern(s), the excess beats will be truncated to fit
the specified time signature. On the other hand, if the
new time signature setting results in a greater number
of beats than the original pattern, the pattern will be
looped to fill the specified number of beats.
4
Play the chain. Press the PLAY
p
button to begin
chain playback from the current measure.
* For information about how to change values, refer to the Basic Operation (page26).


