background image

5

.5   

<Loading originals and print media>

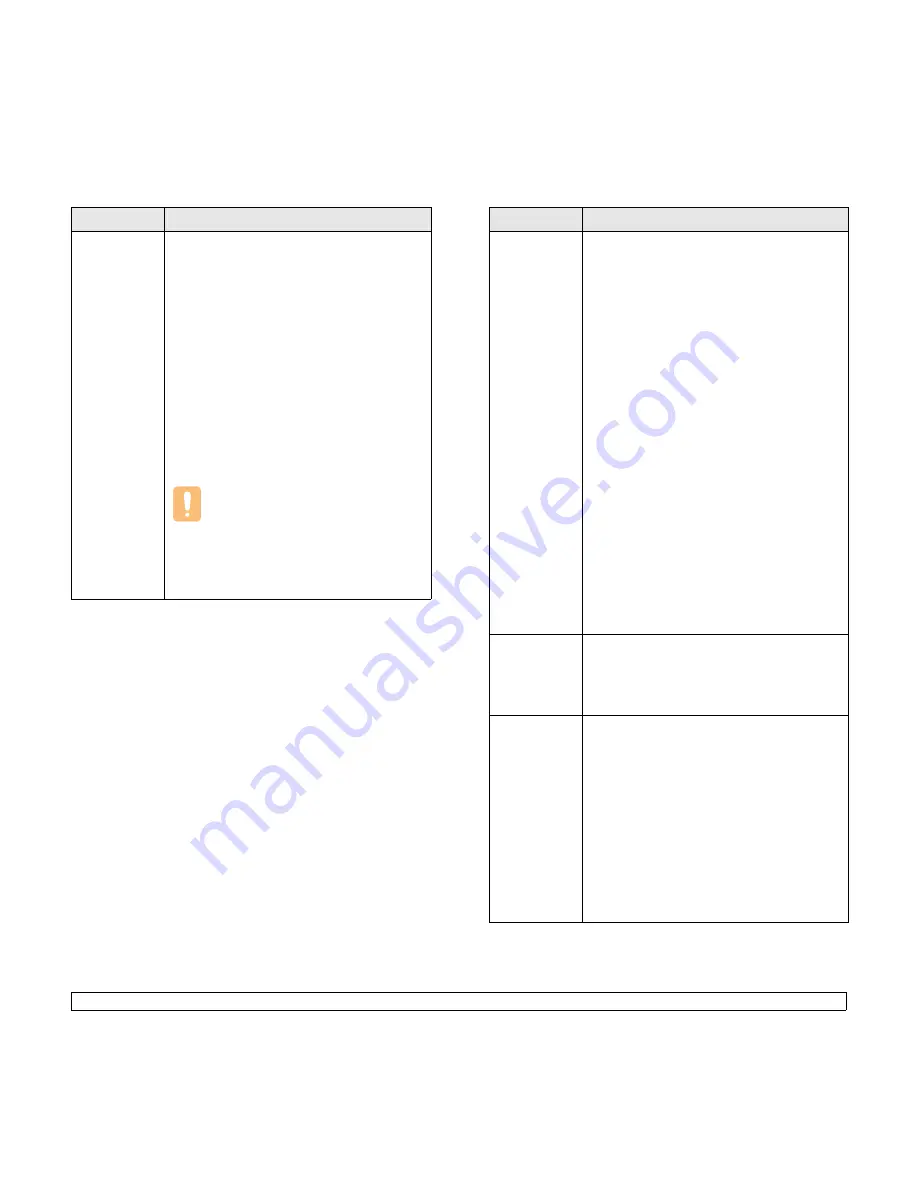
Transparencies

• To avoid damaging the machine, use only 

transparencies designed for use in laser 
printers.

• Transparencies used in the machine must be 

able to withstand 180° C (356° F), the machine’s 
fusing temperature.

• Place them on a flat surface after removing 

them from the machine.

• Do not leave them in the paper tray for long 

periods of time. Dust and dirt may accumulate 
on them, resulting in spotty printing.

• To avoid smudging caused by fingerprints, 

handle them carefully.

• To avoid fading, do not expose printed 

transparencies to prolonged sunlight.

• Ensure that transparencies are not wrinkled, 

curled, or have any torn edges.

Caution

• Recommended media: Transparen

c

y for 

a Color Laser Printers produced by HP, 
Xerox and 3M.

• It is not recommended to use 

paperbacked transparencies such as 
Xerox 3R91334 which can cause a jam 
or be scratched.

Media type

Guidelines

Labels

• To avoid damaging the machine, use only labels 

designed for use in laser printers.

• When selecting labels, consider the following 

factors:
- Adhesives: The adhesive material should be 

stable at 180° C (356° F), the machine’s 
fusing temperature.

- Arrangement: Only use labels with no 

exposed backing between them. Labels can 
peel off sheets that have spaces between the 
labels, causing serious jams.

- Curl: Prior to printing, labels must lie flat with 

no more than 13 mm (5 inches) of curl in any 
direction.

- Condition: Do not use labels with wrinkles, 

bubbles, or other indications of separation.

• Make sure that there is no exposed adhesive 

material between labels. Exposed areas can 
cause labels to peel off during printing, which 
can cause paper jams. Exposed adhesive can 
also cause damage to machine components.

• Do not run a sheet of labels through the 

machine more than once. The adhesive backing 
is designed for only a single pass through the 
machine.

• Do not use labels that are separating from the 

backing sheet or are wrinkled, bubbled, or 
otherwise damaged.

Card stock or 
custom-sized 
materials

• Do not print on media smaller than 76 mm 

(3 inches) wide or 127 mm (5 inches) long.

• In the software application, set margins at least 

6.4 mm (0.25 inches) away from the edges of 
the material.

Preprinted 
paper

• Letterhead must be printed with heat-resistant 

ink that will not melt, vaporize, or release 
hazardous emissions when subjected to the 
machine’s fusing temperature of 180° C (356° F) 
for 0.1 second.

• Letterhead ink must be non-flammable and 

should not adversely affect printer rollers.

• Forms and letterhead should be sealed in a 

moisture-proof wrapping to prevent changes 
during storage.

• Before you load preprinted paper, such as forms 

and letterhead, verify that the ink on the paper is 
dry. During the fusing process, wet ink can come 
off preprinted paper, reducing print quality.

Media type

Guidelines

Summary of Contents for Printer fwww

Page 1: ...User Guide...

Page 2: ...er 6110MFP XN are model names of Xerox Corporation Xerox and Xerox logo are trademarks of Xerox Corporation PCL 6 is trademarks of Hewlett Packard company Microsoft Windows Windows 98 Windows Me Windo...

Page 3: ...driver features 3 1 System requirements 3 2 4 Network setup Introduction 4 1 Supported operating systems 4 1 Configuring TCP IP 4 1 Setting Ethernet speed 4 2 Restoring the network configuration 4 2...

Page 4: ...an extension telephone 9 4 Receiving automatically in Ans Fax mode 9 4 Receiving faxes using DRPD mode 9 4 Receiving in secure receiving mode 9 5 Receiving faxes in memory 9 5 Other ways to fax Sendin...

Page 5: ...iner 13 9 Maintenance Parts 13 10 Checking the machine s serial number 13 11 14 Troubleshooting Clearing document jams 14 1 Clearing paper jams 14 2 Understanding display messages 14 5 Solving other p...

Page 6: ...utlet that lacks an earth connection terminal Operator Accessible Areas This equipment has been designed to restrict operator access to safe areas only Operator access to hazardous areas is restricted...

Page 7: ...h connection terminal to connect the product to an electrical outlet Never attempt any maintenance function that is not specifically described in this documentation This equipment should not be placed...

Page 8: ...dition USA Canada SEMKO IEC60950 1st Edition 2001 Regulatory Information CE Mark The CE mark applied to this product symbolizes Xerox s declaration of conformity with the following applicable Directiv...

Page 9: ...hone Company may make changes in its facilities equipment operations or procedures that could affect the operation of the equipment If this happens the Telephone Company will provide advance notice in...

Page 10: ...rland Denmark Iceland Norway United Kingdom France Ireland Portugal Finland Italy Spain Czech Republic Poland Bulgaria Romania The ENERGY STAR and ENERGY STAR MARK are registered United States tradema...

Page 11: ...tional procedures In accordance with European legislation end of life electrical and electronic equipment subject to disposal must be managed within agreed procedures Prior to disposal please contact...

Page 12: ...e magnified and printed across the sheet of paper and can then be taped together to form a poster See the Software Section Machine features The table below lists a general overview of features support...

Page 13: ...utput tray 13 manual feeder 5 control panel 14 scanner lid 6 output tray 15 scanner glass 7 USB memory port 16 waste toner container 8 front cover 17 toner cartridge 9 optional tray 2 18 imaging unit...

Page 14: ...Edit mode inserts a pause into a fax number 16 Reduce Enlarge Makes a copy smaller or larger than the original 6 Fax Activates Fax mode 17 USB Print Allows you to directly print files stored on a USB...

Page 15: ...the front of your machine 5 Scroll buttons Scroll through the options available in the selected menu and increase or decrease values 13 Number keypad Dials a number or enters alphanumeric characters 6...

Page 16: ...ing To access a printer driver help screen click Help from the printer properties dialog box Xerox website If you have Internet access you can get help support printer drivers manuals and order inform...

Page 17: ...x Dial ECM Mode Send Report Image TCR Dial Mode Receiving Receive Mode Ring to Answer Stamp Rcv Name Rcv Start Code Auto Reduction Discard Size Junk Fax Setup DRPD Mode Default Change Resolution Light...

Page 18: ...g the or button immediately moves the cursor to the indicator You can change the clock mode to 24 hour format e g 01 00 PM as 13 00 For details see the next section Note If power to the machine is cut...

Page 19: ...the volume you want 3 Press Stop Clear to save the change and return to Standby mode Note You can adjust the speaker volume only when the telephone line is connected Entering characters using the num...

Page 20: ...ress Menu until System Setup appears on the bottom line of the display and press Enter 2 Press Enter when Machine Setup appears 3 Press the Scroll buttons until Power Save appears and press Enter 4 Pr...

Page 21: ...configure print settings Network Scan This program allows you to scan a document on your machine and save it to a network connected computer Set IP Use this program to set your machine s TCP IP addre...

Page 22: ...lorer 5 0 or higher Note For Windows 2000 XP users who have an administrator right can install the software Linux Macintosh Item Requirements Operating system RedHat 8 0 9 0 Fedora Core 1 2 3 4 Mandra...

Page 23: ...work Management Protocol DHCP Dynamic Host Configuration Protocol BOOTP Bootstrap Protocol Configuring TCP IP Your machine can be set up with a variety of TCP IP network information such as an IP addr...

Page 24: ...s and press Enter 4 Press Stop Clear to return to Standby mode Setting Ethernet speed You can select the communication speed for Ethernet connections 1 Press Menu until Network appears on the bottom l...

Page 25: ...load up to 50 sheets of paper 75 g m2 20 lb for one job When you use the ADF Do not load paper smaller than 142 x 148 mm 5 6 x 5 8 inches or larger than 216 x 356 mm 8 5 x 14 inches Do not attempt to...

Page 26: ...der the following Desired outcome The print media you choose should be appropriate for your project Size You can use any size media that fits easily within the paper adjusters of the paper tray Weight...

Page 27: ...r tray 1 Envelope Monarch 98 4 x 190 5 mm 3 88 x 7 5 inches Envelope COM 10 105 x 241 mm 4 12 x 9 5 inches Envelope No 9 98 x 225 mm 3 86 x 8 86 inches Envelope DL 110 x 220 mm 4 33 x 8 66 inches Enve...

Page 28: ...label sheets from sticking together remove them as they print out Mode Size Source Copy mode Letter A4 Legal Oficio Folio Executive JIS B5 A5 A6 tray 1 optional tray 2 manual feeder Print mode All siz...

Page 29: ...Curl Prior to printing labels must lie flat with no more than 13 mm 5 inches of curl in any direction Condition Do not use labels with wrinkles bubbles or other indications of separation Make sure tha...

Page 30: ...1 Pull the tray out of the machine 2 Open the paper cover 3 Adjust the size of tray until it sound click 4 Enlarge the tray by adjusting the paper width guide 5 Flex the paper sheets back and forth to...

Page 31: ...should be facing down with an uncurled edge into the machine If you experience problems with paper feed turn the paper around Note that print quality is not guaranteed Changing the size of the paper...

Page 32: ...gle page printing on letterhead or coloured paper To load paper in the manual feeder 1 Load the paper with the side to be printed on facing up Depending on the media type you are using keep the follow...

Page 33: ...feeder Note The settings made from the printer driver override the settings on the control panel Caution If you want to print several pages with the manual feeder wait the machine complete the printin...

Page 34: ...Color Start to begin colour copying Or press Black Start to begin black and white copying Changing the settings for each copy Your machine provides default settings for copying so that you can quickl...

Page 35: ...e appears 4 Press the Scroll buttons until the setup option you want appears and press Enter 5 Press the Scroll buttons until the setting you want appears and press Enter 6 Repeat steps 4 through 5 as...

Page 36: ...ints one side of the original on the upper half of the paper and the other side on the lower half without reducing the size of the original This feature is helpful for copying a small sized item such...

Page 37: ...ned and printed one by one in the following order Note You cannot adjust the copy size using the Reduce Enlarge button when making a poster Clone copying Your machine can print multiple image copies f...

Page 38: ...ns to select On and press Enter 6 Press Stop Clear to return to Standby mode 7 Enter the number of copies using the number keypad 8 Press Black Start to begin mono copying Setting copy timeout You can...

Page 39: ...g in a print queue or print spooler such as the printer group in Windows delete the job as follows 1 Click the Windows Start menu 2 For Windows 98 2000 Me select Settings and then Printers For Windows...

Page 40: ...ing computer speed available disk space memory the size of the image being scanned and bit depth settings Thus depending on your system and what you are scanning you may not be able to scan at certain...

Page 41: ...to register authorized users using CWIS You can add up to 50 users Notes For the scanner name the model name of your machine is automatically entered but can be changed You can enter an ID of up to 8...

Page 42: ...oes not scan a job within a specified timeout period your machine cancels the scan job You can change this timeout setting as needed 1 Press Menu until System Setup appears on the bottom line of the d...

Page 43: ...s and press Enter 7 Repeat steps 5 and 6 to change other settings 8 To change the default settings for other scan types press Exit and repeat from step 4 9 Press Stop Clear to return to Standby mode S...

Page 44: ...y you want appears and press Enter 4 Press Enter when All appears 5 Press the Scroll buttons until the name and address you want appears You can search upwards or downwards through the entire memory i...

Page 45: ...nd name or company name will be printed at the top of each page sent from your machine 1 Press Menu until System Setup appears on the bottom line of the display and press Enter 2 Press Enter when Mach...

Page 46: ...e highest resolution mode supported by the other fax machine Sending a fax automatically 1 Press Fax 2 Load originals face up into the ADF or place a single original face down on the scanner glass For...

Page 47: ...e paper tray you will use for the fax reception 1 Press Menu until System Setup appears on the bottom line of the display and press Enter 2 Press the Scroll buttons until Paper Setup appears and press...

Page 48: ...message as it would normally If your machine detects a fax tone on the line it automatically starts to receive the fax Receiving faxes using DRPD mode Distinctive Ring is a telephone company service...

Page 49: ...ry and shows Secure Receive to let you know that there is a fax received Notes DRPD must be set up again if you re assign your fax number or connect the machine to another telephone line After DRPD ha...

Page 50: ...e Once you entered a group dial number you cannot enter another group dial numbers anymore Sending a delayed fax You can set your machine to send a fax at a later time when you will not be present You...

Page 51: ...r glass For details about loading an original see page 5 1 3 Adjust the document resolution and darkness to suit your fax needs See page 9 1 4 Press Menu until Fax Feature appears on the bottom line o...

Page 52: ...ns until Forward appears and press Enter 4 Press Enter when Fax appears 5 Press the Scroll buttons until Rcv Forward appears and press Enter 6 Press the Scroll buttons until Forward appears and press...

Page 53: ...smoothly to any other ECM equipped fax machine Sending a fax using ECM may take more time Send Report You can set your machine to print a confirmation report showing whether a transmission was success...

Page 54: ...o 10 fax numbers Delete allows you to delete the desired junk fax number Delete All allows you to delete all junk fax numbers DRPD Modea This mode enables a user to use a single telephone line to answ...

Page 55: ...n you are prompted to enter a fax number while sending a fax To retrieve a number from speed buttons 1 to 15 press the corresponding speed button and press Enter To retrieve a number from speed button...

Page 56: ...and press Enter If you entered a new speed dial number Add appears If you enter a speed dial number stored in the group Delete appears 5 Press Enter to add or delete the number 6 Press Enter when Yes...

Page 57: ...Address Book Select Search ID to search for an entry by the first few letters of the name 4 Press the Scroll buttons until the name you want appears and press Enter Or enter the first letters and pre...

Page 58: ...e system settings of your machine Restore backup files to the machine s memory Format the USB memory device Check the available memory space Plugging in a USB memory device The USB memory port on the...

Page 59: ...elect JPEG in Scan Format Scan Format Sets the file format in which the image is to be saved When you select TIFF or PDF you can select to scan multiple pages If you select JPEG in this option you can...

Page 60: ...ining the data you want to restore appears and press Enter 7 Press Enter when Yes appears to restore the backup file to the machine 8 Press Stop Clear to return to Standby mode Managing USB memory You...

Page 61: ...5 Press Stop Clear to return to the Standby mode Printing directly from a digital camera This machine supports the PictBridge feature You can print images directly from any PictBridge compatible devi...

Page 62: ...000 black pages or 50 000 images Region List A 108R00721 Region List B 108R00744 Waste toner container Approx 5 000 imagesb or approx 1 250 pages full colour 5 image b Image counts based on one colour...

Page 63: ...2 Fax Rcv Report This report shows information on the faxes you have recently received Printing a report 1 Press Menu until System Setup appears on the bottom line of the display and press Enter 2 Pre...

Page 64: ...etup Restores all of the network options to the factory default Phone Book Clears all of the fax number and email address entries stored in memory Sent Report Clears all records of sent faxes and emai...

Page 65: ...other material Use the handle on it to avoid touching this area Be careful not to scratch the surface of the imaging unit Note After cleaning let the printer to dry completely 5 Pull the imaging unit...

Page 66: ...cted cartridge life The life of the toner cartridge depends on the amount of toner that print jobs require When printing text at 5 coverage a new toner cartridge lasts an average of 2 000 pages for bl...

Page 67: ...s are saved in memory At this stage the toner cartridge needs to be replaced For order information for toner cartridges see page 12 1 1 Turn the machine off then wait a few minutes for the machine to...

Page 68: ...our service company or dealer to notify them that your machine requires a new toner cartridge when the toner cartridge needs to be replaced The fax number needs to be set by your dealer prior to using...

Page 69: ...toner container from the machine 4 Pull the imaging unit out of the machine using the handle on its bottom 5 Extend the top handle on the imaging unit and then use it to pull the imaging unit out of t...

Page 70: ...oner cartridges and waste toner container into their corresponding slots until they click into place 10 Close the front cover firmly 11 Turn the machine on Caution If the front cover is not completely...

Page 71: ...front cover 3 Pull the waste toner container out of the machine using its handle 4 Remove the container s cap from the container as shown below and use it to close the waste toner container opening 5...

Page 72: ...y2 Roller displays the number of pages printed each item To check the replaceable parts 1 Press Menu until System Setup appears on the bottom line of the display and press Enter 2 Press the Scroll but...

Page 73: ...call for service or register as a user on the Xerox website the machine s serial number may be required You can check the serial number by taking the following steps 1 Press Menu until System Setup ap...

Page 74: ...lay 1 Remove any remaining pages from the ADF 2 Open the ADF cover 3 Pull the jammed paper gently out of the ADF 1 ADF cover 1 4 Close the ADF cover Then load the removed pages if any back into the AD...

Page 75: ...rea 14 4 Paper Jam 2 Check Inside In the fuser area or around the toner cartridge 14 4 Manual Feeder Paper Jam 0 In the paper feed area 14 4 Caution To avoid tearing the paper pull out the jammed pape...

Page 76: ...t the tray 1 into the machine until it snaps into place Printing automatically resumes If the paper does not move when you pull or if you do not see the paper in this area go to the next step 4 Open t...

Page 77: ...In the paper exit area 1 Open and close the front cover The jammed paper is automatically ejected from the machine 2 Gently pull the paper out of the output tray If you do not see the jammed paper or...

Page 78: ...lable only with Phaser 6110MFP XN Note When you call for service it is very convenient to tell the service representative the display message Message Meaning Suggested solutions Color Toner Empty The...

Page 79: ...Meaning Suggested solutions Group Not Available You have tried to select a group location number where only a single location number can be used such as when adding locations for a Multiple Send oper...

Page 80: ...roblem persists please call for service Paper Jam 0 Open Close Door Paper has jammed in the feeding area of the tray Clear the jam See page 14 2 14 3 Message Meaning Suggested solutions Paper Jam 1 Op...

Page 81: ...olutions Follow the suggested solutions until the problem is corrected If the problem persists please call for service Paper feeding problems Condition Suggested solutions Paper is jammed during print...

Page 82: ...es to ensure that all of the print settings are correct Condition Suggested solutions The machine does not print continued The printer driver may be incorrectly installed Repair the printer software S...

Page 83: ...cause Suggested solutions Printing quality problems If the inside of the machine is dirty or paper has been loaded improperly you may notice a reduction in print quality See the table below to clear t...

Page 84: ...bly may be damaged Contact a service representative Condition Suggested solutions A a B b C c A a B b C c A a B b C c A a B b C c A a B b C c Background scatter Background scatter results from bits of...

Page 85: ...improperly Remove the cartridge and reinsert it The toner cartridge may be defective Remove the toner cartridge and install a new one See page 13 5 If the problem persists the machine may require rep...

Page 86: ...is connected properly Make sure that the USB cable is not defective Switch the cable with a known good cable If necessary replace the cable Check that the scanner is configured correctly Condition Su...

Page 87: ...iginal is the right size not too thick or thin Make sure that the ADF is firmly closed The ADF rubber pad may need to be replaced See page 13 10 Faxes are not received automatically The receiving mode...

Page 88: ...e is displayed on the list If not please invoke Add new printer wizard to set up your device Check if the printer is started Open Printers configuration and select your machine on the printers list Lo...

Page 89: ...ove Download the latest version of AFPL Ghostscript from http sourceforge net projects ghostscript and install it to solve this problem Condition Suggested solutions The machine does not appear on the...

Page 90: ...CD or Gimp Front end application If you wish to use other kind of scan application refer to the Help for application Condition Suggested solutions Common Macintosh problems I encounter error Cannot o...

Page 91: ...RH Display 16 characters x 2 lines Printer specifications Toner cartridge lifeb Black 2 000 pages at 5 coverage Shipped with 1 500 pages Starter toner cartridge Colour 1 000 pages at 5 coverage Shipp...

Page 92: ...0 x 300 photo using ADF Print up to 600 x 600 text text photo up to 1200 x 1200 photo using platen up to 600 x 600 photo using ADF Zoom rate Scanner glass 25 to 400 ADF 25 to 100 Multiple copies 1 to...

Page 93: ...rn Detection 9 4 E Erasing background special copy 6 5 error messages 14 5 F fax header set 9 1 Fax mode receiving mode 9 4 fax number set 9 1 faxing default settings change 10 2 delayed faxes 9 6 fax...

Page 94: ...0 replacing ADF rubber pad 13 10 imaging unit 13 7 toner cartridge 13 5 waste toner container 13 9 reports print 13 1 ringer 2 3 S scan power save mode 2 4 scanner glass cleaning 13 4 loading document...

Page 95: ...Software section...

Page 96: ...9 Removing Printer Software 9 Chapter 2 USING SETIP Installing SetIP 10 Using SetIP 10 Chapter 3 BASIC PRINTING Printing a Document 11 Printing to a file PRN 12 Printer Settings 12 Layout Tab 12 Pape...

Page 97: ...Overlay 20 Deleting a Page Overlay 20 Chapter 5 SHARING THE PRINTER LOCALLY Setting Up a Host Computer 21 Setting Up a Client Computer 21 Chapter 6 USING UTILITY APPLICATIONS Opening the Troubleshooti...

Page 98: ...es 28 Printing a Document 28 Printing from Applications 28 Printing Files 29 Scanning a Document 29 Using the Image Manager 30 Chapter 9 USING YOUR PRINTER WITH A MACINTOSH Installing Software for Mac...

Page 99: ...printer cable supplied with your printer such as a USB or parallel cable If your printer is attached to a network skip this step and go to Installing Software for Network Printing on page 6 You can i...

Page 100: ...ox and click Next Otherwise just click Next and skip to step 7 6 If the test page prints out correctly click Yes If not click No to reprint it 7 Click Finish NOTE After setup is complete if your print...

Page 101: ...ectly click Yes If not click No to reprint it 9 Click Finish Installing Software for Network Printing When you connect your printer to a network you must first configure the TCP IP settings for the pr...

Page 102: ...t a test page appears If you choose to print a test page select the checkbox and click Next Otherwise just click Next and skip to step 8 7 If the test page prints out correctly click Yes If not click...

Page 103: ...a printer to be set with a specific IP address from the list To verify your printer s IP address or MAC address print a Network Configuration page b Configure an IP address subnet mask and gateway for...

Page 104: ...want to connect the printer at this time click Next and No on the following screen Then the installation will start and a test page will not be printed at the end of the installation The reinstallatio...

Page 105: ...lick Finish Using SetIP 1 From the Windows Start menu select Programs or All Programs Xerox Phaser 6110MFP SetIP SetIP The program automatically detects and displays new and configured print servers o...

Page 106: ...rinting from various Windows applications The exact steps for printing a document may vary depending on the application program you are using Refer to the User s Guide of your software application for...

Page 107: ...e your changes permanent make them in the Printers folder The following procedure is for Windows XP For other Windows OS refer to the corresponding Windows User s Guide or online help 1 Click the Wind...

Page 108: ...et Type to correspond to the paper loaded in the tray from which you want to print This will let you get the best quality printout If not print quality may not be acheived as you want Thin Less than 1...

Page 109: ...about how to image the text in your document Select the appropriate setting according to the status of your document This option may be available only in Windows 9x Me depending on your particular pr...

Page 110: ...e Windows Start menu 2 Select Printers and Faxes 3 Select your printer driver icon 4 Right click on the printer driver icon and select Properties 5 Click the Printer tab and set the options Using a Fa...

Page 111: ...Printing Multiple Pages on One Sheet of Paper N Up Printing You can select the number of pages to print on a single sheet of paper To print more than one page per sheet the pages will be reduced in si...

Page 112: ...the sheets together 4 Click the Paper tab select the paper source size and type 5 Click OK and print the document You can complete the poster by pasting the sheets together 0 15 inches 0 15 inches Pr...

Page 113: ...g the first side of your job the Printing Tip window appears Follow the on screen instructions to complete the printing job Long Edge Short Edge 2 5 3 2 5 3 2 5 3 2 5 3 Printing a Reduced or Enlarged...

Page 114: ...essage displays in the preview window When the First Page Only box is checked the watermark prints on the first page only 4 Select watermark options You can select the font name style size or grayscal...

Page 115: ...T Dear ABC Regards WORLD BEST Using a Page Overlay After an overlay has been created it is ready to be printed with your document To print an overlay with a document 1 Create or open the document you...

Page 116: ...ed CD ROM Setting Up a Host Computer 1 Start Windows 2 From the Start menu select Printers and Faxes 3 Double click your printer driver icon 4 From the Printer menu select Sharing 5 Check the Share th...

Page 117: ...ty you can configure and check print settings 1 from the Start menu select Programs or All Programs Xerox Phaser 6110MFP Printer Settings Utility 2 Change the settings 3 To send the changes to the pri...

Page 118: ...ed on and properly connected to each other 2 Load the document s face up into the ADF OR Place a single document face down on the document glass 3 Open an application such as PhotoDeluxe or Photoshop...

Page 119: ...with a smart and flexible installation program You don t need to search for additional components that might be necessary for the Unified Linux Driver software all required packages will be carried o...

Page 120: ...n root in the Login field and enter the system password NOTE You must log in as a super user root to install the printer software If you are not a super user ask your system administrator 2 Insert the...

Page 121: ...ponding configuration window You can use the onscreen help by clicking Help 3 After changing the configurations click Exit to close the Unified Driver Configurator Printers Configuration button Scanne...

Page 122: ...lected port Sharing Ports Between Printers and Scanners Your machine may be connected to a host computer via the parallel port or USB port Since the MFP device contains more than one device printer an...

Page 123: ...llows you to view or select another printer driver By clicking Options you can set the default device options Jobs shows the list of print jobs Click Cancel job to cancel the selected job and select t...

Page 124: ...To print any document file 1 Type lpr file_name from the Linux shell command line and press Enter The LPR GUI window appears When you type only lpr and press Enter the Select file s to print window ap...

Page 125: ...r further details about editing an image see page 30 Drag the pointer to set the image area to be scanned 10When you are finished click Save on the toolbar 11Select the file directory where you want t...

Page 126: ...h the image Crops the selected image area Zooms the image out Zooms the image in Allows you to scale the image size you can enter the size manually or set the rate to scale proportionally vertically o...

Page 127: ...d if you are upgrading the software or if installation fails 1 Insert the CD ROM which came with your printer into the CD ROM drive 2 Double click CD ROM icon that appears on your Macintosh desktop 3...

Page 128: ...For a USB connected Macintosh 1 Follow the instructions on Installing Software for Macintosh on page 32 to install the PPD and Filter files on your computer 2 Open Print Setup Utility from the Utiliti...

Page 129: ...t column Mac OS 10 3 Printer Features Setting The Printer Features tab provides options for selecting the paper type and adjusting print quality Select Printer Features from the Presets drop down list...

Page 130: ...er drop down list 5 Click Print and the printer prints the selected number of pages on one side of each page Mac OS 10 3 Scanning If you want to scan documents using other software you will need to us...

Page 131: ...river install Linux 24 N n up printing Macintosh 35 Windows 16 O orientation print 29 Windows 12 overlay create 20 delete 20 print 20 P Paper properties set 13 paper size set 13 print 29 paper source...

Page 132: ...oner save 14 true type option 14 software install Macintosh 32 Windows 4 10 reinstall Windows 9 system requirements Macintosh 32 uninstall Macintosh 32 Windows 9 status monitor use 22 T toner save set...

Page 133: ...www xerox com office support...

Reviews: