background image

4 – 6 1

Xerox DocuColor 3535 Printer/Copier

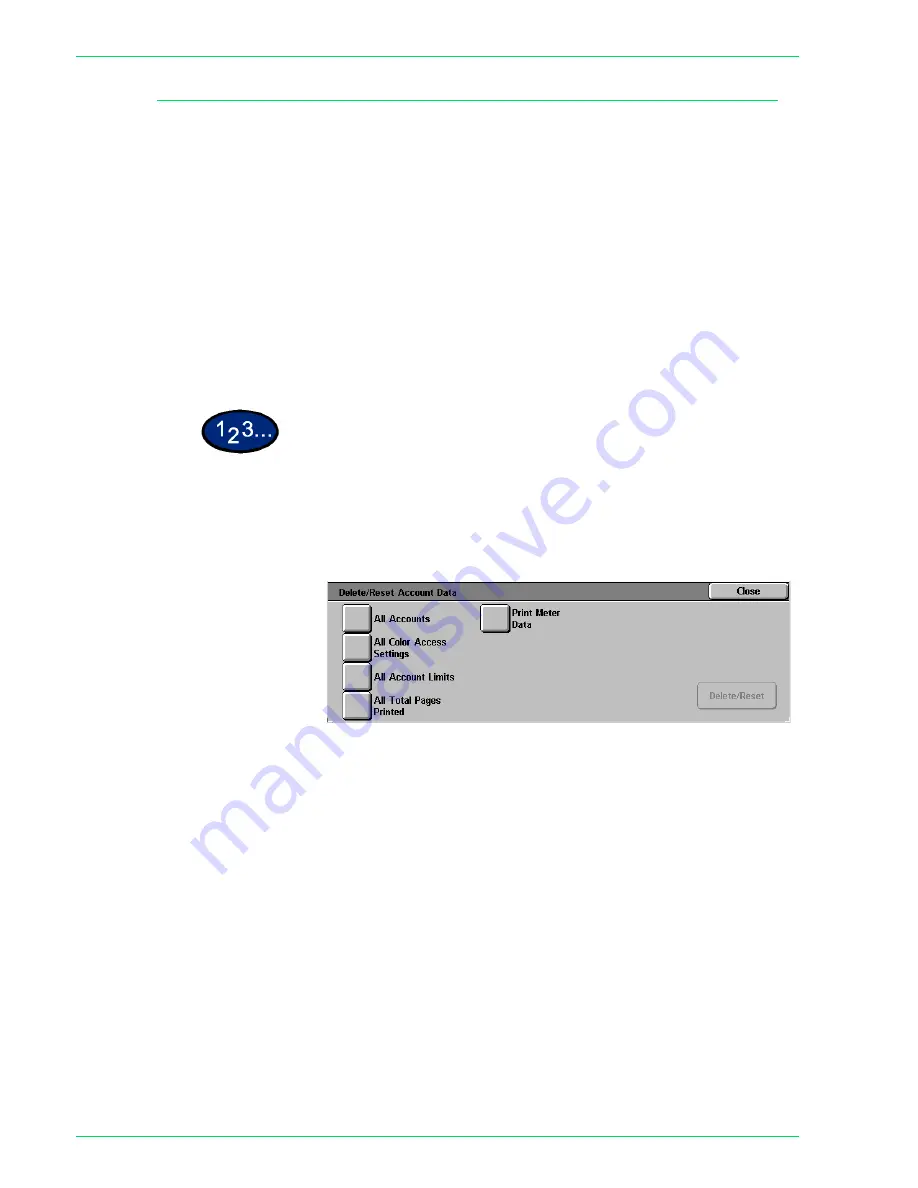
Delete/Reset All Account Data

Five different types of data can be deleted from all accounts.

All Accounts

Deletes all accounts and all account information associated with 
each account.

All Copy Access Settings

Enables color copying for all accounts by setting the Color Access 
in all accounts to Free Access. 

All Account Limits

Sets all Account Limits to the maximum number on the machine, 
1999900. 

All Total Pages Printed

Resets the Total Pages Printed for Color and B/W for each 
account to 0.

Print Meter Data

Resets the meters in System Administrator Data for the total 
number of pages printed.

1

Select 

Delete/Reset Account Data

 on the 

Auditron 

Administration

 screen. The 

Delete/Reset Account Data

 screen is 

displayed.

2

Select the button for the desired operation, and select 

Delete/

Reset

. The 

Confirmation

 screen is displayed.

3

Select 

Yes

 in the 

Confirmation

 screen. The details you selected 

are cleared. Deleted data cannot be restored.

Summary of Contents for DocuColor 3535

Page 1: ...DocuColor 3535 printer copier user guide...

Page 2: ...e Communications Corporation Adobe and PostScript are registered trademarks of Adobe Systems Incorporated TIFF is a copyright of Adobe Systems Incorporated AppleTalk LaserWriter and Macintosh are trad...

Page 3: ...Frequency Emissions xi FCC xi In Canada xi Safety Extra Low Voltage Approval xii Certifications in Europe xii It s Illegal in the USA xiii It s Illegal in Canada xv Environmental Notices for the USA x...

Page 4: ...Tab 1 76 Duplex Automatic Document Feeder DADF 1 82 Component Names and Functions 1 82 Documents Not Recommended 1 84 Loading the Documents 1 84 Job Status 1 86 Checking Current Jobs 1 86 Changing the...

Page 5: ...Image Quality Adjustment 4 21 Other Machine Settings 4 26 Copy Mode Settings 4 26 Basic Copying Presets 4 27 Copy Defaults 4 28 Copy Control 4 41 Original Size Defaults 4 42 Reduce Enlarge Presets 4 4...

Page 6: ...Drum Cartridges 6 16 Troubleshooting 7 1 Paper Jam Clearance 7 2 Paper Jams at the Top Left Cover 7 3 Paper Jams at the Left Center Cover 7 4 Paper Jams at the Bottom Left Cover 7 4 Paper Jams in Tray...

Page 7: ...lt a qualified electrician Do not use a ground adapter plug to connect this equipment to an electrical outlet that lacks a ground connection terminal WARNING You may get a severe electrical shock if t...

Page 8: ...able is the disconnect device for this equipment It is attached to the back of the machine as a plug in device To remove all electrical power from the machine disconnect the power cable from the elect...

Page 9: ...ss a procedure is specifically described in one of the manuals included with your press Operational Safety Your Xerox equipment and supplies were designed and tested to meet strict safety requirements...

Page 10: ...mechanical interlock devices WARNING Be careful when working in areas identified with this warning symbol These areas may be very hot and could cause personal injury If you need any additional safety...

Page 11: ...quency energy and if not installed and used in accordance with the instruction manual may cause harmful interference to radio communications Operation of this equipment in a residential area is likely...

Page 12: ...ation of the laws of the member states related to low voltage equipment January 1 1996 Council Directive 89 336 EEC approximation of the laws of the member states related to electromagnetic compatibil...

Page 13: ...only for publicity purposes in connection with the campaign for the sale of such bonds Internal Revenue Stamps If it is necessary to reproduce a legal document on which there is a canceled revenue st...

Page 14: ...n Cards 9 Selective Service Induction Papers that bear any of the following Registrant s information Earnings or Income Dependency Status Court Record Previous military service Physical or mental cond...

Page 15: ...s wrappers or designs used by or on behalf of the Government of Canada or of a province the government of a state other than Canada or a department board Commission or agency established by the Govern...

Page 16: ...t from generating electricity Environmental Notices for Canada Terra Choice Environmental Services Inc of Canada has verified that this Xerox product conforms to all applicable Environmental Choice Ec...

Page 17: ...mation about Xerox environmental programs visit www xerox com environment html If your product is not part of the Xerox program and you are managing its disposal please note that the product may conta...

Page 18: ...ay cause damage to hardware software or result in the loss of data WARNING Warnings alert you to an action that may cause bodily injury The 1 2 3 symbol indicates the beginning of a task or work proce...

Page 19: ...cuColor 3535 Printer Copier 1 Copy Getting to Know Your Copier Your new Xerox DocuColor 3535 works as a digital copier This section will provide an introduction to your new product For more informatio...

Page 20: ...1 2 Xerox DocuColor 3535 Printer Copier 1 2 3 4 8 9 10 5 7 11 6 12 13 14 15 16 17...

Page 21: ...n through 11x17 in A5 through A3 holding up to 520 sheets based on paper weight 9 Trays 3 4 Tandem Tray Module High capacity paper trays holding a total of 2080 sheets of 8 5 x 11 in A4 and B5 based o...

Page 22: ...u are programming Language Use this feature to change the language on the Touch Screen The language set will remain until the machine is powered off on Access Use this feature to change machine defaul...

Page 23: ...ght will remain constant to identify interrupt has occurred and a new job can be programmed After Interrupted jobs are complete press the Interrupt button again to return the machine to the first job...

Page 24: ...hts when data is being received from a client Features Allows you to alternate between scanning and copying feature screens Job Status Allows you to check or cancel jobs currently executing or to chec...

Page 25: ...Unused Memory The amount of memory remaining to store a scanned original is displayed prior to output Quantity The copy quantity is entered using the keypad and appears in the upper right corner of t...

Page 26: ...udio Tones are available to assist the operator in selecting features and functions Single Tone Acknowledges when a feature is selected or a job has been completed Double Tone Acknowledges an alert su...

Page 27: ...feed Transparencies and paper weights 18 lb to 110 lb 64 to 220 gsm The machine automatically detects the size and orientation of loaded paper The paper type must be set in System Setting mode Trays...

Page 28: ...put Tray delivers output face down and holds up to 400 sheets The Center Output Tray holds up to 200 sheets when the Finisher optional accessory is installed The Finisher Tray optional accessory holds...

Page 29: ...ver button on the control panel lights To use the machine press the Power Saver button Power Saver goes out to indicate that the Power Saver feature is canceled The default is 15 minutes Sleep mode In...

Page 30: ...ing Copies Using the DADF 1 Place original in the Original Input Area face up A stack of up to 50 originals may be place in the tray 2 Slide the documents forward until the green indicator lights indi...

Page 31: ...he Document Cover 2 Place the original face down on the Document Glass aligning the left rear corner with the registration guide 3 Close the cover before making a copy 4 Press the Start button 5 Remov...

Page 32: ...pier Features in this chapter 1 Press Clear All to clear any previous programming Use any of the following steps that apply to your job and desired outcome 2 Use the Numeric Keypad to enter the desire...

Page 33: ...for two sided head to head output as for books Press Head to Toe for two sided head to toe output as for calendars 2 to 1 Sided for one sided copies from two sided originals Press Head to Head if your...

Page 34: ...tput option Press Collated for collated output Collated will automatically be selected when the DADF is used Press Collated Stapled to direct output to the Finisher optional Accessory Press Finisher T...

Page 35: ...ure that the paper guide is against the original document Raise the Duplex Automatic Document Feeder DADF and place the document face down on the Document Glass Ensure that the document lies against t...

Page 36: ...Allows you to select the colors to be used for copying 2 Sided Allows you to select one or two sided originals with options for one or two sided output Reduce Enlarge Allows you to select the size of...

Page 37: ...case select the Full Color option as well NOTE With Auto selected the printer copier runs at the speed for color copying even if the originals are B W NOTE The sensitivity of Auto for detecting color...

Page 38: ...s 1 On the Basic Copying tab select More under Output Color to display the Output Color screen 2 Select the desired option Auto Full Color Black Dual Color Single Color 3 Select Start to make copies o...

Page 39: ...s for one or two sided output The following options are available 1 to 1 Sided Makes one sided copies from one sided input This is the default setting 1 to 2 Sided Makes two sided copies from one side...

Page 40: ...asic Copying tab or use the Added Features tab 1 On the Basic Copying tab select More under 2 Sided 2 Select the desired option 1 to 1 Sided 1 to 2 Sided Select Head to Head for two sided head to head...

Page 41: ...ded head to toe output as for calendars 2 to 1 Sided Select Head to Head if your originals are two sided head to head Select Head to Toe if your originals are two sided head to toe 3 Select the icon t...

Page 42: ...tomatically reduces or enlarges the copy based on the size and orientation of the document and the paper supply selected This option is applied only to standard size documents The copy image will be r...

Page 43: ...Touch Screen arrows Independent X Y Auto The Auto option automatically calculates the reduction and enlargement based on the original document size and on the output paper size when using Independent...

Page 44: ...the Variable option 3 Perform one of the following Press the arrow buttons to increase or decrease the percentage value in increments of 1 Use the Numeric Keypad on the Touch Screen to enter a specif...

Page 45: ...ce Enlarge screen select the Independent X Y option 3 Perform one of the following Press the up arrow to increase the percentage value for X X Y or Y in increments of 1 Press the down arrow to decreas...

Page 46: ...on enables you to access the Paper Supply screen The paper size displayed for Trays 1 2 3 and 4 is set when you adjust the paper guides as part of the process of loading paper The paper type for the t...

Page 47: ...display the Tray 5 Bypass screen 3 Perform one of the following to select Paper Size Select Auto Size Detect Select Standard Size Select the paper size from the list Use the up and down arrows to see...

Page 48: ...per 5 Select Save to return to the Paper Supply screen 6 Select Start to make copies or Save to select additional features NOTE Paper Tray 5 cannot be used with the following features Auto Size Detect...

Page 49: ...Allows you to select one or two sided originals with options for one or two sided output Output Enables you to select the desired output order and destination of the output Margin Shift Enables you t...

Page 50: ...s for one or two sided output The following options are available 1 to 1 Sided Makes one sided copies from one sided input This is the default setting 1 to 2 Sided Makes two sided copies from one side...

Page 51: ...m the Basic Copying tab or the Added Features tab 1 On the Added Features tab select 2 Sided 2 Select the desired option 1 to 1 Sided 1 to 2 Sided Select Head to Head for two sided head to head output...

Page 52: ...two sided head to toe output as for calendars 2 to 1 Sided Select Head to Head if your originals are two sided head to head Select Head to Toe if your originals are two sided head to toe 3 Select the...

Page 53: ...d to the output tray Uncollated Uncollated sets are delivered to the output tray Collated refers to copies that are delivered as sets Each copy set is in the order in which the originals were place in...

Page 54: ...tures tab select Output 2 Select the desired option Auto Collated Uncollated 3 If you have a Finisher optional accessory select the desired Output Destination Center Output Tray Finisher Tray 4 Select...

Page 55: ...output 1 On the Added Features tab select Output Stapling 2 Select Collated Stapling 3 Select Stapling The Stapling screen is displayed 4 Select the desired stapling position The Finisher Tray is aut...

Page 56: ...in Shift are available No Shift Copies are made without shifting the original This is the default setting Auto Center Select this to center an image on the copy when the original and copy paper are a...

Page 57: ...Xerox DocuColor 3535 Printer Copier Using the Auto Center Feature 1 On the Added Features tab select Margin Shift 2 Select Auto Center 3 Select Start to make copies or Save to select additional featu...

Page 58: ...row icon that illustrates the desired location of the image on the output copy Variable Shift Press the left arrow to shift the image toward the left edge Press the right arrow to shift the image towa...

Page 59: ...or combined together Top Bottom For Normal the default is 2mm 0 1 inch For Variable Erase the default is 5mm 0 2 inch Left Right For Normal the default is 2mm 0 1 inch For Variable Erase the default i...

Page 60: ...Variable Erase 3 Press the up or down arrows to increase or decrease the Border Erase amount s for Top Bottom Left Right and Center 4 Select the icon that most closely resembles the Original Orientat...

Page 61: ...g on the output copies Lighter Darker Contrast Allows you to adjust the lightness darkness and contrast of the output copy Sharpness Color Saturation Allows you to adjust the amount of edge definition...

Page 62: ...s NOTE This is the default setting Originals do not have to contain photographs and text Simply use this setting to apply the best sharpness and density levels automatically for optimum color quality...

Page 63: ...ibes the photo in the original document Halftone Use this option when copying from newspapers or magazines Photograph Use this option when copying photos Color Copies Use this option when copying Xero...

Page 64: ...vents the background color of an original from appearing on the output copy A newspaper or colored paper are examples of this type of original 1 On the Image Quality tab select Auto Exposure 2 Select...

Page 65: ...osed of mainly high and low density elements If you decrease the Contrast the copy is softer and renders more uniformly using mid tones There are seven levels of adjustment for Lighter Darker and five...

Page 66: ...the copy There are five levels of adjustment for each feature 1 On the Image Quality tab select Sharpness Saturation 2 Press the up and down arrows to increase or decrease the Sharpness of the origina...

Page 67: ...s also shift in the same direction If you select one of the Cool buttons the red colors shift toward the magenta hue the blue colors shift toward the cyan hue and the green colors shift toward the yel...

Page 68: ...Magenta Cyan and Black for their low medium and high density ranges 1 On the Image Quality tab select Color Balance 2 Select the button for the color you want to adjust 3 Select the desired density Lo...

Page 69: ...the copy by transforming low density colors into light and reddish colors Use this setting to apply a light pink tone to skin colors and to give a soft tone to dark warm colors Cool Produces a strong...

Page 70: ...rators between transparencies Also copy sets can be made in conjunction with the transparencies Covers Allows you to add covers to your copied sets using paper drawn from a different tray than your co...

Page 71: ...a single page NOTE When using this feature place the originals in the DADF NOTE Depending on the size of the original some image loss might occur along the edge of the image The following options are...

Page 72: ...1 54 Xerox DocuColor 3535 Printer Copier 1 On the Output Format tab select Multiple Up 2 Select the desired option 1 Up 2 Up Select the desired Image Order Left to Right Right to Left Top to Bottom...

Page 73: ...that most closely resembles the Original Orientation for the loaded documents 4 Select Start to make copies or Save to select additional features NOTE Multiple Up cannot be used with the following fe...

Page 74: ...et can be made Separators N Sets A blank sheet of paper is inserted between every transparency In addition the quantity selected determines how many copy sets N sets will also be made as part of the j...

Page 75: ...tab select Transparency Separators 2 Select Blank Separators 3 Select Paper Tray Settings 4 Select the size orientation of the transparencies loaded in the Paper Tray 5 Select the paper tray to use fo...

Page 76: ...ings 4 Select the size orientation of the transparencies loaded in the Paper Tray 5 Select the paper tray to use for the Separators and N sets 6 Select Save 7 Select Start to make copies or Save to se...

Page 77: ...available No Covers No Covers are added to the copy set This is the default setting Front Covers A Front Cover is added to the copy set with or without an image Front Back Covers A Front Back Cover i...

Page 78: ...Front Back Covers select the desired Printed Covers option 4 Select Paper Tray Settings 5 Select the correct paper tray for the Body Pages and Covers 6 Select Save 7 Select Start to make copies or Sa...

Page 79: ...e available Off This is the default setting which produces only one image per output page Auto Repeat This option enables the copier to automatically determine the number of output images that will fi...

Page 80: ...he number of images to print in a row or press the down arrow to decrease the number The range is from 1 through 23 3 For Auto Repeat and Variable Repeat select the Image Layout for the output copy Ev...

Page 81: ...ure place the original on the Document Glass in the same orientation as the orientation of the paper loaded in the selected paper tray The DADF cannot be used The following options are available 2 x 2...

Page 82: ...the desired Paper Tray 4 Select Start to make copies or Save to select additional features NOTE Poster cannot be used with the following features Tray 5 Bypass Auto Paper Tray selection 1 to 2 Sided...

Page 83: ...reverses the colors of the whole document image NOTE Negative Image cannot be used with Dual Color NOTE When Negative Image is used with Border Erase the Border Erase area becomes white 1 On the Outp...

Page 84: ...to place documents of mixed sizes into the DADF for copying Bound Originals Automatically scans two adjoining pages of a bound document and copies them onto two separate sheets of paper Image Rotation...

Page 85: ...cally recognizes the size of standard documents in the DADF or on the Document Glass This is the default setting Standard Sizes Select the document size from one of the 11 preset sizes These presets c...

Page 86: ...size of the document from one of the preset size buttons Enter the width X and length Y dimensions of the original document Press the arrow buttons to decrease or increase the X and Y dimensions X dim...

Page 87: ...1 On the Scan Options tab select Mixed Size Originals 2 Select the desired option Off when documents are all the same size On when documents are different sizes 3 Load the mixed size originals with on...

Page 88: ...nt Glass The DADF cannot be used The following options are available Off This is the default Left Page then Right Copies are made starting from the left page of a bound document Right Page then Left C...

Page 89: ...ich pages are to be copied Both Pages Left Page Only Right Page Only 4 Press the left and right arrows to decrease or increase the Center Erase amount from 0 to 50mm 0 0 to 2 0 inches 5 Select Start t...

Page 90: ...age if the orientation differs from the output paper On during Auto The copier will automatically rotate the image if the orientation differs from the output paper only when Auto Paper selection is se...

Page 91: ...s of the Image Rotation setting Original Orientation The document orientation must be set to indicate the top of the original when using the following features 2 Sided Margin Shift Border Erase Multip...

Page 92: ...DF cannot be used The following options are available Left Page then Right Copies are made starting from the left page of a bound document Right Page then Left Copies are made starting from the right...

Page 93: ...t Right Page then Left Top Page then Bottom 3 Select Start Page End Page and select the desired options Press Save to return to the Book Duplex screen 4 Press the left and right arrows to decrease or...

Page 94: ...s explained in detail on the following pages Stored Jobs Allows you to program various feature settings in the built in copier memory as a single job Build Job Allows you to build a job using differen...

Page 95: ...requently You can retrieve stored jobs and apply their programming features to a new copy job Deleting stored jobs frees that memory position for storing different jobs Storing a Job 1 Program the fea...

Page 96: ...number you want to delete 4 Select the desired option Yes to confirm the deletion No to cancel the deletion 5 Select Close You can now store a new job in place of the job you deleted Retrieving a Job...

Page 97: ...rint all the segments as one complete job 1 On the Job Assembly tab select Build Job 2 Select On 3 To make a sample set of your originals select On for Sample Set Select Save 4 Load your originals for...

Page 98: ...egment of the job When you select Change Settings the Basic Copying screen is displayed Select the desired features 8 Select Start Repeat steps 5 through 7 for each job segment 9 Select Last Original...

Page 99: ...this for output that will be bound in a right to left format 1 On the Job Assembly tab select Booklet Creation 2 Select the required binding location Left Bind Top Bind Right Bind 3 Select Gutter if y...

Page 100: ...e original is a thin or transparent document background may appear on the output This may also occur when copies are made using the Document Glass Place a white sheet of paper of the same size on top...

Page 101: ...d size documents in the feeder a message is displayed and the printer copier stops Place such non standard documents on the Document Glass or enter the document size using the Original Size feature on...

Page 102: ...or paste up documents Documents with clips and staples Transparent documents the document size cannot be detected automatically or the DADF belt is copied Coated paper or carbon backed documents Docum...

Page 103: ...alignment and or the placement of the documents until the lamp lights 3 Slide the document guide toward the stack of documents until the guide lightly touches the side edges of the documents If the d...

Page 104: ...pying printing or queued jobs 1 Select the Job Status button on the Control Panel The Job Status screen is displayed 2 Select Current and Pending Jobs The Current and Pending Jobs screen is displayed...

Page 105: ...tinue to change the print priority again after changing the print order in the print schedule priority will be given to the job that you last instructed Changing the Print Priority The print order of...

Page 106: ...ils of completed jobs in more detail 1 Select the Job Status button on the Control Panel The Job Status screen is displayed 2 Select Completed Jobs The Completed Jobs screen is displayed A job list is...

Page 107: ...Number Machine Configuration Software Version Consumable Status Paper Tray Information Billing Meters Error Reports Machine information Consumable status Paper Tray information Billing Meters and Err...

Page 108: ...ts Select the Billing Meter Print Report tab to check the current meter readings and to print reports Checking Consumables Select the Consumables tab to check the status of the machine consumables Err...

Page 109: ...hine Information 1 Press Machine Status The Machine Status screen is displayed 2 Select Machine Information The Machine Information screen is displayed 3 The Serial Number will be displayed 4 Select C...

Page 110: ...1 92 Xerox DocuColor 3535 Printer Copier...

Page 111: ...tput print jobs Print jobs are submitted from the client workstation and processed Raster Image Processed or RIPped through the machine s Network Controller Print jobs are then transferred to the Docu...

Page 112: ...2 2 Xerox DocuColor 3535 Printer Copier...

Page 113: ...ve created or you can use one of the default job templates on the machine The job template will determine the characteristics of your scanned job and its destination For more information on scanning f...

Page 114: ...r documentation may refer to Job Templates as Mailboxes 1 Place the document in the DADF or on the Document Glass 2 Select Scan from the Menu screen The Job Template screen is displayed 3 Select the d...

Page 115: ...en The Basic Scanning Screen is displayed 5 Select the desired scanning features on the feature tabs 6 Press Start to begin scanning or press Save to select additional scanning features For more infor...

Page 116: ...n may refer to Job Templates as Mailboxes Scanning Features Basic Scanning Tab Below is a brief explanation of each feature available on the Basic Scanning tab Each feature is explained in detail on t...

Page 117: ...e configured before you can scan Contact your Network or System Administrator to setup a personal job template 1 Load your originals and select the desired job template 2 Select Job Template on the Ba...

Page 118: ...option can be used for originals that cannot be scanned in black and white only Black Select when the desired output is a black and white copy Black and white copies can be made from any original With...

Page 119: ...ion Select from 200 dpi 300 dpi 400 dpi or 600 dpi The higher the scanning resolution the larger the image file created 1 Load your originals and select the desired job template 2 Select the desired S...

Page 120: ...set on the Basic Scanning tab and the Scan Options tab 2 Sided H to H Select 2 Sided Head to Head if your originals are two sided head to head 2 Sided H to T Select 2 Sided Head to Toe if your origina...

Page 121: ...has been selected proceed to the next step If 2 Sided has been selected select Head to Head or Head to Toe for the Original 5 In Original Orientation select the icon that most closely resembles the or...

Page 122: ...pecify the Head position of the document Scan Size Allows you to scan the original for automatic size detection or the size may be input manually Mixed Size Originals Automatically determines the corr...

Page 123: ...ing tab and the Scan Options tab 1 Load your originals and select the desired job template 2 Select 2 Sided Originals on the Scan Options tab The 2 Sided Originals screen is displayed 3 Select 1 Sided...

Page 124: ...document placed on the Document Glass 1 Load your originals and select the desired job template 2 Select Scan Size on the Scan Options tab The Scan Size Input screen is displayed 3 Select the desired...

Page 125: ...ts The correct paper size will be determined based on the original size and the selected reduction enlargement 1 Load your originals and select the desired job template 2 Select Mixed Size Originals o...

Page 126: ...desired percentage for Reduce Enlarge Use either the up and down arrows or the number buttons that display on the Touch Screen Auto This option automatically reduces or enlarges the copy based on the...

Page 127: ...ions tab The Reduce Enlarge screen is displayed 3 Select Variable 4 Perform one of the following Press the arrow buttons to increase or decrease the percentage value Use the Numeric Keypad on the Cont...

Page 128: ...r originals and select the desired job template 2 Select Reduce Enlarge on the Scan Options tab The Reduce Enlarge screen is displayed 3 Select Auto 4 Select the desired Output Size 5 Select Start to...

Page 129: ...allows you to remove the shadow caused by the center binding of bound originals when they are scanned CAUTION Do not force the DADF down onto the book Forcing the DADF down could damage it Instead le...

Page 130: ...nter Erase is used to delete the center shadow from the output Use the arrows to adjust the amount of erase Center Erase values range from 0 to 50 mm 0 0 to 2 0 inches 6 Place the open document face d...

Page 131: ...fers the following options which can be used individually or combined together Top Bottom The default is 5mm 0 1 inches Left Right The default is 5mm 0 1 inches Center Gutter The default is 0mm 0 0 in...

Page 132: ...tab The Border Erase screen is displayed 3 Select Normal or Variable Erase 4 Press the up or down arrows to increase or decrease the Border Erase amount for Top Bottom Left Right and Center 5 Select t...

Page 133: ...to adjust the lightness darkness and contrast of the scanned original Auto Exposure Prevents undesired marks or images that are printed on the back of an original from appearing on the scanned images...

Page 134: ...y appears sharp vivid If you decrease the Contrast the copy is softer 1 Load your originals and select the desired job template 2 Select Lighter Darker Contrast on the Image Quality File Format tab Th...

Page 135: ...s that are printed on the back of an original from appearing on the scanned image 1 Load your originals and select the desired job template 2 Select Auto Exposure on the Image Quality File Format tab...

Page 136: ...al Files will be saved at a standard compression rate This is the best balance between image quality and file size Low Files will be saved at a low compression rate Image quality will be optimum but f...

Page 137: ...on describes how to scan multiple originals as one scan job if you have more originals to be scanned than can fit into the DADF 1 Begin scanning your first original then select Next Original NOTE When...

Page 138: ...ut managing scanned documents refer to the Network Controller user documentation Configuring the Client for Scanning The client must be setup for scanning before scanned documents can be viewed manage...

Page 139: ...Printer Copier 4 Machine Administrator This chapter describes the features found in the System Settings Mode Overview The System Settings Mode allows you to change the machine default settings and th...

Page 140: ...dio Tones Screen Defaults Paper Trays Printing Priority Image Quality Auto Gradation Adjustment Sleep Mode Copy Mode Settings Change the default settings for Copy Defaults Control of Copy Operation Or...

Page 141: ...etting a password also allows you to output total reports and a list of registered mailboxes 1 Press the Access button The Password Entry screen is displayed 2 Enter the password using the numeric key...

Page 142: ...On and enter the new password using the numeric keypad on the Control Panel 7 Select Enter 8 Re enter the password exactly as you did in Step 6 and select Enter NOTE Enter the exact same number in St...

Page 143: ...sword is 11111 2 Enter the password and select Confirm The machine enters System Settings Mode and the System Administrator Menu screen is displayed NOTE Your password will be displayed by an asterisk...

Page 144: ...ings Mode using the System Clock Setting feature Please follow these procedures for all the features in System Settings Mode 1 Press the Access button 2 Enter the password and select Confirm The Syste...

Page 145: ...chine will return to the previous screen without saving any changes 9 Select Save You are returned to the Machine Clock Timers screen 10 To make changes to other settings repeat the procedure 11 When...

Page 146: ...The date set here is printed on lists and reports The default is 2001 January 1 Time Sets the system clock time H M by 12 hour clock display or 24 hour clock display Hours 0 23 24 hour clock OR 1 12 1...

Page 147: ...es in 60 second increments Enter the value using the numeric keypad on the Control Panel The default is 600 seconds Auto Print Allows the machine to automatically start print jobs when there has been...

Page 148: ...d The default is Normal Control Panel Alert Tone Sets the tone when an incorrect button was selected or an operation was attempted during an error It can be set to Off Soft Normal Loud The default is...

Page 149: ...Tone Sets the tone when a fault occurs and the job is held in a faulted state It can be set to Off Soft Normal Loud The default is Normal Alert Tone Sets the tone when a job finishes abnormally It ca...

Page 150: ...tus Machine Status The default is the Features screen Features Screen Default Select one of the following screens to display as the default screen when Features is selected Menu gives you the option t...

Page 151: ...e following table Refer to the table for specific information and recommendations for the type of paper you are using The default is 14 or Bond Paper For more information on recommended paper types re...

Page 152: ...er minute This setting should be used for Heavyweight paper that is delivered to the Finisher optional accessory 29 Heavyweight FA 127 128 gsm paper Output speed for 8 5x11 inch A4 paper is 22 pages p...

Page 153: ...k text 100 lb text 8 pt 120 169 gsm Coated paper Output speed for 8 5x11 inch A4 paper is 11 pages per minute This setting has a slower output speed than the Coated 1 setting thus providing a higher g...

Page 154: ...aper For more information on recommended paper types refer to the Recommended Materials List There are Image Quality options available for these paper types Refer to the Image Quality information for...

Page 155: ...Tray 2 Tray 3 Tray 4 Paper Type Priority Set the priority of each of the paper types for Auto Tray Switching Set the priority for Bond Paper Plain Paper Recycled Paper Bond S Custom 5 Custom Paper 1...

Page 156: ...avyweight 1 Side 2 paper For Heavyweight 2 paper the range of settings is 27 to 31 The default is 27 for Heavyweight 2 paper For Heavyweight 2 Side 2 paper the range of settings is 33 to 36 and 200 Th...

Page 157: ...special media 99 169 gsm 23 Best suited for Heavyweight 1A side 2 90 lb index 60 lb cover 127 169 gsm 24 Best suited for Heavyweight 1B side 2 28 lb 99 105 gsm 25 Best suited for Heavyweight 1C side 2...

Page 158: ...e following table The default is 38 3rd Priority Print Job Sets the priority that will be given to print jobs Enter the setting on the Numeric Keypad using the numbers listed in the following table Th...

Page 159: ...judges text or photos during document scanning can be changed when making copies by selecting Text Photo on the Original Type screen More Text fine text can be easily identified as text More Photo ha...

Page 160: ...on Level You can adjust the color reproduction of images judged by the machine as photos when making copies by selecting Text Photo on the Original Type screen Heavy Text the black areas of the image...

Page 161: ...mples the entire document to detect the background color level Enter the setting on the Numeric Keypad using the numbers listed in the following table B W Copy Auto Exposure Configure how background c...

Page 162: ...is recommended that this procedure be performed only by the Machine Administrator Copy Job Text Compensates tones when a text original is copied Copy Job Photo Compensates tones when a photo original...

Page 163: ...etwork Controller 1 Network Controller 2 Press Start The Adjustment Chart is output 4 Place the Adjustment Chart face down on the Document Glass with both Magenta color patches against the left side o...

Page 164: ...reen cannot be set The default is Enabled NOTE Low Power Mode cannot be disabled Job Offset Center Tray This sets up whether to offset jobs per set or per job when outputting to the Center Tray Job Of...

Page 165: ...on from the top Tray 2 for the 3rd button from the top Tray 3 for the 4th button from the top Reduce Enlarge 3rd to 4th Buttons The 3rd and 4th buttons under Reduce Enlarge can be changed on the Basic...

Page 166: ...or Set the default for Output Color on the Basic Copying screen Select one of the following options No Default Auto Full Color Black Dual Color Single Color The default is Auto NOTE If No Default is s...

Page 167: ...table The default is 1 Red Dual Color B W Image Set the default for a B W Image in Dual Color on the Basic Copying screen Enter the setting on the Numeric Keypad using the numbers listed in the follow...

Page 168: ...ted for Reduce Enlarge Paper Supply This sets the default for Paper Supply on the Basic Copying screen Enter the setting on the Numeric Keypad using the numbers listed in the following table The defau...

Page 169: ...e Numeric Keypad using the numbers listed in the following table The default is 0 Auto Output Destination This sets up the Output Tray for copy and print jobs Enter the setting on the Numeric Keypad u...

Page 170: ...ng on the Numeric Keypad using the numbers listed in the following table The default is 0 No Shift Setting Description 0 No Shift 1 Auto Center 2 Corner Shift Top Right 3 Corner Shift Bottom Right 4 C...

Page 171: ...rase Enter the setting on the Numeric Keypad using the numbers listed in the following table The default is 5mm 0 1 inches Setting Description 0 No Shift 1 Auto Center 2 Corner Shift Top Right 3 Corne...

Page 172: ...lt for Center Erase It is distributed along the center of the original image Enter the setting on the Numeric Keypad using the numbers listed in the following table The default is 0 mm 0 inches Settin...

Page 173: ...on the Image Quality screen when Black is selected as the Output Color on the Basic Copying screen Enter the setting on the Numeric Keypad using the numbers listed in the following table The default...

Page 174: ...numbers listed in the following table The default is 1 Auto Exposure On Lighter Darker This sets up the default for Lighter Darker in Light Dark Contrast on the Image Quality screen Enter the setting...

Page 175: ...ers listed in the following table The default is 2 Normal Sharpness This sets up the default for Sharpness in Sharpness Saturation on the Image Quality screen Enter the setting on the Numeric Keypad u...

Page 176: ...ypad using the numbers listed in the following table The default is 2 Normal Color Shift This sets up the default for Color Shift on the Image Quality screen Enter the setting on the Numeric Keypad us...

Page 177: ...up the default for Original Orientation on the Scan Options screen Enter the setting on the Numeric Keypad using the numbers listed in the following table The default is 0 Head to Top Image Rotation T...

Page 178: ...ptions screen Enter the setting on the Numeric Keypad using the numbers listed in the following table The default is 1 Portrait Original Left Edge NOTE When the machine is equipped with a Finisher the...

Page 179: ...is 1 Select Tray 1 Memory Full Procedure Set the processing method when the hard disk runs out of memory during a job Enter the setting on the Numeric Keypad using the numbers listed in the following...

Page 180: ...al Size Button 1 11 The sizes that can be selected for Original Size Buttons are as follows Select a button and set the size The defaults are as follows The order is from Original Size Button 1 Left U...

Page 181: ...can be assigned to R E Preset 1 7 R E Preset 1 7 Assign magnifications to R E Preset 1 7 Enter the setting on the Numeric Keypad using the numbers listed in the following table The default for R E Pre...

Page 182: ...communication Ethernet Setting Sets the Ethernet Setting for the machine Select one of the following settings The default is 0 Auto 10BASE T 100BASE TX Auto 10BASE T 100BASE TX 100BaseTX 10BaseT TCP I...

Page 183: ...hine Enter the setting on the Numeric Keypad using the numbers listed in the following table TCP IP IP Address for Download Sets the IP address for download for the machine Enter the setting on the Nu...

Page 184: ...Reduce Enlarge 2nd 4th Buttons Set the ratios displayed for the 2nd to 4th buttons from the top down for each of the feature buttons Select available ratios from those currently assigned to R E Prese...

Page 185: ...ing screen Select from Auto Full Color Grayscale and Black The default is Auto Scan Resolution Set the default for Scan Resolution on the Basic Scanning screen Enter the setting on the Numeric Keypad...

Page 186: ...ult for Center Erase The Center Erase will be distributed evenly along the center of the original image Enter the setting on the Numeric Keypad using the numbers listed in the following table The defa...

Page 187: ...Enter the setting on the Numeric Keypad using the numbers listed in the following table The default is 0 Head to Top Lighter Darker Set the default for Lighter Darker in Lighter Darker Contrast on th...

Page 188: ...if Output Color is not set to Black Enter the setting on the Numeric Keypad using the numbers listed in the following table The default is 2 Normal Auto Exposure Set the default for Auto Exposure on t...

Page 189: ...nts of 1mm 0 1 inches Scan Size 1 11 The following table shows the sizes that can be set to scan size defaults Select a button and choose a size The defaults are as follows 5 5x8 5 in LEF 5 5x8 5 in S...

Page 190: ...events you from having to set sizes each time you scan Output Size 1 8 Enter the setting on the Numeric Keypad using the numbers listed in the following table Setting Description Setting Description 4...

Page 191: ...0 Setting frequently used magnification ratio saves you from having to change the setting each time R E Preset 1 7 Enter the setting on the Numeric Keypad using the numbers listed in the following tab...

Page 192: ...aximum number of stored pages for scanning Set any number between 1 999 Enter the number of the pages using the Numeric Keypad The default is 999 Lighter Darker Level Set the default for the density a...

Page 193: ...nged Set so that the values increase from Lower to Higher Select Contrast using the up and down arrow buttons on the left and set the values using the up and down arrow buttons on the right The defaul...

Page 194: ...r account and controls the access and use of the copier Auditron Administration allows you to Create change and delete up to 1000 user accounts Control access to copy features Control access to scan f...

Page 195: ...imit Set the maximum number of copies that can be made with this account The account limit can be set between 100 1999900 in 100 page increments 1 Select Create Check Accounts on the Auditron Administ...

Page 196: ...by Account Information for individual user accounts can be deleted and reset 1 Select Create Check Accounts on the Auditron Administration screen The Create Check Accounts screen is displayed 2 Select...

Page 197: ...t the Access button and enter the appropriate user account password to start using the machine 1 Select Auditron Mode on the Auditron Administration screen The Auditron Mode screen is displayed 2 Sele...

Page 198: ...tal number of pages printed for color and B W You can also reset this data 1 Select System Administrator Data on the Auditron Administration screen The System Administrator Data screen is displayed 2...

Page 199: ...mits to the maximum number on the machine 1999900 All Total Pages Printed Resets the Total Pages Printed for Color and B W for each account to 0 Print Meter Data Resets the meters in System Administra...

Page 200: ...e machine 1 Press the Access button Enter the password and select Confirm 2 Select User Mode 3 Press the Machine Status button on the Control Panel The Machine Status screen is displayed 4 Select the...

Page 201: ...on on the DocuColor 3535 machine specifications and Finisher optional accessory Loading Paper This section contains basic information about loading paper and transparencies and about using paper trays...

Page 202: ...OTE When making copies you can select transparencies from Tray 5 Bypass If you want to select transparencies from Trays 1 4 your System Administrator must change the Paper Type setting in System Setti...

Page 203: ...paper size mismatch message will be displayed if you try a job with Auto Size Detect selected and a paper size that is not included in the list above Auto Tray Switching The Auto Tray Switching featur...

Page 204: ...s loaded in the tray NOTE For the best results use only the recommended paper sizes paper weights or paper types If you do not use recommended papers you may experience copy quality problems paper jam...

Page 205: ...ing or copy curl problems occur flip the paper over in the tray and make the copies again If the performance improves continue to load the paper in this manner Testing has shown that paper handling an...

Page 206: ...anparency Separators feature refer to the section entitled Transparency Separators in this chapter Follow these guidelines to prevent static build up when using transparencies Place no more than twent...

Page 207: ...into Tray 5 Bypass at a time You may be able to fit a few more depending on the thickness of the envelope but do not exceed the max fill line on the tray Envelopes must be loaded LEF face down in Tra...

Page 208: ...paper and load the desired paper into the tray by aligning the edge of the paper against the left edge of the tray The side to be copied should be facing up Do not fill the paper tray above the fill l...

Page 209: ...y and gently pushing it away and down from the printer copier 2 Check the position of the front edge paper guide for Tray 5 Bypass NOTE The guide should only be set to the 12 inch position for papers...

Page 210: ...guide for Tray 5 Bypass to the 12x18 position 3 Load up to 100 sheets of 12x18 inch 305 x 457 mm 20 lb paper into Tray 5 Bypass Load paper with the side to be copied or printed on facing down 4 Adjus...

Page 211: ...SRA3 paper into Tray 5 Bypass Load the paper with the side to be printed on facing down 4 Adjust the back edge guide until it lightly touches the paper NOTE You can select SRA3 paper as one of the de...

Page 212: ...22 ppm Transparency 8 5x11 in A4 Black and white 16 ppm Color 8 ppm Heavyweight 1 8 5x11 in A4 28 lb bond 90 lb index 99 169 gsm Black and white 22 ppm Color 22 ppm Heavyweight 1 11x17 in A3 28 lb bon...

Page 213: ...Color 11 ppm Coated 2 8 5x11 in A4 65 lb cover 80 lb cover 170 gsm 220 gsm Black and white 11 ppm Color 11 ppm Coated 2 11x17 in A3 65 lb cover 80 lb cover 170 gsm 220 gsm Black and white 5 ppm Color...

Page 214: ...o the Finisher Center Tray Exit Cover Provides access to the paper path WARNING Never cheat the safety interlock switch Injury or a document jam may occur This switch shuts off the Finisher power when...

Page 215: ...I or from your printer driver and depend on the paper selected The table below shows the acceptable paper sizes and stapling options Copying Paper Orientation Paper Size One Left Two Left Two Up One R...

Page 216: ...Xerox DocuColor 3535 Printer Copier Printing Paper Orientation Paper Size One Left Two Left Two Up One Right Two Right LEF B5 A4 8 5x11 in SEF A4 8x10 in 8 5x11 in 8 5x13 in 8 5x14 in SEF B4 A3 11x17...

Page 217: ...ing message will appear Consumables need to be replaced Press the Machine Status button on the Control Panel to view the status of the consumables in your machine There are several pages of consumable...

Page 218: ...pplies contact your Xerox Representative or use the Xerox Web Site at www Xerox com Part Number Description 006R01122 Black Toner Cartridge 006R01123 Cyan Toner Cartridge 006R01124 Magenta Toner Cartr...

Page 219: ...er 2 Wipe off any dirt from the underside of the DADF document cover belt section with a dry cloth moistened with water Wipe the cover with a soft dry cloth until it is clean and dry 3 Wipe off any di...

Page 220: ...erformed after replacing the Waste Cartridge or when image quality defects such as white or color streaks appear during copying or printing 1 Turn off the machine and open the Front Cover CAUTION Plac...

Page 221: ...ox DocuColor 3535 Printer Copier 3 Remove the Waste Toner Cartridge Pull the Waste Toner Cartridge straight from the machine 4 Remove the ROS Window Cleaning Tool from its storage area inside the Fron...

Page 222: ...the pad facing down b When the cleaning tool has gone in as far as possible gently draw it out of the machine towards you c Repeat for each of the three 3 cleaning slots 6 Return the cleaning tool to...

Page 223: ...nd you will not know which cartridges require replacement Press the Machine Status button on the Control Panel then select the Consumables tab to view the status of all the consumables 1 Open the Fron...

Page 224: ...ing to local regulations 5 Remove the new cartridge from the box 6 Shake the cartridge from side to side 7 With the arrow on the cartridge facing upward slide the cartridge into the printer copier 8 R...

Page 225: ...e warm or hot water or cleaning solvents to remove toner from your skin or clothing This will set the toner and make it difficult to remove If any toner gets on your skin or clothing use a brush to re...

Page 226: ...Cartridges If you have the optional Finisher on your machine you will need to replace staple cartridges periodically Open the Finisher Front Cover and replace the staple cartridges according to the in...

Page 227: ...6 11 Xerox DocuColor 3535 Printer Copier Changing the Fuser...

Page 228: ...6 12 Xerox DocuColor 3535 Printer Copier...

Page 229: ...6 13 Xerox DocuColor 3535 Printer Copier...

Page 230: ...6 14 Xerox DocuColor 3535 Printer Copier Changing the Waste Toner Container...

Page 231: ...6 15 Xerox DocuColor 3535 Printer Copier...

Page 232: ...6 16 Xerox DocuColor 3535 Printer Copier Changing Drum Cartridges...

Page 233: ...6 17 Xerox DocuColor 3535 Printer Copier...

Page 234: ...6 18 Xerox DocuColor 3535 Printer Copier...

Page 235: ...opier can detect problems and display the corrective action on the screen This section describes the printer copier faults and how to perform the appropriate recovery procedure Sometimes you may not s...

Page 236: ...er that the surfaces are hot To avoid injury proceed with caution when clearing the path Paper may jam in several areas inside the printer copier Behind the Top Cover Behind the Left Center Cover Behi...

Page 237: ...d paper in the direction of the feed out tray WARNING The fuser area is very hot Be careful when clearing a jam in this area 3 Remove the jammed paper NOTE If paper is torn check for any torn pieces o...

Page 238: ...paper NOTE If paper is torn check for any torn pieces of paper inside the machine 3 Gently close the left center cover Paper Jams at the Bottom Left Cover This section describes how to clear paper ja...

Page 239: ...rn check for any torn pieces of paper inside the machine 4 Push the tray in gently until it comes to a stop Paper Jams in Tray 5 Bypass This section describes how to clear paper jams that occur in Tra...

Page 240: ...inside the machine 3 Close the duplex unit cover and lift up Tray 5 Bypass Paper Jams in the Finisher This section describes how to clear paper jams that occur inside the Finisher when the Finisher o...

Page 241: ...ny torn pieces of paper inside the machine 4 Close the top cover on the Finisher 5 Slide the Finisher back to the left Paper Jams on the Center Tray Exit 1 Move the Finisher to the right 2 Remove the...

Page 242: ...e other cover NOTE Unlatch the document scanner cover completely to stabilize it Gently open the covers 2 Remove the jammed paper 3 Close the left cover of the DADF until you hear it click into place...

Page 243: ...ed paper 4 Gently return the DADF to the original position 5 Make sure that the document is not torn wrinkled or folded and load the document again following the instructions displayed NOTE After remo...

Page 244: ...e staple cartridge check the inside of the Finisher for any remaining staples 5 Pull up the lever on the front of the staple cartridge 6 Remove the jammed staples together with the staple sheet NOTE W...

Page 245: ...removed the wrong toner cartridge and wishes to reinsert it Operator cannot reinstate a partially full toner cartridge after it has been removed Reinstall the toner cartridge using the following proc...

Page 246: ...s open Jobs cannot be programmed or copies made while some screens such as administration screens jam clearance screens or consumable status information screens are open Follow the directions on the i...

Page 247: ...ck together at the holes Remove the paper from the Tray and fan the sheets to separate the joined sheets Multiple sheets feed from Tray 5 Bypass Paper and transparencies may stick together if environm...

Page 248: ...h output blocks exit Ensure the first sheet of 11x17 inch output exits completely Copies originating from Tray 5 Bypass are skewed Jams may be occurring The paper guide on Tray 5 Bypass may not be set...

Page 249: ...eets of 24 lb 90 gsm paper Remove the output when it approaches this limit to ensure continuous production Copying high density background areas or documents with alternating high and low density area...

Page 250: ...h images occur when copying a document that is on thin paper Select Background Suppression in the Preset Color Balance feature on the Image Quality tab To eliminate the unwanted show through images pl...

Page 251: ...tions Select Background Suppression in the Image Quality Presets feature on the Image Quality tab Use the Border Erase feature on the Added Features tab to deliberately erase the unwanted color or bac...

Page 252: ...ease the Sharpness Select the Text or Other Color Originals Maps option in the Original Type feature Ensure that the document is held flat on the Document Glass and that the Document cover DADF is clo...

Page 253: ...e Auto Center feature to eliminate the black when using the Duplex Automatic Document Feeder DADF Copies made from a newspaper a map or a photograph have background when Original Type is defined as Ma...

Page 254: ...for service The numbers for calling for service are as follows North America 1 800 821 2797 Europe _____________________ Be prepared to provide a complete description of the problem to the service op...

Page 255: ...paper size Remedy Enter the Reduce Enlarge ratio or change the paper size 015 790 Cause The scanned document is a copy prohibited document Remedy See the section entitled Illegal Copies in the front s...

Page 256: ...iding up the print data or printing one copy at a time when making multiple copies 016 757 Cause The entered password is wrong Remedy Enter the correct password 016 758 Cause The account is not regist...

Page 257: ...use The server IP address set to the job template is illegal Remedy Specify the correct job template 016 788 Cause Failed to retrieve the file from the Web browser Remedy Refresh the browser page or r...

Page 258: ...7 24 Xerox DocuColor 3535 Printer Copier...

Page 259: ...unts 4 57 Delete Reset All Account Data 4 61 Deleting Resetting Data by Account 4 58 Enabling Auditron 4 59 Printing Meter Reports 4 62 System Administrator Data 4 60 Auto Exposure 1 46 3 23 Auto Grad...

Page 260: ...s 1 89 Cleaning the DADF and Document Glass 6 3 Cleaning the ROS Window 6 4 Color Balance 1 50 Color Shift 1 49 Common Settings 4 7 Audio Tones 4 10 Auto Gradation Adjustment 4 24 Image Quality Adjust...

Page 261: ...te Reset All Account Data 4 61 Deleting Resetting Data by Account 4 58 Document Glass 1 8 Document Jams 7 8 Left Cover Top 7 8 Original Input Area and Document Glass 7 9 E Electrical Safety vii Discon...

Page 262: ...e Format Tab 3 21 Auto Exposure 3 23 File Format 3 24 Lighter Darker Contrast 3 22 Image Rotation 1 72 In Canada xi It s Illegal in Canada xv It s Illegal in the USA xiii J Job Assembly Tab 1 76 Bookl...

Page 263: ...intenance Safety ix Making Copies from the Document Glass 1 13 Making Copies Using Features 1 14 Making Copies Using the DADF 1 12 Managing Scanned Documents 3 26 Margin Shift 1 38 Auto Center 1 39 Va...

Page 264: ...e 7 2 Bottom Left Cover 7 4 Center Tray Exit 7 7 Duplex Unit 7 6 Finisher Interface 7 7 Finisher Top Cover 7 6 Left Center Cover 7 4 Top Left Cover 7 3 Tray 5 Bypass 7 5 Trays 1 to 4 7 5 Paper Supply...

Page 265: ...vii Laser Safety viii Maintenance Safety ix Operational Safety ix Ozone Safety x Scan 3 1 Scan Mode Settings 4 46 Basic Scanning Presets 4 46 Other Settings 4 54 Output Size Defaults 4 52 Reduce Enla...

Page 266: ...ts 7 10 Stored Jobs 1 77 Deleting a Job 1 78 Retrieving a Job 1 78 Symbols xviii System Administrator Data 4 60 System Settings 4 2 T Touch Screen 1 7 Transparencies 5 6 Transparency Separators 1 56 B...

Page 267: ......

Page 268: ...701P39761 March 2003 Xerox Corporation Global Knowledge and Language Services 780 Salt Road Webster New York 14580...

Reviews: