background image

12

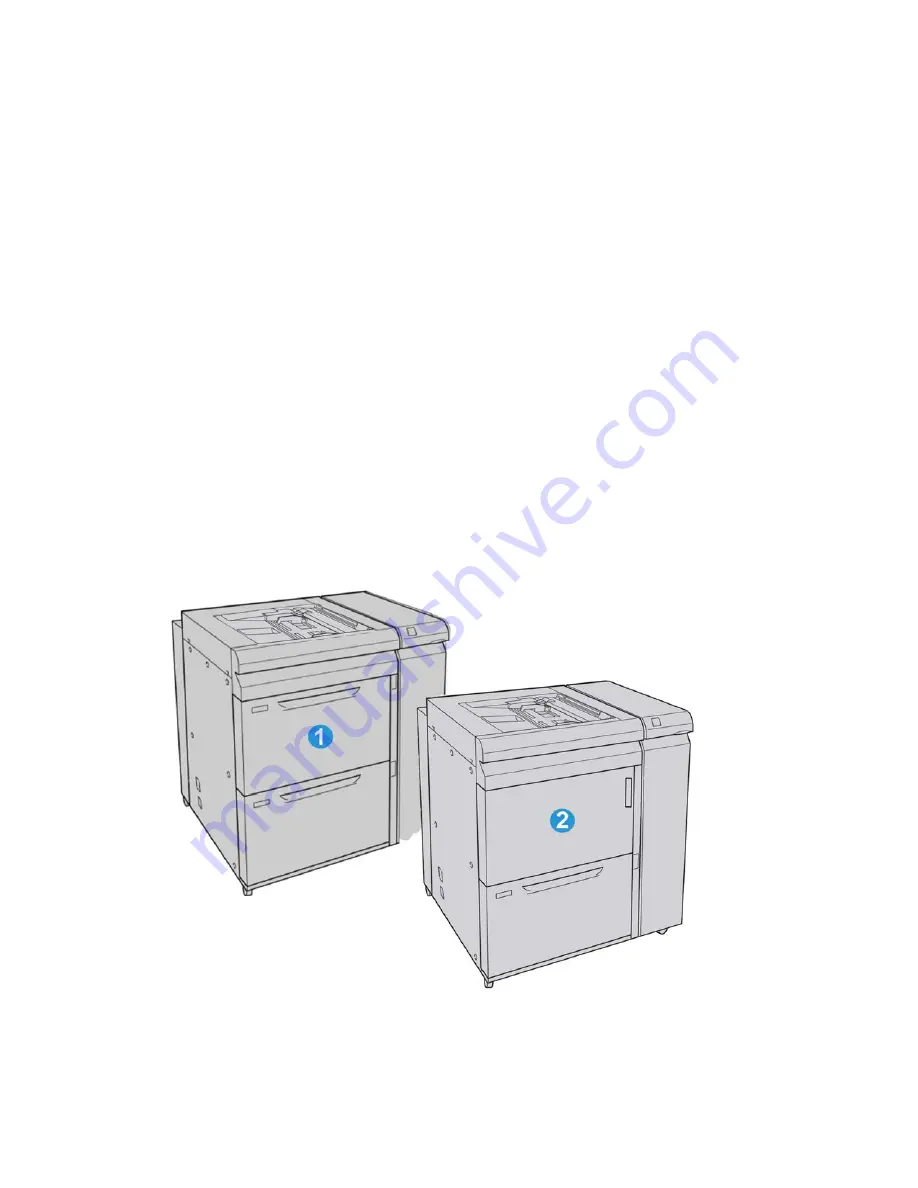
Oversized High Capacity
Feeder (OHCF), 1 or 2 trays
(Trays 6/7)

The Oversized High Capacity Feeder (OHCF) is available in a 1-tray or 2-tray option. The
OHCF feeds a variety of stock sizes, including standard and oversized stock up to 13 x
19.2 in./330.2 x 488 mm. Each tray holds 2,000 sheets.

12-1

Xerox

®

 Color J75 Press

User Guide

Summary of Contents for Color J75 Press

Page 1: ...Xerox Color J75 Press User Guide Version 1 0 February 2013 702P00985...

Page 2: ...Explorer and Word are registered trademarks of Microsoft Corporation in the United States and or other countries Adobe the Adobe logo Acrobat the Acrobat logo Acrobat Reader Distiller Adobe PDF logo A...

Page 3: ...t Maker Finisher 1 10 SquareFold Trimmer Module 1 11 2 Where to find help 2 1 Help on the World Wide Web 2 1 Print server customer documentation 2 1 3 Submitting a print job 3 1 Printing from your com...

Page 4: ...rge 5 3 Reduce Enlarge More options 5 4 Paper Supply 5 4 Output Color 5 5 Copy Output 5 5 2 Sided Copying 5 6 Original Type 5 7 Lighten Darken 5 8 Image Quality tab 5 8 Image Options 5 8 Image Enhance...

Page 5: ...s 6 7 E mail Options 6 8 E mail 6 11 E mail components 6 11 Scanning to an e mail address 6 12 Network Scanning 6 13 Network scanning components 6 13 Network Scanning procedure 6 14 Scan to PC 6 16 Sc...

Page 6: ...dering supplies 9 6 Checking the status of CRUs 9 7 Replacing a toner cartridge 9 8 Replacing the toner waste bottle 9 10 Replacing a drum cartridge 9 11 Replacing the fuser 9 17 10 Problem solving 10...

Page 7: ...ing pre drilled stock into the OHCF 1 or 2 Trays for 2 sided print jobs 12 5 Skew adjustment levers 12 7 Maintenance 12 8 Replacing the OHCF feed rolls 12 8 Replacing the OHCF Bypass Tray feed rolls 1...

Page 8: ...andard Booklet Maker Finisher 15 1 Folding feature 15 3 Fold types 15 3 Loading paper tabs in Tray 8 T1 Post Process Inserter 15 5 Maintenance 15 6 Standard Booklet Maker consumable supplies 15 6 Repl...

Page 9: ...andard Booklet Maker Finisher 15 51 Optional C Z Folder 15 54 16 SquareFold Trimmer Module 16 1 Overview 16 1 Identifying the components 16 2 Main components 16 2 Paper path 16 3 Control panel 16 4 Sq...

Page 10: ...m clearance 16 13 Clearing jams 16 14 Clearing E1 E2 jams 16 14 Clearing E3 jams 16 16 Fault codes 16 17 Technical data 16 27 Specifications 16 27 Xerox Color J75 Press viii User Guide Table of Conten...

Page 11: ...ptional 2 tray Oversized High Capacity Feeder OHCF Other optional feeding devices are available 2 User Interface UI The User Interface UI consists of the touch screen and control panel with the button...

Page 12: ...unication device between the print engine and any attached finishing devices 8 Optional finishing device Shown is the optional Booklet Maker Finisher with the optional C Z Folder other optional finish...

Page 13: ...r Mixed size original documents can be used however the top left corners of the original documents must be aligned in the document handler Remove any staples and paper clips from the documents before...

Page 14: ...ouch screen 2 Services Home 3 Services 4 Job Status 5 Machine Status 6 Log In Out 7 Energy Saver 8 Clear All 9 Stop 10 Start 11 Interrupt 12 Keypad 13 Language 14 Help Xerox Color J75 Press 1 4 User G...

Page 15: ...stomer documentation that was delivered with it Power on off Two power switches The machine has two power switches 1 Power switch Use this switch to turn on or turn off the machine 2 Main power switch...

Page 16: ...ed while it is warming up Power off 1 Press the power switch to the Off position 2 Verify that the UI display is turned off completely before turning on the machine again Energy Saver Note The terms P...

Page 17: ...chine serial number The machine serial number can be accessed from either the machine UI or by locating it on the inside of the machine 1 Press the Machine Status button on the UI 2 Ensure that the Ma...

Page 18: ...e cabinet above the tray 2 Interface Module The Interface Module is required with all finishing devices The Interface Module provides communication between the print engine and any attached finishing...

Page 19: ...ximum of 47 hole Note The GBC AdvancedPunch is shown here with the required Interface Module and with the optional Booklet Maker Finisher and the optional C Z Folder Information on this accessory can...

Page 20: ...ce the finishing options by adding the optional C Z Folder to either finisher Standard Finisher with optional C Z Folder Booklet Maker Finisher with optional C Z Folder Note Both the Standard Finisher...

Page 21: ...ishing device that is used in conjunction with a finishing device that contains a booklet maker Note The SquareFold Trimmer Module is shown here with the required Interface Module and the required Boo...

Page 22: ...Xerox Color J75 Press 1 12 User Guide Product overview...

Page 23: ...xerox com Be sure to periodically check this website for the latest information on your product It may be helpful to know your machine serial number before calling for support The machine serial numbe...

Page 24: ...Xerox Color J75 Press 2 2 User Guide Where to find help...

Page 25: ...d print queue 4 Select the Properties button for that machine 5 Select the desired output options such as quantity 1 or 2 sided printing 6 Select OK to close the Properties window 7 Select OK to send...

Page 26: ...o a storage device such as a flash drive or CD DVD 2 Connect your storage device to the print server 3 From the Xerox EX Printer Server select File Import Job 4 Select the desired queue such as Print...

Page 27: ...job 2 Pull out the tray slowly until it stops 3 Open the ream of paper with the seam side facing up 4 Fan the sheets before loading them into the tray 5 Load and align the edge of the paper against th...

Page 28: ...rint job 2 Pull out the tray slowly until it stops 3 Fan the tab paper before loading into the tray 4 Load and align the edge of the tab paper against the right edge of the tray with the side to be co...

Page 29: ...e stripe against the left edge of the tray with the side to be copied or printed on facing down Note Do not load more than 100 transparencies in a paper tray at one time Transparencies can be loaded e...

Page 30: ...ease and carefully moving the Edge Guide until it lightly touches the edge of the material in the tray Do not load materials above the MAX line located on the rear Edge Guide 7 Gently push in the tray...

Page 31: ...r information about setup refer to the System Administration Guide You can load up to 250 sheets of 20 lb 75 gsm paper Do not load mixed size paper into the Bypass tray Tray 5 Do not load materials ab...

Page 32: ...e desired changes to paper curl and alignment adjustment Note Refer to the System Administration Guide for detailed information on the paper curl and alignment adjustment options c Select Save until y...

Page 33: ...ceed to the next step a Make the desired selections for Paper Type Paper Weight Paper Size and Paper Color b If necessary make the desired changes to paper curl and alignment adjustment Note Refer to...

Page 34: ...paper guides so that they touch the edges of the stack If enabled by your System Administrator the Paper Tray settings screen may be displayed on the UI 8 If changes have been made to the paper tray s...

Page 35: ...o the tray until it stops 7 Adjust the paper guides so that they touch the edges of the stack If enabled by your System Administrator the Paper Tray settings screen may be displayed on the UI 8 If cha...

Page 36: ...nishing devices Refer to the specific chapter for information on loading post process media in the optional finishing devices Loading tab stock with the GBC AdvancedPunch When the optional GBC Advance...

Page 37: ...h the first page on top and with the headings toward the back or left of the machine The confirmation indicator lights to show that the documents are loaded correctly 3 Press the Services Home button...

Page 38: ...ed by the administrator 6 Enter the quantity 7 Press Start Basic copy using the document glass 1 Open the document feeder 2 Place the document face down by aligning it as shown in the illustration 3 P...

Page 39: ...E feature provides a variety of reduction and enlargement options to adjust the size of the output image Originals can be enlarged or reduced from 25 400 Various automatic and preset selections are a...

Page 40: ...age gets bigger or smaller but the proportion remain the same Auto Proportionally reduces or enlarges the image so that it will fit onto your chosen paper If this option is selected you must also sele...

Page 41: ...he source color is extracted from the original and replaced by the target area color The rest of the colors are replaced by the non target area color that you select Single Color This option allows yo...

Page 42: ...sided copies from one or two sided originals using either the document feeder or the document glass The two sided option enables you to select your output in book or calendar orientation Options inclu...

Page 43: ...venient way to enhance the quality of your output based on the type of original images you are copying Select the Original Type button on the Image Quality tab and select the desired option Auto This...

Page 44: ...n the scanned image from light originals such as pencil images Select the Right scroll button to lighten the scanned image from dark originals such as half tones or originals with colored backgrounds...

Page 45: ...this option when The Darken adjustment does not produce a satisfactory copy from light originals The original has a gray or colored border such as a certificate You want to bring out the fine detail t...

Page 46: ...es The default option is Normal Basic Color adjusts the density Advanced Color adjusts the Highlights Midtones and Shadows Color Shift This feature allows you to shift all hues in an image simultaneou...

Page 47: ...to the rear left corner of the document glass Align the top of the bound original against the rear edge of the document glass Book Copying options include Both Pages Copies both pages in page order Le...

Page 48: ...ages The document sizes that can be detected automatically include all standard sizes Manual Size Input This option allows you to select a standard paper size from the options shown or to input a non...

Page 49: ...y shifting the image away from that edge The Margin Shift option enables you to center a document image shift the image to one edge slightly or move the image to a specified edge 0 2 0 in 0 50 8 mm Le...

Page 50: ...ns with the left edge of portrait documents Rotation Direction Portrait Original Right Edge This option rotates the images of original documents with mixed orientation so that the top edge of landscap...

Page 51: ...l document when it is placed in the document feeder or on the document glass The orientation must be specified in order to identify the top of the document set This information is used by the system t...

Page 52: ...Booklet Creation allows you to create multi page booklets from an ordered set of 1 Sided or 2 Sided originals When Auto is selected the print engine reduces or enlarges the image as required Any othe...

Page 53: ...9 in 0 to 50 mm in 0 1 in or 1 mm increments Divide Output Use this option when you have a large number of original documents The original documents are divided to create subsets in order to reduce t...

Page 54: ...s square folding flattens the booklet spine thereby reducing the booklet s thickness and giving it the appearance of a perfect bound book Covers This feature allows you to automatically add covers to...

Page 55: ...ge of the document is copied onto the front side of the front cover For Back Cover only no front cover The first page of the document is copied onto the front side of the back cover For both front and...

Page 56: ...nto the back side of the front cover For Back Cover only no front cover The first page of the document is copied onto the back side of the back cover For both front and back covers The first page of t...

Page 57: ...t cover For Back Cover only no front cover The first and second pages of the document are copied onto the front and back sides of the back cover For both front and back covers The first and second pag...

Page 58: ...output destination with a blank sheet of paper separating each transparency Blank Separators and Handouts This option inserts a blank sheet of paper between each printed transparency In addition a dis...

Page 59: ...n allows you to copy a single image up to eight times onto one page Auto Repeat This option automatically sets the number of images per page according to the document size and paper size and then repe...

Page 60: ...n also change the position and appearance of the comment using the Position and Font Size buttons Date This option allows you to place the current date in the margins of your output The date can be pr...

Page 61: ...to be printed on one page or many pages Existing watermarks include Copy Prohibited Copy and Duplicate Date and Time This option prints the current date and time on the output each page Serial Number...

Page 62: ...Face Down Selecting the Face Down button causes all output to be delivered face down with the first page on the bottom of the output stack Face Up Reverse Order Selecting the Face Up Reverse Order but...

Page 63: ...tock Folding options include Single Fold Bi Fold Select this option to fold the output copies in half C Fold Select this option to fold the output copies in thirds Z Fold Select this option to fold th...

Page 64: ...9 in increments This Cut Size setting is based on the media type media weight the number of sheets in the finished booklet and the finished booklet width size ID Card Copy Whether needing to copy insu...

Page 65: ...applicable features from the features shown at the bottom of the Build Job screen Copy Output Booklet Creation Covers Annotations Segment Separators Watermark Face Up Down Orientation 8 Load only the...

Page 66: ...and the machine is paused 9 If desired change any applicable setting and copy quantity 10 Select either Start to finish the job or Cancel to stop the job Selecting Start continues the copy process an...

Page 67: ...the copies from the output area Delete Outside Delete Inside This feature allows you to specify the area for omission or deletion and then to copy that area Keep the following in mind when using this...

Page 68: ...o enter the value for Y1 b Select the Y2 box and use the numeric keypad on the control panel to enter the value for Y2 c Select the X1 box and use the numeric keypad on the control panel to enter the...

Page 69: ...tore to Folder Scans a document and saves the scanned data in a folder on the machine Send from Folder Scans a document and temporarily saves the scanned data on the machine The user is notified by e...

Page 70: ...These options include the following Color Scanning Color Scanning options include Auto Detect The color of the document is determined automatically the machine scans in full color when the document is...

Page 71: ...g results in small file sizes and higher image quality Archival Record This setting is best used for standard business documents that are stored for record keeping purposes This setting results in the...

Page 72: ...ment options include Background Suppression This option prevents reproduction of unwanted shading from originals where the opposite side printing shows through translucent Off This is the default sett...

Page 73: ...ages Use the slider to choose from good image quality with small file size higher image quality with larger file size or highest image quality with largest file size Note This feature is unavailable w...

Page 74: ...mounts as set up by the System Administrator This includes preset options for Header Footer Erase and Hole Punch Erase Book Scanning Use this option to scan pages from bound originals Options include...

Page 75: ...page JPEG for full color and grayscale pages and TIFF for monochrome pages XPS XML Paper Specification Saves multiple pages into a single file Note Options may vary and some options may not be availab...

Page 76: ...esults do not matter and you want to use less page memory For grayscale or color images pages select one of the following options JPEG This is the default setting for grayscale color pages Flate This...

Page 77: ...le Note Options may vary and some options may not be available for your machine Additional File Format options Depending on the selected file format the following sub options also are available Compre...

Page 78: ...following options JPEG This is the default setting for grayscale color pages Flate This option saves the image data at a higher compression rate than JPEG Flate is lossless and does not remove data du...

Page 79: ...hine Retrieve entries using index This option displays a keyboard allowing you to enter characters and narrow the search to specific recipients Search Public This option searches for entries in the lo...

Page 80: ...Home button 4 Select E mail 5 Specify one or more recipients by using one of the following options Select New Recipient Select Address Book 6 If using New Recipient perform the following a Use the key...

Page 81: ...a server When Scan to Home is enabled and when the Remote Access feature is available the scanned document can be transferred to a different destination according to an authenticated user Note In ord...

Page 82: ...ng to an authenticated user 1 Scan the images and select job features 2 While scanning select Preview to preview the last page that was scanned 3 From the drop down menu specify the view size by selec...

Page 83: ...photo areas to scan each area with optimum quality Text Select this option when scanning text clearly Photo Select this option when scanning photos 11 There are various scan presets that can be chosen...

Page 84: ...ice allows you to scan documents and send the scanned data to a network computer using the FTP or SMB protocol 1 Perform the Transfer Protocol From the Scan to PC option select Transfer Protocol FTP T...

Page 85: ...n Windows enter a folder name Up to 128 characters This option is only available when you select FTP or SMB in Transfer Protocol 18 The following directory path Host Name Shared Name Directory Name is...

Page 86: ...ptional Store to WSD component List of Computers Select the destination from the list of computers Choose the one in accordance with the intended use Store to WSD procedure 1 Select Store to WSD on th...

Page 87: ...ew 5 Use the up or down buttons to navigate the list 6 If required select Display Time to show the time required to process the job 7 To delete a job or change the execution order select a job from th...

Page 88: ...w pull down menu select the desired job 4 Use the scroll bar to navigate the list 5 To check the details of a job select the job from the displayed list 6 After checking the job details select Close X...

Page 89: ...ne information Faults Supplies Billing information Tools Machine Information tab Machine Information provides general information about the copier printer and has buttons that allow the user to view d...

Page 90: ...Controller ROM Read Only Memory and any optional feeding and finishing devices Print Reports The Print Reports button must be enabled by the system administrator before reports can be printed Some fea...

Page 91: ...ns that need to be taken to continue or resume the proper operation of the machine Fault History Select the Fault History button to display a list of past fault codes This information can be used to d...

Page 92: ...the total impression amount for copied and printed impressions and for large impressions Black Copied Impressions This number represents the total number of impressions for all black white copied sca...

Page 93: ...Usage amount for this session Total usage Account Limit set by the system administrator Available Balance remaining unused amount for the account Tools tab Regular users have limited access to some of...

Page 94: ...Tools tab 4 Select a tray 5 Select Change Settings 6 If the settings are correct select Confirm or select Change Settings 7 If necessary make the required changes to the tray settings such as weight t...

Page 95: ...document cover and document glass at the same time These components consist of the document cover the document platen glass and the second side scanning lens assembly Cleaning the document cover and...

Page 96: ...remove try gently wiping with a soft cloth moistened with a small amount of neutral detergent 2 Wipe off any excess water from the exterior with a soft cloth Cleaning the document cover and glass 1 C...

Page 97: ...h If dirt is difficult to remove try gently wiping with a soft cloth moistened with a small amount of neutral detergent Caution Do not press heavily on the document glass to avoid damaging the glass s...

Page 98: ...s away from the assembly which allows better access to the second side scanning lens assembly c To remove dirt wipe the mirrored glass metal strip both sides of the white plastic strip and the rollers...

Page 99: ...d side scanning assembly is clean return the document cover to its original position and ensure that the lever is locked in place If you touch the document cover with your bare hands wipe it clean bef...

Page 100: ...upplies Ordering supplies Xerox supplies paper and throughput material can be ordered from Xerox by going to www xerox com and clicking on either the Contact Us link for specific contact information t...

Page 101: ...lies tab The status of consumables is indicated by Ready Order New Replace Now or other indications An indication from 0 to 100 displays the remaining amount of toner The machine UI will indicate when...

Page 102: ...e to do so may result in burns to the skin if certain parts of the machine are touched 1 Open the toner cover located just above the machine front door cover 2 Lay paper on the floor before removing t...

Page 103: ...y aligning the arrows on the cartridge evenly with the printer and gently sliding the cartridge into the machine until you hear a click 9 Close the toner cover If the cover does not close completely m...

Page 104: ...pped not running any jobs and open the front door cover 2 Open the toner waste bottle cover located to the right of the Area 2 lever 3 Grip the handle of the toner waste bottle and pull it halfway out...

Page 105: ...t 5 Hold the used toner waste bottle firmly with both hands and put it into the provided plastic bag 6 Hold the center part on the top of a new bottle and insert it into the machine until it comes to...

Page 106: ...turned off all information stored to the machine s memory is erased 1 Ensure that the machine power is ON and proceed to the next step 2 Ensure that the machine is stopped not running any jobs and op...

Page 107: ...ase Handle 5 Open the bag containing the new drum cartridge Place the new drum cartridge near the machine Caution Do not touch or scratch the surface of the drum when you take it out from the bag 9 13...

Page 108: ...ring the new drum cartridge and place it under the cartridge Some drum cartridges may include a protective film Remove the film on the drum cartridge if the film is present Xerox Color J75 Press 9 14...

Page 109: ...ut the drum cartridge drawer 8 Remove the old drum cartridge by holding the finger rings provided at the both ends of the drum cartridge and gently lifting up 9 15 Xerox Color J75 Press User Guide Mai...

Page 110: ...in a horizontal position 11 Immediately close the drum cartridge drawer to protect the other drums from light 12 Return the Release Handle to its original position 13 Return the R1 R4 handle to the or...

Page 111: ...5 10 minutes for the fuser to cool down before performing this procedure Always observe the warning labels inside the machine 1 Open the front door cover 2 Grasp Handle 2 and turn it to the unlocked p...

Page 112: ...3 Carefully pull out the transfer module 4 Pull out the fuser handle Xerox Color J75 Press 9 18 User Guide Maintenance...

Page 113: ...colored handle only lift and pull up and out of the transfer module 6 Dispose of the old fuser as normal office waste or recycle the fuser 7 Remove the new fuser from its packaging 9 19 Xerox Color J7...

Page 114: ...alue A4 Letter SEF 1 A3 SEF A4 Letter LEF 12 in 304 8 mm 2 A5 Post Card 3 SRA3 13 in 330 2 mm 4 Custom set by the Xerox Service Representative 5 7 Note For detailed information refer to the Fuser hint...

Page 115: ...10 Close the transfer module 11 Turn Handle 2 to the locked position 12 Close the front door cover of the printer 9 21 Xerox Color J75 Press User Guide Maintenance...

Page 116: ...Xerox Color J75 Press 9 22 User Guide Maintenance...

Page 117: ...on the UI indicating in which area the jam is situated Follow the instructions provided for clearing the jam and resuming machine operation Document feeder jams 1 Gently lift the latch of the documen...

Page 118: ...f the document feeder then remove it 4 If instructed to open the inner cover lift up the lever and open the inner cover Remove the jammed document Note If the document is stuck do not pull on it force...

Page 119: ...n covers until they click into place Close them in the following order Inner cover Top cover Left cover 7 If a document jam cannot be found slowly raise the document feeder and if the document is ther...

Page 120: ...ment feeder Note Ensure that there are not any torn wrinkled or folded documents in the document set To scan torn wrinkled or folded documents use the Document Glass only The already scanned document...

Page 121: ...load the entire document set into the document feeder Note Ensure that there are not any torn wrinkled or folded documents in the document set To scan torn wrinkled or folded documents use the Documen...

Page 122: ...Lower left cover jams 1 Open the lower left cover 2 Remove the jammed paper 3 Close the lower left cover Xerox Color J75 Press 10 6 User Guide Problem solving...

Page 123: ...l it is in the horizontal position and then pull out the transfer module 3 Remove the visible jammed paper Warning To avoid burns to the skin never touch the fuser labeled area where it indicates High...

Page 124: ...per pieces are left in the machine 5 Move Handle 2a to the right and remove any jammed paper 6 Pull down Handle 2d and remove the jammed paper 7 Return Handle 2a and Handle 2d to their original positi...

Page 125: ...resume the copying printing process Paper jams in Trays 1 3 Note Paper is sometimes torn and remains inside the machine if you open a tray without checking the paper jam position This may cause machin...

Page 126: ...2 Remove the jammed paper 3 Push the tray in gently until it comes to a stop Xerox Color J75 Press 10 10 User Guide Problem solving...

Page 127: ...of paper are cleared before proceeding with any copy print jobs 1 Remove the jammed paper and any paper that is loaded from the Bypass tray Note If paper is torn check inside the machine and remove i...

Page 128: ...using envelopes in the Bypass Tray Always ensure that the Bypass tray guides are against the edges of the envelopes Check that the attributes of the paper tray are set correctly Some wrinkle is expect...

Page 129: ...sheet straight down toward the floor Warning When clearing this jam the sheet should be pulled straight down toward the floor Pulling the sheet at an angle toward the front of the machine can cause d...

Page 130: ...well as print data stored in the machine built in memory is discarded 002 770 Cause Unable to process the job template due to insufficient hard disk space Remedy Remove unnecessary data from the hard...

Page 131: ...fied in the document scan conditions Remedy Check the selected options 003 761 Cause The paper size of the tray selected for auto tray is different from the paper size of the tray selected for Auto Re...

Page 132: ...r 016 210 Cause An error occurred on the software settings Remedy Power cycle the machine Contact your Xerox Customer Support Center 016 211 Cause An error occurred on the software settings Remedy Pow...

Page 133: ...Support Center 016 224 Cause An error occurred in the document scanner Remedy Power cycle the machine Contact your Xerox Customer Support Center 016 225 Cause An error occurred in the document scanner...

Page 134: ...Settings ESC P command error Remedy Perform one of the following When printing by automatic tray selection set one of the paper types to a setting other than Automatic Tray Switching Off in Paper Type...

Page 135: ...been reached Remedy Check with your System Administrator 016 764 Cause Cannot connect to the SMTP server Remedy Contact the SMTP server administrator 016 766 Cause An error occurred on the SMTP server...

Page 136: ...ve unnecessary data from the hard disk to increase free disk space or initialize the hard disk 016 791 Cause In Scan to FTP SMB or Job Template the forwarding destination or job template save location...

Page 137: ...Customer Support Center could not be contacted Remedy Check that the phone lines are connected and try sending an inspection or maintenance request again after a short time If the error persists conta...

Page 138: ...ly 027 700 Cause The medium is damaged Remedy Check the media with a computer 027 701 Cause A medium is not inserted correctly Remedy Insert the medium correctly 027 702 Cause No data is stored in the...

Page 139: ...to job template server Remedy Check the login user name and password 027 741 Cause Unable to connect to job template server Remedy Have the network administrator check the network and server environme...

Page 140: ...data from the hard disk to increase free disk space 047 210 Cause An error occurred with the offset stacking module Remedy Power cycle the machine If the machine is not improved by performing the rele...

Page 141: ...r Support Center 065 215 Cause An error occurred in the document feeder Remedy Power cycle the machine If the machine is not improved by performing the relevant remedy contact your Xerox Customer Supp...

Page 142: ...x Customer Support Center 075 135 Cause Tray 5 Bypass malfunctioned Remedy Power cycle the machine If the machine is not improved by performing the relevant remedy contact your Xerox Customer Support...

Page 143: ...ron cleaner failure Remedy Power cycle the machine If the error is not fixed by performing the relevant remedy contact the Customer Support Center 091 320 Cause Charge Corotron fault Remedy Power off...

Page 144: ...ion between the printer and the controller Power off and on both the printer and the controller If the problem persists call the Customer Support Center 127 212 Cause Detected an internal print check...

Page 145: ...ob Continue with the copy print job by pressing Start on the UI Note The fuser assembly may be damaged as a result of pressing Start and overriding the current fuser width settings Cancel the current...

Page 146: ...dge Check that the Punch Scrap Container is not full Drilled paper holes are on the wrong side Remedy Ensure that the drilled paper is loaded correctly in the paper tray and that the holes are positio...

Page 147: ...network as a printer Try printing a test page from your workstation to the machine to verify that the printer is connected on the network Try selecting the Network Scanning button If the Network Scan...

Page 148: ...left of the document glass Place a sheet of blank paper on top of the original Black Lines Streaks Spots Smears or Bands Cause A CRU may need replacing Remedy Perform the following Check the status of...

Page 149: ...jobs with individual colors yellow magenta cyan in order to determine which color drum may be damaged or light shocked Replace the appropriate color drum cartridge If spots or bands occur every 188 mm...

Page 150: ...r original from the Document Glass ensure that your original is loaded face down and to the rear left of the document glass Output has a black border at the edge only some of the image is visible Caus...

Page 151: ...If there is a message about low toner on the screen replace the specified toner cartridge Double Image or Show Through Cause Paper issues or copy selections need adjusting Remedy If your original or o...

Page 152: ...pen then fully close the Document Feeder Unfused Toner Rubs Off Cause Paper being used may not be within machine specifications Remedy Ensure that the paper loaded is within machine specifications Go...

Page 153: ...gsm Heavyweight 1 or Coated 1 Mode 106 to 176 gsm Heavyweight 2 or Coated 2 Mode 177 to 220 gsm Heavyweight 2 or Coated 2 Mode 221 to 300 gsm Note Setting the media type on the machine UI does not ap...

Page 154: ...2 mode If your paper is not supplied with a wrapper check with your paper supplier about the grain direction Figure 1 For Heavyweight 1 or Coated 1 papers 106 176 gsm 17 inch 431 8 mm or larger Feed t...

Page 155: ...e of the fuser or multiple fusers A rotary switch with a protruding knurled knob is on every new fuser assembly This is the width switch The width switch on the new fuser assembly has eight different...

Page 156: ...lank and reserved for custom media ranges These positions must be set by the Xerox Service Representative Contact the Customer Support Center for more information and assistance 2 Important Before ins...

Page 157: ...roblem persists check the Machine Status Fault screen select the fault and click on the Instructions button If the machine stops running mid job or does not begin printing after a job is submitted ver...

Page 158: ...Xerox Color J75 Press 10 42 User Guide Problem solving...

Page 159: ...per size ranges Minimum Trays 1 3 5 5 x 7 2 in A5 140 x 182 mm Bypass Tray 4 x 5 6 in 100 x 148 mm Maximum 13 x 19 2 in 330 x 488 mm Warm up time 150 seconds or less after Power on or after exiting th...

Page 160: ...engine 2400 x 2400 x 1 dots per inch dpi Copy 600 x 600 x 1 dpi Print gray font only 600 x 600 x 1 dpi Additional optional accessories Foreign Interface Kit The Foreign Interface Kit enables the conn...

Page 161: ...The Oversized High Capacity Feeder OHCF is available in a 1 tray or 2 tray option The OHCF feeds a variety of stock sizes including standard and oversized stock up to 13 x 19 2 in 330 2 x 488 mm Each...

Page 162: ...per Tray settings screen may be displayed on the UI 9 If changes have been made to the paper tray select the Change Settings button otherwise proceed to the next step a Make the desired selections for...

Page 163: ...otherwise proceed to the next step a Make the desired selections for Paper Type Paper Weight Paper Size and Paper Color b If necessary make the desired changes to paper curl and alignment adjustment N...

Page 164: ...n made to the paper tray select the Change Settings button otherwise proceed to the next step a Make the desired selections for Paper Type Paper Weight Paper Size and Paper Color b If necessary make t...

Page 165: ...Change Settings button otherwise proceed to the next step a Make the desired selections for Paper Type Paper Weight Paper Size and Paper Color b If necessary make the desired changes to paper curl an...

Page 166: ...n the tray until it comes to a stop If enabled by your System Administrator the Paper Tray settings screen may be displayed on the UI 10 If changes have been made to the paper tray select the Change S...

Page 167: ...and film Use the following procedure to set the skew adjustment levers 1 Pull out the tray slowly until it stops 2 Slide the rear skew adjustment lever to the right 3 Gently push in the tray until it...

Page 168: ...ut is unsatisfactory proceed to the next step 14 Pull out the tray slowly until it stops 15 Return the right side skew adjustment lever toward the rear of the paper tray this is its default position 1...

Page 169: ...nudger roll by pushing the black tab with one hand and then squeezing the metal shaft with your other hand 3 Replace the feed roll using the same technique 4 Remove the three thumb screws on the side...

Page 170: ...ray 6 Replace the retard roll by pressing the metal shafts 7 Reinstall the assembly into the tray using the pin as a guideline and ensure the device is connected correctly Xerox Color J75 Press 12 10...

Page 171: ...mponents e Select Reset Current Value f When prompted select the Reset button 10 Exit administrator mode by pressing the Log In Out button on the UI When prompted select Logout Replacing the OHCF Bypa...

Page 172: ...o access the feed components 3 Replace the feed roll by squeezing the metal shaft 4 Replace the nudger roll using the same technique Xerox Color J75 Press 12 12 User Guide Oversized High Capacity Feed...

Page 173: ...Key Operator feature is displayed d Select the item that corresponds with the newly replaced components e Select Reset Current Value f When prompted select the Reset button 9 Exit administrator mode b...

Page 174: ...the paper jam occurred 2 Remove the jammed paper Note If paper is torn check inside the machine and remove it 3 Gently push in the tray until it comes to a stop Xerox Color J75 Press 12 14 User Guide...

Page 175: ...lever 1a to the right and turn the knob 1c to the right Remove the jammed paper Note If paper is torn check inside the machine and remove it 3 Return the lever 1a to the original position 12 15 Xerox...

Page 176: ...l not operate OHCF paper jams at lever 1b and knob 1c 1 Open the front cover of the OHCF 2 Move the lever 1b to the right and turn the knob 1c to the right Remove the jammed paper Note If paper is tor...

Page 177: ...e If the front cover of the OHCF is not completely closed a message will appear and the machine will not operate OHCF paper jams at lever 1d and knob 1c 1 Open the front cover of the OHCF 12 17 Xerox...

Page 178: ...nside the machine and remove it 3 If the paper cannot be removed turn the knob 1c clockwise and then remove the jammed paper Note If paper is torn check inside the machine and remove it Xerox Color J7...

Page 179: ...OHCF tray is empty or out of paper Remedy Add paper to correct OHCF Tray 077 210 Cause An OHCF tray is broken Remedy Perform the following Power Off On the machine If problems persist contact the Cust...

Page 180: ...persist contact the Customer Support Center Note Trays other than the OHCF trays may be used in the interim 078 210 Cause An OHCF tray has malfunctioned Remedy Perform the following Check the paper se...

Page 181: ...s may be used in the interim 078 262 Cause An OHCF tray has malfunctioned Remedy Perform the following 1 Check the paper loaded in the trays 2 Power Off On the machine 3 If problems persist contact th...

Page 182: ...has malfunctioned Remedy Perform the following 1 Check the paper loaded in the trays 2 Power Off On the machine 3 If problems persist contact the Customer Support Center Note Trays other than the OHCF...

Page 183: ...he trays 2 Power Off On the machine 3 If problems persist contact the Customer Support Center Note Trays other than the OHCF trays may be used in the interim 078 271 Cause An OHCF tray has malfunction...

Page 184: ...mer Support Center Note Trays other than the OHCF trays may be used in the interim 078 275 Cause An OHCF tray has malfunctioned Remedy Perform the following 1 Check the paper loaded in the trays 2 Pow...

Page 185: ...s may be used in the interim 078 279 Cause An OHCF tray has malfunctioned Remedy Perform the following 1 Check the paper loaded in the trays 2 Power Off On the machine 3 If problems persist contact th...

Page 186: ...has malfunctioned Remedy Perform the following 1 Check the paper loaded in the trays 2 Power Off On the machine 3 If problems persist contact the Customer Support Center Note Trays other than the OHCF...

Page 187: ...ine 3 If problems persist contact the Customer Support Center Note Trays other than the OHCF trays may be used in the interim OHCF Trays 6 7 specifications Oversized High Capacity Feeder OHCF Trays 6...

Page 188: ...Xerox Color J75 Press 12 28 User Guide Oversized High Capacity Feeder OHCF 1 or 2 trays Trays 6 7...

Page 189: ...verview The Interface Module is an optional finishing device that is used in conjunction with other optional finishing devices It is shown here with the optional High Capacity Stacker 13 1 Xerox Color...

Page 190: ...rl indicator This indicates that the Auto Curl Mode is selected If you want to quickly and at the point of need adjust the paper curl on the printed output you may use the Interface Module s Manual Cu...

Page 191: ...e Interface Module to the optional finishing device s that is are connected to your machine Paper curl settings on the Interface Module Preset decurler settings The Interface Module is designed with s...

Page 192: ...cans and measures targets automatically without an external spectrophotometer It resets color tables to original values to maintain consistent color Operators can create destination or output profiles...

Page 193: ...roceeding with your print jobs Note Remedies differ according to the paper jam location Follow the instructions displayed to remove the jammed paper Paper jams at lever 1a 1 Open the front cover of th...

Page 194: ...se the front cover of the Interface Module 5 Follow the instructions on the UI to clear other areas or to resume your print job Paper jams at lever 2a 1 Open the front cover of the Interface Module Xe...

Page 195: ...nd remove the jammed paper 3 Return the lever 2a to the original position 4 Close the front cover of the Interface Module 5 Follow the instructions on the UI to clear other areas or to resume your pri...

Page 196: ...the front cover of the Interface Module 2 Move the lever downward turn the knob 2c counterclockwise and remove the jammed paper 3 Return the lever 2b to the original position Xerox Color J75 Press 13...

Page 197: ...g Remedy Perform the following Carefully remove all sheets and paper scraps from the jam clearance areas Close the front door Verify the paper used is within the approved paper specifications Open the...

Page 198: ...pen Remedy Close the Interface Module front door 048 310 Cause Interface Module decurler sensor or belt problem Remedy Power off the machine print engine then power on If problem continues contact the...

Page 199: ...continues contact the Customer Support Center 048 319 Cause Interface Module cooling fan failure Remedy Power off the machine print engine then power on If problem continues contact the Customer Suppo...

Page 200: ...n failure Remedy Perform the following Check the connection between the Interface Module and the connected finishing device or devices Fully clear any jams between the Interface Module and the connect...

Page 201: ...devices Ensure all jam clearance handles levers are returned to their closed positions After clearing all jams remove any ejected paper from the finishing output area Power Off On the machine 048 900...

Page 202: ...eeding Remedy Perform the following Carefully remove all sheets and paper scraps from the jam clearance areas Close the front door Verify the paper used is within the approved paper specifications Ope...

Page 203: ...t provides stacking and offsetting capabilities for output to a Stacker Tray Note The HCS requires the Interface Module The Interface Module acts as a communication device and paper path between the m...

Page 204: ...a second stacking finishing device is installed This path transports media through the HCS to another connected finishing device 4 Stacker Tray Cart Collated sets up to a total of 5000 sheets are tran...

Page 205: ...Unload indicator This indicator lights when the Stacker Tray has reached the down position and the front door can be opened 6 Exit jam This indicator blinks where there is a jam in the exit area E8 7...

Page 206: ...sition the securing bar on top of the stacked paper 4 Pull the Stacker Cart straight out of the HCS 5 Remove the securing bar 6 Remove the paper from the Stacker Tray 7 Push the empty Stacker Cart str...

Page 207: ...according to the paper jam location Follow the instructions displayed to remove the jammed paper HCS entrance jams E1 E2 and E3 Perform the following steps to clear the jam and resume printing 1 Open...

Page 208: ...ow the instructions displayed on the UI to resume printing HCS transport jams E4 E5 and E6 Perform the following steps to clear the jam and resume printing 1 Open the HCS Front Cover 2 Lift the green...

Page 209: ...the stacker cart and gently remove the jammed paper 8 Push the stacker cart straight into the HCS 9 Close the front door 10 If the UI indicates there is a jam in the print engine follow the instructi...

Page 210: ...me printing 1 Remove any output delivered to the Top Tray 2 Open the HCS Front Cover 3 Lift the green handle s and or rotate the green knob and remove all paper in the entrance area 4 Close the green...

Page 211: ...e area indicates 7 Follow the instructions displayed on the UI to resume printing HCS exit jam E8 Perform the following steps to clear the jam and resume printing 1 Open the HCS Front Cover 2 Lift the...

Page 212: ...are finished b If no curl is present and if the output is NOT acceptable call for service c If curl IS present continue to the next step 2 Check the paper in the Stock Tray for curl 3 Adjust the paper...

Page 213: ...sensor fault in the HCS Remedy Perform the following Power Off On the machine If the problem still exists contact the Customer Support Center Carefully remove all sheets and paper scraps from jam clea...

Page 214: ...following Power Off On the machine If the problem still exists contact the Customer Support Center Carefully remove all sheets and paper scraps from jam clearance areas 049 114 Cause Stacker sensor f...

Page 215: ...ct the Customer Support Center Carefully remove all sheets and paper scraps from jam clearance areas 049 121 Cause Stacker exit sensor jam Remedy Perform the following Power Off On the machine If the...

Page 216: ...achine If the problem still exists contact the Customer Support Center 049 214 Cause Stacker cart sensor fault Remedy Perform the following Power Off On the machine If the problem still exists contact...

Page 217: ...r limit fault Remedy Perform the following Power Off On the machine If the problem still exists contact the Customer Support Center 049 221 Cause Stacker upper lower limit fault Remedy Perform the fol...

Page 218: ...r Carefully remove all sheets and paper scraps from jam clearance areas 049 232 Cause HCS sensor failure Remedy Perform the following Power Off On the machine If the problem still exists contact the C...

Page 219: ...Cause HCS sensor failure Remedy Perform the following Power Off On the machine If the problem still exists contact the Customer Support Center Carefully remove all sheets and paper scraps from jam cl...

Page 220: ...ng Power Off On the machine If the problem still exists contact the Customer Support Center Carefully remove all sheets and paper scraps from jam clearance areas 049 243 Cause HCS sensor failure Remed...

Page 221: ...till exists contact the Customer Support Center Carefully remove all sheets and paper scraps from jam clearance areas 049 280 Cause HCS sensor failure Remedy Perform the following Power Off On the mac...

Page 222: ...learance areas 049 285 Cause HCS sensor failure Remedy Perform the following Power Off On the machine If the problem still exists contact the Customer Support Center Carefully remove all sheets and pa...

Page 223: ...m still exists contact the Customer Support Center Check the connection between the Interface Module and the HCS 049 500 Cause HCS communication or software fault Remedy Perform the following Power Of...

Page 224: ...ng Power Off On the machine If the problem still exists contact the Customer Support Center Carefully remove all sheets and paper scraps from jam clearance areas 049 903 Cause The HCS detects paper at...

Page 225: ...ustomer Support Center Carefully remove all sheets and paper scraps from jam clearance areas 049 940 Cause HCS front door fault Remedy Perform the following Power Off On the machine If the problem sti...

Page 226: ...wing Power Off On the machine If the problem still exists contact the Customer Support Center 049 967 Cause HCS detects paper still remaining on stacker cart after the front door was opened closed Rem...

Page 227: ...HCS front door Remove any paper from the stacker cart Close the HCS front door 049 971 Cause Stacker limit or full sensor fault Remedy Perform the following Power Off On the machine If the problem st...

Page 228: ...ality and increased jam rate for stocks that are heavier than 300 gsm Transparencies may be run to either the Top Tray or the Stack Tray Stack height should be limited to 100 transparencies Coated pap...

Page 229: ...the Standard Finisher or Booklet Maker Finisher 2 Standard or Booklet Maker Finisher These finishers provide a wide range of finishing and folding options The Booklet Maker Finisher is shown in the ab...

Page 230: ...h the Top and Stacker Trays can be used for hole punched output optional This is available only with the Booklet Maker Finisher The Booklet tray receives saddle stitched booklets when you select Singl...

Page 231: ...ction Post process inserter Tray 8 Tray T1 12 Press this button to open C Z Fold output tray C Z Fold output tray but ton 13 When you press this button it activates a decurling feature for the output...

Page 232: ...o panels to the output C Fold A C Fold has two folds which creates a three panel output Z Fold A Z Fold has two folds that are folded in opposite directions resulting in a type of fan fold Xerox Color...

Page 233: ...qual folds The two folds are unequal which allows one edge of the Z Fold Half Sheet to have a longer edge and the longer edge allows for stapling or hole punching Loading paper tabs in Tray 8 T1 Post...

Page 234: ...including staples staple cartridges and staple waste containers can be ordered from Xerox by going to www xerox com and clicking on either the Contact Us link for specific contact information telepho...

Page 235: ...machine has stopped printing 2 Open the Right Cover on the finisher 3 Grasp the Staple Cartridge handle located at R1 and pull out the staple cartridge from the finisher 4 Hold the positions as indic...

Page 236: ...ate if the right cover is open even slightly Replace the booklet staple cartridge In addition to the standard stapler the Booklet Maker Finisher is equipped with a booklet stapler When this booklet st...

Page 237: ...t 5 While holding the tabs of a new staple cartridge push it into the unit 6 Push the staple cartridge unit to its original position in the machine 7 Close the Right Cover on the finisher Note A messa...

Page 238: ...iner 1 Make sure that the machine has stopped printing 2 Open the Right Cover on the finisher 3 Locate the Staple Waste Container R5 in the finisher and move the lock lever to the unlock position 4 Ho...

Page 239: ...the Customer Support Center 6 Hold the new staple waste container by the R5 handle area and push it into the machine Note To prevent injury do not put your fingers on top of the container 7 Push R5 u...

Page 240: ...o empty the Punch Waste Container Caution Only remove the Punch Waste Container while the system is powered ON If you switch off the power when emptying the container the machine cannot detect that th...

Page 241: ...ot operate if the right cover is open even slightly Finisher problem solving Tip Always ensure that all paper jams including any small ripped pieces of paper are cleared before proceeding with your pr...

Page 242: ...nd all paper loaded in the tray Note If paper is torn check inside the machine and remove it 3 Fan the paper you removed making sure that all four corners are neatly aligned and then load them again 4...

Page 243: ...s at lever 1a and knob 1c 1 Make sure that the machine has stopped printing 2 Open the finisher left cover 3 Move lever 1a downward and turn knob 1c left Remove the jammed paper Note If paper is torn...

Page 244: ...The machine will not operate if the cover is open even slightly Paper jams at lever 1d 1 Make sure that the machine has stopped printing 2 Open the finisher left cover 3 Move lever 1d upwards and remo...

Page 245: ...position 5 Close the finisher left cover completely Note The machine will not operate if the cover is open even slightly Paper jams at lever 1b 1 Make sure that the machine has stopped printing 2 Ope...

Page 246: ...ove it 4 Move the lever 1b to the original position 5 Close the finisher left cover completely Note The machine will not operate if the cover is open even slightly Paper jams at lever 3b and 3d 1 Make...

Page 247: ...n check inside the machine and remove it 4 Return the levers 3b and 3d to their original positions 5 Close the Right Cover on the finisher Note A message will display and the machine will not operate...

Page 248: ...ng 2 Open the Right Cover on the finisher 3 Move the lever 3e and turn the knob 3c remove the jammed paper Note If paper is torn check inside the machine and remove it 4 Return the lever 3e its origin...

Page 249: ...slightly Paper jams at lever 3g and knob 3f 1 Make sure that the machine has stopped printing 2 Open the Right Cover on the finisher 3 Move the lever 3g and turn the knob 3f and remove the jammed pape...

Page 250: ...achine will not operate if the right cover is open even slightly Paper jams at lever 4b and knob 3a 1 Make sure that the machine has stopped printing 2 Open the Right Cover on the finisher 3 Move the...

Page 251: ...ght Cover on the finisher Note A message will display and the machine will not operate if the right cover is open even slightly Paper jams at lever 2a and knob 3a 1 Make sure that the machine has stop...

Page 252: ...the lever 2a to its original position 5 Close the Right Cover on the finisher Note A message will display and the machine will not operate if the right cover is open even slightly Paper jams at lever...

Page 253: ...paper is torn check inside the machine and remove it 4 Return the lever 2b to its original position 5 Close the Right Cover on the finisher Note A message will display and the machine will not operate...

Page 254: ...d swing lever 2e 2f to the right and remove the jammed paper Note If paper is torn check inside the machine and remove it 4 If you cannot remove the paper return the lever 2e 2f to its original positi...

Page 255: ...tray 2d 6 Close the Right Cover on the finisher Note A message will display and the machine will not operate if the right cover is open even slightly Paper jams at 2d and lever 2g 1 Make sure that th...

Page 256: ...ed lever 2g to its original position and close the output tray 2d 5 Close the Right Cover on the finisher Note A message will display and the machine will not operate if the right cover is open even s...

Page 257: ...nisher 3 Pull out unit 4 4 Turn the knob 4a to remove the jammed paper from the left side of unit 4 Note If paper is torn check inside the machine and remove it 15 29 Xerox Color J75 Press User Guide...

Page 258: ...e will not operate if the right cover is open even slightly Paper jams at finisher top tray 1 Make sure that the machine has stopped printing 2 Remove jammed paper from the finisher top tray Note If p...

Page 259: ...open even slightly Paper jams at finisher stacker tray 1 Make sure that the machine has stopped printing 2 Remove jammed paper from the finisher stacker tray Note If paper is torn check inside the ma...

Page 260: ...ven slightly Paper jams at the optional booklet maker tray 1 Make sure that the machine has stopped printing 2 Open the Right Cover on the finisher 3 Turn knob 4a and remove any jammed paper from the...

Page 261: ...le 2 Bent staple 3 One side of staple rising up 4 Staple bent in reverse direction 5 Flattened staple 6 Entire staple rising up 7 Staple rising up with the center pressed in If the output is stapled a...

Page 262: ...sp the Staple Cartridge handle located at R1 and pull out the staple cartridge from the finisher 4 Check the inside of the finisher for any remaining staples and if necessary remove them 5 Open the st...

Page 263: ...chine will not operate if the right cover is open even slightly Staple jams in the booklet maker cartridge Note Always check inside the finisher for any individual staples or staple remnants 1 Make su...

Page 264: ...nit by the tabs and lift to remove it 5 Remove the jammed staples from the cartridge Warning To avoid injury to your fingers carefully remove the jammed staples from the cartridge 6 While holding the...

Page 265: ...pen even slightly Reinserting the standard staple cartridge Use this procedure if the standard staple cartridge is inserted incorrectly into the machine Note Always check inside the finisher for any i...

Page 266: ...pen the staple cartridge unit as shown and remove the jammed staple 5 Move the lever on the rear of the staple cartridge unit in the downward direction 6 While holding the lever down turn over the uni...

Page 267: ...he printing to end abnormally or a malfunction occurred in the Booklet Maker Finisher then an error code is displayed If an error code appears that is not listed in the table below or if an error pers...

Page 268: ...rsists contact the Customer Support Center Check for any obstructions in the paper path and clear them 012 212 Cause The finisher malfunctioned Remedy Perform the following Power off on the machine an...

Page 269: ...7 Cause The finisher malfunctioned Remedy Perform the following Power off on the machine and if necessary resend restart your print job If the error persists contact the Customer Support Center Check...

Page 270: ...machine and if necessary resend restart your print job If the error persists contact the Customer Support Center Check for any obstructions in the paper path and clear them 012 226 Cause The finisher...

Page 271: ...rsists contact the Customer Support Center Check for any obstructions in the paper path and clear them 012 235 Cause The finisher malfunctioned Remedy Perform the following Power off on the machine an...

Page 272: ...0 Cause The finisher malfunctioned Remedy Perform the following Power off on the machine and if necessary resend restart your print job If the error persists contact the Customer Support Center Check...

Page 273: ...machine and if necessary resend restart your print job If the error persists contact the Customer Support Center Check for any obstructions in the paper path and clear them 012 250 Cause The finisher...

Page 274: ...rsists contact the Customer Support Center Check for any obstructions in the paper path and clear them 012 255 Cause The finisher malfunctioned Remedy Perform the following Power off on the machine an...

Page 275: ...2 Cause The finisher malfunctioned Remedy Perform the following Power off on the machine and if necessary resend restart your print job If the error persists contact the Customer Support Center Check...

Page 276: ...r full Remedy Remove the Staple Waste Container and install a new one 024 932 Cause The Staple Waste Container is not attached Remedy Check that the Staple Waste Container is installed in the finisher...

Page 277: ...p tray is full Remedy Remove all paper from the finisher top tray 024 982 Cause The finisher stacker tray lower safety warning in on Remedy Remove all paper from the stacker tray and remove any other...

Page 278: ...ainer is full or near full Remedy Remove and empty the waste container then reinstall it 116 790 Cause The settings for stapling are canceled and prints the data Remedy Confirm the staple position and...

Page 279: ...in Optional C Z Folder tray Supports A4 SEF and 8 5 x 11 in SEF Delivery to a supported third party DFA device Maximum 13 x 19 in SRA3 Minimum B5 Executive 7 25 x 10 5 in Supported Paper Size Trays To...

Page 280: ...25 x 10 5 in Staple position 1 location front angled stapling center parallel stapling back parallel stapling 2 locations parallel stapling 4 locations A4 LEF and 8 5 x 11 in LEF parallel stapling An...

Page 281: ...sm Uncoated 25 sheets 81 90 gsm Uncoated 20 sheets 91 105 gsm Uncoated 10 sheets 106 128 gsm Uncoated 10 sheets Coated 10 sheets 129 150 gsm Uncoated 10 sheets Coated 10 sheets 151 176 gsm Uncoated 10...

Page 282: ...4 90 gsm Output tray Stacker middle tray Z Fold Half Sheet Paper size A4 8 5 x 11 in Number of sheets to be folded 1 sheet Capacity Minimum 30 sheets When using Xerox 20 lb 75 gsm paper Paper type 16...

Page 283: ...quareFold Trimmer Module requires a finisher with a booklet maker attached The SquareFold Trimmer Module Receives the booklet from the booklet maker area of the finisher Flattens the booklet spine the...

Page 284: ...tput for your print copy jobs You may want to run one or more test prints copies before running larger jobs Identifying the components Main components The main components consist of 1 Top Left Cover O...

Page 285: ...ine reaches the square fold area the booklet is clamped and the square folding operation begins 4 The booklet is flattened and the spine squared according to the square fold setting indicated on the c...

Page 286: ...one of these indicators 1a 1b 1c is lit the top covers can be opened and the jam fault cleared otherwise during normal operation or when the machine is idle the top covers cannot be opened d This indi...

Page 287: ...ect one of five options depending on your requirements for the finished booklet job Note For the remainder of this section the SquareFold Trimmer Module Control Panel and the machine UI screens are sh...

Page 288: ...essure applied to the spine of the booklet The less pressure applied to the booklet the more rounded the booklet spine will be 7 2 Lower Low 2 Select this setting when your finished booklet is five pa...

Page 289: ...desired job a Double click on the job from either the Hold or Printed Jobs queues b From the Properties window go to the Finishing Output tab c Continue to the next step 4 Ensure that the correct out...

Page 290: ...atic electricity build up and is normal If booklets contain trim remnants scraps simply remove and discard them The Trimmer feature can be switched on or off based on user preference When the feature...

Page 291: ...e Trim settings cannot be adjusted to remove less than 2 mm 0 078 in or more than 20 mm 0 787 in of edge material from the booklet Adjustments less than 2 mm 0 078 in may produce poor trim quality and...

Page 292: ...mm 8 5 x 14 in B4 250 x 353 mm 7 14 200 24 lbs 90 gsm 8 5 x 11 in A4 210 x 297 mm 11 x 17 in A3 297 x420 mm 8 5 205 80 lbs 216 gsm 8 5 x 11 in A4 210 x 297 mm 11 x 17 in A3 297 x420 mm 9 22 210 20 lb...

Page 293: ...erties of the desired job a Double click on the job from either the Hold or Printed Jobs queues b From the Properties window go to the Finishing Output tab c Continue to the next step 4 Ensure that th...

Page 294: ...5 x 11 in A4 paper The image on the front cover is truncated after trimming it Before you print any booklet job you should consider your whole job including the following What is the desired size of t...

Page 295: ...e opened during normal operation or when the machine is idle The covers can be opened only when an indicator is lit and a jam fault occurs within the SquareFold Trimmer Module For indicator details re...

Page 296: ...s completely pushed in closed 8 Ensure that all covers on the SquareFold Trimmer Module are closed 9 If the SquareFold Trimmer Module Control Panel and or the machine s UI indicate there is a still a...

Page 297: ...d paper 3 If you cannot remove the paper in Step 2 open the right cover of the finisher 4 Turn the knob 4a to the right and then remove the jammed paper 16 15 Xerox Color J75 Press User Guide SquareFo...

Page 298: ...te if the right cover of the finisher is even slightly open Clearing E3 jams Use the following procedure to clear jams when the E3 LED is lit on the SquareFold Trimmer Module control panel 1 Make sure...

Page 299: ...The top covers cannot be opened during normal operation or when the machine is idle The covers can be opened only when an indicator is lit and a jam fault occurs within the SquareFold Trimmer Module F...

Page 300: ...go to the finisher Open the finisher Remove any jams Close the finisher cover s 2 Follow the instructions shown on the machine UI to resume printing 3 If fault persists power off on the machine 4 If...

Page 301: ...s from jam clearance areas 3 Close the SquareFold Trimmer Module Top Left and Right Covers 4 Check the Trimmer Waste Container If full empty the container and reinsert it into the SquareFold Trimmer M...

Page 302: ...Right Covers 4 Check the Trimmer Waste Container If full empty the container and reinsert it into the SquareFold Trimmer Module If the container is partially pulled out push it completely in 5 If nece...

Page 303: ...eFold Trimmer Module Remedy Perform the following 1 Power off on the machine 2 If fault persists call for service 013 223 Cause Jam or communication error with the SquareFold Trimmer Module Remedy Per...

Page 304: ...Power off on the machine 2 If fault persists call for service 013 230 Cause Jam or communication error with the SquareFold Trimmer Module Remedy Perform the following 1 Power off on the machine 2 If f...

Page 305: ...reFold Trimmer Module Remedy Perform the following 1 Power off on the machine 2 If fault persists call for service 013 237 Cause Jam or communication error with the SquareFold Trimmer Module Remedy Pe...

Page 306: ...ing 1 Power off on the machine 2 If fault persists call for service 013 246 Cause Jam or communication error with the SquareFold Trimmer Module Remedy Perform the following 1 Power off on the machine...

Page 307: ...and reinsert it into the SquareFold Trimmer Module If the container is partially pulled out push it completely in 5 If necessary follow any remaining instructions on the machine s UI 6 If fault persi...

Page 308: ...and reinsert it into the SquareFold Trimmer Module If the container is partially pulled out push it completely in 5 If necessary follow any remaining instructions on the machine s UI 6 If fault persi...

Page 309: ...rsists repeat the previous steps 5 If fault persists power off on the machine 6 If fault persists call for service 013 943 Cause Booklet Tray on the SquareFold Trimmer Module is full Remedy Perform th...

Page 310: ...Specifications Item 16 lb bond 90 lb cover 60 220 gsm Paper weights Xerox Color J75 Press 16 28 User Guide SquareFold Trimmer Module...

Page 311: ...ompleted Jobs 7 1 Copy 5 1 Copy tab 5 3 Image Quality tab 5 8 Layout Adjustment tab 5 10 Output Color 5 5 Output Format tab 5 16 Paper Supply 5 4 Reduce Enlarge 5 3 Copy Output 5 6 Covers 5 18 Current...

Page 312: ...dule 13 4 paper curl settings on the Interface Module 13 3 paper jams at lever 1a 13 5 paper jams at lever 2a 13 6 paper jams at lever 2b 13 8 paper path 13 3 preset decurler settings on the Interface...

Page 313: ...erwrite Hard Disk 8 2 P Page Layout Multiple Up Variable Repeat 5 22 Paper curl settings on Interface Module 13 3 settings on the Interface Module 13 3 loading paper in the Bypass tray Tray 5 4 5 load...

Page 314: ...ottle 9 10 S Saturation 5 8 Scan 6 1 Serial number on the machine on the UI Sharpness 5 8 Skew adjustment levers for trays 1 and 2 for trays A1 1 and A1 2 OHCF 12 7 for trays A1 1 and A1 2 OHCF Softwa...

Page 315: ...ding paper in the OHCF Trays 6 7 12 2 loading paper in Tray 5 Bypass loading paper in Tray5 Bypass 4 5 loading paper in Trays 1 2 and3 4 1 loading pre drilled stock in the OHCF Trays 6 7 12 4 12 5 loa...

Page 316: ...Xerox Color J75 Press vi User Guide Index...

Page 317: ......

Page 318: ......

Reviews: