background image

Common Settings

283

Sys

tem
 S

et

tin

g

s

10

Millimeters/Inches

Select whether the unit of measure displayed on the screen is millimeters or inches.

Keyboard Input Restriction

Select whether to restrict the display of the virtual keyboard on the machine. To prevent 
characters being garbled when switched from one character set to another, you can restrict 
the input to ASCII characters only. If you select [On (Standard ASCII only)], the displayed 
keyboard shows ASCII characters only.

Operation of Up/Down Buttons

Select whether or not there is a continuous scrolling effect when the scroll buttons are held 
down.

„

Disable Fast Scrolling

Holding down the scroll buttons does not scroll.

„

Enable Fast Scrolling

Holding down the scroll buttons causes continuous scrolling.

Display Consumables Screen

Set whether the machine displays the parts status when parts need to be replaced.

„

Off

Does not display the consumable status screen.

„

When power is switched on

Status is displayed at startup.

„

When Auto Clear is activated

Status is displayed when Auto Clear is executed.
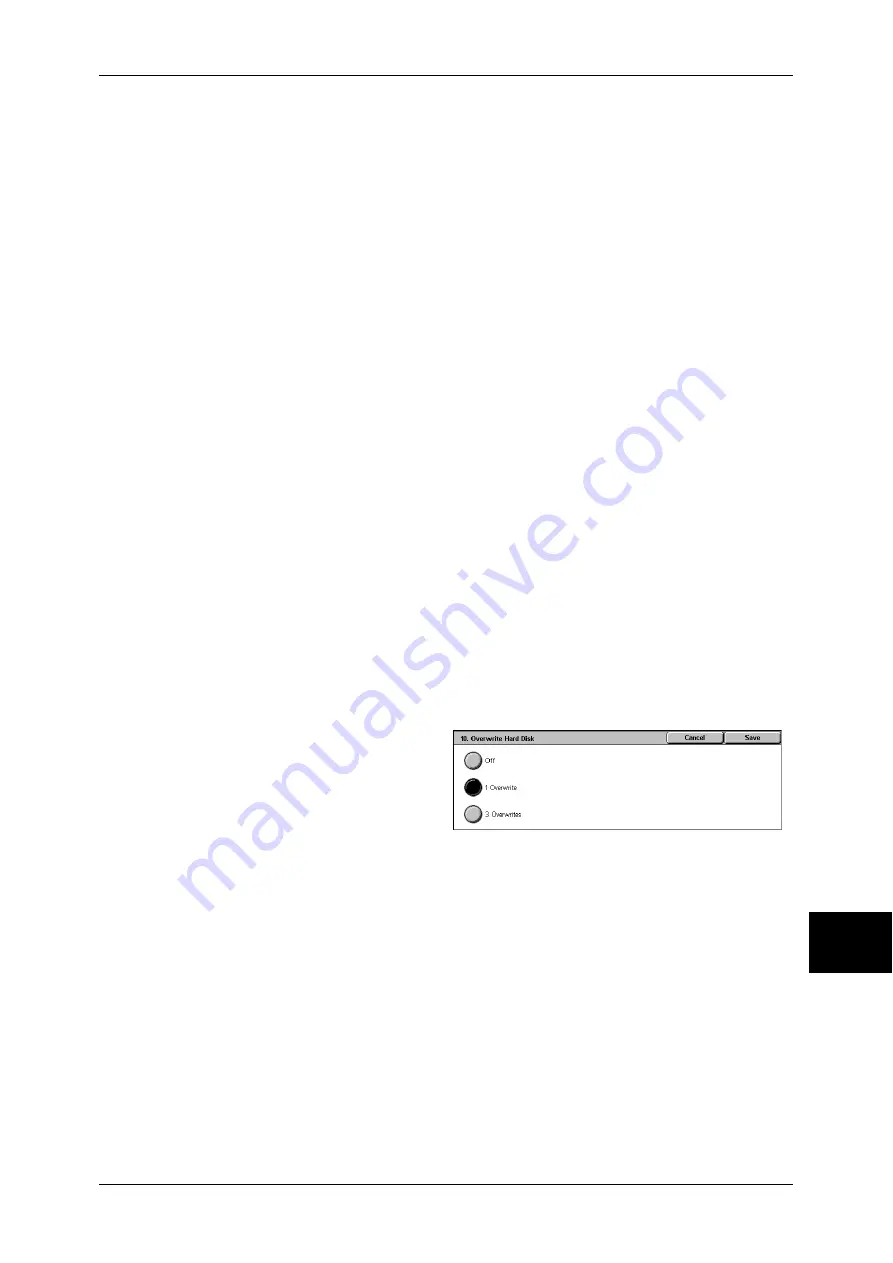
Overwrite Hard Disk

Select whether or not to carry out hard disk overwrite erasing. If you overwrite the hard disk, 
you can select whether to overwrite once or three times.

When copy (P.53), fax (P.105), scan (P.171), or print (P.230) processing is completed, the 
data is deleted from the hard disk and the area on which the deleted data was stored is 
automatically overwritten with blank data. This feature prevents unauthorized retrieval or 
restoration of the data recorded on the hard disk. It also applies to copy source, and other 
information stored temporarily by the system.

Important •

If the machine is powered off during the overwriting operation, unfinished files may remain 
on the hard disk. The overwriting operation will resume if you power the machine on again 
with the unfinished files remaining on the hard disk.

The data is erased by overwriting once, but overwriting three times makes it even more 
definite that the data cannot be recovered. It does, however, take longer.

During the overwriting process, processing of normal operations may be slowed down.

Note

An optional package is required to use this feature. For more information, contact our 
Customer Support Center.

For information about how to check the status during the overwriting process, refer to "Overwrite Hard 
Disk" (P.369).

Summary of Contents for ApeosPort-II 5010

Page 1: ...ApeosPort II 5010 4000 3000 DocuCentre II 5010 4000 User Guide ...

Page 2: ...ration or Fuji Xerox Co Ltd All Xerox and Fuji Xerox product names are either registered trademarks or trademarks of Xerox Corporation or Fuji Xerox Co Ltd The data saved in the hard disk of the machine may be lost if there is any problem in the hard disk Fuji Xerox is not responsible for any direct and indirect damages arising from or caused by such data loss Fuji Xerox is not responsible for any...

Page 3: ...25 Regulation 27 Radio Frequency Emissions Class B 27 Product Safety Certification CB 27 Environment 28 About License 29 RSA BSAFE 29 Heimdal 29 LZMA 29 JPEG Code 30 Libcurl 30 FreeBSD 30 OpenLDAP 31 DES 33 AES 33 Legal Notice 34 2 Product Overview 35 Machine Components 36 Power On Off 40 Powering On 40 Powering Off 41 Circuit Breaker 42 Power Saver Mode 43 Changing the Power Saver Mode Change Int...

Page 4: ...Making 2 Sided Copies of Facing Pages 71 Original Size Specifying the Scan Size for the Document 72 Mixed Sized Originals Scanning Different Size Documents Simultaneously 73 Edge Erase Erasing Edges and Margin Shadows of the Document 74 Image Shift Adjusting the Image Position 74 Image Rotation Changing the Orientation of Images 76 Invert Image Making Reversed Copies of Images 77 Original Orientat...

Page 5: ...ures 118 About Server Fax 121 Sending Server Fax 121 Fax Internet Fax 123 iFax Fax Selecting iFax Fax 123 Next Recipient Sending Faxes to Multiple Recipients 123 Specifying a Destination Using the Address Book 124 Speed Dialing Specifying a Destination Using an Address Number 125 Specifying a Destination using a One Touch Button 126 Specifying a Destination using the Keyboard Screen 126 Entering S...

Page 6: ...Documents from Remote Machines 154 Store for Polling Allowing Remote Machines to Retrieve Documents from Your Machine 155 On hook Confirming Remote Machine Response Prior to Transmission 157 Broadcast 158 Broadcast Send Transmitting to Multiple Recipients 158 Relay Broadcast Transmitting Documents Through a Relay Station 158 Remote Relay Broadcast Performing Relay Broadcast to Remote Locations 162...

Page 7: ... Both Sides of a Document 197 Book Scanning Scanning Facing Pages on Separate Sheets 198 Original Size Specifying a Scan Size 199 Mixed Sized Originals Scanning Different Size Documents Simultaneously 199 Edge Erase Erasing Edges and Margin Shadows in the Document 200 Reduce Enlarge Specifying a Scanning Ratio 201 Output Format 202 Read Receipts 202 Split Send Sending in Sections 203 File Name Spe...

Page 8: ... E mail Printing 231 Setup 231 Sending E Mail 231 Importing Scanned Data 233 Importing to a TWAIN Compatible Application 233 Importing Using Mailbox Viewer2 235 Importing Using CentreWare Internet Services 237 Importing with the WebDAV Protocol 238 Sending Fax 239 Registering Destinations 239 9 Paper and Other Media 241 Paper Types 242 Supported Paper Type 242 Loading Paper 245 Loading Paper in th...

Page 9: ...ettings 287 Copy Tab 287 Copy Defaults 288 Copy Control 291 Original Size Defaults 293 Reduce Enlarge Presets 293 Annotation Create Stamps 293 Network Settings 294 Port Settings 294 Protocol Settings 294 Machine s E mail Address Host Name 295 Outgoing Incoming E mail Settings 295 PKI Public Key Settings 295 Other Settings 296 Print Mode Settings 297 Allocate Memory 297 Delete Form 299 Other Settin...

Page 10: ...System Administrator Settings 337 System Administrator Login ID 337 System Administrator s Passcode 337 Maximum Login Attempts 338 Login Setup Auditron Administration 339 Create Check User Accounts 339 Account Details 341 Reset User Accounts 341 System Administrator s Meter Copy Jobs 342 User Details Setup 342 Charge Private Print Settings 343 Fax Billing Data 345 Passcode Entry from Control Panel...

Page 11: ...rs Controlled by Authentication 386 Types of Authentication 386 Features Controlled by Authentication 387 Authentication for Job Flow Sheets and Mailboxes 390 Job Flow Sheet Types 390 Types of Mailboxes 393 Linking Job Flow Sheets to Mailboxes 395 Overview of Auditron Administration 397 Authentication and Auditron Administration 397 Manageable Features and Services 398 14 Maintenance 405 Replacing...

Page 12: ...sult is Not What was Expected 441 Trouble during Faxing 443 Sending Problems 443 Receiving Problems 444 Trouble during Scanning 447 Unable to Scan with the Machine 447 Unable to Import Scanned Documents to the Computer 447 Unable to Send a Scanned Document over the Network FTP SMB 448 Unable to Send E mail 449 The Image is not What was Expected 449 Error Code 452 Other Errors 506 Paper Jams 507 Pa...

Page 13: ... Magnification Table 556 Paper Size and Number of Printable Characters 560 PDF Direct Print 562 PDF Direct Print Settings 562 PCL Emulation 564 HP GL2 Emulation 567 Hard Clip Area 571 Printable Area 572 Auto Layout 574 Optional Components 581 Notes and Restrictions 583 Notes and Restrictions on the Use of the Machine 583 Notes and Restrictions in the Interrupt Mode 585 Notes and Restrictions on th...

Page 14: ......

Page 15: ...to use this guide as well as safety notes and legal notice you need to read before using the machine z Preface 14 z Using This Guide 15 z Organization of This Guide 16 z Safety Notes 19 z Regulation 27 z Environment 28 z About License 29 z Legal Notice 34 ...

Page 16: ...the machine For instructions on configuring your network environment refer to the Network Administrator Guide For information about optional accessories for the printer functionality also refer to the guide provided with each optional accessory In this manual safety instructions are preceded by the symbol Always read and follow the instructions before performing the required procedures The equipme...

Page 17: ...ng the various items and the safety information Network Administrator Guide Aimed toward network administrators as a guide to setting up the network environment ApeosPort Function Guide Describes the features unique to the ApeosPort series Manual HTML A guide for installing print drivers configuring the printer environment etc This manual is included in the CD ROM of the Driver CD Kit Guides for O...

Page 18: ...boxes 7 Stored Programming Describes the stored programming feature 8 Computer Operations Describes operations performed from a computer such as printing documents importing scanned documents sending fax as well as using CentreWare Internet Services 9 Paper and Other Media Describes the types of paper that can be used on the machine precautions when handling paper and how to load paper in trays 10...

Page 19: ...ons displayed on the touch screen The names of menus windows dialog boxes buttons and other items displayed on computer monitors button Hardware buttons on the machine s control panel key Keys on computer keyboards Indicates a path to a certain item within a procedure on the control panel Example When you see the procedure select System Settings Setup Menu Mailbox this means that you need to selec...

Page 20: ...s and paper loaded in trays are described as follows Long Edge Feed LEF The long edge of the paper is positioned to enter the machine first Short Edge Feed SEF The short edge of the paper is positioned to enter the machine first LEF Orientation Paper feed direction SEF Orientation Paper feed direction ...

Page 21: ...re information Used for item that if not followed strictly can lead death or severe or fatal injuries and the possibility to do it is comparatively high Used for items that if not followed strictly can lead to severe or fatal injuries Used for items that if not followed strictly can cause injuries to user or damages to machine A symbol for items to pay attention to when handling machine Follow ins...

Page 22: ...wet hand It may cause electric shock Do not place an object on the power cord Always keep the plug connection free of dust The dusty and damp environment may bring about minute electric current in a connector It may generate heat and eventually cause a fire accident To avoid the risk of electric shock and a fire accident only use the power cord supplied with this product or the ones designated by ...

Page 23: ...heat and eventually cause electric shock or a fire accident Never locate this product in the following places z Near radiators or any other heat sources z Near volatile flammable materials such as curtains z In the hot humid dusty or poorly ventilated environment z In the place receiving direct sunlight z Near cookers or humidifiers Locate this product on the level and sturdy surface that can with...

Page 24: ...re 75 650 460 200 1340 1185 560 580 75 680 430 200 1340 1185 560 580 ApeosPort mm 75 650 460 200 1440 1185 560 700 DocuCentre with High Capacity Feeder DocuCentre with B Finisher and Side Tray 75 650 460 1000 2140 1185 560 580 DocuCentre with C Finisher and Side Tray ...

Page 25: ...ators access to hazard areas The hazard areas are isolated from operators by covers or protectors which require a tool to remove To prevent electric shock and injuries never remove those covers and protectors To avoid the risk of electric shock and a fire accident switch off and unplug the product promptly in the following conditions then contact your local Fuji Xerox representative z The product ...

Page 26: ...ys follow all warning instructions marked on or supplied with this product To avoid the risk of burn injuries and electric shock never touch the area with the High Temperature or High Voltage marks on Keep electrical and mechanical safety interlocks effective Keep the safety interlocks away from magnetic materials Magnetic materials may accidentally activate the product and cause injuries or elect...

Page 27: ... all consumables in accordance with the instructions given on its package or container Use a broom or a wet cloth to wipe off spilled toner Never use a vacuum cleaner for the spills It may catch fire by electric sparks inside the vacuum cleaner and cause explosion If you spill a large volume of toner contact your local Fuji Xerox representative Never throw a toner cartridge into an open flame Rema...

Page 28: ...r particles in your eyes wash it out with plenty of water for at least 15 minutes until irritation is gone Consult a physician if necessary If you inhale toner particles move to a fresh air location and rinse your mouth with water If you swallow toner spit it out rinse your mouth with water drink plenty of water and consult a physician immediately ...

Page 29: ...at interference will not occur in a particular installation If this product does cause harmful interference to radio or television reception which can be determined by turning this product off and on the user is encouraged to try to correct the interference by one or more of the following measures z Reorient or relocate the receiving antenna z Increase the separation between this product and the r...

Page 30: ...er the condition of monochrome copying using the toner type ApeosPort II 5010 4000 3000 DocuCentre II 5010 4000 Toner Black that is recommended for this product z For environmental protection and efficient use of resources Fuji Xerox reuses returned toner cartridges to make recycle parts recycle materials or energy recovery z Proper disposal is required for drums and toner cartridges no longer nee...

Page 31: ...ributors may be used to endorse or promote products derived from this software without specific prior written permission THIS SOFTWARE IS PROVIDED BY THE INSTITUTE AND CONTRIBUTORS AS IS AND ANY EXPRESS OR IMPLIED WARRANTIES INCLUDING BUT NOT LIMITED TO THE IMPLIED WARRANTIES OF MERCHANTABILITY AND FITNESS FOR A PARTICULAR PURPOSE ARE DISCLAIMED IN NO EVENT SHALL THE INSTITUTE OR CONTRIBUTORS BE L...

Page 32: ...o promote the sale use or other dealings in this Software without prior written authorization of the copyright holder FreeBSD This product contains the part of FreeBSD codes The FreeBSD Copyright Copyright 1994 2006 The FreeBSD Project All rights reserved Redistribution and use in source and binary forms with or without modification are permitted provided that the following conditions are met Redi...

Page 33: ...enLDAP org license html OpenLDAP is a registered trademark of the OpenLDAP Foundation Individual files and or contributed packages may be copyright by other parties and or subject to additional restrictions This work is derived from the University of Michigan LDAP v3 3 distribution Information concerning this software is available at http www umich edu dirsvcs ldap ldap html This work also contain...

Page 34: ...e applicable copyright statements and notices this list of conditions and the following disclaimer in the documentation and or other materials provided with the distribution and 3 Redistributions must contain a verbatim copy of this document The OpenLDAP Foundation may revise this license from time to time Each revision is distinguished by a version number You may use this Software under terms of ...

Page 35: ...on Copyright 1999 2003 The OpenLDAP Foundation Redwood City California USA All Rights Reserved Permission to copy and distribute verbatim copies of this document is granted DES This product includes software developed by Eric Young eay mincom oz au AES Copyright c 2003 Dr Brian Gladman Worcester UK All rights reserved This product uses published AES software provided by Dr Brian Gladman under BSD ...

Page 36: ...les of items that may be illegal to copy or print in your country z Currency z Banknotes and checks z Bank and government bonds and securities z Passports and identification cards z Copyright material or trademarks without the consent of the owner z Postage stamps and other negotiable instruments This list is not inclusive and no liability is assumed for either its completeness or accuracy In case...

Page 37: ...e s basic information such as the names of components how to switch on and off how to use the touch screen and how to set the power saver feature z Machine Components 36 z Power On Off 40 z Circuit Breaker 42 z Power Saver Mode 43 z Control Panel 46 ...

Page 38: ...the printed side facing down 4 Center output tray Printed or copied documents are delivered with the printed side facing down Note When the Exit 2 Tray is installed on the machine the center output tray is referred to as center tray lower 5 Power switch Switches the power of the machine on off 6 Front cover Opened to replace consumables 7 Tray 1 2 Tray 3 4 optional Accommodates papers 8 Side Tray ...

Page 39: ...unch scraps 16 Staple cartridge Contains staples Pull out the cartridge when clearing staple jams or when replacing the cartridge 17 Booklet tray For C Finisher with Booklet Maker Only Receives documents when Folding is selected in the booklet creation function 18 Front cover Open this cover to access the insides of the machine to clear paper or staple jams replace staple cartridges or throw punch...

Page 40: ... forming powder 23 Drum cartridge Contains a photo conductor to transfer toner No Component Function 24 B Finisher optional Allows you to staple printed or copied documents 25 Finisher top cover button Pressed to open the upper cover of the finisher when clearing paper jams 26 Finisher tray Stapled documents are delivered 27 Front cover Opened to clear staple jams or replace staples 28 Staple cart...

Page 41: ...andard interface cable 34 10BASE T 100BASE TX connector Connected to a network cable 35 RESET button Automatically turns the power off if detecting current leakage No Name on the machine cover Name on the touch screen Function 36 TEL Connected to an external telephone Note Do not connect other fax machines 37 LINE 1 Line 1 Connected to a public telephone network 38 LINE 2 optional Line 2 Connected...

Page 42: ... may cause loss of data being processed For information on the power saving feature refer to Power Saver Mode P 43 Note When the power is turned off all functions of the machine will stop Do not turn the machine off if it is used all day for receiving faxes Powering On The procedure for turning on the power is as follows 1 Press the power switch to the position to turn the power on Note The Please...

Page 43: ...s not lit Important Never turn the power off in the following instances While data is being received While jobs are being printed While jobs are being copied While jobs are being scanned 2 Press the power switch to the position Important Power off processing is performed internally on the machine for a while after the power switch is turned off Therefore do not unplug the power cord from the power...

Page 44: ...s the TEST button with the tip of a ballpoint pen or another fine tipped object to cancel the pressed in state of the RESET button Once a month check the breaker for correct operation Also make sure that it is earthed If not the breaker cannot detect current leakage which can cause electric shock If you notice any unusual conditions contact our Customer Support Center Note The RESET button automat...

Page 45: ...s the Power Saver button The Power Saver button then goes out and the Power Saver mode is exited Sleep Mode In this mode the power is lowered more than in the Low Power mode The touch screen goes out and the Power Saver button on the control panel lights up To use the machine press the Power Saver button The Power Saver button then goes out and the Power Saver mode is exited Changing the Power Sav...

Page 46: ...e last operation Note The default for From Last Selection to Low Power Mode is 2 minutes The Low Power Mode cannot be disabled From Last Selection to Sleep Mode Set the time to move to the Sleep Mode after the last operation Note The default for From Last Selection to Sleep Mode is 2 minutes Configure the From Last Selection to Sleep Mode time to be longer than the From Last Selection to Low Power...

Page 47: ...how to exit the Power Saver mode The Power Saver mode is exited in the following instances z When the Power Saver button is pressed z When data is received z When the Apply button is clicked on CentreWare Internet Services 1 Press the Power Saver button 1 2 3 4 5 6 7 8 9 0 C Power Saver button ...

Page 48: ... can also check the destination information for sending faxes and e mail In this manual this button is indicated as the Review button 7 Machine Status button Press this button to check the machine status and meters to check the status of consumables and to print reports In this manual this button is indicated as the Machine Status button 8 Log In Out button Press this button to display a login scr...

Page 49: ...tered a wrong numerical value with the numeric keypad In this manual this button is indicated as the C button 17 Dial Pause button Used to insert a pause into a destination number In this manual this button is indicated as the Dial Pause button 18 Custom buttons Copy Custom 2 Custom 3 buttons Used to call their associated features To the buttons you can assign Language or any features displayed on...

Page 50: ...buttons and to select the features to be displayed on the All Services screen 1 Press the Log In Out button 2 Enter the user ID with the numeric keypad and select Confirm Note The default User ID is 11111 When using the Authentication feature a passcode may be required The default passcode is x admin 3 Select System Settings 4 Select System Settings 5 Select Common Settings 6 Select Screen Button ...

Page 51: ...ection Screen and All Services 1 Select Screen After Auto Clear and select Change Settings 2 Select Last Selection Screen or All Services Customizing the All Services Screen By selecting features and their positions you can customize the All Services screen that is displayed when you press the All Services button on the control panel The following are the factory default features displayed on the ...

Page 52: ... position will remain empty Assigning Features to Custom Buttons Assign features to the Custom buttons on the control panel Custom 1 to Custom 3 By assigning features to the Custom buttons you can switch to the features without returning to the All Services screen If you do not want to assign any feature to a button select Not Set By factory defaults Copy is assigned to the Copy button and no feat...

Page 53: ...stomize the screen layouts for the following features listed on the All Services screen z Copy z Fax Internet Fax z E mail z Scan to Mailbox z Scan to PC For information on how to change the settings refer to Copy Tab P 287 General Settings Tab P 302 and Screen Defaults P 306 ...

Page 54: ......

Page 55: ...escribes the basic copy procedures and the copy features provided by the machine z Copying Procedure 54 z Operations during Copying 59 z Copy 62 z Image Quality 68 z Layout Adjustment 70 z Output Format 79 z Job Assembly 98 ...

Page 56: ...ze documents For non standard size documents input the size in the Original Size screen For information on entering document sizes refer to Original Size Specifying the Scan Size for the Document P 72 Note The standard document sizes that can be detected automatically depend on the Paper Size Settings in the System Administration mode For information about paper size settings refer to Paper Size S...

Page 57: ...ent glass close the document cover The document glass automatically detects standard size documents For non standard size documents input the size in the Original Size screen For information on entering document sizes refer to Original Size Specifying the Scan Size for the Document P 72 Note The standard document sizes that can be detected automatically depend on the Paper Size Settings in the Sys...

Page 58: ...nding on the model of your machine When the Authentication or Auditron Administration feature is used a user ID and passcode may be required Ask your system administrator for the user ID and passcode 1 Press the All Services button 2 Select Copy 3 If the previous settings still remain press the Clear All button 4 Select each tab and configure features as necessary The following shows the reference...

Page 59: ...an error message appears in the touch screen Solve the problem in accordance with the message You can set the next job during copying If you have more documents If you have more documents to copy select Next Original on the touch screen while the current document is being scanned This allows you to scan the documents as a single set of data 2 Select Next Original while scanning is in progress Note...

Page 60: ...repeat Steps 3 and 4 5 When all documents have been scanned select Last Original Step 5 Confirming the Copy Job in Job Status 1 Press the Job Status button 2 Confirm the job status Note Select to return to the previous screen or to move to the next screen 1 2 3 4 5 6 7 8 9 0 C Job Status button ...

Page 61: ...utton on the control panel 2 Select Cancel Note If two or more jobs are in progress a confirmation screen appears for each job Select Start or Cancel depending on whether you want to start or cancel the job If the screen shown in step 2 does not appear even after you press the Stop button on the control panel Depending on the jobs in progress screens for canceling jobs may not appear In that case ...

Page 62: ... new quantity must include the number of copies that have already been printed You cannot enter a number less than the number of copies that have already been printed 4 Press the Start button Interrupting the Copy Job You can temporarily stop the copy job to have the machine process another job 1 Press the Interrupt button Note The interrupt indicator lights up to indicate that the machine is in t...

Page 63: ...5 After you have finished making the interrupt copy press the Interrupt button Note The interrupt indicator goes out to indicate that the interrupt mode is exited If you used the document glass to copy the document remove the document from the document glass 6 Press the Start button The suspended copy job is resumed ...

Page 64: ...y box Allows you to enter a value between 25 and 400 in 1 increments by touching the entry box and then using numeric keys or by using the and buttons 100 Copies at the same image size as the original document Auto Automatically determines the copy ratio based on the document size and the paper size specified in Paper Supply and copies the document to fit into the paper Note If you select Auto sel...

Page 65: ...select Copy All and you do not want to erase the edges of the document set the amount of edge erase to 0 mm Note that if the amount is set to 0 mm the edges of the copied document may get dirty or the image loss may occur Copy ratio entry box Touch the entry box and then use the numeric keypad or the and buttons to specify a ratio within the range of 25 to 400 in 1 increments When Independent X Y ...

Page 66: ... the output copy into Copy Size of Width X using the numeric keypad and select Next 3 In the same way enter the length of the original document and the length of the output copy into Original Size and Copy Size of Length Y respectively and select Next Note To change a value you have entered select Next to move the mark to the desired text box and then enter a new value Width X Length Y Displays th...

Page 67: ...Auto Size Detect Standard Size and Custom Size When you select Auto Size Detect the paper size is identified automatically When you select Standard Size or Custom Size refer to When Standard Size is Selected P 65 and When Custom Size is Selected P 65 Note Auto Size Detect is available for standard size paper only Paper Type Select a paper type When Standard Size is Selected Select a paper size fro...

Page 68: ...per used for 2 Sided Copying is not a user specified one the paper will be output to the center output tray Remove the paper frequently from the tray 1 Select any item 1 J 1 Sided Makes a copy of a 1 sided document on one side of paper 1 J 2 Sided Makes a copy of a 1 sided document on both sides of paper 2 J 2 Sided Makes a copy of a 2 sided document on both sides of paper More Displays the 2 Side...

Page 69: ...at of the document This appears when 1 J 2 Sided or 2 J 2 Sided is selected Image Shift Adjusting the Image Position This feature is the same as Image Shift of the Layout Adjustment screen Refer to Image Shift Adjusting the Image Position P 74 Edge Erase Erasing Edges and Margin Shadows in the Document This feature is the same as Edge Erase of the Layout Adjustment screen Refer to Edge Erase Erasi...

Page 70: ...quality 1 Select Original Type 2 Select the original type Text Select this option for text documents This option is also suitable for graphs and illustrations Photo Text Select this option when the document contains both text and photos The machine automatically distinguishes the text and photo areas of the document and sets the appropriate image quality for each area Photo Select this option to c...

Page 71: ...wer position makes darker Sharpness You can select from five sharpness levels between Soften and Sharpen Selecting an upper cell on the bar makes the contours of images sharper and selecting a lower cell makes softer Background Suppression Erasing the Background Color of Documents This feature allows you to suppress the background color of documents such as newspaper and color paper Note When Orig...

Page 72: ...entation Specifying the Orientation of Loaded Documents 78 1 On the All Services screen select Copy 2 Select the Layout Adjustment tab and then select a feature on the Layout Adjustment screen Book Copying Copying Facing Pages onto Separate Sheets This feature allows you to copy facing pages of a document on separate sheets of paper in page order It is useful if you need to make separate copies of...

Page 73: ...ithin the range from 0 to 50 mm in 1 mm increments 2 Sided Book Copy Making 2 Sided Copies of Facing Pages You can assign pages when making copies of facing pages in a bound document so that pages face each other in the same way as the document You can also specify the start page and the end page from the left and right of facing pages Note This feature does not appear for some models An optional ...

Page 74: ...hese items when Top Page then Bottom is selected End Page Select the copy end page from the following items z Left Page Right Page You can select these items when Left Page then Right or Right Page then Left is selected z Top Page Bottom Page You can select these items when Top Page then Bottom is selected Original Size Specifying the Scan Size for the Document This feature allows you to set the s...

Page 75: ...uments and make copies onto paper that matches the respective sizes of the documents You can also specify the size of the paper to make copies on so that copies are made on the same size of paper Important Ensure that the orientation of the first sheet of the document and the Original Orientation setting of the Layout Adjustment screen are the same Always load A5 documents in portrait orientation ...

Page 76: ...o specify Edge Erase values z Top Bottom Erase Erases the shadows of top and bottom edges of the document in accordance with the orientation of the loaded document You can set the edge erase width within the range from 0 to 50 mm in 1 mm increments z Left Right Erase Erases the shadows of left and right edges of the document in accordance with the orientation of the loaded document You can set the...

Page 77: ...tioning of Side 1 Image Shift Side 1 Screen You can make settings for Side 1 on this screen 1 Select any item No Shift Does not shift the position of document images Auto Center Shifts document images so that they are placed in the center of paper To make fine adjustments set the amounts of the top and bottom and left and right margins within the range from 0 to 50 mm in 1 mm increments Corner Shi...

Page 78: ...bottom and left and right margins within the range from 0 to 50 mm in 1 mm increments Image Rotation Changing the Orientation of Images If the orientation of the paper currently loaded in the tray differs from that of your document the machine automatically rotates the document image to fit on the paper You can also select a reference position of image rotation if documents are of mixed orientatio...

Page 79: ...ons images will be rotated so that the top edge of a landscape document is aligned with the left edge of a portrait document Portrait Original Right Edge If documents are of mixed orientations the image will be rotated so that the top edge of a landscape document is aligned with the right edge of a portrait document Invert Image Making Reversed Copies of Images This feature allows you to invert do...

Page 80: ...ntation then the machine may mistakenly detect the top of the document 1 Select Original Orientation 2 Select Upright Images or Sideway Images in accordance with the orientation of the document loaded Upright Images Select this item when placing the top edge of the document against the top side of the document glass or document feeder Sideways Images Select this item when placing the top edge of t...

Page 81: ...ound of Copies 92 Secure Watermark Managing Document Security 95 Folding Outputting Bi Folded Paper 96 Preset Repeat Image Making Multiple Copies on a Single Sheet 97 ID Card Copying Copying Both Sides of an ID Card 97 1 On the All Services screen select Copy 2 Select the Output Format tab and then select a feature on the Output Format screen Copy Output Specifying Finishing Options This feature a...

Page 82: ...e machine outputs copies with inserting blank sheets as a separator and sorts sheets by page Stapling Displays the Copy Output Stapling screen Refer to Copy Output Screen P 80 Hole Punching Displays the Copy Output Hole Punching screen Refer to Copy Output Hole Punching Screen P 81 Output Destination Select the output destination Select from the following trays Note This feature does not appear fo...

Page 83: ... the Layout Adjustment screen are the same When the C Finisher or C Finisher with Booklet Maker is installed and the punching feature is out of order the documents will be output on the center output tray Remove the documents output to the center output tray frequently The 3 hole setting is optional For more information contact our Customer Support Center Our customer engineer will make the necess...

Page 84: ...hift Screen P 82 Covers Displays the Booklet Creation Covers screen Refer to Booklet Creation Covers Screen P 83 Divide Output Displays the Booklet Creation Divide Output screen Refer to Booklet Creation Divide Output screen P 83 Fold Staple Options Displays the Booklet Creation Fold Staple Options screen Refer to Booklet Creation Fold Staple Options screen P 83 Last Page on Back Cover Selecting t...

Page 85: ...he same size and orientation for the copy paper and the cover When Bypass is selected the Tray 5 Bypass screen appears Refer to Tray 5 Bypass Screen P 65 Booklet Creation Divide Output screen When you have a large number of originals the originals are divided to create subsets to reduce the thickness of each booklet The machine folds copies in half and piles them up to form a booklet This feature ...

Page 86: ... first page of the original document is copied onto the front cover Front Back Covers Attaches front and back covers to copies You can use a different type of paper as the covers If Printed Covers is selected under Covers the first and last pages of the original document are copied onto the front and back covers respectively Covers z Blank Covers Blank sheets of paper are attached as covers z Prin...

Page 87: ...re does not appear for some models An optional package is necessary For more information contact our Customer Support Center Transparency Set Handouts Copies are made on transparencies and the required number of copies for distribution is printed Note This feature does not appear for some models An optional package is necessary For more information contact our Customer Support Center Paper Tray Se...

Page 88: ...ight document pages onto one side of a single sheet of paper Reading Order Allows you to select how to lay out images on a page Poster Making Enlarged Copies Spread over Multiple Sheets An enlarged copy of a document can be made spread over multiple sheets This feature allows you to create a large poster by pasting together the copies spread over multiple sheets Copied sheets are provided with a p...

Page 89: ...mber of times When the copy ratio is set to Auto the repeated copies of the image are reduced to fit on the selected paper You can also specify how the repeated copies of the image are arranged Note When making repeat copies at the same size as the document image specify a number of repeats that will fit on the paper 1 Select Repeat Image 2 Select any item 1 Page Up Image Repeat is not applied Aut...

Page 90: ...ext sizes If you specify Stamp Date and Page Number together make sure that their print positions do not overlap When the Multiple Up feature is used an annotation is added to each copy page When the Repeat Image or Booklet Creation feature is used an annotation is added to each copy image 1 Select Annotation 2 Select any item Stamp Displays the Stamp screen Refer to Stamp Screen P 88 Date Display...

Page 91: ... the Stamp Size screen You can select a stamp size from three options or can directly specify a size in the range of 6 to 64 points in 1 point increments Date Screen This screen allows you to add a date to copies The date shows when you started copying the document The date format can be changed For details refer to Date Format P 274 1 Select any item Off No date is added On A date is added Print ...

Page 92: ...reen P 91 Position Displays the Page Number Position screen You can select a page number position from six options Size Displays the Page Number Size screen You can select a page number size from three options or can directly specify a size in the range of 6 to 24 points in 1 point increments Prefix Displayed when Bates Stamping is selected Use the displayed keyboard to enter a prefix string of up...

Page 93: ...pecify a page range to add page numbers 1 Select any item All Pages Adds page numbers to all copy pages Enter Start Page Number Allows you to specify the start page to add a page number in the range of 1 to 999 Use and or select Enter Number using Keypad to enter a page number Enter End Page Number Allows you to specify the end page to add a page number in the range of 1 to 999 Use and or select E...

Page 94: ... jobs if the total number of scanned pages exceeds the limit In that case follow the message displayed on the screen to cancel the job The maximum number of scannable pages is 999 per job For multiple jobs the maximum number of pages is 6 000 pages for all the jobs when the documents are A4 LEF Xerox standard size These values are approximate and may vary depending on the paper type size and orien...

Page 95: ...er to Custom Text 1 to 3 P 274 Watermark User Account Number Screen When using User Administration or Auditron Administration a user account number is printed Note User Account Number is the No User Administration Number registered by users in Login Setup Auditron Administration This screen is displayed when the Auditron Administration feature is enabled If the Login Setup Auditron Administration ...

Page 96: ...Effect feature the text strings specified in Control Number Text User Account Number Date Time and Serial Number on the Watermark screen are embedded in the background of each copy When the copy is copied again the text embedded in the background is printed as embossed or outline text depending on the option you select on the Watermark Text Effect screen Note This feature does not appear for some ...

Page 97: ...follows Copy density may become darker Text in documents may become hard to read Dots such as decimal characters and periods may become hard to read The Secure Watermark feature may not work properly for a document if its size is smaller than A5 if its background color is not white or if the Watermark or Secure Watermark feature has already been used for the document In some cases a document may n...

Page 98: ...talled on the machine 1 Select any item Off Does not print hidden text On Prints hidden text You can select any text from three preset text or from text registered in the System Settings For information on how to register text refer to Custom Text 1 to 3 P 274 Folding Outputting Bi Folded Paper This feature allows you to fold copies in half Note This feature does not appear for some models An opti...

Page 99: ...es Up Four copies of the document image are made on one side of a single sheet of paper 8 Pages Up Eight copies of the document image are made on one side of a single sheet of paper ID Card Copying Copying Both Sides of an ID Card This feature allows you to copy both sides of a small undetectable original such as an ID card onto one side of paper Important Use the document glass when copying The d...

Page 100: ...b Processing Documents Scanned with Different Settings as One Job This feature allows you to apply different copy settings to each document page or each document stack and then outputs the copies as one job Note This feature does not appear for some models An optional package is necessary For more information contact our Customer Support Center 1 Select Build Job 2 Select On 3 Select the desired p...

Page 101: ...eparators screen Refer to Build Job Chapter Start Separators Screen P 100 Change Settings Displays the Copy screen allowing you to change the settings After changing the settings as necessary press the Start button on the control panel to start scanning the document Last Original Ends scanning the document and starts copying Next Original Select this button when you have more documents to scan Thi...

Page 102: ...separators from Separators Tray To insert a separator sheet between the first and second sets select the Separator button after copying the first set and then copy the second set Sample Set Checking the Finished Output of the Copy When making multiple sets of copies you can print a sample set to check the finished output and then print the remaining copy sets You can select to continue or cancel t...

Page 103: ...formed if you press the Start button on the control panel Combine Original Sets Adding Originals Use this feature when you copy a document that has too many pages to be loaded into the document feeder at one time or when you scan each document page using the document glass and have the machine process the pages as one job Next Original that is usually displayed while scanning documents with the do...

Page 104: ... document data stored by Combine Original Sets is cleared and the copy job is cancelled Note The same operation is performed if you press the C button or Clear All button on the control panel Start Load the next document and select Start to start scanning Note The same operation is performed if you press the Start button on the control panel Form Overlay Making Copies to Overlay Documents This fea...

Page 105: ...gs to both sides of the document z Side 1 Only Applies the settings to side 1 of the document z Side 2 Only Applies the settings to side 2 of the document Delete Outside Delete Inside Area 1 screen Set the area to be deleted The area is defined by the rectangle formed between the points X1 Y1 and X2 Y2 The origin point is the top right corner of a document You can specify a value within the range ...

Page 106: ...e To change the coordinates you have entered select Next move and then enter the value again If all of X1 Y1 X2 and Y2 are set to 0 the area will be invalid If you select C button the value with the mark is cleared Clear Area 1 Clears the specified area Next The mark moves to the next coordinate ...

Page 107: ... package is necessary For more information contact our Customer Support Center z Fax Procedure 106 z Operations during Faxing 112 z About Internet Fax 114 z About Server Fax 121 z Fax Internet Fax 123 z General Settings 129 z Layout Adjustment 133 z Transmission Options 138 z Advanced Features 154 z Broadcast 158 z Receiving Faxes 167 z Facsimile Information Services 169 ...

Page 108: ...s documents of standard size widths Note The standard document sizes that can be detected automatically depend on the Paper Size Settings in the System Administration mode For information on the paper size settings refer to Paper Size Settings P 280 The sizes on the left are detected as the sizes shown on the right z 8 inch width document J B5 width document z 10 inch width document J B4 width doc...

Page 109: ...or other similar documents up to 297 x 432 mm A3 11 x 17 Important After using the document glass close the document cover The document glass automatically detects standard size documents Note The standard document sizes that can be detected automatically depend on the Paper Size Settings in the System Administration mode For information on the paper size settings refer to Paper Size Settings P 28...

Page 110: ...rtant The fax and iFax features are not available while the Server Fax feature is enabled Note Features displayed may vary depending on the model of your machine When the Authentication or Auditron Administration feature is used a user ID and passcode may be required Ask your system administrator for the user ID and passcode 1 Press the All Services button 2 Select Fax Internet Fax 3 If the previo...

Page 111: ...d the documents with a single phone call This feature is referred to as Batch Send Note that you cannot use Batch Send with Broadcast Send Relay Broadcast Remote Mailbox and Delayed Start when prior to the specified time When using a redial resend or delayed start send transmission job or authentication feature to send to the same address from different users then Batch Send is not possible Import...

Page 112: ...out Internet Fax P 114 Step 4 Starting the Fax Job 1 Press the Start button Important If the document has been set in the document feeder do not hold down the document while it is being conveyed Fax cannot be sent if a copy protection code is detected Note Depending on the settings the screen to re enter the recipient may be displayed after pressing the Start button In this case re enter the recip...

Page 113: ...b in Job Status 1 Press the Job Status button 2 Confirm the job status Note Select to return to the previous screen or to move to the next screen If undelivered documents exist You can confirm undelivered documents in the Job Status screen or Job Status Activity Report screen For information on how to send or delete undelivered documents refer to Undelivered Faxes P 361 1 2 3 4 5 6 7 8 9 0 C Job S...

Page 114: ...el 2 Select Cancel Note If two or more jobs are in progress a confirmation screen appears for each job Select Start or Cancel depending on whether you want to start or cancel the job If the screen shown in step 2 does not appear even after you press the Stop button on the control panel Depending on the jobs in progress screens for canceling jobs may not appear In that case use the following proced...

Page 115: ...ings while scanning the document 1 Select Next Original 2 Select Change Settings 3 Set Resolution Original Size and Lighten Darken For each setting refer to Resolution Specifying the Scanning Resolution P 131 Original Size Specifying the Scan Size for the Original P 133 or Lighten Darken Adjusting Fax Density P 129 4 Press the Start button ...

Page 116: ...nt Confirm the profile that can be processed by the recipient s iFax compatible machine before specifying a profile For more information refer to Sending iFax iFax Transmission P 116 For information on profiles refer to iFax Profile Specifying iFax Profiles P 152 Important If a document is sent to a computer using the iFax feature it cannot be opened in some cases When you send a document to a com...

Page 117: ...hine will not be notified of such transmission error After sending an important e mail we suggest you to confirm it is received such as by calling the recipient Note You can receive a transmission result e mail if you set Read Receipts MDN Delivery Receipts DSN when transmitting For more information refer to Report Read Receipts Confirming Transmission Results P 138 Receiving iFax Printing iFax Th...

Page 118: ...You can use address numbers one touch buttons group dial numbers or Address Book to specify e mail addresses For more information refer to Speed Dialing Specifying a Destination Using an Address Number P 125 Specifying a Destination using a One Touch Button P 126 and Specifying a Destination Using the Address Book P 124 4 Enter a subject and a message if necessary For entering the subject refer to...

Page 119: ...ocuments received on the machine are printed at the same size as the original documents of the senders Received iFax is printed at the same size as the document sent by the sender Note When TIFF S is selected for the profile the printing size will be A4 When the loaded paper is not the same size as the sent document or when the paper tray used for printing received documents is restricted the rece...

Page 120: ... the Fax Internet Fax screen and select iFax Fax several times to display iFax in the address field 2 Select a profile as necessary to set the required features 3 Enter the e mail address of the target mailbox in the following format B O X 1 2 3 m y h o s t e x a m p l e c o m Example Mailbox number 123 Enter the digits of the mailbox number to match those of the recipient Host name of the receivi...

Page 121: ...ng machine myhost Domain name of the receiving machine example com Note If the hard disk of the machine becomes full during scanning of a document a screen appears to prompt you to select whether to send the job up to the stored pages or to cancel the job Choose one of the processes If the hard disk of the machine becomes full during iFax transmission the transmission is cancelled and the document...

Page 122: ...tion on registering a job flow refer to Job Flow Sheets P 324 Important Do not set the address of the machine as the forwarding address Note Mailbox Number and Passcode are required by the sender Inform the sender of the settings Do not set a passcode to the mailbox for receiving forwarded iFax You can register up to 100 locations If the fax you received is a JBIG compressed image and if the iFax ...

Page 123: ...or Guide and the manual on the Driver CD Kit CD ROM Important While the Server Fax feature is enabled the Fax feature is detected as not installed even if a Fax Kit is installed on the machine During that time therefore fax transmission and reception are disabled and printed reports show that the machine does not support the Fax feature Note The Server Fax service cannot be used together with the ...

Page 124: ...of the Server Fax feature use the values specified under System Settings Scan Mode Settings Scan Defaults z Background Suppression z Lighten Darken z Sharpness Features Available for Sending Server Fax When SMTP is Used When the SMTP protocol is used the Server Fax feature is compliant with the E mail settings configured under System Settings The following E mail settings however are not available...

Page 125: ...ith a single operation There is no need to repeat the same operation for each recipient When an Additional G3 Port Kit optional is installed you can use the extra lines to make multiple transmissions simultaneously with Broadcast Send If you specify Broadcast Send the machine prints a relay broadcast report multi poll report after the Broadcast Send operation finishes Note For Fax and Internet Fax...

Page 126: ... search for 3 Select recipients from the displayed list A check mark is then added to the check box of each recipient you selected 4 Repeat steps 2 and 3 to specify all the required recipients Note To deselect a recipient select the recipient again or press the C button Any recipient that has 50 or more characters cannot be specified for the Server Fax feature Using the Address Book Use address nu...

Page 127: ...ss numbers for speed dialing beforehand You can use a wildcard character on the numeric keypad or on the keyboard screen to specify multiple recipients z Enter the first two digits to specify address numbers For example enter 10 to specify 10 numbers from 100 to 109 z Specify all the address numbers Enter to specify all the address numbers Note When you specify address numbers confirm that the cor...

Page 128: ...bers from 001 to 070 Repeat this step to specify multiple recipients Turn the one touch button panel over to press one touch buttons 031 and above Specifying a Destination using the Keyboard Screen When the Additional G3 Port Kit optional is installed you can set the line port and send faxes Local terminal information can be registered to each line You can use each line for a different purpose For...

Page 129: ...ecipient 2 Select any item from the pop up menu Feature Button Function Input method Enter pause or Pause One pause is 3 seconds You can enter pauses of 6 seconds 9 seconds etc by additional button presses Press the Pause button Example 0 123 0 123 Transmit using a password S When a password has been set transmission will only start if the password matches the ID number on the remote terminal 1 Se...

Page 130: ...4 Fax 128 Fax 4 Remove Removes the recipient Details The Recipient Details screen is displayed You can confirm recipients or address numbers Cancel Hides the pop up menu ...

Page 131: ...y You can adjust fax density from seven levels 1 Use and to select a density level 2 Sided Originals Transmitting 2 sided Originals This feature enables you to scan and then transmit both sides of a document automatically Note This feature does not appear for some models An optional package is necessary For more information contact our Customer Support Center The image on the back side of a docume...

Page 132: ...on to scan one side of the document 2 Sided Select this option to scan both sides of the document 2 Sided First Page 1 Sided Select this option to scan the front side of the first page and both sides of the remaining pages Use this item when the back side of the first page is blank 2 Sided Skip Blank Pages Select this option to scan only the document pages that are not blank You can send documents...

Page 133: ...the documents to be scanned Note The resolution can be set individually for each address number For information on how to register address numbers refer to Address Book P 328 The machine scans a document at the specified resolution but if the machine of the recipient does not support the resolution the machine automatically changes the resolution to one supported by the recipient s machine and the...

Page 134: ...4 Fax 132 Fax 4 Superfine 600dpi Select this item when transmitting documents with extremely fine images 600 x 600 pels 25 4 mm ...

Page 135: ...ting 2 sided Originals P 129 Original Size Specifying the Scan Size for the Original This feature allows you to set the scan size for fax transmission The machine scans the document at the size you specify regardless of the original size You can add margins or delete unwanted margins using this feature Note The default values for buttons other than the Auto Size Detect button can be changed in the...

Page 136: ...size documents in portrait orientation When loading B5 documents together with A3 documents loaded in landscape orientation or A4 documents loaded in portrait orientation load B5 the documents in portrait orientation The recommended document size combinations are A4 portrait and A3 landscape or B5 portrait and B4 landscape If the combination of the document sizes is not our recommendation the docu...

Page 137: ...cans as a bound document Left Page then Right Scans the left page and then the right page of facing pages Right Page then Left Scans the right page and then the left page of facing pages Top Page then Bottom Scans the top page and then the bottom page of facing pages Both Pages Scans both pages Left Page Only Scans the left page only You can select this item when Left Page then Right or Right Page...

Page 138: ...e A3 You can specify whether to rotate documents in the System Settings For more information refer to Rotate 90 degrees P 308 Variable Touch the box displaying a value and then use the numeric keypad or the and buttons to specify a ratio within the range of 50 400 in 1 increments Stamp Adding a Stamp when Scanning a Document This feature prints a circular stamp on the bottom corner of each documen...

Page 139: ...Layout Adjustment 137 Fax 4 Off No stamp is added On A stamp is added ...

Page 140: ...y Delayed Start is available for the Server Fax feature Report Read Receipts Confirming Transmission Results You can check fax and iFax transmission results To receive fax transmission results enable Transmission Report By enabling this feature the machine automatically prints a transmission report when fax transmission completes successfully and prints a transmission report undelivered when fax t...

Page 141: ...es how to use the MDN feature The procedure is the same for the DSN feature 1 Select the Fax Internet Fax tab to display the Fax Internet Fax screen 2 Select iFax Fax to display iFax in the address field 3 Select the Transmission Options tab to display the Transmission Options screen 4 Select Report Read Receipts 5 Select any item Transmission Report z Off No Transmission Report is printed z On A ...

Page 142: ...or telephone lines as can be the case with overseas calls Also select this mode when transmitting over noisy or poor telephone lines domestically G4 Auto Do not use this mode Note G4 Auto is displayed on when Internet Fax Kit is installed This setting applies the transmission speed between the fax gateway and destination fax for the iFax About F4800 You can communicate with faxes overseas via tele...

Page 143: ...wer is turned off after the Delayed Start feature is set the setting is cleared and transmission begins as soon as the power is turned on Note You can specify a time within 24 hours in 1 minute increments You cannot specify a date You can set Delayed Start separately for each address number For information on how to register address numbers refer to Address Book P 328 If address numbers or group d...

Page 144: ...op of each page at the remote machine Note If the document is resent Resend is printed at the left of the date and time indication If this feature is enabled for Broadcast transmission header information is attached to faxes for all the recipients The start time is printed in the format set on the machine 12 or 24 hour clock For information on setting the time refer to Time P 267 For information o...

Page 145: ...e feature for Broadcast transmission register recipients to address numbers The size and resolution of the cover note is based on the first page of the document 1 Select Cover Note on the Transmission Options screen 2 Select On Off No cover note is added On A cover note is added Comment The Cover Note Comment screen is displayed Refer to Cover Note Comment Screen P 143 Cover Note Comment Screen Se...

Page 146: ...o be added to the sender field 1 Select any item Off No comment is added to the sender field On A comment is added to the sender field Select a comment from the registered comments Comment The registered comments are displayed For information on how to register comments refer to Comments P 335 About the Cover Note To When an address number is used the recipient name registered for the address numb...

Page 147: ... the preset subject will be automatically entered Note This feature is not available for some models An optional package is necessary For more information contact our Customer Support Center 1 Select the Fax Internet Fax tab to display the Fax Internet Fax screen 2 Select iFax Fax to display iFax in the address field 3 Select the Transmission Options tab to display the Transmission Options screen ...

Page 148: ...ion Options screen 4 Select iFax Comment Mail Contents 5 Select any item Delete Deletes the comment displayed on the screen Keyboard Allows you to enter body text using the keyboard Up to 256 characters can be entered You can also click Add Comment to select a registered comment and edit it For information on how to enter the characters refer to Entering Text P 266 Add Comment Allows you to insert...

Page 149: ... paper For example if you have a document of 12 pages and you select 3 Pages Up the machine combines the scan data into 4 pages You can specify a multiple up value in the range of 2 to 9 Important If the length of each resultant page is too long the output data may be split on the recipient machine If number of pages of documents is smaller than the specified pages scanned number of pages will be ...

Page 150: ...are numerals and Documents received in mailboxes can be automatically printed For information on the mailbox settings refer to Mailbox P 322 Depending on the report print settings a Mailbox Report may not be printed after a document is received in a mailbox For information on the report print settings refer to Reports P 277 For information on printing received documents refer to Printing Deleting ...

Page 151: ...asscode has not been set leave this box blank Next Select this button after entering Remote Mailbox Number and Passcode Format for Auto Send DTMF Method 1 Select Keyboard to display a keyboard on the touch screen and enter the destination and passcode in the following format Format for Manual Send DTMF Method 1 Select the On hook Manual Send Receive button on the Advanced Features screen to displa...

Page 152: ...n Relay Broadcast refer to Relay Broadcast Transmitting Documents Through a Relay Station P 158 For information on Remote Relay Broadcast refer to Remote Relay Broadcast Performing Relay Broadcast to Remote Locations P 162 We recommend using the fax signal method for sending to a mailbox or private polling when the recipient is using the same model of machine You can use the following features wit...

Page 153: ... to enter an F code and select Next Note An F code must be up to 20 digits 4 If required enter a password into Password and then select Next Note A password must be up to 20 digits Off The F code transmission is not used On The F code transmission is used Enter the F Code F Code Enter the F code using the numeric keypad Note You can enter up to 20 digits for the F Code Password Enter the password ...

Page 154: ...ine of the recipient can process If inconsistency occurs between a profile and stored document size and resolution priority is given to the settings specified in the profile If the profile differs for each recipient when using Broadcast Send the smallest size becomes the maximum image size You can set an iFax profile for each address number For information on how to register address numbers refer ...

Page 155: ...fine for the resolution or when you send A3 or B4 documents z Encoding method MMR z Stored Document Size A4 B4 A3 z Resolution Standard Fine Superfine 400 dpi Superfine 600 dpi Note When a fax is sent to a machine that does not support TIFF F the recipient machine will not be able to display or print the images TIFF J Select this profile for sending documents in JBIG z Encoding method JBIG z Store...

Page 156: ...This feature is used for Facsimile Information Services For information on Facsimile Information Services refer to Receiving Faxes P 167 Note Depending on the remote machine the Polling feature may be unavailable This feature is not available for Server Fax When you specify polling in combination with Delayed Start on the Transmission Options screen you can retrieve a document at a specified time ...

Page 157: ... specify any machine that supports our DTMF method feature By registering destinations into address numbers using the above dialing formats you can use the address numbers for the Private Polling feature For information on how to register address numbers refer to Address Book P 328 Store for Polling Allowing Remote Machines to Retrieve Documents from Your Machine Store for Polling is to store a do...

Page 158: ... screen appears Refer to Public Mailbox Screen P 156 z When selecting Private Mailbox The Private Mailbox button is displayed When the button is selected the Mailbox screen appears Select a mailbox to store documents For information on how to select a mailbox refer to Step 2 Selecting a Mailbox P 206 For information on how to check and print delete documents for Private Polling refer to Step 3 Che...

Page 159: ... can be changed in the System Administration mode For information on how to change the volume refer to Line Monitor Volume P 270 1 Lift the receiver or select On hook Manual Send Receive on the Advanced Features screen 2 A keyboard screen appears Manual Receive Manual Send Use the drop down menu to switch between Manual Receive and Manual Send z Manual Send Allows you to check if connection is est...

Page 160: ...ed with address numbers 001 to 070 When using Broadcast Send the Cover Note and Remote Mailbox features are not available even if they are enabled on the control panel If you want to use Cover Note and Remote Mailbox set them when registering each recipient in an address number The Transmission Report feature is not available Check Broadcast Multi poll reports to see transmission results 1 Select ...

Page 161: ...f the initiating station which is already registered at a relay station as a relay station ID for the Relay Broadcast operation z Register the address numbers or group dial number of the relay recipients which are registered at a relay station as broadcast recipients The wildcard can be used DTMF Method G3 F Code Method z No registration is required The dialing format can be registered to an addre...

Page 162: ...assword contact our Customer Support Center If a password has not been set you do not need to enter one z Relay station ID The last two digits of the initiating station address number registered at the relay station z Address number An address number for the relay recipients registered at the relay station The wildcard can also be used Note The above dialing format can be registered in an address ...

Page 163: ...iating station is as follows Relay Broadcast The number of digits of the relay station ID 1 When the relay station IDs and address numbers are two digits 2 When the relay station IDs and address numbers are three digits Print Directive Printing not printing at the relay station 1 Printing at the relay station 0 Not printing at the relay station Relay Station ID An address number for an initiating ...

Page 164: ...Broadcast in transmitting documents to multiple remote machines Note Multiple Relay Broadcast can be performed from a secondary relay station There are three Relay Broadcast methods Fax Signal Method This method employs a Fuji Xerox proprietary communication procedure that is only for use with specific machines that have the Relay Broadcast feature The G3 is available DTMF Method G3 fax machines t...

Page 165: ...the address number to On Assign the secondary relay station to an address number from 001 to 099 z As the relay station ID assign the last two digits of the address number for the primary relay station that is registered to the secondary relay station z As the broadcast recipients assign the address number for the relay recipients that have been registered to the secondary relay station Secondary ...

Page 166: ... Select the Advanced Features tab to display the Advanced Features screen 2 Pick up the telephone receiver or select On hook Manual Send Receive 3 Select Manual Send from the drop down menu 4 Use the keyboard shown in the touch screen to enter numbers in the following format Note You can specify up to 20 locations for relay recipients F Code Method When using the machine as the initiating station ...

Page 167: ...e initiating station is 3 digits in F Code or to 001 to 099 when the specification method for the initiating station is 2 digits in F Code Then set Relay Station Setup of the address number to On Assign the secondary relay station either to an address number from 001 to 500 when the specification method for the initiating station is 3 digits in F Code or to 001 to 099 when the specification method...

Page 168: ...station ID is set the initiating station is notified of the results of the Remote Relay Broadcast When the relay station ID is 00 or 000 the initiating station is not notified of the results of a Remote Relay Broadcast Address Number The address number assigned to the secondary relay station The operating procedure is the same as for Relay Broadcast ...

Page 169: ...ual Receive 1 Press the Machine Status button 2 Select Fax Receiving Mode on the Machine Status screen 3 Select Manual Receive or Auto Receive Manual Receive Reception of a fax from a remote machine is manual This mode is convenient for confirming the sender or using an external telephone to confirm whether it is a fax before beginning reception Auto Receive Reception of a fax from a remote machin...

Page 170: ...in the cradle when the Online indicator on the control panel lights up Important Make sure that the receiver is placed properly in the cradle Otherwise the line will remain busy Using Mailbox Receive Documents received using Mailbox Receive are stored in a mailbox After receiving a document the Job in Memory indicator lights up and the machine prints a mailbox report The mailbox number and the mai...

Page 171: ...he keyboard displayed on the screen Pressing More Characters on the screen displays symbols Note When the line type is set to a pulse line Tone does not appear If you want to send tones or to use the touch tone services while using a pulse line select Tone Some touch tone services may not be available even if you set your telephone to send tones 4 When the machine connects to the service you will ...

Page 172: ...service z The call destination can be specified using the numeric keypad address numbers or one touch buttons The address book cannot be used z The call destination can also be specified using the keyboard displayed on the screen Note When the line type is set to a pulse line Tone does not appear If you want to send tones or to use the touch tone services while using a pulse line select Tone Some ...

Page 173: ...ttings refer to the Network Administrator Guide Important The scan features are not available for some models An optional package is necessary For more information contact our Customer Support Center z Scanning Procedure 172 z Operations during Scanning 178 z E mail 180 z Scan to Mailbox 186 z Scan to PC 187 z General Settings 190 z Image Quality 196 z Layout Adjustment 197 z Output Format 202 ...

Page 174: ...cts standard size documents For non standard size documents input the size in the Original Size screen For information on entering document sizes refer to Original Size Specifying a Scan Size P 199 Note The standard document sizes that can be detected automatically depend on the Paper Size Settings in the System Administration mode For information on the paper size settings refer to Paper Size Set...

Page 175: ...s up to 297 x 432 mm A3 11 x 17 inches Important After using the document glass close the document cover The document glass automatically detects standard size documents For a non standard size document specify the size in the Original Size screen For information on entering document sizes refer to Original Size Specifying a Scan Size P 199 Note The standard document sizes that can be detected aut...

Page 176: ... on the machine You need to create a mailbox in advance For information on how to create a mailbox refer to Mailbox P 322 Scan to PC Scans a document and sends the scanned data to a network computer via the FTP or SMB protocol The following shows the reference section for each feature E mail 180 Scan to Mailbox 186 Scan to PC 187 Note Features displayed may vary depending on the model of your mach...

Page 177: ... settings still remain press the Clear All button 4 Specify a mailbox to save the data in 5 Select each tab and configure features as necessary The following shows the reference section for each feature General Settings P 190 Image Quality P 196 Layout Adjustment P 197 Output Format P 202 1 2 3 4 5 6 7 8 9 0 C All Services button 1 2 3 4 5 6 7 8 9 0 C Clear All button ...

Page 178: ...be stored Note If the number of document pages exceeds the maximum then scanning stops Follow the displayed message and either abort the operation or save the scanned data 2 While documents are being scanned select Next Original Note When the screen on the right is displayed and no operation is performed during a certain period of time the machine automatically assumes that there are no more docum...

Page 179: ...ted into your computer using the following Import using an application Use a network scan driver Refer to Importing to a TWAIN Compatible Application P 233 Import using Mailbox Viewer2 Use Mailbox Viewer2 Fuji Xerox application software Refer to Importing Using Mailbox Viewer2 P 235 Import using CentreWare Internet Services Use CentreWare Internet Services Refer to Importing Using CentreWare Inter...

Page 180: ... Select Cancel Note If two or more jobs are in progress a confirmation screen appears for each job Select Start or Cancel depending on whether you want to start or cancel the job If the screen shown in step 2 does not appear even after you press the Stop button on the control panel Depending on the jobs in progress screens for canceling jobs may not appear In that case use the following procedure ...

Page 181: ...e Settings 3 Set Scan Resolution Original Size 2 Sided Originals Lighten Darken and Original Type For each setting refer to Scan Resolution Specifying a Scanning Resolution P 197 Original Size Specifying a Scan Size P 199 2 Sided Originals Scanning Both Sides of a Document P 197 Lighten Darken Adjusting the Scan Density P 190 and Original Type Selecting the Document Type P 192 4 Press the Start bu...

Page 182: ...202 Split Send Sending in Sections 203 1 Select E mail on the All Services screen 2 On the E mail screen specify recipients using the Address Book or the keyboard Important Recipients cannot be specified with address numbers using the numeric keypad one touch buttons or group numbers You can only specify recipients registered for e mail Any recipients registered for fax cannot be specified Dependi...

Page 183: ... Selected Select a recipient from the local address list Note Select to return to the previous screen or to move to the next screen Go to Enter a recipient number using the numeric keypad to display the recipient at the top of the list Details Select a recipient from Name E mail and select Details Then the detailed information on the recipient appears When Local Search is Selected Enter keywords t...

Page 184: ...artment A department name is used for the keyword search z Change Settings Select a custom item and select this button Then the keyword entry screen appears Up to 60 characters are allowed Enter Change Keyword Select a keyword item and select Enter Change Keyword Then the keyword is set or changed Search Now The search starts The searched results are listed on the screen Keyboard You can enter add...

Page 185: ...nder s address to CC BCC Adds the sender s address to BCC Recipient s You can confirm delete or edit recipients using the pop up menu displayed 1 From the Recipient s list select the recipient to be deleted confirmed or edited 2 Select any item from the pop up menu Remove Removes the selected recipient Edit Displays the Change Recipient Settings screen where you can confirm or edit the recipient R...

Page 186: ...gs of the selected item From Specify a sender s e mail address You can specify only one address as a sender s address Note When using the Authentication feature the e mail address registered in user information is automatically set as a sender s address For more information on user information refer to Create Check User Accounts P 339 Depending on the System Settings From may not be editable 1 Sel...

Page 187: ...a user defined subject 1 Select Subject 2 Enter a subject of up to 128 characters using the displayed keyboard For information on how to enter characters refer to Entering Text P 266 Message Enter the e mail body using the following procedure 1 Select Message 2 Enter a message of up to 256 characters using the keyboard For information on how to enter characters refer to Entering Text P 266 ...

Page 188: ...entry screen may appear Enter the passcode and select Confirm If you have forgotten the passcode set the mailbox passcode in the System Administration mode again Mailbox Select a mailbox to save the scanned data in Note Select to return to the previous screen and select to move to the next screen Go to Use the numeric keypad to enter a 3 digit mailbox number The mailbox then appears at the top of ...

Page 189: ...P 541 This feature does not appear for some models An optional package is necessary For more information contact our Customer Support Center Transfer Protocol 187 Address Book 188 Browse 188 Specifying a Destination 188 1 Select Scan to PC from the All Services screen 2 Specify a forwarding destination on the Scan to PC screen Note The setup fields displayed on the screen depend on the selected pr...

Page 190: ...ation such as Recipient Name and Server Name IP Address Browse Displays a hierarchy consisting of server names and folders You can specify a save destination by tracing the hierarchy 1 Select Browse 2 Select the destination in which data is to be stored You can move to another level by pressing Previous or Next Important You can specify recipients for SMB only Save in Shows the current location in...

Page 191: ...sfer Protocol Enter Host Name Shared Name Directory Name Up to 260 characters are allowed User Name Enter the user name of the computer you are forwarding to When a user name is not required for the destination this field can be skipped When FTP is selected for Transfer Protocol up to 32 characters are allowed When SMB is selected for Transfer Protocol use one of the following formats z For Active...

Page 192: ...t a feature on the General Settings screen Lighten Darken Adjusting the Scan Density You can select a scan density level from seven levels Moving the mark to the upper position makes the scan density lower and moving to the lower position makes the density higher 1 Use and to adjust the density 2 Sided Originals Scanning Both Sides of a Document You can automatically scan both sides of a 2 sided d...

Page 193: ... this when both sides of the 2 sided document are in opposite orientations Original Orientation To scan using the document feeder the orientation must be set to specify the head of the document Load the document in the Head to Left orientation when File Format is set to TIFF When viewing the scanned document on a computer the document is displayed in the Head to Top orientation Note If the setting...

Page 194: ...ata Note When selecting Scan to Mailbox File Format is disabled If High compression Image Kit optional is installed the machine can store PDF and DocuWorks files with higher compression rates 1 Select a file format Multi page TIFF Saves multiple pages into a single file in TIFF format TIFF Saves each page into a different file in TIFF format PDF Saves scanned data in PDF format DocuWorks Saves sca...

Page 195: ... file by password and assign the access privileges for the file operation 1 Select any item Off The file is not encrypted and no access privilege is configured Password Encrypts the file using a password Encryption Algorithm Set the encryption method z 128 bit RC4 Encrypts by the 128 bit RC4 method Files encrypted by this method can be opened with Adobe Acrobat 5 0 or later z 128 bit AES Encrypts ...

Page 196: ...ssword Files encrypted by this method can be opened with DocuWorks Ver5 0 or later Select Open Password and set a password Encryption Algorithm Displays the encryption methods Restricted Operations Select file operations to whom access privileges are assigned When assigning access privileges configure Full Access Password Open Password The DocuWorks Security Open Password screen appears If you sel...

Page 197: ...o perform unauthorized operations You can enter a password up to 32 characters Printing The Authorization Printing screen appears Configure whether to allow users to print the file If allowed select the print resolution as well Changes Allowed The Authorization Changes Allowed screen appears Configure whether to allow users to change the file contents such as inserting pages and adding notes Allow...

Page 198: ...2 Adjust the scan density and sharpness with and Lighten Darken You can select a scan density level from among 7 levels between Lighten and Darken Moving the arrow mark to the upper position makes the scan density lighter and moving to the lower position makes darker Sharpness You can select a sharpness level from 5 levels between Soften and Sharpen Selecting an upper cell on the bar makes the con...

Page 199: ...n Shadows in the Document 200 Reduce Enlarge Specifying a Scanning Ratio 201 1 On the All Services screen select E mail Scan to Mailbox or Scan to PC 2 Select the Layout Adjustment tab and then select a feature on the Layout Adjustment screen Scan Resolution Specifying a Scanning Resolution This feature allows you to set the resolution to scan a document As the value increases the scan becomes mor...

Page 200: ... and then the left page of facing pages Top Page then Bottom Scans the top page and then the bottom page of facing pages Both Pages Scans both pages in page order Left Page Only Scans the left page only in page order You can select this item when Left Page then Right or Right Page then Left is selected Right Page Only Scans the right page only in page order You can select this item when Left Page ...

Page 201: ...m the original document size You can specify a value in the range of 15 to 432 mm for the scan length X and a value in the range of 15 to 297 mm for the scan width Y in 1 mm increments The scales attached on the upper and left edges of the document glass are helpful for you to specify values Mixed Sized Originals Scanning Different Size Documents Simultaneously When using the document feeder you c...

Page 202: ... of the document may be scanned as black shadows The Edge Erase feature allows you to erase such shadows Note For 2 sided originals the same edge erase amounts are set for the front and back sides If you set Reduce Enlarge the edge erase amounts will be reduced or enlarged in proportion to the ratio you configured 1 Select Edge Erase 2 Select Edge Erase 3 Use and to set the erase widths of top and...

Page 203: ...ing a Scanning Ratio This feature allows you to set the scanning ratio for the document to be scanned 1 Select Reduce Enlarge 2 Select or enter a ratio Proportional Select a preset ratio or enter a value within the range of 25 to 400 in 1 increments To enter a value touch the entry box and then use the numeric keypad or the and buttons Auto In Output Size select the output size of the scanned docu...

Page 204: ... screen Note The buttons displayed on the screen depend on the scan feature selected on the All Services screen The screen shown above is for the E mail feature Read Receipts This feature allows you to receive read receipts from e mail recipients when using the E mail feature This feature is not available unless recipients support the MDN feature Note When multiple e mails are sent using Split Sen...

Page 205: ...l or Scan to Mailbox feature you can specify a name for the document to be sent Auto Set The file name is img xxx yyy zzz where xxx is the date and time yyy is the page number and zzz is the extension The extension depends on the setting in File Format z When Multi page TIFF or TIFF is set for File Format tif z When PDF is set for File Format pdf z When DocuWorks is set for File Format xdw To set ...

Page 206: ...en the file name conflicts with another file stored in the destination 1 Select File Name Conflict 2 Select any item Cancel Job The job is cancelled and the file is not saved Change Name and Save The file name is automatically changed and saved The machine adds a number 0001 9999 to the end of the file name Overwrite Name and Save The existing file is replaced with the new one Document Name Specif...

Page 207: ... feature is not available for some models An optional package is necessary For more information contact our Customer Support Center z Mailbox Operating Procedure 206 z Selecting a Mailbox 208 z Checking Selecting Mailbox Documents 209 z Printing Deleting Documents in the Mailbox 210 z Configuring Starting Job Flow 213 ...

Page 208: ...ures displayed depend on the machine configuration 1 Press the All Services button 2 Open the next screen and select Send from Mailbox Step 2 Selecting a Mailbox Selectable mailboxes depend on the settings on the user authentication feature For information on selectable mailboxes refer to Types of Mailboxes P 393 1 Select a mailbox For information on the Send from Mailbox screen refer to Selecting...

Page 209: ...end from Mailbox 6 Step 4 Operating Mailbox Documents The following shows the reference sections for operations available on the Send from Mailbox screen Printing Deleting Documents in the Mailbox 210 Configuring Starting Job Flow 213 ...

Page 210: ...boxes P 393 1 Select a mailbox Note Select to return to the previous screen and select to move to the next screen An arrow is displayed next to each mailbox which has a link to a job flow sheet and for which the auto start is set If you are prompted for a passcode enter a passcode and select Confirm Go to Displays a mailbox at the top when you enter the three digit mailbox number with the numeric ...

Page 211: ...appears to the left of the document icon indicating the order in which it was selected Documents are processed in this order 3 Select any item Refresh Displays the refreshed information Document s Displays the number of documents stored in the mailbox Select All Selects all the documents in the mailbox If Select All is selected again all the documents are deselected Print Delete Displays the Print...

Page 212: ... document Refer to Mailbox Print Settings Screen P 210 Delete Deletes the selected document Print Prints the selected document Note When a print document stored by Save to Mailbox of a print driver is printed the settings specified on the control panel or CentreWare Internet Services will override the settings specified on the print driver except the Multiple Up Skip Blank Pages and print position...

Page 213: ...ve Paper Size is selected the document will be printed automatically on the paper loaded on the bypass tray in case the specified paper tray cannot be used For information on Receive Paper Size settings refer to Receiving Paper Size P 310 2 Sided Printing Allows you to set 2 sided printing Note This feature does not appear for some models An optional package is necessary For more information conta...

Page 214: ...t and the Original Orientation setting of Edge Erase or the 2 Sided Originals setting of Layout Adjustment tab are the same Reset Resets the print settings Print Prints the selected document Original Original Orientation Stapling Position Report Report Report Report R e p o r t R e p o r t R e p o r t R e p o r t Report Report Report Report ...

Page 215: ...the Authentication feature job flows whose owners are authenticated are displayed on the Job Flow Sheets screen To use job flows a HDD Extension Kit is necessary Features that can be registered are listed below Forward Multiple forwarding recipients can be configured for each forwarding method z Fax Forwards via fax Up to 100 recipients can be specified z iFax Forwards via iFax Up to 100 recipient...

Page 216: ...this button while documents are selected the Select Job Flow Sheet screen is displayed Refer to Select Job Flow Sheet Screen P 215 Link Job Flow Sheet to Mailbox Screen You can change the link between the mailbox and its job flow sheet Note Linking delinking and auto start settings can be also performed during the creation of a mailbox 1 Select a job flow sheet to link to Important Selecting Save ...

Page 217: ...d in the system settings to search for job flows Job flows that fully match the entry are searched The machine searches through keywords that were registered upon each job flow creation Sheet Filtering Screen Filters the job flow sheets displayed Displayed job flow sheets may vary depending on the user authentication feature Refer to Job Flow Sheet Types P 390 1 Select the filtering conditions the...

Page 218: ...er characters refer to Entering Text P 266 Search by Keyword Searches job flow sheet that fully corresponds with the keyword for registered keywords when job flow sheet is created For information on how to enter characters refer to Entering Text P 266 Select Keyword Displays the Select Keyword screen Searches job flow sheet by selecting keywords registered in the System Settings Searches job flow ...

Page 219: ... This chapter describes the Stored Programming feature that enables you to store customized job settings z Stored Programming Overview 218 z Registering Deleting Renaming Stored Programs 219 z Calling a Stored Program 222 ...

Page 220: ...n as a short cut to the screen A stored program can store not only settings of a feature but a flow of settings configured on multiple screens For example this feature is available when you want to record a procedure starting from pressing the Machine Status button to displaying the Report Job screen to print a job history report The following shows the reference section for each feature Registeri...

Page 221: ... program may not be called properly If the stored program has the Watermark feature and a Watermark setting is changed If any registered feature becomes disabled due to its value change under System Settings If the stored program has an operation for a mailbox and the mailbox passcode is changed Note The following cannot be registered System Settings Browse under Scan to PC Job Flow Sheets Address...

Page 222: ...register Note Once a job is stored to a button it cannot be overwritten Select to return to the previous screen or to move to the next screen 3 Set the feature you want to register Note Press the Interrupt button to cancel registration The machine produces an audible tone while a stored program is registered You can change the volume of the sound that notifies of stored program registration For in...

Page 223: ...ect Enter Change Name 2 Select the number to register or change a name Note Select to return to the previous screen or to move to the next screen 3 Enter a name and select Save Assigning Changing Icons for Stored Programs The following is the procedure for assigning or changing an icon of a stored program Nine icons are available 1 Select Assign Change Icon 2 Select the number to assign or change ...

Page 224: ...s the All Services button 2 Display the next screen and select Stored Programming 3 Select the number of a stored program containing the features you want to use Note You can only select registered numbers Select to return to the previous screen or to move to the next screen 4 After the stored program is called select other features if necessary 5 Press the Start button 1 2 3 4 5 6 7 8 9 0 C All S...

Page 225: ...n your computer Note Some models do not support the features described in this chapter An optional package is necessary For more information contact our Customer Support Center The computer screen images shown in this section are as of January 2007 z Features Overview 224 z Printing 230 z E mail Printing 231 z Importing Scanned Data 233 z Sending Fax 239 ...

Page 226: ...o Printing P 230 Note Some features are not available unless you configure optional component settings in the Printer tab The unavailable features are grayed out Multiple Up Prints multiple pages onto one sheet of paper 2 Sided Printing Prints data on both sides of paper Only available when the machine has the 2 sided printing feature Poster Splits one page of print data into multiple sheets of pa...

Page 227: ... E mail Printing When the E mail feature is available allows you to send e mail with the TIFF PDF or JPEG JFIF format documents attachment from a computer to the machine The received e mail is automatically printed from the machine For details on how to use this software refer to E mail Printing P 231 Direct Fax You can directly send fax documents created with application software in the same way ...

Page 228: ...uter There are two types of Network Scanner Utility2 Note Use the included CD ROM of the Driver CD Kit to install Network Scanner Utility2 Network Scan Driver Network Scan Driver is software to allow a client side application to import documents scan data from the machine s mailbox via the network For details on how to use this software refer to Importing to a TWAIN Compatible Application P 233 Ma...

Page 229: ...ts available features and information in these frames Left Center Frame Displays the machine information and status and the Refresh Status button Clicking Refresh Status updates the information This frame does not appear on the Status or Properties screen Lower Left Frame Displays a link to the Fuji Xerox home page Main features of CentreWare Internet Services are listed below Tab Name Main Featur...

Page 230: ...et Explorer 5 2 or later z Netscape Navigator 7 0 or later For Mac OS X 10 3 9 to 10 4 6 z Netscape Navigator 7 1 or later z Safari 1 3 or later Browser Settings Before using this service ensure the following settings on your browser The following is the setting procedure for Internet Explorer 6 0 SP1 1 Select Internet Options from the Tools menu 2 In the General tab click Settings for Temporary I...

Page 231: ...cations are encrypted you must specify an address that starts with https instead of http to access CentreWare Internet Services Starting CentreWare Internet Services To use this service perform the following procedure on your computer 1 Start up the computer and a web browser 2 Enter the machine s IP address or Internet address in the browser address field and press the Enter key Note If your netw...

Page 232: ... For details refer to the documentation provided with the application To learn about print features click Help on the print driver screen to see the print driver s online help 1 Select Print from the File menu on the application 2 Confirm Printer Name and click Properties if necessary 3 Set the properties if necessary 4 Click OK 5 Click OK in the Print dialog box ...

Page 233: ... 1 Use your e mail software to create an e mail body and then attach a document to the e mail if necessary Important Only plain text is permitted for the e mail body Change the body text format to plain text by the e mail software setting Any forwarded e mail that is attached to another e mail cannot be printed Note If the extension of the attached files is other than tif tiff pdf jpeg jpg jpe and...

Page 234: ...f PDF Direct Print when Print Processing Mode for PDF Direct Print is set to PDF Bridge Printed based on the settings of the logical printer configured by Logical Printer Number of PostScript in Emulation Settings of CentreWare Internet Services when Print Processing Mode of the PDF direct print is set to PS ...

Page 235: ... online help 1 Launch application software to which documents are imported Important The application must support TWAIN TWAIN is a standard for scanners and other input devices Note For information on supported applications refer to the Readme contained in the CD ROM of the Driver CD Kit 2 From the File menu select the command for selecting the scanner source 3 Select FX Network Scan and click Sel...

Page 236: ...ote is attached to a document that is scanned in pages and whose forwarding operation has not been completed For most applications except DocuWorks Network Scan Driver expands the compressed data and transfers the data to the applications in BMP format For DocuWorks on the other hand Network Scan Driver transfers the data without data expansion processing For this reason it does not take much time...

Page 237: ...cify the directory instead of above 2 From the displayed list click the scanner name of the machine and click Select Scanner Note If no items are shown in the list click Refresh The application searches for scanners To display the scanner names use the dialog box which can be displayed by clicking Options For information on how to change the displayed scanner names refer to Changing the display of...

Page 238: ... box click Help to see the Mailbox Viewer2 online help Changing the display of scanner names You can change the display of scanner names listed To change the display of scanner names click Change Display in the scanner selection dialog box To display scanners on other subnetworks register them in Scanner Registration Import settings for scanned documents You can change the display and the import s...

Page 239: ...n name For example if the host name is myhost and the domain name is example com then the Internet address is myhost example com Ask your system administrator for the IP address or Internet address When specifying a port number add and the port number after the Internet address If using the authentication feature on the machine enter a user ID and passcode into the User Name and Password fields As...

Page 240: ...bDAV protocol such as EasyOperator The documents in a mailbox can be listed displayed with thumbnails The WebDAV protocol uses an HTTP port If HTTP communication is encrypted WebDAV communication for importing scanned documents is also encrypted To use the WebDAV protocol a WebDAV port must be activated on the machine beforehand For information on network settings refer to the Network Administrato...

Page 241: ...an use the same procedure to register fax destinations from another machine ApeosPort II 5010 4000 3000 DocuCentre II 5010 4000 to this machine The registration requires CentreWare Internet Services For information on CentreWare Internet Services refer to CentreWare Internet Services P 226 The control panel allows you to register destinations separately For details refer to Address Book P 328 Impo...

Page 242: ... the machine enter a user ID and passcode into the User Name and Password fields respectively Ask your system administrator for the user ID and passcode If communications are encrypted you must specify an address that starts with https instead of http to access CentreWare Internet Services 3 Click the Properties tab and select Address Book in the left frame on the screen 4 Click Map Existing Addre...

Page 243: ...escribes the types of paper that can be used on the machine precautions when handling paper and how to load paper in trays z Paper Types 242 z Loading Paper 245 z Changing the Paper Sizes for the Trays 248 z Changing the Paper Settings 250 ...

Page 244: ...tact our Customer Support Center Supported Paper Type When using commonly used paper known as printable paper for copying or printing make sure that it complies with the following specifications Warning Do not use conductive paper such as carbonic paper or coated paper When paper jam occurs it may cause short circuit and eventually a fire accident Paper Tray Weight Loadable Quantity Tray 1 60 105 ...

Page 245: ...tinued for 30 seconds or more when one sheet of paper A5 in size or smaller has been printed When Labels Heavyweight 1 or Heavyweight 2 is selected for the paper type load the paper as If the paper is loaded as image quality may deteriorate Depending on the type of the heavyweight paper paper loaded as may not be fed into the machine If it happens load the paper as Depending on the type of the pap...

Page 246: ...that is folded creased or heavily warped z Do not use waved or curled paper z Do not load paper of mixed size together into the tray z Transparency paper and label paper can cause paper jams and multiple sheets can be fed to the printer at once Be sure to carefully fan these types of paper z If continuously output transparency sheets may sometimes stick to each other Remove transparencies from the...

Page 247: ...riority setting is set to Auto Paper Off are not targeted in the automatic tray selection Also if the Paper Type Priority setting is exactly the same the tray priority is determined by Paper Tray Priority Note The Tray 5 Bypass cannot be selected in the automatic tray selection When the machine runs out of paper during copying or printing select the tray containing the paper of the same size and o...

Page 248: ...ded in the Tandem Tray Module 3 Push the tray in gently until it comes to a stop Loading Paper in the Tray 5 Bypass When printing or copying with paper sizes or types that cannot be set in the Trays 1 to 4 use the Tray 5 Bypass The following describes how to load paper into Tray 5 Bypass To make detailed instructions during printings specify the instructions using the Tray Output tab in the print ...

Page 249: ...hick stock paper such as postcards and the paper is not fed into the machine apply a curl to the leading edge of the paper as shown in the figure on the right Note however that excessively bending or folding the paper may cause paper jams When loading envelopes make sure that the flaps are closed and that the flap side edge feeds first Depending on the type of the heavyweight paper paper loaded as...

Page 250: ...nt on non standard size paper refer to the print driver s online help 1 Pull out the tray towards you until it stops Important While the machine processes a job do not pull the tray out that the job uses Do not supply new paper until the tray runs out of paper in order to prevent paper jams and not to have the machine misidentify the amount of paper loaded in the tray 2 Remove any paper loaded on ...

Page 251: ...9 6 Push the tray in gently until it comes to a stop Note Affix the paper size label to the front of the paper tray 7 When you changed the paper type set the new paper type for the tray For information on setting paper types refer to Changing the Paper Settings P 250 ...

Page 252: ...rs can name User1 to User5 displayed in the paper type For information on how to set names to User1 to User5 refer to Custom Paper Name P 272 1 Press the Log In Out button 2 Enter the user ID with the numeric keypad or the keyboard displayed by pressing Keyboard and select Confirm Note The default user ID is 11111 When using the Authentication feature a passcode is required The default passcode is...

Page 253: ... at Items and select Change Settings 9 Select Paper Type 10 Select the paper type to be set and then select Save 11 Make sure on the screen that the paper type you selected has been set for the tray and then select Close 12 Select Close repeatedly until the System Settings screen is displayed 13 Select Exit to exit the System Administration mode ...

Page 254: ......

Page 255: ... explains the features whose set values can be changed and their setting procedures z System Settings Procedure 254 z System Settings Menu List 257 z Entering Text 266 z Common Settings 267 z Copy Mode Settings 287 z Network Settings 294 z Print Mode Settings 297 z Scan Mode Settings 302 z Fax Mode Settings 306 z E mail Internet Fax Settings 316 z Mailbox Stored Document Settings 319 z Setup Menu ...

Page 256: ...istrator User ID on the login screen If Passcode Entry from Control Panel in Login Setup Auditron Administration is activated the passcode also needs to be entered It is recommended to change the system administrator user ID and passcode as soon as you install the machine For more information refer to System Administrator Settings P 337 1 Enter the System Administrator ID with the numeric keypad o...

Page 257: ...em Settings Menu List P 257 1 Select a menu button System Settings You can configure the settings of the supported features Note When Fax Server is selected in the System Settings Scan Mode Settings is replaced with Scan Fax Mode Settings Common Settings Allows you to configure the settings related to the machine s basic specifications For more information refer to Common Settings P 267 Copy Mode ...

Page 258: ...es and how to delete print documents stored in the machine For more information refer to Mailbox Stored Document Settings P 319 Setup Menu You can create mailboxes and can create and edit Address Book address numbers For more information refer to Setup Menu P 322 System Administrator Settings You can set the system administrator ID and system administrator passcode to enter the System Administrati...

Page 259: ...e P 269 z Machine Ready Tone P 269 z Copy Job Complete Tone P 269 z Non Copy Job Complete Tone P 270 z Fault Tone P 270 z Alert Tone P 270 z Out of Paper Warning Tone P 270 z Low Toner Alert Tone P 270 z Line Monitor Volume P 270 z Ringing Volume P 270 z Stored Programming Tone P 270 z Auto Clear Alert Tone P 270 z Base Tone P 271 Screen Button Settings P 271 z Screen Default P 271 z Screen After ...

Page 260: ... P 278 z Fax Server Report P 278 z 2 Sided Report P 278 z Recipient on Activity Report P 278 z Job Flow Error Report P 278 Maintenance P 279 z Initialize Hard Disk P 279 z Delete All Data P 279 z Software Options P 279 Other Settings P 279 z Fax Service P 279 z Offset Stacking Center Output Tray P 279 z Offset Stacking Finisher Tray P 280 z Auto Job Promotion P 280 z Default Print Paper Size P 280...

Page 261: ...z Date Size P 290 z Page Number Style P 290 z Page Number Position P 290 z Page Number Size P 290 z Bates Stamping Number of Digits P 290 z Bates Stamping Position P 290 z Bates Stamping Size P 290 z Sample Set P 290 z Booklet Creation Covers Tray P 290 z Covers Covers Tray P 291 z Build Job Separators Tray P 291 Copy Control P 291 z Memory Full Procedure P 291 z Maximum Stored Pages P 291 z Auto ...

Page 262: ...ame z Host Name z Domain Name Outgoing Incoming E mail Settings P 295 z POP3 Server Settings P 295 POP3 Server Setup POP3 Server IP Address POP3 Server Name POP3 Server Port Number POP3 Server Check Interval POP3 Server Login Name POP3 Server Password POP Password Encryption z SMTP Server Settings P 295 SMTP Server Setup SMTP Server IP Address SMTP Server Name SMTP Server Port Number E mail Send A...

Page 263: ...z PostScript Paper Supply P 301 z PostScript Font Absence P 301 z PostScript Font Substitution P 301 General Settings Tab P 302 z Feature in 2nd Column P 302 z Reduce Enlarge Buttons 2 3 and 4 P 302 Scan Defaults P 302 z Original Type P 303 z File Format P 303 z Lighten Darken P 303 z Sharpness P 303 z Background Suppression P 303 z Original Orientation P 303 z Scan Resolution P 303 z Mixed Sized ...

Page 264: ... 308 z Mixed Sized Originals Scan Mode P 309 z Skip Blank Pages P 309 z Sender ID P 309 z Save Undelivered Faxes P 309 z Save Cancelled Faxes P 309 z Saved Faxes Auto Delete P 309 z Transmission Interval P 309 z Batch Send P 309 z Manual Send Receive Default P 309 z Fax Receiving Mode P 310 z Border Limit P 310 z Auto Reduce On Receipt P 310 z Receiving Paper Size P 310 z 2 Pages Up On Receipt P 3...

Page 265: ...rror Mail P 317 z Response to Read Receipts P 317 z Read Receipts P 317 z Auto Print Delivery Confirmation Mail P 317 z Max No of Pages for Split Send P 317 z Allow Casual Users to Edit From P 317 z Allow Guest Users to Edit From P 318 z Allow to edit From if Search found P 318 z Allow to edit From if Search failed P 318 z E mail Sending When Search Failed P 318 z Add Me to To Field P 318 z Add Me...

Page 266: ... mail Address P 330 z Recipient Name P 330 z Index P 330 z Relay Station Setup P 331 z Communication Mode P 331 z Resolution P 331 z Cover Note P 331 z Maximum Image Size P 331 z Delayed Start P 332 z Remote Mailbox P 332 z F Code P 332 z Relay Broadcast P 332 z Billing Day Time Billing Night Time Billing Midnight P 333 z iFax Profile P 333 z Last Name P 334 z First Name P 334 z Transfer Protocol ...

Page 267: ...t Report P 342 z Reset P 342 System Administrator s Meter Copy Jobs P 342 User Details Setup P 342 z User ID Characters P 342 z Hide User ID P 342 z Account ID Characters P 343 z Hide Account ID P 343 z Failed Access Log P 343 z Store User Details P 343 Charge Private Print Settings P 343 z PJL Receive Command Control P 343 z PJL Output Command Control P 343 z Receive Control P 343 Fax Billing Dat...

Page 268: ...s numerals letters and symbols Item Description Entering letters and numerals If you select Shift uppercase letters appear To return to the lowercase letters select Shift again Entering symbols Select Symbol Note Depending on the keyboard the Symbol button may be displayed as More Characters Entering a space Select Space Deleting characters Select Backspace You can delete one character at a time ...

Page 269: ...stem Settings Procedure P 254 2 Select Common Settings 3 Select the item to be set or changed Machine Clock Timers You can set the clock time or the time intervals until the power saver or reset features take effect Date Set the date in the system clock of the machine The date set here is printed on lists and reports 1 Select Date and select Change Settings 2 Select the date format 3 Select Year M...

Page 270: ... from 1 to 500 hours in 1 hour increments Time Server IP Address Set the IP address of the time server from which the time is obtained using values 0 to 255 Note The range between 224 XXX XXX XXX through 255 XXX XXX XXX and 127 XXX XXX XXX cannot be set Auto Clear If a given time period elapses with no operation the machine automatically returns to the initial screen When On is selected specify a ...

Page 271: ...chine J Low Power mode J Sleep mode For more information refer to Changing the Power Saver Mode Change Interval P 43 Note There is no setting to disable switching to the Low Power mode or the Sleep mode From Last Selection to Low Power Mode Specify a time period between the last operation and entering the Low Power mode in the range from 2 to 60 minutes in 1 minute increments Note Configure the Fr...

Page 272: ...d select Off Low Toner Alert Tone Select the sound to be made when the toner cartridge needs to be replaced You can select the volume from Soft Normal and Loud To disable the sound select Off Line Monitor Volume You can relay the sound on the telephone circuit in the interval from dialing until the connection is made through the speakers on the machine This is convenient for using Fax Information ...

Page 273: ...the All Services screen For more information refer to Customizing the Control Panel P 48 Note It is not possible to assign the same feature to more than one button Services You can select a feature button The feature buttons are the oval buttons in the All Services screen If you select Not Set the selected button position will remain empty Additional Features You can select an additional feature b...

Page 274: ...t For more information refer to Changing the Paper Settings P 250 Paper Size The machine automatically detects standard size paper loaded in the Trays 1 to 4 However when non standard size paper is loaded it is necessary to specify the width and height The size cannot be entered for the Tray 5 Bypass Important Adjust the paper guides to the paper size to prevent paper jams or errors If the machine...

Page 275: ...ng with the Tray 5 Bypass You can assign 11 paper sizes to the Tray 5 standard size buttons 1 to 11 If you frequently use non standard size paper for copying assigning the paper size to a button will save your time to specify the size each time It is also convenient to set the commonly used paper sizes toward the top A B Series Size You can select from sizes of A and B series Inch Size You can sel...

Page 276: ...nd Pattern is used Text Default Set text to be printed with Watermark You can select text from Copy Prohibited Copy Duplicate and the strings registered on Custom Text 1 to 3 For more information about Custom Text refer to Custom Text 1 to 3 P 274 Text Size Set the size of the text printed with Watermark You can set the value from 24 to 80 points in 1 point increments Density Set the density for p...

Page 277: ...r information on how to operate Secure Watermark Analyzer refer to the documentation provided with the application Important Be sure to place strict controls on the decoding passcode If you forget the specified decoding passcode or your passcode entry does not match that registered on ApeosWare Secure Watermark Analyzer you will not be able to analyze the digital code on ApeosWare Secure Watermark...

Page 278: ...ackground pattern to be used for the Secure Watermark feature You can select from the eight patterns wave circle stripe chain beam rhombic sunflower and fan Text Background Contrast Specify a level of hidden text background contrast to be used for the Secure Watermark feature You can select from contrast levels 1 to 9 You can see the contrast samples by selecting Print Sample List Important The hi...

Page 279: ... mode Selecting Disabled displays the Print Report List and Error History Report buttons only in the System Administration mode under Machine Status Billing Meter Print Report For information on Print Report List refer to Print Report List P 374 Job History Report You can select whether or not to automatically print a Job History Report when a total of 50 jobs have been processed All jobs are auto...

Page 280: ...print a transmission report after scanned data is sent using the Server Fax feature Note This feature does not appear for some models An optional package is necessary For more information contact our Customer Support Center Auto Printer Off Does not print a report regardless of whether data transmission is successfully completed or not Auto Print On Automatically prints a transmission report for a...

Page 281: ...Fax and Server Fax features Note This feature does not appear for some models An optional package is necessary For more information contact our Customer Support Center The Fax and Server Fax features cannot be enabled at the same time Scan to Fax Allows you to use the Fax feature on the machine Scan to Fax Server Allows you to use the Server Fax feature on the machine Offset Stacking Center Output...

Page 282: ...per feed system treats those sheets printed on both sides differently from those printed on one side only Since odd numbered pages are printed on the reverse side of the paper sheets printed on both sides are ejected to the tray the opposite way up from sheets printed on only one side For example when printing on punched forms or stock with the front and rear sides of different colors to prevent t...

Page 283: ...X B6 X X X X X X X X X O B5 O X O X O O O O X O B5 O O X O X O O O O O B4 O O O X O O O O X O 5 5 x 8 5 X X X X X X X X X X 5 5 x 8 5 O O X X O X X X X X 7 25 x 10 5 X O O X O X X X X X 8 5 x 11 O O O X O X O O X X 8 5 x 11 O O O O O X O O O X 8 5 x 13 X O O X O X X O X X 8 5 x 14 X X O X O X X O X X 11 x 17 O O O X O X O O X X 16K X X X X X X X X X X 16K X X X X X X O O X X 8K X X X X X X O O X X...

Page 284: ... X X X X X X X X B5 O O O X O O X O X O O X O X O B5 O O O O O O O X O X O O X O X B4 O O O X O O O O X O O O O X O 5 5 x 8 5 X X X X X X X X X X X O O X O 5 5 x 8 5 X X X X X O O X X O O O X X O 7 25 x 10 5 X X X X X X O O X O X O O X O 8 5 x 11 X O O X X O O O X O O O O X O 8 5 x 11 O O O O X O O O O O O O O O O 8 5 x 13 X X O X X X O O X O X X O X O 8 5 x 14 X X O X X X X O X O X O O X O 11 x 1...

Page 285: ...rd Disk Select whether or not to carry out hard disk overwrite erasing If you overwrite the hard disk you can select whether to overwrite once or three times When copy P 53 fax P 105 scan P 171 or print P 230 processing is completed the data is deleted from the hard disk and the area on which the deleted data was stored is automatically overwritten with blank data This feature prevents unauthorize...

Page 286: ... to set Passcode Entry from Control Panel refer to Passcode Entry from Control Panel P 345 For information on how to set the system administrator s user ID refer to System Administrator Login ID P 337 The manager of the organization that this machine is used for must follow the instructions below z Assign appropriate persons as system and machine administrators and manage and train them properly z...

Page 287: ...owing procedure is recommended for changing the settings of the encryption while a large amount of data 100 jobs or more is stored in a mailbox and Overwrite Hard Disk is specified to 1 Overwrite or 3 Overwrites 1 Select System Settings Setup Menu Mailbox to display the Mailbox screen 2 Select the mailbox then select Create Delete Delete Mailbox 3 Select Close until the System Settings screen is d...

Page 288: ...are no longer able to change any setting in System Administrator mode If you lose the system administrator s user ID and passcode when the Security Kit is installed the electric component board of the machine must be replaced in order to change any setting in System Administrator mode In that case you will be charged for the electrical component board and handling cost Note An optional package is ...

Page 289: ... the left of the Copy screen By setting the most commonly used features you can avoid extra operations such as selecting tabs 1 Select Features Allocation and select Change Settings 2 Select the number of features displayed on the Copy screen 3 From the buttons appearing on the right select the position where you want to allocate a feature Note The position of the buttons on the right of the scree...

Page 290: ...s This menu allows you to set the default settings of copy features When the power is turned on or the machine returns from a Power Save mode or when the Clear All button is pressed the system returns to the defaults specified under this menu By setting frequently used features and values as defaults you can simplify copy operations Paper Supply Set the default value for Paper Supply in the Copy s...

Page 291: ...rections in Edge Erase in the Layout Adjustment screen Set the value from 0 to 50 mm in 1 mm increments Center Erase Binding Erase Set the default value for the binding erase amount of the original in Edge Erase in the Layout Adjustment screen Set the value from 0 to 50 mm in 1 mm increments Image Shift Side 1 Set the default value for Side 1 of Image Shift in the Layout Adjustment screen Image Sh...

Page 292: ...rmat screen Page Number Style Set the default value for Style displayed when Page Number is selected for Annotation on the Output Format screen Page Number Position Set the default value for Position displayed when Page Number is selected for Annotation in the Output Format screen Page Number Size Set the default value for Size displayed when Page Number is selected for Annotation in the Output Fo...

Page 293: ... Supply in the Copy screen is cancelled the tray used when Auto Paper of Paper Supply is selected in the Copy screen and Auto or Independent X Y is selected for Reduce Enlarge Mixed Sized Originals 2 Sided Copy Select the action to be taken if the paper size determined for the document page to be printed on the front side of paper is different from the paper size determined for the document page t...

Page 294: ... to print a stamp on side 2 of each sheet of paper Opposite to Side 1 Prints in a position symmetrically opposite to side 1 Same as Side 1 Prints in the same position as side 1 Date Position Side 2 When the 2 sided copy feature is used and Date is selected under Annotation set where to print a date on side 2 of each sheet of paper Opposite to Side 1 Prints in a position symmetrically opposite to s...

Page 295: ...e you can save time to enter the original size each time a copy is made A B Series Size You can select from sizes of A and B series Inch Size You can select from sizes of inch series Others You can select from other sizes Variable Size You can enter any size Set the width X from 15 to 432 mm and the height Y from 15 to 297 mm in 1 mm increments Reduce Enlarge Presets Set the magnifications shown i...

Page 296: ...screen select System Settings For the method of displaying the System Settings screen refer to System Settings Procedure P 254 2 Select Network Settings 3 Select the item to be set or changed Port Settings Set the interface by which the machine is connected to a client In Port Settings you can set the following items For information on port settings refer to the Network Administrator Guide Protoco...

Page 297: ...tor Guide Domain Filter Set accepted domains In Domain Filter you can set the following items For information on domain filter refer to the Network Administrator Guide PKI Public Key Settings In PKI Public Key Settings you can configure the SSL TLS settings Note Before setting the HTTP SSL TLS communications the device certificate must be set For information on the device certificate refer to the ...

Page 298: ... communication within the range from 1 to 65535 Important Do not use the port numbers of the other ports Other Settings In Other Settings you can set the following items For information on other settings refer to the Network Administrator Guide E mail Receive Protocol Select from SMTP and POP3 depending on the usage environment Output Destination for E mail Specify an output destination for e mail...

Page 299: ... therefore data stored in all memory areas is lost It is not possible to assign more than the total memory When the power is turned on if the settings exceed the available memory capacity they are automatically adjusted by the system Note When a port is set to Disabled the corresponding items do not appear Depending on the amount of data sent from the client increasing the memory capacity may not ...

Page 300: ...ffer for spooling from 0 50 MB to 32 00 MB in 0 25 MB increments Note that print data exceeding the set memory capacity is not accepted In such cases select Hard Disk or Off Hard Disk Carries out spooling The receiving buffer for spooling uses the hard disk Note This feature does not appear for some models An optional package is necessary For more information contact our Customer Support Center Re...

Page 301: ...mer Support Center Receiving Buffer EtherTalk Set the EtherTalk receiving buffer Specify a value within the range from 1 024 to 2 048 KB in 32 KB increments Note This feature does not appear for some models An optional package is necessary For more information contact our Customer Support Center Receiving Buffer Port 9100 Set the Port 9100 receiving buffer Specify a value within the range from 64 ...

Page 302: ...he paper type loaded in the paper tray does not match the paper type specified Print Prints with the paper loaded in the tray Display Confirmation Screen A confirmation screen appears to show procedures If a paper type mismatch occurs during print job processing the machine ignores the paper type specified on the print driver and selects another type of paper loaded on the machine Display Paper Su...

Page 303: ...nd Sheet Prints a banner sheet before and after a print job Banner Sheet Tray Set the paper tray used for banner sheets Select from Tray 1 to Tray 4 PostScript Paper Supply Select whether the PostScript DMS Deferred Media Selection feature is enabled or disabled Note This feature does not appear for some models An optional package is necessary For more information contact our Customer Support Cent...

Page 304: ...tings 3 Select the item to be set or changed General Settings Tab You can set items relating to the General Settings screen display Feature in 2nd Column You can set the features shown in the second column of the General Settings screen You can select from 2 Sided Originals Scan Resolution and Reduce Enlarge Reduce Enlarge Buttons 2 3 and 4 This item can be set when Reduce Enlarge is selected in F...

Page 305: ...creen Note This feature does not appear for some models An optional package is necessary For more information contact our Customer Support Center Edge Erase Set the default value for Edge Erase in the Layout Adjustment screen You can select from Normal or Edge Erase Edge Erase Top Bottom Edges Set the default value for the amount of edges erased from the original in the top and bottom directions i...

Page 306: ...o and postcard sizes Variable Size You can enter any size Set the width X from 15 to 432 mm and the height Y from 15 to 297 mm in 1 mm increments Output Size Defaults Set the sizes to be displayed at Output Size when selecting Auto for scanning documents at Reduce Enlarge in the Layout Adjustment screen Any output sizes can be assigned to output size buttons 1 to 8 By presetting frequently used ou...

Page 307: ... time until the memory full procedure is carried out For more information refer to Auto Job Release P 268 Cancel Job The stored data is discarded Run Job The stored data is processed Maximum Stored Pages Set the maximum number of scan pages that the machine can store You can specify a value in the range of 1 to 999 TIFF Format Set the TIFF format for scan data You can select TIFF V6 or TTN2 Image ...

Page 308: ... Mode Settings 3 Select the item to be set or changed Screen Defaults You can set items relating to the Fax Internet Fax screen Fax Screen Default Set the default screen that appears when the Fax Internet Fax screen is displayed Select from the Fax Recipients Programming Screen General Settings and Address Book screens General Settings 2nd Column You can set the features that appear in the second ...

Page 309: ...ion Options screen Note This feature does not appear for some models An optional package is necessary For more information contact our Customer Support Center Skip Blank Pages Set the default value for 2 Sided Skip Blank Pages in the Layout Adjustment screen Note This feature is for customer engineer use For more information contact our Customer Support Center Transmission Report Set the default v...

Page 310: ... re enter the recipient z Enter Twice Allows the Broadcast Send Re entering the recipient is required z Broadcast Disabled No Broadcast Send is allowed Re enter Speed Dial Recipients This setting is required when you activated Re enter Recipients Select how to re enter a recipient after the first entry z Enter Once Only No need to re enter the recipient z Enter Twice Use the speed dial feature to ...

Page 311: ...Faxes set whether to also save cancelled fax documents Saved Faxes Auto Delete When Yes is selected for Save Undelivered Faxes set whether to automatically delete saved documents in 24 hours Transmission Interval Specify a value for the interval between the end of one transmission and the beginning of the next from 3 to 255 seconds in 1 second increments A longer transmission interval increases th...

Page 312: ...fax document cannot be printed on the paper loaded on the specified paper trays automatically it will be printed on the paper loaded on Tray 5 Bypass User Mode Specify the paper sizes to be used for printing received fax documents Regardless of whether the paper is loaded into trays only the specified size paper is used for printing When User Mode is selected select paper sizes from A3 A4 A4 A5 B4...

Page 313: ...be handled Once a certain time has elapsed with the confirmation screen displayed the subsequent processing is determined by these settings You can set the time until the memory full procedure is carried out For more information refer to Auto Job Release P 268 Cancel Job The stored data is discarded Run Job The stored fax data is printed Maximum Stored Pages Set the maximum number of fax pages tha...

Page 314: ...tput destination for each receiving line and the destination for a mailbox print Note This feature does not appear for some models An optional package is necessary For more information contact our Customer Support Center The displayed items may be different depending on the options installed Reduce Enlarge Presets You can set the magnifications shown in Preset for Reduce Enlarge in the Layout Adju...

Page 315: ...d and the numeric keypad make the specification with not more than 20 characters Company Logo Register a sender s name The sender name is the name of the local terminal as printed in the send headers and on cover notes Using the displayed keyboard and the numeric keypad make the specification with not more than 30 characters Machine Password Set the machine password when you want to limit the othe...

Page 316: ...heck that it is supported on the destination machine TIFF S This profile is the iFax standard For documents that are larger than A4 the size is reduced automatically to A4 for transmission TIFF F Select this profile when you specify super fine for the resolution or when you send A3 or B4 documents TIFF J Select this profile for sending documents in JBIG Broadcast Communication Mode Set the default...

Page 317: ...onal package is necessary For more information contact our Customer Support Center Fax Transfer from Address Book Set whether to permit forwarding of iFax data that is received by email via SMTP when the forwarding destination is not registered in Address Book Off Permits forwarding On Checks if the forwarding fax number is listed in the address book and if not rejects receiving the email and dele...

Page 318: ... an upper limit on data size You can specify a value within the range from 50 to 65 535 KB in 1 KB increments Note If the set value is exceeded the e mail transmission is aborted Maximum Address Entries Set the maximum number of addresses that can be specified when sending an e mail The number of addresses is the total number of addresses to be specified under TO CC and BCC You can specify a value...

Page 319: ... users are permitted to use the read receipts MDN feature Auto Print Delivery Confirmation Mail Select whether to automatically print transmission result e mails DSN response MDN response Off Transmission result e mails are not printed On Transmission result e mails are automatically printed regardless of success or failure of the transmission Print when delivery fails Prints only when the transmi...

Page 320: ...ct e mail addresses from being changed under From on the E mail tab when an authenticated user fails to retrieve an e mail address from the LDAP server E mail Sending When Search Failed Set whether to disable E mail when an authenticated user fails to retrieve an e mail address from the LDAP server Add Me to To Field Set whether to automatically add the sender s address to the To field Add Me to C...

Page 321: ...red in the mailbox when it is retrieved by the client Delete according to Mailbox Settings Follows the settings for individual mailbox For information about setting the mailbox refer to Delete Documents After Retrieval P 323 Force Delete Ignores the settings for each individual mailbox and when a document is retrieved by a client the retrieved document is forcibly deleted Print Delete Confirmation...

Page 322: ...lete charge print documents after the expiration date Note This item appears only when optional HDD Extension Kit is installed on the machine This item does not appear when the Charge Print feature is enabled Delete Secure Print Documents Select whether or not to delete secure print documents after the expiration date Note This item appears only when optional HDD Extension Kit is installed on the ...

Page 323: ...r of digits allowed for a passcode between 0 and 12 digits A passcode is required when Secure Print or Private Charge Print documents are to be stored or printed A passcode must have digits equal to or longer than the value specified here Note Specify 0 if you do not set passcodes or the minimum number of digits ...

Page 324: ...ling features and to classify received data Documents scanned using the Scan to Mailbox feature and documents sent using the Polling and Private Polling features are stored in the mailboxes you specify You can create various types of mailboxes such as mailboxes for receiving documents and for sending documents You can check the current mailboxes in the Mailbox list For more information refer to Ma...

Page 325: ...in a mailbox is printed or retrieved set whether the document should be deleted No The document is kept in the mailbox Yes After the document is printed or retrieved it is automatically deleted Delete Expired Documents Specify whether to enable the feature to delete documents stored in a mailbox at a specified time after a retention period has elapsed No Even when the set retention period has elap...

Page 326: ...ument is stored in a mailbox 2 by selecting a document stored in a mailbox to manually execute the associated job flow and 3 by selecting a document stored in a mailbox and a job flow manually To start a job flow you must link the job flow to a mailbox Documents are automatically processed by the job flow sheet when they are stored in the mailbox Note To link a mailbox with a job flow sheet create...

Page 327: ...Sheet P 326 Edit Delete The Details screen appears Refer to Edit Delete P 328 Search by Name Searches for job flows that partially match the entry The machine searches through job flow names that were registered upon each job flow creation The entry can be up to 128 characters long For information about how to enter characters refer to Entering Text P 266 Search by Keyword Searches for job flows t...

Page 328: ...possible to use wildcard or group dial number specifications Note This item is not displayed when the Server Fax feature is enabled Address Number Specify an address with an address number Enter the address number with the numeric keypad and select Save The specified address appears in Recipient Name Fax Number in the Send as Fax screen New Recipient Specify a new address Select the item you want ...

Page 329: ...erval Seconds Set the transmission retry interval in the range of 30 to 300 seconds Delete Recipient Deletes all information for the selected addresses Change Settings Confirm or change the selected recipients For information about the method for confirm change refer to Address Book P 328 Print Makes print settings When On is selected you then configure print settings Quantity Set the number of co...

Page 330: ...w Sheet P 326 Job Flow Sheet Keywords You can register job flow search keywords The registered keywords are displayed under Search by Keyword and allows you to use for job flow sheet search The keywords are also available from a list under Select Keyword that is displayed when you create a new job flow sheet Up to 12 characters are allowed for a job flow search keyword Address Book You can store f...

Page 331: ...een By entering a three digit number with the numeric keypad you can specify the abbreviated number directly 3 Select Address Type and select Change Settings 4 Select the address type and select Save 5 Select the item to be set and select Change Settings 6 When the settings are completed select Save When selecting Fax as the address type The following items appear z Address Type z Maximum Image Si...

Page 332: ...to Entering Text P 266 Recipient Name Enter a recipient name with not more than 18 characters For information about how to enter characters refer to Entering Text P 266 Index You can enter a single alphanumeric index character for use as a keyword to search the address book For information about how to enter characters refer to Entering Text P 266 z Address Type z Resolution z E mail Address z Max...

Page 333: ...n the fax gateway and the recipient fax Resolution Set the transmission image quality Select from Panel image quality selected on the control panel Standard Fine Superfine 400 dpi and Superfine 600 dpi Cover Note Select whether to send transmissions with a cover note attached If attached specify comments relating to the recipients and sender to be included in the cover notes Comments must be regis...

Page 334: ...the T 30 communication protocol method for using sub addresses that are standardized by the ITU T The F code sub address and password use not more than 20 digits 0 to 9 and 1 Select Off or On 2 If you selected On enter the F code with the numeric keypad and select Next Note The F code consists of 0 mailbox number For example if the mailbox number is 123 the F code is 0123 3 Enter the password as r...

Page 335: ... about how to print refer to Billing Data List P 378 1 Enter the System Administration mode For details on how to enter the System Administration mode refer to System Settings Procedure P 254 2 Select one of Billing Day Time Billing Night Time and Billing Midnight and select Change Settings 3 Select No Billing or Billing 4 When Billing is selected using the keyboard displayed on the screen or the ...

Page 336: ... FTP Example To save in the bbb directory under the aaa directory in the root directory aaa bbb z Forwarding via SMB Example To save in the bbb directory under the aaa directory in a specified volume aaa bbb User Name When a user name is required to be input by the forwarding destination server set the user name When FTP is selected under Transfer Protocol up to 32 characters are allowed When SMB ...

Page 337: ...oup must already be stored in the address book Note It is not possible to include a group in another group As shown in the following example you can use wildcards for specifying the numbers 01 Specifies the 10 addresses with address numbers 010 to 019 Specifies all address numbers 1 Select Group Send 2 Select a group number you want to register and select Create Delete Note Select to return to the...

Page 338: ...per Size Type displayed under Paper Tray Settings in Common Settings For details refer to Paper Size Type P 272 Paper Size Type under Setup Menu is displayed only when you enable Paper Tray Attributes on Setup Menu For details refer to Paper Tray Attributes on Setup Menu P 272 ...

Page 339: ...System Administrator Login ID 2 Select On 3 Select Keyboard and then in New System Administrator Login ID enter the system administrator ID and select Save 4 Select Keyboard again and in Re enter System Administrator Login ID enter the same system administrator ID and select Save 5 Select Save 6 A confirmation window appears Select Yes to confirm your entry System Administrator s Passcode Set the ...

Page 340: ...ts This feature protects the settings from being changed by anyone other than the system administrator If authentication for a system administrator s ID fails more than specified times continuously access is denied You can specify a login attempt count in the range from 1 to 10 Note The failure count is reset when the machine is restarted To cancel the access rejection state restart the machine by...

Page 341: ... the method of displaying the System Settings screen refer to System Settings Procedure P 254 2 Select any item Create Check User Accounts When the Login Setup Auditron Administration feature is used register user IDs and user names to authenticate the users For a user of the machine you can set a limit on the number of pages For each registered user you can also check the cumulative number of pag...

Page 342: ...bout how to enter characters refer to Entering Text P 266 Account Limit You can place restrictions on the use and the maximum number of allowed pages for each of the copy fax scan and print features 1 Select Account Limit 2 Select Copy Service Fax Service Scan Service or Print Service 3 To place restrictions on a color mode or feature select Feature Access and select the item 4 To set account limi...

Page 343: ...nting on the Login Setup Auditron Mode screen allows you to check the following for each registered user or group 1 the maximum number of times that the account can be used for each service and 2 how many times the account has been used for each service Note You can register users and groups on CentreWare Internet Services For more information refer to the CentreWare Internet Services Help 1 Click...

Page 344: ...including contents for confirmation before resetting Reset Deletes or resets the data for the selected item System Administrator s Meter Copy Jobs You can check or reset the total impression copied using the System Administration mode on the screen The total impressions are counted up to 9 999 999 pages Note This item does not appear when Network Access is selected in Login Setup Auditron Mode P 3...

Page 345: ...thorized access an error is logged if authentication fails within a specified period of time Set the failure count Store User Details You can set the destination to save authentication information Select NVM or hard disk Note This item appears when Network Access is selected in Login Setup Auditron Mode P 346 Charge Private Print Settings You can set how received print jobs should be handled PJL R...

Page 346: ... be applied to jobs with no user ID attached such as print or e mail print jobs sent from CentreWare Internet Services To print all jobs select Print Job To save jobs using the Charge Print feature select Save in Charge Print To delete jobs select Cancel Job Note Job without UserID is changed to Print Job when you select as follows on CentreWare Internet Services Properties Auditron Administration...

Page 347: ... P 378 1 Enter the System Administration mode For details on how to enter the System Administration mode refer to System Settings Procedure P 254 2 Select Fax Billing Data and select Change Rate per Unit Charge Rate per Unit This is a communication charge per unit 3 Select Change Settings 4 Enter an amount using the keyboard displayed on the screen or the numeric keypad 5 Select Save Passcode Entr...

Page 348: ...tication refer to Authentication and Auditron Administration P 397 Note When Network Access is selected you will be able to enter your account ID on the Authentication screen that appears when the Log In Out button is pressed on the control panel Verify User Details Set whether to access a remote service to verify user information z No Prompts for your user ID and account ID but does not verify th...

Page 349: ...he Login Setup Auditron Administration feature for copy operations Fax Service Set whether to enable the Login Setup Auditron Administration feature for fax and iFax operations Scan Service Set whether to enable the Login Setup Auditron Administration feature for scan operations Print Service Set whether to enable the Login Setup Auditron Administration feature for print operations Note A job may ...

Page 350: ......

Page 351: ...escribes the job status feature z Job Status Overview 350 z Checking Current Pending Jobs 351 z Checking Completed Jobs 352 z Printing and Deleting Stored Documents 353 z Printing Pending Jobs 363 z Handling Error Terminations 364 ...

Page 352: ...Checking Current Pending Jobs P 351 Checking Completed Jobs Displays the status of completed jobs Also displays their details For more information refer to Checking Completed Jobs P 352 Checking Stored Documents Prints or deletes documents stored using the Charge Print Secure Print Private Charge Print Sample Print and Delayed Print features and also undelivered fax documents and documents stored ...

Page 353: ...e cancelled or preferentially executed 4 Select Cancel or Promote Job Print Waiting Jobs Select this to print the jobs that are waiting to be output For more information refer to Printing Pending Jobs P 363 Cancel Cancels the current or pending job Promote Job Preferentially executes the selected job The mark will be displayed on the Status column of the job Stop Stops the job processing Last Orig...

Page 354: ...e Job Status button 2 Select the Completed Jobs tab Note Select to return to the previous screen or to move to the next screen 3 Select a job to see the details 4 Select Close after the check Group Parent Jobs Allows you to check the list or history of related jobs such as broadcast fax and job flow jobs Show Children Jobs Displays a job list Job History Report Prints the job results to allow you ...

Page 355: ...h authentication user ID Note This item is displayed when the Private Charge Print feature is enabled by using one of the following procedures Select Save in Private Charge Print under Receive Control Select According to Print Auditron under Receive Control and then set Job Login Success to Save in Private Charge Print Under Login Setup Auditron Mode select an option other than Off and then set Pr...

Page 356: ... is Selected 1 Select Yes Yes Deletes the document Important Once the document is deleted it cannot be restored No Cancels deleting the document When Print is Selected 1 Select what to do with the document after printing Print and Delete Starts printing the document After printing the document is deleted Print and Save Starts printing the document After printing the document remains undeleted Canc...

Page 357: ...sing the numeric keypad or the keyboard displayed by pressing Keyboard and select Confirm 2 Select Charge Print 3 Select the user to be checked and select Document List Note Select Refresh to display the updated information Select to return to the previous screen or to move to the next screen Entering a 3 digit user ID with the numeric keypad specifies the user directly 4 Enter the passcode and se...

Page 358: ...ayed when the Private Charge Print feature is enabled by using one of the following procedures Select Save in Private Charge Print under Receive Control Select According to Print Auditron under Receive Control and then set Job Login Success to Save in Private Charge Print Under Login Setup Auditron Mode select an option other than Off and then set Print Service under Auditron Mode to On When you h...

Page 359: ...ID are all deleted the Billing ID will be deleted Refer to When Delete is Selected P 357 Print Prints the selected document Refer to When Print is Selected P 357 When Delete is Selected 1 Select Yes Yes Deletes the document Important Once the document is deleted it cannot be restored No Cancels deleting the document When Print is Selected 1 Select what to do with the document after printing Print ...

Page 360: ...e Print for Receive Control under Charge Private Print Settings jobs will not be saved in Sample Print under Stored Documents even if you select Sample Print on the print driver For more information refer to Charge Private Print Settings P 343 1 Select Sample Print 2 Select the user to be checked and select Document List Note Select Refresh to display the updated information Select to return to th...

Page 361: ...lue refer to Auto Job Release P 268 Print and Save Cancels printing the document Print Quantity Allows to specify the number of print sets Note Print Quantity is disabled when you use Select All to select all documents Delayed Print This section describes how to print or delete documents stored with the Delayed Print feature For information on Delayed Print operations refer to the print driver s h...

Page 362: ... When Delete is Selected 1 Select Yes Yes Deletes the document Important Once the document is deleted it cannot be restored No Cancels deleting the document When Print is Selected 1 Select Yes Yes Starts printing the document After printing deletes the document No Cancels printing the document Public Mailbox This section describes how to print or delete a document stored in a public mailbox For in...

Page 363: ... When Delete is Selected 1 Select Yes Yes Deletes the document Important Once the document is deleted it cannot be restored No Cancels deleting the document When Print is Selected Starts printing the document Undelivered Faxes This section describes how to re send or delete an undelivered fax document Note This feature does not appear for some models An optional package is necessary For more infor...

Page 364: ...ents is Selected P 362 When Delete This Document is Selected 1 Select Yes Yes Deletes the fax document No Cancels deleting the fax document When Change Recipients is Selected Specify a fax recipient for the undelivered fax document Besides the fax recipient the following features can be changed on the control panel Important If the fax number is changed the setting for adding a header will be disa...

Page 365: ... 363 Job Status 11 Printing Pending Jobs This section describes how to print pending jobs Note If there are no pending jobs the Print Waiting Jobs button is disabled 1 Press the Job Status button 2 Select Print Waiting Jobs ...

Page 366: ...delivered refer to Transmission Report Undelivered P 381 For details on how to print transmission reports undelivered automatically refer to Transmission Report Undelivered P 277 For a Scan Job A transmission report undelivered is printed For more information on transmission reports undelivered refer to Transmission Report Undelivered P 381 For details on how to print transmission reports undelive...

Page 367: ...12 Machine Status This chapter describes the features for checking the machine status z Overview of Machine Status 366 z Machine Status 367 z Billing Meter Print Report 372 z Supplies 383 z Faults 384 ...

Page 368: ...s and hard disk overwriting status You can also set print modes For more information refer to Machine Status P 367 Billing Meter Print Report You can check the number of pages printed by meter or user You can also print various reports lists to check the job history settings and registered information For more information refer to Billing Meter Print Report P 372 Supplies You can check the status ...

Page 369: ... can check the machine status Machine Information On the Machine Information screen you can check the serial number of the machine machine configuration and software version 1 Select Machine Information For enquiry on maintenance and operation Indicates how to make maintenance and operating enquiries Serial Number Indicates the serial number of the machine Machine Configuration Displays the Machin...

Page 370: ...e Machine Configuration screen you can check the following items Paper Tray You can check the paper trays set on the machine On the screen you can check the following items z Status z Full Amount of paper remaining z Paper Size z Paper Type 1 Select Paper Tray z Configuration Code z Duplex Module z PCL z Auto Document Feeder z Hard Disk z PDF z Stamp z Page Memory Size z USB z Paper Tray z System ...

Page 371: ...n refer to Overwrite Hard Disk P 283 1 Select Overwrite Hard Disk Print Mode You can change and register the print mode settings Note The items displayed vary depending on the options installed 1 Select Print Mode 2 Select Off line or On line Off line The printer cannot accept data Any data being sent is cancelled and not printed On line The printer can accept data 3 Select a printer language 4 Se...

Page 372: ...meric keypad 6 Select Save Item Number Enter the item number of the feature to be set Current Value When you enter Item Number the currently set value appears New Value Enter a new value Store Delete Programming For ESC P K HP GL 2 emulations you can register settings in the memory You can register up to 20 print modes for ESC P K and HP GL 2 emulations 1 Select Store Delete Programming 2 Select S...

Page 373: ...d matches the password set here You can use up to 32 characters for the password 1 Press Password 2 Select Keyboard 3 Enter a password within 32 characters in New Password Passcode and select Set 4 In Re enter Password Passcode enter the same password and select Save Fax Receiving Mode You can set a fax receiving mode For information on automatic and manual fax receiving modes refer to Receiving F...

Page 374: ...elect the Billing Meter Print Report tab Important If Print Report Button under Reports is set to Disabled Print Report List appears only in User Mode of the System Administration mode For information on Reports refer to Reports P 277 Billing Meter You can confirm the total number of copies and printed pages 1 Select Billing Meter Serial Number Displays the serial number of the machine Meter 1 Dis...

Page 375: ...oard enter the user ID of a user whose billing meter needs to be checked and select Confirm Note Enter the passcode if required 2 Press the Machine Status button 3 Proceed to Step 2 To check the system administrator meter 1 Using the numeric keypad or the keyboard displayed by pressing Keyboard enter the user ID to enter the System Administration mode and select Confirm Note Enter the passcode if ...

Page 376: ...l Jobs All Non printing Jobs Mailbox Transfer Jobs and All Printing Jobs If All Jobs is selected the Include Children Jobs check box appears Clearing this check box lists all the child jobs such as broadcast fax and job flow jobs on one line Selecting this check box lists each child job on each line You can also have Job History Report printed automatically for every 50 jobs For information on hav...

Page 377: ...Print Mode Settings Note To display the Print Mode Settings screen select the Machine Status button and then select Billing Meter Print Report Print Report List Print Mode Settings 2 Select the list to be printed 3 Press the Start button Note The items displayed vary depending on the options installed Settings List Common Items Allows you to check the hardware configuration network information and...

Page 378: ...are Internet Services For more information refer to the online help of CentreWare Internet Services PostScript Fonts List Prints the fonts available in PostScript HP GL 2 Settings List Prints the settings for the HP GL HP GL 2 and HP RTL emulation modes HP GL 2 Stored Programming List Prints the stored programming settings for the HP GL HP GL 2 and HP RTL emulation modes PCL Settings List Prints t...

Page 379: ...server where the job templates which are created using scan service setting tools are stored Address Book You can check the settings for the address numbers and relay stations When you specify a range of address numbers the list of settings for the specified address numbers 3 pages and relay stations 1 page will be printed Each page contains the settings information on 50 address numbers If you se...

Page 380: ...you select Address Book the screen for specifying a range of address numbers is displayed Select a range of numbers and press the Start button z Group Send You can print the list of settings for Group Send only z Select All You can print the list of settings for all address numbers Group Send and relay stations Comment List You can check the registered comments to be used on cover notes Billing Da...

Page 381: ...on the screen differs depending on whether the Auditron Administration feature is enabled Note Auditron Administration appears when User Mode is selected in the System Administration mode When the Auditron Administration feature of each service is set to Off When the Auditron Administration feature of each service is set to Off the following screen appears allowing you to print a printer meter rep...

Page 382: ... the report is the No User Administration Number registered for the Login Setup Auditron Administration feature Auditron Report Copy Jobs You can check the total number of pages copied on the machine If the maximum limit is set for the number of pages that can be copied you can also view the limit value Auditron Report Copy Jobs counts pages from the time at which the data has been initialized Not...

Page 383: ...e the report printed automatically refer to Transmission Report P 307 Transmission Report z Fax iFax Jobs Printed when a fax or iFax transmission succeeded A reduced image of the scanned data and its transmission result are printed You can specify whether or not to have the Transmission Report printed when sending the document For information on how to automatically print out the transmission repo...

Page 384: ...ion on specifying whether or not to have the report printed automatically refer to Relay Broadcast Report P 277 Power Off Report You can check the stored documents that are accidentally deleted because of the power being switched off such as when an electrical power failure occurs This report is printed automatically when the machine is turned back on All the documents that are listed on this repo...

Page 385: ...splayed vary depending on the options installed Staple Cartridge is displayed when one of the following options is installed B Finisher C Finisher and C Finisher with Booklet Maker Hole Punch Container is displayed when one of the following options is installed C Finisher and C Finisher with Booklet Maker Booklet Staple Cartridge is displayed when C Finisher is installed Important If using a partl...

Page 386: ...he following describes how to print the error history report 1 Press the Machine Status button 2 Select the Faults tab 3 Select Error History Report 4 Press the Start button Note You can also access the Error History Report from the Job Status Activity Report on the Billing Meter Print Report screen If Print Report Button under Reports is set to Disabled the Error History Report button does not ap...

Page 387: ...to keep track of how often each feature was used This chapter is intended for system administrators and explains the features whose set values can be changed and their setting procedures Important The Remote Access feature is available on the ApeosPort models only z Overview of Authentication 386 z Authentication for Job Flow Sheets and Mailboxes 390 z Overview of Auditron Administration 397 ...

Page 388: ...e When using a restricted service an authenticated user is prompted to type the user ID and passcode on the authentication screen Unauthenticated Users These are users who are not registered with the machine An unauthenticated user cannot use restricted services General Users These are users who are not permitted to use the machine in the authentication mode Types of Authentication Authentication ...

Page 389: ...icated by cross checking the pre registered authentication information on the client s fax driver with the one registered on the machine For information on the print driver or fax driver refer to the online help of each driver For information on the user information settings or account information settings refer to the online help of CentreWare Internet Services Important When setting the user inf...

Page 390: ...ices or EasyOperator EasyAdmin through a network The following features are controlled by remote access Print Print instructions from a computer are restricted To use the Authentication feature authentication information such as a user ID and passcode must be set on the print driver Print data that was sent to the machine and failed authentication is either stored on the machine or deleted accordi...

Page 391: ...eature is not used for the copy fax scan or print services authentication is required to access the machine when the Authentication feature is used on the machine Note Only the system administrators are authenticated when Login Setup Auditron Mode under System Settings is set to Remote Access EasyOperator EasyAdmin is not available for general users ...

Page 392: ...sabled The owner of the job flow sheet is the mailbox it was created from For example the owner of a job flow sheet created in Mailbox 001 will be Mailbox 001 and the job flow sheet can be used only in Mailbox 001 Any users who have access to the mailbox upon the job flow sheet creation can use the job flow and change its settings This job flow sheet can be used by any machine users when the Authe...

Page 393: ...eted or selected run only from the mailbox where the job flow sheet was created The applicable users are all users who can use the mailboxes If job flow sheets which are no longer available for use due to a change in the authentication status are linked to mailboxes they cannot be edited or copied but still can be used If you cancel the links however the job flow sheets will no longer be displayed...

Page 394: ...flow sheet is the user who made the copy When Check User Details under Network Access is set to Off Keep logon records The owner of a copied job flow sheet is the user who made the copy Job flow operation Unauthenticated Users General Users Authenticated Users System Administrators General shared Mailbox Admin shared Personal General shared Mailbox Admin shared Personal owner Personal Non owner Ge...

Page 395: ...create a administrator shared mailbox you need to press the Log In Out button and operate the machine as a system administrator Personal Mailbox This is a mailbox created by an authenticated user when the Authentication feature is enabled Only the authenticated user who created it can use it When the Authentication feature is not enabled this mailbox can only be handled by a system administrator T...

Page 396: ...ed user general user and cannot handle mailboxes 1 The following operations are not authenticated Fax to Mailbox iFax to Mailbox Document retrieval using a scan driver or Mailbox Viewer2 2 Available only when the mailbox operations are permitted in the Authentication feature settings of the System Administration mode 3 You can perform display auto run and manual run operations for job flow sheets ...

Page 397: ...e Authentication feature is enabled Important If job flow sheets which are no longer available for use due to a change in the authentication status are linked to mailboxes they cannot be edited or copied but still can be used If you cancel the links however the job flow sheets will no longer be displayed and will be unavailable When the Authentication Feature is not Enabled When the Authentication...

Page 398: ... User Details under Network Access is set to Off Keep logon records General shared O O O O Admin shared O O O O Personal O O O Mailbox Job Flow Unauthenticated Users General Users Authenticated Users System Administrators General shared Admin shared Personal General shared Admin shared Personal owner Personal Non owner General shared Admin shared Personal General shared O O O Admin shared O O O O ...

Page 399: ...le devices Remote services supported by the machine includes ApeosWare EasyAdmin optional Using Remote Authentication Remote authentication is carried out based on the user information managed on a remote authentication server such as ApeosWare Accounting Service optional User information is not required to be registered on the machine Important When registering user information on the remote auth...

Page 400: ...entication is required 2 You can select features available for each user For more information refer to Account Limit P 340 3 This feature stops further machine operation if the number of pages has reached the specified maximum number For more information refer to Account Limit P 340 Network Access When the network authentication is used the Auditron Administration information can be managed with A...

Page 401: ...at can be managed on the machine are as follows 1 This column shows whether authentication is required for each service O indicates that authentication is required 2 If ApeosWare Authentication Agent optional is used as an authentication system you can select features to restrict For information on ApeosWare Authentication Agent refer to the documentation provided with it 3 Under Remote Access the...

Page 402: ...services This section describes the items that can be managed for the jobs of each service Print The items you can manage for print jobs using the Auditron Administration feature are as follows Corresponding Service Authentica tion 1 Restrictions on Use Per user Usage Count User ID Feature restrictions 2 Account Limit 3 Copy O O O O Print O O O O Charge Print Private Charge Print O O O O Scan Serv...

Page 403: ...Required Authenticated user Pages sheets Private Charge Print Store Documents Required Not required 3 Print Documents Required Authenticated user Pages sheets E mail Printing 2 Unauthenticate d user Pages sheets Services Jobs Authenti cation Users for which Auditron are Collected Managed Items Fax Send Automatic Transmission Required Authenticated user Transmissions pages charging units Manual Tra...

Page 404: ...ric keypad or the on hook off hook Fax Polling Storing Documents for Polling Mailboxes Polling Mailboxes Required 1 Automatic Transmission to Mailbox Not required Unregistered user Transmissions pages Automatic Reception Printing Required Authenticated user Polls pages charging units printed pages sheets Polling Document Printing Mailboxes Polling Mailboxes Required 1 Authenticated user Pages numb...

Page 405: ...u can manage for scan jobs using the Auditron Administration feature are as follows Corresponding Service Authenti cation Users for which Auditron are Collected Managed Items E mail Required Authenticated user Scanned pages mail transmission pages Scan to Mailbox Required Authenticated user Scanned pages stored pages Scan to PC Required Authenticated user Scanned pages file transfer pages Network ...

Page 406: ......

Page 407: ...14 Maintenance This chapter describes how to replace consumables clean the machine and print a report list z Replacing Consumables 406 z Cleaning the Machine 419 z Printing a Report List 422 ...

Page 408: ...parks inside the vacuum cleaner and cause explosion If you spill a large volume of toner contact your local Fuji Xerox representative z Never throw a toner cartridge into an open flame Remaining toner in the cartridge may catch fire and cause burn injuries or explosion If you have a used toner cartridge no longer needed contact your local Fuji Xerox representative for its disposal CAUTION z Keep t...

Page 409: ...cartridge is empty Follow the messages and replace the toner cartridge as necessary 1 The page yield after each message is displayed is for when A4 LEF paper is used The number of pages that you can copy or print is an estimate and varies depending on the conditions such as the print contents dot coverage area coverage paper size paper type copy print density output image type and the machine usag...

Page 410: ... out of the cartridge Return used toner cartridges to our Customer Support Center 4 Remove the new toner cartridge out of the box and shake it from side to side before removing it out of the bag 5 Hold the toner cartridge by its handle and slide it into the machine until it comes to a stop Note Be sure to insert the toner cartridge into the machine until it clicks into place 6 Close the front cove...

Page 411: ...ome conditions Important The use of drum cartridges not recommended by Fuji Xerox may impair quality and performance Use only drum cartridges recommended by Fuji Xerox Note Do not expose drum cartridges to direct sunlight or strong light from indoor fluorescent lighting Do not touch or scratch the surface of the drum cartridge Doing so may result in unsatisfactory printing Used drum cartridges req...

Page 412: ...ot hold it by its handle it might fall out of the machine and soil the floor 6 Remove the new drum cartridge from the box Important Do not place the new drum cartridge in an upright position Return used drum cartridges to our Customer Support Center 7 Place the drum cartridge on a flat surface Undo the sealing tape as shown and carefully pull it out to remove the protective sheet out of the cartri...

Page 413: ...tly placed 11 Close the Cover A tightly 12 Close the Tray 5 Bypass 13 Close the front cover Note If you do not completely close the front cover the machine will display a message and not resume operation Replacing the Staple Cartridge For B Finisher When the B Finisher optional is installed and it is time to replace the staple cartridge a message appears on the touch screen When this message appea...

Page 414: ...own in the figure to pull out the staple cartridge to the right towards you 3 Move up the staple cartridge to take it out of the machine 4 Press in both sides of the staple cartridge holder marked PUSH The staple cartridge rises up and becomes removable Important If there are still staples inside the staple case the case will not rise up ...

Page 415: ...into the holder 7 Push the top of the staple cartridge holder down as shown 8 Remove the tab from the new staple cartridge as shown 9 Insert the staple cartridge into the machine until you hear it click into place 10 Close the front cover of the finisher Note If you do not completely close the front cover the machine will display a message and not resume operation ...

Page 416: ...ecommended by Fuji Xerox may impair quality and performance Use only staple cartridges recommended by Fuji Xerox Note To order a new staple cartridge contact our Customer Support Center 1 Make sure that the machine has stopped and open the front cover of the finisher 2 Grip the lever R1 of the staple cartridge holder and pull out the holder to the right towards you 3 Take out the staple cartridge ...

Page 417: ...t When a C Finisher with Booklet Maker is Installed When the C Finisher with Booklet Maker optional is installed and it is time to replace the booklet staple cartridge a message appears on the display When the message appears load a new staple case into the staple cartridge Important The use of staple cartridges not recommended by Fuji Xerox may impair quality and performance Use only staple cartr...

Page 418: ... Finisher with Booklet Maker is Installed When the C Finisher optional or C Finisher with Booklet Maker optional is installed and the hole punch container becomes full a message appears on the touch screen Discard the scraps following the message When you take the hole punch container out of the machine make sure to empty it completely If it is reinstalled with some scraps remaining it may become ...

Page 419: ...rs the Fax service and is installed with optional Stamp Kit replace the stamp cartridge when stamp impressions start to fade Important Do not touch the ink pad of the stamp cartridge If it comes into contact with your skin wash immediately Problems caused by using consumables other than what is recommended by us are not covered by the maintenance service contract Before using consumables carefully...

Page 420: ... the old stamp cartridge and pull it straight out of the machine Note If only the sponge part of the stamp cartridge is removed make sure to remove the bottom part of it also 4 Insert the new stamp cartridge in the machine 5 Close the inner cover and then close the document feeder cover until it clicks into place ...

Page 421: ...o not use cleaning agents other than water or neutral detergent Note If dirt does not come off easily gently wipe it with a soft cloth moistened with a small amount of neutral detergent 2 Wipe off any excess water with a soft cloth Cleaning the Document Cover and Document Glass If the document cover and document glass are dirty streaks or smears may appear on copies and the machine may not properl...

Page 422: ...re clean copies at all times clean the film and constant velocity transport glass about once a month Important Do not use benzene paint thinner or other organic solvents Doing so might damage paint or coating on plastic parts Cleaning the machine with an excessive amount of water may cause the machine to malfunction or damage documents during copying 1 Wipe the film with a soft cloth moistened wit...

Page 423: ...tion or damage documents during copying or printing 1 Pull up the knob on the left cover of the document feeder and open the document feeder cover completely Note When you fully open the cover it enters a fixed position Open the cover gently 2 While turning the roller gently clean it with a soft cloth moistened with water Important Do not use cleaning agents other than water or neutral detergent U...

Page 424: ...rt List P 374 1 Press the Machine Status button 2 Select the Billing Meter Print Report tab 3 Select Print Report List Note If Print Report Button under Reports is set to Disabled the Print Report List button appears only in User Mode of the System Administration mode For information on Reports refer to Reports P 277 If printing Billing Data List or Fax Auditron Administration Report insert a card...

Page 425: ... and their solutions z Troubleshooting 424 z Machine Trouble 426 z Image Quality Trouble 431 z Trouble during Copying 436 z Trouble during Printing 440 z Trouble during Faxing 443 z Trouble during Scanning 447 z Error Code 452 z Paper Jams 507 z Document Jams 528 z Stapler Faults 530 ...

Page 426: ...en turn the power switch on Refer to Power On Off P 40 No Cause Does the AC outlet supply power properly Action Connect another appliance to the outlet to verify the power supply The touch screen is too dark Cause Is the Power Saver button on No Yes Action The machine is in the Power Saver mode Press the Power Saver button on the control panel to exit the Power Saver mode Refer to Power Saver Mode...

Page 427: ...r Customer Support Center Trouble during copying Action Refer to Trouble during Copying P 436 No Yes Trouble during printing Action Refer to Trouble during Printing P 440 No Yes Trouble during faxing Action Refer to Trouble during Faxing P 443 No Yes Trouble during scanning Action Refer to Trouble during Scanning P 447 Yes ...

Page 428: ...fer to Control Panel P 46 Unable to print or unable to copy Is a message displayed on the touch screen Follow the instructions displayed to solve the problem When a parallel interface cable is used to connect between the machine and the computer bi directional communication is not available for the computer The bi directional communication is set to Enabled by factory default on the machine You ca...

Page 429: ...r on after powering the machine on Press the Job Status button to cancel printing Note Before powering the machine on make sure that the computer power has been on Refer to Checking Current Pending Jobs P 351 Unsatisfactory print quality A probable cause is an image defect Remedy the problem referring to Image Quality Trouble Refer to Image Quality Trouble P 431 Unable to print text correctly Text...

Page 430: ...e sheet over the document Is the document in the correct position Load the document correctly Refer to Step 1 Loading Documents P 54 Is the document loaded correctly Are the document guides on the document feeder in the correct positions Adjust the document guide positions Refer to Step 1 Loading Documents P 54 Is the document folded Unfold and correctly place the document Refer to Step 1 Loading ...

Page 431: ...ng Paper P 245 Is non standard paper loaded in the tray Replace with paper that meets machine specifications Refer to Paper Types P 242 or Loading Paper P 245 Is paper exceeding the maximum fill line in the tray Load paper in the paper tray so that it does not exceed the maximum fill line Refer to Loading Paper in the Trays 1 to 4 P 245 Are the paper guides set correctly Load the paper correctly a...

Page 432: ... paper clips or adhesive tape from the document before copying Are the document guides in the correct positions Adjust the document guide positions Refer to Step 1 Loading Documents P 54 Is a piece of torn paper remaining in the document feeder Open the document feeder cover and check inside Refer to Document Jams P 528 Is the Mixed Sized Originals setting set to On when you copy originals of diff...

Page 433: ...ensity or image quality Refer to Original Type Selecting the Document Type P 68 or Image Options Adjusting Copy Density Sharpness of images P 69 Is the document glossy printing paper Glossy printing paper easily sticks to the document glass and shadows are sometimes copied and shown as dirt Place a transparency film under the document when copying The copy has black lines Is the document glass on ...

Page 434: ... unclear Replace the paper with new one Refer to Loading Paper P 245 Is folded or wrinkled paper included in the tray Remove the improper paper or replace whole paper with new one Refer to Loading Paper P 245 Is the document pasted or folded There may be a gap between the document glass and the pasted or folded section Place a stack of white sheets on the document to remove the gap between the doc...

Page 435: ...lean the Constant Velocity Transport Glass Refer to Cleaning the Film and Constant Velocity Transport Glass P 420 Dirt appears at equal intervals The paper feeder is dirty Print a few pages to remove the dirt The drum cartridge has deteriorated or is damaged Replace the drum cartridge with a new one Refer to Replacing the Drum Cartridge for customers having a spot maintenance contract P 409 White ...

Page 436: ... maintenance contract P 409 High voltage power supply problem may have occurred Contact our Customer Support Center Nothing is printed Two or more sheets of paper are being fed simultaneously double feed Fan the paper well and load it again Refer to Loading Paper P 245 There is no toner left in the toner cartridge Replace the toner cartridge with a new one Refer to Replacing Consumables P 406 High...

Page 437: ... Refer to Loading Paper P 245 Paper has been added to the loaded paper The paper is damp White patches appear vertically The drum cartridge has deteriorated or is damaged Replace the drum cartridge with a new one Refer to Replacing the Drum Cartridge for customers having a spot maintenance contract P 409 There is no toner left in the toner cartridge Replace the toner cartridge with a new one Refer...

Page 438: ...ding Documents P 54 Cause The document guides are in incorrect positions Action Adjust the document guides to the document Refer to Step 1 Loading Documents P 54 Cause Part of a document is remaining in the document feeder Action Open the document feeder cover and remove the piece Refer to Document Jams P 528 Cause Documents of different sizes are loaded Action When loading documents of different ...

Page 439: ...too light select Text for Original Type Refer to Original Type Selecting the Document Type P 68 The copy is slightly misaligned Cause Paper is misaligned in the tray No Action Align the paper edges and adjust them with the tray s front corners to reload the paper Refer to Loading Paper P 245 Part of the image is missing on the copy Cause The paper is damp No Action If the paper is damp the copy im...

Page 440: ...ray 5 Bypass P 246 Unable to copy with the specified size Cause The document glass or the document cover is dirty No Action Clean the document glass or the document cover Refer to Cleaning the Document Cover and Document Glass P 419 Cause The document is a transparent type such as a transparency film Action Place a white sheet of paper over the original document when copying Cause The document is ...

Page 441: ...st Reduce Enlarge to make the copy smaller Documents are not stapled Cause The finisher is not attached Action A finisher is needed to perform stapling Attach the finisher or change the print option setting to cancel stapling Cause The number of pages to staple exceeds 50 Action A maximum of 50 pages can be stapled Reduce the number of pages to 50 or less ...

Page 442: ...eck the Print Mode on the Machine Status screen If Print Mode is set to Off line select On line Cause An error occurred with the machine Action Check the error details Cause The IP address or SMB network path is not correctly set Action Set the correct IP address or SMB network path Refer to the Network Administrator Guide for details Cause The network between the computer and machine is abnormal ...

Page 443: ...r less The 2 sided printing is not available Cause The Duplex Kit is not attached No Action The Duplex Kit is needed for 2 sided printing Attach the Duplex Kit or cancel stapling from the print option settings Cause The print page buffer is insufficient Action Add memory The document is printed with a different paper size Cause The document size is different from the paper size in the specified tr...

Page 444: ... printed with the high image quality the print speed becomes slow Select Normal for Print Mode The print option settings do not take effect Cause The print driver used is for another model No Action Install the print driver for this model Cause The required optional kit is not attached on the machine Action Check the options attached on the machine and set the configuration again Image edges are m...

Page 445: ...the on hook feature allows you to call through general lines Cause The phone dialing method is not available Action Specify the same dialing method as the subscribed one Tone 10pps for the machine Cause An error occurred with the phone line Action Use a telephone near the machine to check whether to be able to make a phone call If the phone call is disabled the problem is the phone line not the ma...

Page 446: ... destination machine has a problem Action Check it to the sender Note Image quality may be affected by a problem of the sender s machine as well as a problem of this machine The phone line has a problem Cause The phone line is not connected correctly No Action The machine equips some connectors to connect phone lines to The communication is disabled unless the phone line is connected to a correct ...

Page 447: ... the Start button Cause The document is not correctly loaded on the sender s machine Action Check it to the sender Note Image quality may be affected by a problem of the sender s machine as well as a problem of this machine The image quality is poor Cause The drum cartridge is damaged No Action Copy a document If the image quality is poor replace the drum cartridge with a new one Refer to Replacin...

Page 448: ... in the mailbox Cause The unregistered mailbox is specified on the mailbox selector feature Action When using the mailbox selector feature specify the registered mailbox If the unregistered mailbox is selected the received document cannot be stored in the mailbox and will be automatically printed For information on how to register the mailbox refer to Mailbox P 322 For information on the mailbox s...

Page 449: ...uments In addition the document feeder does not feed documents with tags paper clips or tape Refer to Step 1 Loading Documents P 172 Cause The document guides are in incorrect positions Action Adjust the document guides to the document Refer to Step 1 Loading Documents P 172 Cause Part of a document is remaining in the document feeder Action Open the document feeder cover and remove the piece Refe...

Page 450: ...ort data from the scanner due to a TWAIN transmission error Cause The scan driver is not installed No Action Install the scan driver Operation halts during scanning Cause The file size is too large No Action Lower the resolution and import again Refer to File Format Selecting a File Format for Output Data P 192 A Transmission Report Undelivered is output Cause Unable to transmit due to the error A...

Page 451: ...Check the Transmission Results in the Transmission Report Undelivered If the error code is listed refer to Error Code P 452 Unable to send e mail Cause The mail address is incorrect Action Enter the correct mail address Cause The data size exceeded the maximum e mail size Action Change the maximum e mail size or lower the resolution Refer to Maximum E mail Size P 316 or Scan Resolution Specifying ...

Page 452: ...s and the pasted or folded section Place a stack of white sheets on the document to remove the gap The image is not the desired size Cause The document glass or the document cover is dirty No Action Clean the document glass or the document cover Refer to Cleaning the Document Cover and Document Glass P 419 Cause The document is a transparent type such as a transparency film Action Place a white sh...

Page 453: ...Trouble during Scanning 451 Problem Solving 15 The image is coarse Cause The resolution is too low Action Set the resolution higher Refer to Scan Resolution Specifying a Scanning Resolution P 197 ...

Page 454: ...ttached on the machine Errors are classified into the following categories C Copy P Print F Fax S Scan M Mail O Others Error Code Category Cause and Remedy C P F S M O 002 770 O O Cause Unable to process the job template due to insufficient hard disk space Remedy Remove unnecessary data from the hard disk to increase free disk space 003 701 O O Cause A digital code is embedded in the document to r...

Page 455: ... O Cause Failed to compress the scanned document Remedy Reduce the resolution or the ratio for Reduce Enlarge to decrease the data size or split the data to send it separately 003 795 O Cause When enlarging reducing a scanned document to the specified paper size the reduction enlargement ratio value is out of allowed range Remedy Take one of the following actions z Manually enter a reduction enlar...

Page 456: ...Support Center 016 210 016 211 016 213 016 214 016 217 016 219 016 229 016 230 O Cause Software error Remedy Turn the machine off and on If the machine conditions are not improved by performing the relevant remedy contact our Customer Support Center 016 231 O Cause Image Expansion Kit may be broken or may not be installed correctly Remedy Turn the machine off and on If the error persists contact o...

Page 457: ...rvices if the user name and password used in the POP3 server are correct 016 513 O Cause A timeout occurred while the machine was waiting for a response from the SMTP server Remedy The server or network may be overloaded Wait for a while and try again If the error persists consult your network administrator 016 522 O Cause LDAP server SSL authentication error Unable to get an SSL client certificat...

Page 458: ...the summer time and the time zone as well on the machine and Kerberos server 016 534 O Cause Kerberos server authentication protocol error Remedy The realm set on the machine does not exist on the Kerberos server or the Kerberos server address set on the machine is invalid for connection Check if the realm name and the server address have been correctly set on the machine For connection to Windows...

Page 459: ...saved in the FTP server after connection Remedy Check if the FTP server s save location is correct 016 580 O Cause The machine failed to transfer data using FTP of the Scan to PC feature because the file or folder name on the FTP server could not be retrieved after connection Remedy Check the access privilege to the FTP server 016 581 O Cause The machine failed to transfer data using FTP of the Sc...

Page 460: ...of the Scan to PC feature because lock folder deletion was not successful on the FTP server after connection Remedy Take one of the following actions zCheck the access privilege to the FTP server z If any lock directory LCK exists in the forwarding destination delete it manually then retry executing the job 016 587 O Cause The machine failed to transfer data using FTP of the Scan to PC feature bec...

Page 461: ...e Scan to PC feature was cancelled after connection to the FTP server because the same file or folder name existed Remedy Make sure that the multiple machines are not accessing the same folder on the server then try again If the error persists contact our Customer Support Center 016 700 O Cause The job was suspended because the number of the digits for the Security Print or Charge Print passcode s...

Page 462: ...use 1 You have specified the mailbox registry for the scanned document to the machine However optional Scanner Kit is not installed 2 You have not used the print driver for this machine 3 The machine received a Secure Print Mailbox Print Charge Print or Private Print job with no HDD Extension Kit installed Remedy For 1 press the All Services button and check if Scan to PC is displayed If Scan to P...

Page 463: ...o the mailbox Remedy Input the correct passcode 016 714 O Cause The specified mailbox does not exist Remedy Create a new mailbox or specify an existing mailbox 016 716 O Cause Unable to spool TIFF file due to insufficient hard disk space Remedy Remove unnecessary documents and users from the machine and then attach the hard disk For information on attaching the hard disk contact our Customer Suppo...

Page 464: ...try to print again 016 723 O Cause The specified punch position or the specified paper size is not supported in the finisher Remedy Check the punch position and the paper size and try to print again 016 724 O Cause The specified staple and punch position combination is unsupported Remedy Specify the staple and punch positions to be on the same side and try to print again 016 725 O Cause A scanned ...

Page 465: ...e to obtain the IP address the string after in the destination e mail address when sending e mail 2 Unable to resolve the Internet address the string after by the DNS server when sending e mail Remedy For Cause 1 Check the e mail address For Cause 2 Check the DNS server address 016 735 O O Cause Attempted to print Job Template List while updating the job template Remedy Retry printing after waitin...

Page 466: ...ication usage and print instruction are correct check with the application manufacturer for operations of the application If the problem persists have a printer settings list a job history report and the print data with the printing job ticket ready and contact our Customer Support Center 016 751 O Cause 1 During the PDF Bridge processing one of the following occurred a syntax or parameter error o...

Page 467: ...to On 016 762 O Cause The specified print language is not installed on the machine Remedy In Specify Print Mode under Port Settings specify another print language 016 763 O Cause Connection error to the POP server Remedy Check if the IP address of the POP server is correctly set on the machine 016 764 O Cause Unable to connect to the SMTP server Remedy Contact the SMTP server administrator 016 765...

Page 468: ... of the following actions zCheck if the certificate is valid zSet the correct date and time on the machine 016 777 O Cause A hard disk error occurred during image processing Remedy The hard disk may be defective For replacing the hard disk contact our Customer Support Center 016 778 O Cause The scanned image conversion processing was interrupted due to insufficient disk space Remedy Remove unneces...

Page 469: ...owser Remedy Take one of the following actions and try again z Reload the browser page z Restart the browser zTurn the machine off and on 016 792 O Cause Failed to get the job history report specified in Job Counter Report Remedy The specified job history does not exist 016 793 O Cause Free space is insufficient on the hard disk Remedy Either remove unnecessary data from the hard disk to increase ...

Page 470: ... machine z When the destination computer is Macintosh specify a user who is permitted to use Windows Sharing Important The password cannot be retrieved If you have forgotten the password reset the password z To reset the password z 1 Select Start Programs Administrative Tools Active Directory Users and Computers on the Active Directory domain controller where the user information is set z 2 Displa...

Page 471: ...aused by the Address Book operation The server returned RFC2251 Result Message No 3 timelimit exceeded for Address Book query Remedy Change the search conditions start position to narrow the range of search area and try again If the problem persists check with your network administrator 018 704 O Cause LDAP server protocol error caused by the Address Book operation The server returned RFC2251 Resu...

Page 472: ...aused by the Address Book operation The server returned RFC2251 Result Message No 12 unavailable extension for Address Book query Remedy Have the network administrator check the operational status of the server 018 713 O Cause LDAP server protocol error caused by the Address Book operation The server returned RFC2251 Result Message No 13 confidentiality required for Address Book query Remedy Have ...

Page 473: ...dress does not exist Check the e mail address you entered and the e mail address registered on the LDAP server 018 733 O Cause LDAP server protocol error caused by the Address Book operation The server returned RFC2251 Result Message No 33 incorrect alias for Address Book query Remedy The LDAP server has a Name problem Have the network administrator check the LDAP server status 018 734 O Cause LDA...

Page 474: ... server protocol error caused by the Address Book operation The server returned RFC2251 Result Message No 51 busy for Address Book query Remedy The service has a problem Retry after waiting for a while If the problem persists check with your network administrator 018 752 O Cause LDAP server protocol error caused by the Address Book operation The server returned RFC2251 Result Message No 52 unavail...

Page 475: ...age No 68 already exists for Address Book query Remedy The LDAP server has an Update problem Have the network administrator check the LDAP server status 018 769 O Cause LDAP server protocol error caused by the Address Book operation The server returned RFC2251 Result Message No 69 no object class modifications for Address Book query Remedy The LDAP server has an Update problem Have the network adm...

Page 476: ...the network administrator check the LDAP server status 018 785 O Cause LDAP server protocol error caused by the Address Book operation The server returned RFC2251 Result Message No 85 timeout for Address Book query Remedy Change the search conditions start position to narrow the range of search area and try again If the problem persists check with your network administrator 018 786 O Cause LDAP se...

Page 477: ...t Message No 93 no results returned for Address Book query Remedy Have the network administrator check the LDAP server status 018 794 O Cause LDAP server protocol error caused by the Address Book operation The server returned RFC2251 Result Message No 94 no more results for Address Book query Remedy Have the network administrator check the LDAP server status 018 795 O Cause LDAP server protocol er...

Page 478: ...new one For information on how to replace the staple cartridge for booklet refer to Replacing the Staple Cartridge for Booklet When a C Finisher with Booklet Maker is Installed P 415 026 700 O Cause By Address Book operation the machine received an unsupported protocol from the LDAP server Remedy Try again If the problem persists contact our Customer Support Center 026 701 O Cause The number of qu...

Page 479: ... same name as the specified file name may exist on the server Remedy Change the settings so that a file or a folder can be read and written at the save location When the server is Macintosh change the folder name on the server or the file name to be transferred 027 514 O Cause The machine failed to transfer data using SMB of the Scan to PC feature because the machine could not resolve the host nam...

Page 480: ...nd check if the server address can be resolved correctly z For Windows NT 4 0 Server Workstation use the following steps to see if the NetBIOS interface device is activated on the destination SMB server 1 Select Start Settings Control Panel 2 Display Services then select Messenger service 3 Select Startup Auto OK then select Close 4 Select Devices in the Control Panel then select NetBIOS Interface...

Page 481: ... the transfer using SMB of the Scan to PC feature the file name or folder name could not be retrieved Remedy Check the access privilege to the SMB server 027 521 O Cause During the transfer using SMB of the Scan to PC feature the suffix of the file name or folder name exceeded the limit on the SMB server Remedy Change the file name or destination folder on the SMB server Or move or delete the file...

Page 482: ...owing reasons z The file does not exist z The directory is not empty z The specified directory name does not exist Remedy If any lock directory LCK exists in the forwarding destination manually delete it and then try again 027 527 O Cause During the transfer using SMB of the Scan to PC feature a folder could not be deleted from the SMB server due to one of the following reasons zThe file does not ...

Page 483: ...nvalid character was detected in the specified domain name Remedy If the error occurred during SMB authentication Check with the network administrator for the domain name then re configure correctly Also check if the domain name set on the machine is correct using the following procedure 1 Enter the System Administration mode and select System Settings System Settings Network Settings Remote Authe...

Page 484: ... has been established via a network For example check the following points z Network cable connection z TCP IP settings zConnection via Port 137 UDP Port 138 UDP Port 139 TCP 027 565 O Cause SMB protocol error Remedy Try again If the problem persists contact our Customer Support Center 027 566 O Cause SMB protocol error SMB TCP IP is not active Remedy Check on CentreWare Internet Services that SMB...

Page 485: ...l error Remedy Try again If the problem persists contact our Customer Support Center 027 702 O O Cause A certificate for addresses does not exist Remedy Register a certificate to the machine 027 703 O O Cause The certificate for addresses has expired Remedy Register a valid certificate to the machine 027 704 O O Cause The CA certificate for the specified Address Book does not exist Remedy Check th...

Page 486: ... not identical and ask to send the e mail again 027 715 O Cause The received S MIME certificate has not been registered on the machine or has not been set to use on the machine Remedy Import the sender s S MIME certificate to the machine or change settings to use the S MIME certificate on the machine when the S MIME certificate has already been registered 027 716 O Cause The received S MIME certif...

Page 487: ...ached to the SMTP mail is more than the maximum number of pages allowed for the Split Send feature Remedy Reduce the number of the document pages and try again 027 737 O O Cause An error occurred while reading data from the job template pool server Remedy Check to see whether you have privileges for the directory which stores the job template 027 739 O O Cause Unable to find the specified job temp...

Page 488: ...values to the mandatory fields of the job flow 027 753 O Cause 1 Attempted to execute the service while the port necessary for the job flow is either deactivated or disabled 2 Attempted to execute a job flow to send e mail using the encryption or digital signature feature while S MIME communication is disabled Remedy For Cause 1 Have your System Administrator check the port status For Cause 2 Enab...

Page 489: ...Address Host Name If the error persists check with your network administrator whether the SMTP server supports the HELO command 027 773 O Cause An error occurred during communication with the SMTP server Remedy Wait for a while and try again 027 774 O Cause The specified e mail address contains unsupported characters Remedy Specify the e mail address using ASCII characters 027 775 O Cause Too many...

Page 490: ...to be sent by polling was deleted Remedy Store the document again 033 712 O Cause Unable to process due to insufficient memory Remedy Remove unnecessary data 033 713 O Cause An error occurred during fax transmission Remedy Contact our Customer Support Center 033 716 O Cause The mailbox specified from the sender s machine does not exist Remedy Register the mailbox Refer to Mailbox P 322 033 717 O C...

Page 491: ...30 O Cause An error occurred during fax communication Remedy Power cycle the machine If the problem persists contact our Customer Support Center 033 731 O Cause The print job for the received fax document was interrupted Remedy The Auto Print processing of the received fax document was interrupted by a manual print operation No operation is necessary 033 733 O Cause An error occurred during fax tr...

Page 492: ... Support Center 033 747 O Cause The job is in pending status Remedy No operation is necessary 033 749 O Cause The machine will automatically resume and print out Remedy No operation is necessary 033 750 O Cause An error occurred during fax transmission Remedy Turn the machine off and on If the machine conditions are not improved by performing the relevant remedy contact our Customer Support Center...

Page 493: ...ur Customer Support Center 034 511 O Cause A document for relay broadcasting cannot be transmitted Remedy Select Address Book to print an address list and check if the relay station is correctly registered If the registered address is incorrect modify it Check also the contents of the address number registered at the relay station For information on Relay Broadcast refer to Relay Broadcast Transmi...

Page 494: ...Check the sizes of paper loaded on the machine zCheck if the paper trays are correctly inserted 034 530 O Cause Operation time out Remedy Operate within a specified time 034 700 034 701 O Refer to 034 521 034 702 O Cause Unable to transmit because the number is not registered in Address Number Remedy Check if the number registered in Address Number is correct and try again 034 703 034 704 034 705 ...

Page 495: ...er to 034 508 034 752 O Cause The destination machine is busy Remedy Retry after waiting for a while 034 753 O Cause The destination machine does not respond Remedy Check the phone number and try again 034 754 O Cause The destination machine does not respond Remedy Check if the destination machine is ready to receive a fax and try again 034 755 O Cause Unable to communicate due to an incorrect pho...

Page 496: ...034 783 O Cause An error occurred during fax transmission Remedy Check the settings and the phone number and send the fax again 034 784 O Cause Unable to communicate due to an incorrect phone number Remedy Check the phone number and try again If DP dial pulse is used for G3 check that and are not included in the phone number 034 785 034 786 034 787 034 788 034 789 O Refer to 034 508 034 790 034 79...

Page 497: ... to check the condition of the machine and the fax number and then try again 035 707 O Cause The received document has an incorrect or no password Remedy No operation is necessary This error is just to notify that the machine received such a document 035 708 035 709 035 710 035 711 O Cause The destination machine may have a problem Remedy Call the destination to check the condition of the machine ...

Page 498: ...e does not have the specified feature Remedy Check if the fax number is correct and the destination machine has the specified feature and then try again 035 726 O Cause Communication error Remedy For sending error check the destination phone number check also if the destination machine has the feature you specified and then try again For receiving error ask the sender to try again 035 727 035 728 ...

Page 499: ... was re dialed the specified number of times but the destination machine did not respond Remedy Ask the recipient if the telephone line and telephone switchboard for the destination machine are defective 035 750 O Refer to 034 508 035 751 035 752 O Cause The dialing or transmission was interrupted by the Stop button Remedy No action is necessary 035 753 O Cause Memory became insufficient when atte...

Page 500: ...036 531 036 532 036 533 036 534 036 535 036 536 036 537 036 538 036 539 036 540 036 541 036 542 036 700 036 701 036 702 036 703 036 704 036 705 036 706 036 707 036 708 036 709 036 710 036 711 O Refer to 034 508 Error Code Category Cause and Remedy C P F S M O If the error persists after following the listed solution contact our Customer Support Center The contact number is printed on the label or ...

Page 501: ...735 036 736 036 737 036 738 036 739 036 740 036 741 036 742 036 743 036 744 036 745 036 746 036 747 036 748 036 749 036 750 036 751 036 752 036 753 036 754 036 755 036 756 036 757 036 758 O Refer to 034 508 Error Code Category Cause and Remedy C P F S M O If the error persists after following the listed solution contact our Customer Support Center The contact number is printed on the label or card...

Page 502: ...enter 036 788 036 789 O Cause The machine sent a polling request but the destination machine does not have target documents Remedy Call the destination to check the condition and try again 036 790 036 791 O Cause Unable to communicate due to incorrect operation Remedy Refer to this User Guide to operate the machine correctly 036 792 036 793 O Refer to 034 508 036 795 O Cause The destination machin...

Page 503: ...rror persists contract our Customer Support Center 047 216 O Cause The finisher is defective Remedy Power cycle the machine If the error persists contract our Customer Support Center 047 218 O Cause An error occurred in a paper tray unit Remedy Power cycle the machine If the error persists contract our Customer Support Center 062 210 O Cause Document feeder malfunction Remedy Contact our Customer ...

Page 504: ...t Center 077 213 O Cause A different type of Duplex Kit is attached Remedy Contact our Customer Support Center 112 700 O Cause The finisher s hole punch container is full Remedy Empty the hole punch container For more information refer to Emptying the Hole Punch Container When C Finisher or C Finisher with Booklet Maker is Installed P 416 116 324 O Cause An error occurred on the machine Remedy Tur...

Page 505: ...y Decrease the paper margin value and try again 116 748 O Cause There is no plot data in the HP GL 2 print data Remedy Check the print data 116 749 O Cause The job was cancelled because the specified font does not exist Remedy Install the font or set the font replacement on the print driver 116 752 O Cause The descriptions of the PDF printing job ticket have a problem Remedy Try again If the probl...

Page 506: ...y due to the malfunction of the specified Finisher tray Remedy Contact our Customer Support Center Any trays other than the defective output tray can be used 124 704 O Cause The output destination was changed to the center tray due to the malfunction of the specified output tray Remedy Contact our Customer Support Center Any trays other than the defective output tray can be used 124 705 O Cause Th...

Page 507: ... 5x13 SEF 8 5x14 SEF 11x17 SEF 8 5x11 LEF 5 5x8 5 SEF zUse the printable paper type for printing the received fax document plain paper recycled paper side 2 paper user defined custom paper zCheck the settings by selecting System Settings Fax Mode Settings Fax Control Receiving Paper Size 1 Select Receiving Paper Size Tray Mode to add the tray to be used for printing the received fax documents 2 Se...

Page 508: ...cord the displayed contents for xxx yyy Switch off the machine immediately wait for the touch screen to go dark and contact our Customer Support Center Completed with an error xxx yyy O O O O O O Cause An error occurred Remedy Retry the same procedure after waiting for a period A fault has occurred The machine has rebooted Select Close If the problem persists call for service xxx yyy O O O O O O C...

Page 509: ... Paper Jam in Bottom Left Cover B 511 Paper Jams in Bottom Left Cover C 512 Paper Jams in Top Cover E 513 Paper Jams in the Duplex Kit 514 Paper Jams in Trays 1 to 4 515 Paper Jams in the Tandem Tray Module 515 Paper Jams in Tray 5 Bypass 516 Paper Jams in the B Finisher 517 Paper Jams in the C Finisher C Finisher with Booklet Maker 518 Important If a paper jam occurs and you pull out a paper tray...

Page 510: ...rs A1 and A2 for clearing paper jams When using green lever A1 508 When using green lever A2 509 When using green lever A1 1 Open Tray 5 Bypass 2 If the Side Tray optional is attached remove paper from the Side Tray Note If opened with the paper loaded on the Side Tray Cover A will not be easily folded up when closed 3 Lift up the lever on the upper right side of Cover A and open Cover A 4 If the ...

Page 511: ...ow Note If the paper is torn check for any torn pieces inside the machine 7 Push the center section of Cover A and firmly close Cover A 8 Close Tray 5 Bypass When using green lever A2 1 Open Tray 5 Bypass 2 If the Side Tray optional is attached remove paper from the Side Tray Note If opened with the paper loaded on the Side Tray Cover A will not be easily folded up when closed ...

Page 512: ...er Unit push down green lever A2 in the direction of the arrow to open the Fuser Unit cover 5 If paper is jammed inside the Fuser Unit gently remove the paper while holding down green lever A2 Note If the paper is torn check for any torn pieces inside the machine 6 Push the center section of Cover A and firmly close Cover A 7 Close Tray 5 Bypass ...

Page 513: ...ever on the right side of Cover B and open Cover B 2 Remove the jammed paper Note If paper is jammed at the upper position it may be invisible Check inside thoroughly If paper is torn check for any torn pieces of paper inside the machine 3 Press the center section of Cover B and firmly close Cover B Note Be sure to press the center section of the cover ...

Page 514: ...the lever on the right side of Cover C and open Cover C 2 Remove the jammed paper Note If paper is jammed at the upper position it may be invisible Check inside thoroughly If paper is torn check for any torn pieces of paper inside the machine 3 Press the center section of Cover C and firmly close Cover C Note Be sure to press the center section of the cover ...

Page 515: ... Tray Note If opened with the paper loaded on the Side Tray Cover A will not be easily folded up when closed 3 Lift up the lever on the upper right side of Cover A and open Cover A 4 Lift up the handle to open Top Cover E 5 Remove the jammed paper Note If paper is torn check for any torn pieces of paper inside the machine 6 Close Top Cover E 7 Press the center section of Cover A and firmly close C...

Page 516: ...ng describes how to clear paper jams in the Duplex Kit 1 Open Tray 5 Bypass 2 Lift up the lever on the upper right side of Cover D and unlock the cover 3 Open Cover D 4 Remove the jammed paper Note If paper is torn check for any torn pieces of paper inside the machine 5 Close Cover D 6 Close Tray 5 Bypass ...

Page 517: ...alfunction Identify where the paper jam occurred first 2 Remove the jammed paper Note If paper is torn check for any torn pieces of paper inside the machine 3 Push the tray in gently until it comes to a stop Paper Jams in the Tandem Tray Module This section describes how to clear paper jams in the optional Tandem Tray Module The following explains how to remove jammed paper from the locations belo...

Page 518: ...ntly until it comes to a stop Paper Jams in Tray 5 Bypass The following describes how to clear paper jams in Tray 5 Bypass 1 Check the feed slot of Tray 5 Bypass to remove the jammed paper Important When two or more sheets of paper are loaded remove all the sheets from the tray Note If paper is torn check for any torn pieces of paper inside the machine 2 Fan the paper you removed making sure that ...

Page 519: ...Jams under Top Cover F of the Finisher Transport 517 Paper Jams under the Top Cover of the B Finisher 1 Press the button on the top cover of the finisher 2 The top cover opens 3 Remove the jammed paper Note If paper is torn check for any torn pieces of paper inside the machine 4 Close the top cover Paper Jams under Top Cover F of the Finisher Transport 1 Open Top Cover F on the finisher transport ...

Page 520: ...inisher Transport 519 Paper Jams at 2a in the Finisher 519 Paper Jams at 2a in the Finisher Using Wheel 2c 520 Paper Jams at 2b in the Finisher 522 Paper Jams at 2b in the Finisher Using Wheel 2c 522 Paper Jams at 3 in the Finisher 523 Paper Jams at 5 in the Finisher 524 Paper Jams at 4a in the Finisher For C Finisher with Booklet Maker 524 Paper Jams at 4b in the Finisher For C Finisher with Book...

Page 521: ...isible at the right side proceed to Step 3 Note If paper is torn check for any torn pieces of paper inside the machine 3 Gently remove the paper to the left Note If paper is torn check for any torn pieces of paper inside the machine 4 Close the top cover of the finisher transport Paper Jams at 2a in the Finisher 1 If the edge of the jammed paper comes out from the exit of the output tray gently pu...

Page 522: ...Lever 2a to its original position 6 Close the front cover of the finisher Note If you do not completely close the front cover the machine will display a message and not resume operation Paper Jams at 2a in the Finisher Using Wheel 2c 1 If the edge of the jammed paper comes out from the exit of the output tray gently pull out the paper to remove ...

Page 523: ...right 4 Turn Wheel 2c in the direction of the arrow to eject the jammed paper 5 Gently remove the paper 6 Return Lever 2a to its original position 7 Close the front cover of the finisher Note If you do not completely close the front cover the machine will display a message and not resume operation ...

Page 524: ...d then remove the jammed paper 3 Return Lever 2b to its original position 4 Close the front cover of the finisher Note If you do not completely close the front cover the machine will display a message and not resume operation Paper Jams at 2b in the Finisher Using Wheel 2c 1 Open the front cover of the finisher 2 Move Lever 2b to the right 2b 2b ...

Page 525: ... the paper 5 Return Lever 2b to its original position 6 Close the front cover of the finisher Note If you do not completely close the front cover the machine will display a message and not resume operation Paper Jams at 3 in the Finisher 1 Open the front cover of the finisher 2 Pull down Lever 3 3 Remove the jammed paper ...

Page 526: ...the front cover the machine will display a message and not resume operation Paper Jams at 5 in the Finisher 1 Open finisher s Exit Cover 5 upward 2 Gently remove the jammed paper to the right 3 Return Exit Cover 5 to its original position Paper Jams at 4a in the Finisher For C Finisher with Booklet Maker 1 Open the front cover of the finisher 2 Pull out Unit 4 ...

Page 527: ...ition 5 Close the front cover of the finisher Note If you do not completely close the front cover the machine will display a message and not resume operation Paper Jams at 4b in the Finisher For C Finisher with Booklet Maker 1 Open the front cover of the finisher 2 Move Lever 4b to the left 3 Remove the jammed paper if there is ...

Page 528: ...sition 7 Return Lever 4b to its original position 8 Close the front cover of the finisher Note If you do not completely close the front cover the machine will display a message and not resume operation Paper Jams in the Booklet Tray For C Finisher with Booklet Maker 1 Open the front cover of the finisher 2 Turn Wheel 4a to the right to eject the paper to the booklet tray ...

Page 529: ... Jams 527 Problem Solving 15 3 Remove the jammed paper 4 Close the front cover of the finisher Note If you do not completely close the front cover the machine will display a message and not resume operation ...

Page 530: ... the document 3 If the massage on the screen instructs you to turn the wheel turn the green wheel to eject the document upward Important If the document is caught do not pull it out forcibly The document could be damaged 4 If the message on the screen instructs you to open the inner cover lift up the lever with the green label attached and open the inner cover 5 Turn the green wheel to eject the d...

Page 531: ...ot torn wrinkled or folded and load the document again following the instructions displayed on the touch screen Note After removing the jammed document reload the entire document including the pages already scanned The machine will automatically skip the scanned pages and start scanning unscanned pages Torn wrinkled or folded documents may cause document jams and damage To copy such documents dire...

Page 532: ... copies are not stapled or staples are bent Contact our Customer Support Center if the problem persists after you have tried the following solutions If copies are stapled as shown in the figures below contact our Customer Support Center Unstapled Bent staple One side of staple rising up Staple bent in reverse direction Flattened staple Entire staple rising up Staple rising up with center pressed i...

Page 533: ...sure that the machine has stopped and open the front cover of the finisher 2 Grip the lever as shown in the figure to pull out the staple cartridge to the right towards you 3 Move up the staple cartridge and take it out of the machine 4 After removing the staple cartridge check inside of the finisher for any remaining staples CAUTION Be careful in removing jammed staples ...

Page 534: ...7 Pull down the front lever on the staple cartridge until you hear it click into place 8 Return the staple cartridge to its original position and pull the lever down until you hear it click into place 9 Close the front cover of the finisher Note If you do not completely close the front cover the machine will display a message and not resume operation If you cannot remove jammed staples even after ...

Page 535: ... open the front cover of the finisher 2 Grip Lever R1 of the staple cartridge holder and pull out the holder to the right towards you 3 Take out the staple cartridge holder by gripping the orange lever Note The staple cartridge is firmly inserted When taking the staple cartridge out of the machine strongly pull it out 4 After removing the staple cartridge check the inside of the finisher for any r...

Page 536: ... the machine will display a message and not resume operation If you cannot remove jammed staples even after you use the above procedure contact our Customer Support Center Staple Jams in the Booklet Staple Cartridge For C Finisher with Booklet Maker The following describes how to clear staple jams in the booklet staple cartridge for C Finisher with Booklet Maker optional 1 Make sure that the machi...

Page 537: ...t and right tabs return the cartridge to its original position and then gently push the cartridge in until you hear it click into place 6 Return the unit to its original position 7 Close the front cover of the finisher Note If you do not completely close the front cover the machine will display a message and not resume operation If you cannot remove jammed staples even after you use the above proc...

Page 538: ......

Page 539: ...rictions optional components and printer emulation languages z Specifications 538 z Printable Area 547 z ESC P K Emulation 548 z PDF Direct Print 562 z PCL Emulation 564 z HP GL2 Emulation 567 z Optional Components 581 z Notes and Restrictions 583 z Using the Telephone 591 z Simple Operating Procedures 593 ...

Page 540: ... Copy sheet size Trays 1 4 Maximum A3 297 x 420 mm Tabloid 11 x 17 Minimum A5 148 x 210 mm Bypass tray Maximum A3 297 x 420mm Tabloid 11 x 17 Minimum Postcard 100 x 148 mm Envelope 120 x 235 mm Non standard size X direction 99 to 432 mm Y direction 89 to 297 mm When copying both sides of non standard size paper specify the size within the range from 127 to 432 mm for the X direction and from 89 to...

Page 541: ... 1 4 Continuous 1 sided copy same magnification A4 B5 A5 45 sheets minute A4 B5 32 sheets minute B4 29 sheets minute A3 24 sheets minute z Paper Tray 1 4 Continuous 2 sided copy same magnification A4 B5 A5 45 sheets minute A4 B5 32 sheets minute B4 18 sheets minute A3 16 sheets minute When paper is fed from Tray 5 Bypass and the paper size is set to Auto Size Detect the printing speed for the firs...

Page 542: ...led Approx 500 sheets A4 Side Tray optional Approx 100 sheets A4 1When Exit 2 Tray is installed Exit 2 tray is displayed as Center output tray upper 2When Exit 2 Tray is installed Center output tray is displayed as Center output tray lower Important When using Xerox P paper Power source 110 120 V AC 220 240 V AC Power consumption Maximum power consumption 1 50 KVA 110 VAC 1 44 KVA 120 VAC 1 76 KVA...

Page 543: ...stems PCL6 Microsoft Windows 2000 Microsoft Windows XP Microsoft Windows Server 2003 Microsoft Windows VistaTM PostScript Microsoft Windows 2000 Microsoft Windows XP Microsoft Windows Server 2003 Microsoft Windows VistaTM Mac OS 7 5 3 Mac OS 9 2 2 English Mac OS X 10 2 x 10 3 9 10 4 10 4 9 English Note For information about the latest supported OS s contact our Customer Support Center Built in fon...

Page 544: ... about the latest supported OS s contact our Customer Support Center Scan to PC Supported protocol TCP IP SMB FTP Supported OS SMB Microsoft Windows 2000 Microsoft Windows XP Microsoft Windows Server 2003 Microsoft Windows VistaTM Mac OS X 10 2 x 10 3 x 10 4 x FTP Microsoft Windows 2000 Microsoft Windows NT 4 0 Microsoft Windows XP Microsoft Windows Server 2003 Microsoft Windows VistaTM Mac OS X 1...

Page 545: ...le line PSTN PBX G3 maximum 3 lines Sending document size A3 B4 A4 Communication speed Same as the fax feature Resolution Standard 200 100 dpi 7 9 3 9 dots mm Fine 200 200 dpi 7 9 7 9 dots mm Super fine 400 400 dpi 15 7 15 7 dots mm 600 600 dpi 23 6 23 6 dots mm Applicable line Same as the fax feature Supported operating systems Microsoft Windows 2000 Microsoft Windows XP Microsoft Windows Server ...

Page 546: ...uCentre II 5010 4000 Width 1 538 x Depth 668 mm main unit B Finisher ApeosPort II 5010 4000 3000 Width 1 538 x Depth 678 mm main unit B Finisher Tray type Output tray 1 Collated Uncollated Finisher tray 1 Collated offset stacking available Uncollated offset stacking available Paper size Supported paper Output tray Maximum A3 11x17 Minimum B5 56 216g m2 Finisher tray Maximum A3 11x17 Minimum B5 56 ...

Page 547: ...16 g m2 Booklet tray Maximum A3 11x17 Minimum A4 64 90 g m2 Important Transparencies and labels are not supported Tray capacity Output tray 500 sheets Finisher tray For paper not stapled Width 216 mm or smaller 1 500 sheets Width larger than 216 mm 1 500 sheets Mixed stack 300 sheets Finisher tray For paper stapled Width 216 mm or smaller 200 sets or 1 500 sheets Width larger than 216 mm 100 sets ...

Page 548: ...ht 1 058 0mm 81 kg When the extension tray is extended Space requirements when connected to the main unit DocuCentre II 4000 3000 Width 1 805 x Depth 672 mm Main unit C Finisher when Bypass Tray is fully extended ApeosPort II 5010 4000 3000 Width 1 805 x Depth 678 mm Main unit C Finisher when Bypass Tray is fully extended ...

Page 549: ...r control language Extended Printable Area With the extended printable area setting the printable area can be extended to 297x432 mm at a maximum The un printable area however may vary depending on the size of paper Note To extend the print area change the PCL print driver setting or the Print Area setting on the touch screen For the setting method on the print driver refer to the online help prov...

Page 550: ...lation Different host interfaces support different printer languages The host interfaces that support printer languages are as follows z Parallel port z NetWare port z lpd port z SMB port z IPP port z Port 9100 port Switching between Printer Languages The machine provides a multi emulation feature that allows to switch between different printer languages There are three methods of switching betwee...

Page 551: ...storing user defined characters and other user defined data can be set on the control panel This value is retained after the machine is switched off User defined characters are registered as bitmap fonts and cannot be shared among different printer languages Font Caching To ensure high speed printing outline fonts of up to a certain size are cached Outline fonts are converted into bitmap data temp...

Page 552: ...ESC P K Emulation Settings The following tables show the basic and extended settings that can be configured on the ESC P K emulation mode menu Basic Settings Setting Item Item Number Value Paper tray 3 Sets the paper tray to be used for printing 0 Auto 1 Default Tray 1 2 Tray 2 3 Tray 3 4 Tray 4 5 Tray 5 Bypass If printing from Tray 5 Bypass instruct printing and then operate the machine to start ...

Page 553: ... and will be printed in a scale of 100 When 2 Up is selected the machine automatically calculates the magnification based on Original Size and 1 2 of Paper Size The orientation set here is that of the original It is not affected by the orientation of paper loaded in the paper trays Orientation 19 Sets the orientation of paper 0 Default Portrait 1 Landscape Paper size 2 Sets the size of paper to be...

Page 554: ...0 Also if 2 Up is selected the original will be reduced to the size where two pages fit into one sheet of paper Variable is a magnification set in Variable under Reduce Enlarge A reference point for scaling reducing enlarging is the upper left corner of the printable area This reference point applies to all text images and graphics Fit to Cut Sheet prints the entire cut sheet area to the printable...

Page 555: ...rif Important Since this feature selects the default value its setting will not be affected when an extended command is received Print control 51 Blank sheet output Sets whether to print blank pages if included in the original 0 Default Off 1 On Note Even when Off is selected blank pages will be printed if they are spaces created with user defined characters or images in white color If Off is sele...

Page 556: ...ts the action to be performed when a CR command is received 0 Default Carriage return 1 Carriage return and linefeed Position adjustment 15 Vertical position adjustment Adjusts the printing position vertically or horizontally and changes the positions of the margins 0 Default Off 1 500 250 to 250 mm Important Data outside the printable area will not be printed even when the printing position is ad...

Page 557: ...Top Double 3 Top Right 4 Left Double 5 Right Double 6 Bottom Left 7 Bottom Double 8 Bottom Right Bypass Tray Wait User 67 Sets whether to suspend the print processing when feeding paper from Bypass Tray The processing is resumed by a user operation on the machine Hole punching 69 Sets the hole punching position 0 Default Off 1 Top 2 Bottom 3 Left 4 Right Number of holes 70 Sets the number of punch...

Page 558: ...ge 164 116 81 143 100 156 120 120 120 53 11 x 17 Long edge 97 68 48 84 59 100 82 76 64 100 Short edge 106 74 51 92 64 100 77 77 77 100 8 5 x 14 Long edge 119 83 58 102 72 122 100 93 78 100 Short edge 139 97 67 120 84 131 100 100 100 100 8 5 x 13 Long edge 128 90 63 111 77 132 108 100 84 100 Short edge 139 97 67 120 84 131 100 100 100 100 8 5 x 11 Long edge 152 106 74 131 92 156 128 119 100 100 Sho...

Page 559: ... 83 83 83 100 Short edge 116 80 55 100 69 120 98 90 76 100 11 x 17 Long edge 68 48 100 59 100 64 49 49 49 100 Short edge 74 51 100 64 100 77 62 58 48 100 8 5 x 14 Long edge 83 58 100 72 50 78 60 60 60 100 Short edge 97 67 100 84 57 100 82 75 63 100 8 5 x 13 Long edge 90 63 100 77 54 84 64 64 64 100 Short edge 97 67 100 84 57 100 82 75 63 100 8 5 x 11 Long edge 106 74 51 92 64 100 77 77 77 100 Shor...

Page 560: ...110 76 136 95 149 114 114 114 50 11 x 17 Long edge 95 67 47 82 57 98 80 74 63 100 Short edge 103 72 50 89 62 97 74 74 74 100 8 5 x 14 Long edge 116 81 57 100 70 119 98 90 76 100 Short edge 133 93 64 115 80 125 96 96 96 100 8 5 x 13 Long edge 125 87 61 108 75 128 105 97 82 100 Short edge 133 93 64 115 80 125 96 96 96 100 8 5 x 11 Long edge 147 103 72 127 89 151 124 115 97 100 Short edge 133 93 64 1...

Page 561: ... 54 97 67 105 81 81 81 100 Short edge 110 76 53 95 65 114 93 86 72 100 11 x 17 Long edge 67 47 100 57 100 63 48 48 48 100 Short edge 72 50 100 62 100 74 60 56 47 100 8 5 x 14 Long edge 81 47 100 70 49 76 58 58 58 100 Short edge 93 50 100 80 55 96 78 72 61 100 8 5 x 13 Long edge 87 61 100 75 52 82 63 63 63 100 Short edge 93 64 100 80 55 96 78 72 61 100 8 5 x 11 Long edge 103 89 100 89 72 97 74 74 7...

Page 562: ...ding on the hardware configuration Paper Size Portrait Landscape Characters Lines Characters Lines A3 113 92 161 63 B4 97 78 139 53 A4 79 63 113 42 B5 68 53 97 35 A5 54 42 79 27 Postcard 35 30 54 19 11 x 17 106 94 166 58 8 5 x 14 81 76 136 43 8 5 x 13 81 70 126 43 8 5 x 11 81 58 106 43 Paper Size Portrait Landscape Characters Lines Characters Lines A3 113 95 161 66 B4 97 82 139 56 A4 79 66 113 45 ...

Page 563: ...inch Continuous Form Mode Note The values are based on 10 cpi character pitch and 6 lpi line pitch Paper Size Portrait Landscape Characters Lines Characters Lines A3 116 99 165 70 B4 101 85 143 60 A4 82 70 116 49 B5 71 60 101 42 A5 58 49 82 34 Postcard 39 34 58 23 11 x 17 110 102 170 66 8 5 x 14 85 84 140 51 8 5 x 13 85 78 130 51 8 5 x 11 85 66 110 51 Paper Size Portrait Landscape Characters Lines...

Page 564: ...ual provided on the driver CD kit CD ROM z Output Quantity z Layout z 2 Sided Printing z Paper Size z Print Mode z Print Processing Mode z Collate Setting Item Item Number Value Output Quantity 401 Sets the number of copies to be printed 1 999 Default 1 1 999 sheets 2 Sided Printing 402 Sets the 2 sided printing option 0 Default 1 Sided 1 2 Sided Flip on long edge 2 2 Sided Flip on short edge 2 Si...

Page 565: ...aper When Paper Size is set to Auto documents will be printed on A3 or A4 size paper The 2 up setting prints two pages onto one sheet of paper When 2 Up is selected the paper size is fixed at A4 The 4 up setting prints four pages on each sheet of paper When 4 Up is selected the paper size is fixed at A4 Paper Size 406 Set the size of the paper to be printed 0 Default Auto 1 A4 The Auto setting aut...

Page 566: ... Size 202 3 A3 4 Default A4 5 A5 14 B4 15 B5 21 8 5 14 22 8 5 13 23 Default 8 5 11 24 11 17 25 Custom Size 30 8K Sets the default paper size when the machine is set to select the paper size automatically Only available when Paper Tray is set to Auto The default value will be either 4 or 23 depending on the region of use Bypass Size 203 3 A3 4 Default A4 5 A5 14 B4 15 B5 21 8 5 14 22 8 5 13 23 Defa...

Page 567: ...net 34 Marigold 35 Arial 36 Arial Italic 37 Arial Bold 38 Arial Bold Italic 39 Times New 40 Times New Italic 41 Times New Bold 42 Times New Bold Italic 43 Symbol 44 Wingdings 45 Line Printer 46 Times Roman 47 Times Italic 48 Times Bold 49 Times Bold Italic 50 Helvetica 51 Helvetica Oblique 52 Helvetica Bold 53 Helvetica Bold Oblique 54 CourierPS 55 CourierPS Oblique 56 CourierPS Bold 57 CourierPS ...

Page 568: ...e pitch size of a font The value of 100 represents the pitch size of 1 Form Line 211 5 128 Default 64 or 60 Specifies the number of lines on a page The default value will be 64 if the default value of the item 202 203 is 4 60 if the value for 202 203 is 23 Print Sets 212 1 999 Default 1 Specifies the number of print sets Image Enhance 213 0 Off 1 Default On Sets whether to enable the enhanced imag...

Page 569: ...ient When Auto 99 is specified the document size is determined based on the Scaling Mode setting the item number 160 Paper Size 102 99 Auto 101 Default A Size 3 A3 4 A4 5 A5 14 B4 15 B5 Sets the paper size to be printed This can be set if the paper tray setting is either Auto or Tray 5 Manual Feed In addition settings can only be made for cut paper When Auto 99 is specified the paper size is deter...

Page 570: ...des are aligned for each page when the left side is closed Head to Toe Place the paper as in the Paper Orientation and it prints both sides so that the orientation of the up sides are aligned for each page when the top side is closed Chinese Fonts 111 0 Stroke Specifies 2 byte character fonts including Chinese characters The setting cannot be changed for this model Alphanumeric Fonts 112 0 Stroke ...

Page 571: ...n Processes as an eject command ON is set as the default for SPO only Scaling 159 0 OFF 1 Default ON Determines the setting to either enlarge or reduce the document size so that the document size fits the paper size OFF Prints in the same size without enlargement reduction even if the document size and paper size are different ON Prints while enlarging reducing the data on document size so that it...

Page 572: ...g the drawing command and the maximum size of characters and line width specified in the page are used to calculate the rectangular area Paper Margin 162 0 to 99 Default 0 0 99 mm Sets the paper margin when auto scaling is being used Image Enhancement 163 0 OFF 1 Default ON Sets whether to artificially increase the resolution of an image and smooth its edges Stapling 164 0 Default None 1 Top Left ...

Page 573: ...he area that allows actual printing is within the printable area The hard clip area can be set either via HP GL emulation mode settings or by the specified hard clip command 1 The following coordinate values present an example of when the origin is set at the lower left Auto Layout in HP GL 2 of A3 sheet Pen Width No 0 No 15 800 815 0 to 255 Default 3 0 to 25 5 mm Sets the width of the pen thickne...

Page 574: ... Width Height Bottom left X Bottom Left Y Long Side Short Side Top right X Top right Y XR YU A3 119052 84168 1260 1260 116532 81648 117792 82908 1260 1260 A4 84168 59508 1260 1260 81648 56988 82908 58248 1260 1260 A5 59508 41940 1260 1260 56988 39420 58248 40680 1260 1260 B4 103176 72828 1260 1260 100656 70308 101916 71568 1260 1260 B5 72828 51588 1260 1260 70308 49068 71568 71568 1260 1260 16798 ...

Page 575: ...1260 1260 81648 116532 82908 117792 1260 1260 A4 59508 84168 1260 1260 56988 81648 58248 82908 1260 1260 A5 41940 59508 1260 1260 39420 56988 40680 58248 1260 1260 B4 72828 103176 1260 1260 70308 100656 71568 101916 1260 1260 B5 51588 72828 1260 1260 49068 70308 50328 71568 1260 1260 Width Short side YU Long side Bottom left X Bottom left Y 0 0 XR Height Actual Paper Printable Area Top right X Top...

Page 576: ...ing to ON The default value is ON z Select a method for obtaining the active coordinate area using the area determining mode The default value is AUTO z Set the paper margin using Paper Margin The default value is 0 mm z Set the Scaling Mode The default value is Paper Size 3 Details on Setting Items Details on each item are as follows Document Size Press the mode button and select AUTO under docum...

Page 577: ... the areas specified by PS commands in the data becomes the active coordinate area If there are no PS commands in the data the active coordinate area is determined by Adapted Paper Margin Set the range from 0 to 99 mm The default value is 0 mm To get the active coordinate area subtract the area set in paper margins from the ACA obtained in the area determination mode Scaling Mode Select the mode f...

Page 578: ...ate area to be active from the HP GL data entered in accord with the area determination mode 2 As a margin add the larger value of either the font size specified in the page the default size or one half the specified pen width to the ACA obtained in 1 3 Subtract the value set in paper margins from the ACA obtained in 2 4 The ACA obtained in the process up to 3 will be the document size Ex If the f...

Page 579: ... are those that are actually loaded in the trays from among the 5 sizes A3 B4 A4 B5 and A5 If A3 B4 A4 B5 or A5 paper is not loaded in the trays all of the sizes become possible sizes a message is displayed on the operation panel prompting the user to load paper If the Scaling Mode Setting is Paper Size If the paper size and the document size are the same select paper that is the same size as the ...

Page 580: ...s inactive The hard clip area is always the advanced hard clip area The scaling factor is determined according to the ACA and the paper size The range for the ACA for each paper size is as follows Unit Plotter Unit The maximum scaling factor is 210 of the advanced hard clip area for each paper size and the minimum scaling factor is 22 5 7 Restrictions When Plotting under Auto Layout If the Printer...

Page 581: ...uto Layout memory capacity max is 5120 KB So print data larger than 5120 KB cannot be received When using the Auto Layout function we recommend the printer be equipped with a hard disk 8 Examples of Combinations of Each Function The following are examples showing the print results that can be achieved by combining various functions Document Auto Coordinate Origin 0 Degrees Scaling Mode Paper Size ...

Page 582: ...ing Mode Active Coordinate Area Scaling ON Document Auto Coordinate Origin 0 Degrees Scaling Mode Active Coordinate Area Scaling OFF Print Area Active Coordinate Area determined by entered data Paper Size Print Area Active Coordinate Area determined by entered data Paper Size ...

Page 583: ... PostScript printer Also enables printing from Macintosh Printer Kit If your machine does not have the printer feature this enables you to use the printer feature on the machine Fax Kit Adds the fax feature G3 x 1 ch to the machine Internet Fax Kit Adds the Internet Fax iFax feature to the machine Stamp Kit Allows you to stamp each sheet of a document to mark successfully scanned sheets Network Ac...

Page 584: ...ange without notice For the latest information contact our Customer Support Center Image Expansion Kit Required when the Image Log Control feature is used Image View Kit Previews images stored in mailboxes You can rotate and enlarge to preview images Product Name Description ...

Page 585: ...e print page buffer the job including that page will be terminated Options z To use the Secure Print Private Charge Print Sample Print Delayed Print or Server Fax feature the optional HDD Extension Kit needs to be installed z To use the Print to Mailbox feature optional Scanner Kit needs to be installed z To use the machine as a PostScript printer the optional Adobe PostScript 3 Kit needs to be in...

Page 586: ... J 1 sheet 2 up and the number of printed pages is calculated as follows z Total pages 5 z 2 up 5 The numbers of pages for 2in1 4in1 and 8in1 are also calculated in the same way as above on DocuLyzer and ApeosWare Accounting Service The meter on the Billing Meter screen calculates the number of printed pages correctly regardless of the Multiple up setting Output Sequence of Jobs When 130 or more j...

Page 587: ...d Document on the control panel Required O Direct Fax Direct Fax transmission Not required U iFax iFax Transmission Required O iFax reception printing Required 4 O iFax reception iFax reception to mailbox Not required U Forwarding an incoming iFax to a regular fax machine Not required U Forwarding an incoming fax to an iFax Not required X Report List Automatic printing of a report list other than ...

Page 588: ...ns when Transmitting an iFax z Resolution on the General Settings screen When TIFF S is selected for iFax Profile on the Transmission Options screen Superfine 400 dpi or Superfine 600 dpi cannot be selected For information on iFax profiles refer to iFax Profile Specifying iFax Profiles P 152 z Communication Mode on the Transmission Options screen The communication mode can be specified only when s...

Page 589: ...he recipient the e mail that was received originally will be deleted For more information on the fax gateway feature refer to Sending an iFax to normal fax machines via a relay station P 118 Restrictions on Paper Selections upon IFax Reception The machine determines whether a TIFF file attached to an e mail complies with the content type defined in RFC2301 and RFC3250 If the content type is compli...

Page 590: ...acity is insufficient In such a case increase the memory size or ask the sender to lower the resolution Notes and Restrictions when Connecting with Internet Service Provider This section describes notes and restrictions on features relating e mail that accesses with a Internet service provider ISP The following shows the features relating e mail z Mail scanning z Mail Notice Service z iFax z E mai...

Page 591: ...ng Settings to store e mail on the server is not supported Encryption communication SSL not supported Note IMAP4 is not supported IP address settings The machine does not support a global IP address Make sure to use the machine under circumstances using IP masquerade z Operating with fixed address Register the machine s IP address to a rooter or a server managing IP addresses for control servers z...

Page 592: ...0dpi text document around 25 KB z A4 black white 200dpi text photo document around 200 KB Note The sizes described above are those for sending e mail The actual size may be different Settings from CentreWare Internet Services For settings to be performed on CentreWare Internet Services refer to the Network Administrator Guide Important Set POP3 Server Check Interval to 10 minutes or longer when co...

Page 593: ...r Saver button to switch out of the Power Saver mode 2 Specify the call destination z The call destination can be specified using the numeric keypad address numbers or one touch buttons The address book cannot be used z The call destination can be specified also with the keyboard displayed on the screen Pressing More Characters on the screen displays symbols Note To cut the line select Exit Line C...

Page 594: ...e specified using the numeric keypad address numbers or one touch buttons The address book cannot be used z The call destination can be specified also with the keyboard displayed on the screen Pressing More Characters on the screen displays symbols Note To cut the line select Exit Line Cut If your telephone line is set to touch tone Tone does not appear If you want to send tones or to use the touc...

Page 595: ...inted upon transmission Log In Out J Enter the user ID J System Settings J System Settings J J Fax Mode Settings J Fax Defaults J Send Header J Off For more information refer to Send Header P 307 To change the dialing method tone dialing pulse dialing Log In Out J Enter the user ID J System Settings J System Settings J J Fax Mode Settings J Local Terminal Information J G3 Line 1 2 4 Dial Type For ...

Page 596: ...ze For more information refer to Receiving Paper Size P 310 To change the volume of the audio tone produced upon fax reception Log In Out J Enter the user ID J System Settings J System Settings J J Common Settings J Audio Tones J Ringing Volume For more information refer to Ringing Volume P 270 To allow different sizes of original to be loaded by default Log In Out J Enter the user ID J System Set...

Page 597: ... System Settings J J Common Settings J Audio Tones J Select a volume For more information refer to Audio Tones P 269 To check the network settings such as IP address Machine Status J Billing Meter Print Report J Print Report List J J Copy Mode Settings J Settings List Common Items Copy Mode Settings will be Print Mode Settings Fax Mode Settings or Scan Mode Settings depending on the situation For ...

Page 598: ...refer to All Services P 271 To change the features assigned to the custom buttons Log In Out J Enter the user ID J System Settings J System Settings J J Common Settings J Screen Button Settings J Custom Button 1 to Custom Button 3 For more information refer to Custom Buttons 1 to 3 P 271 To check the completion of a job Job status J Completed Jobs For more information refer to Checking Completed J...

Page 599: ...17 Glossary This chapter contains a list of terms used in this guide z Glossary 598 ...

Page 600: ...and right pages of an unfolded document onto two separate sheets of paper Border Limit Page split threshold value One more sheet is used when the length of the transmitted document exceeds the length of paper installed on the receiving terminal A margin at the bottom of a received document can be eliminated so that the data can be printed on one page The amount of space that can be removed from th...

Page 601: ...operating the printer to achieve the same print results as when printing with other manufacturers printers This mode is called the Emulation Mode Error Code A code is displayed on the control panel or a report when a problem occurs F Code A transmission method defined by Communications and Information Network Association of Japan CIAJ for use of T 30 sub addresses standardized by ITU T Between the...

Page 602: ...m refers to this machine This is a general term for terminals such as telephones facsimile machines personal and computers Low Toner Alert Tone A tone the device sounds when the drum toner cartridge needs to be replaced Machine Ready Tone A tone produced when the status of the machine changes from standby to ready such as when the power is switched on MIME Type Multipurpose Internet Mail Extension...

Page 603: ...When specifying a profile check that it can be handled by the other party s iFax compatible machine RAM Random Access Memory It is a storage device memory where information can be retrieved as well as stored Receive Buffer A space used to temporarily store data sent from a client computer Receiving Paper Size A feature that specifies the output paper size for received fax documents The specified p...

Page 604: ...l an agreement governing the way data is transmitted commonly used for sending and receiving e mail Start Reservation In this guide this refers to loading a document selecting features and pressing the Start button immediately after switching the power on Once the machine is warmed up and ready it will automatically start copying Status Display Code A code that indicates the machine status When an...

Page 605: ...ator shared mailbox 393 AES 33 Alert Tone System Settings 270 All Feature Access Settings 342 All Services System Settings 271 All Services button 47 Allocate Memory System Settings 297 Allow Casual Users to Edit From System Settings 317 Allow Guest Users to Edit From System Settings 318 Allow to edit From if Search failed System Settings 318 Allow to edit From if Search found System Settings 318 ...

Page 606: ...8 Broadcast Communication Mode System Settings 314 Broadcast iFax Profile System Settings 314 Broadcast Report 382 Broadcast Send 114 123 162 Broadcast Multi Poll Report System Settings 277 Browse 188 Build Job 98 Build Job Separators Tray System Settings 291 built in fonts 541 C C Clear button 47 Calculator 64 calling a stored program 222 canceling printing a job status activity report 594 Center...

Page 607: ...ttings 271 Custom Paper Name System Settings 272 Custom Text System Settings 274 D DADF 36 Date System Settings 267 Date Format System Settings 274 Date Position Side 2 System Settings 292 Date Position System Settings 290 Date Size System Settings 290 Daylight Savings system settings 268 Default Language System Settings 272 Default Print Paper Size System Settings 280 Default Programming 371 Dela...

Page 608: ...hen Search Failed System Settings 318 E mail Subject System Settings 303 E mail Internet Fax Settings System Settings 316 emulation 541 548 emulation mode 548 encoding method 543 Encryption Key for Confidential Data System Settings 285 enlarged copies 62 entering specific symbols 127 entering text 266 entering changing a stored program name 221 erasing edges and margin shadows in the document 200 ...

Page 609: ...4 front cover 36 37 38 G G3 140 G3 Line 1 2 4 Dial Type System Settings 313 G3 Line 1 2 4 Fax ID System Settings 313 G3 Line 1 2 4 Line Type System Settings 314 General Settings 129 190 General Settings 2nd Column System Settings 306 general shared mailbox 393 general users 386 gradation 538 Group Send System Settings 335 H handling error terminations 364 Heimdal 29 Hidden Text 96 Hide Account ID ...

Page 610: ...Job Status button 46 Job Status Activity Report 374 Job Template List 377 Job Type on Job Status Screen System Settings 271 jobs that can be managed for each service 400 JPEG Code 30 K Keyboard 182 Keyboard Input Restriction System Settings 283 L label paper 244 Language 272 Last Name System Settings 334 Layout Adjustment 70 133 197 Left Page then Right 198 legal notice 34 Libcurl 30 license 29 Li...

Page 611: ...Manual Receive 167 371 Manual Send 157 Manual Send System Settings 309 Manual Send Receive Default System Settings 309 Max No of Pages for Split Send System Settings 317 Maximum Address Entries System Settings 316 Maximum E mail Size System Settings 316 maximum fill line 246 Maximum Image Size System Settings 331 Maximum Login Attempts System Settings 338 Maximum Number of Sets System Settings 293...

Page 612: ...inistration 397 overview of authentication 386 Overwrite Hard Disk 369 Overwrite Hard Disk System Settings 283 P page description language 541 Page Number Position Side 2 System Settings 292 Page Number Position System Settings 290 Page Number Size System Settings 290 Page Number Style System Settings 290 paper capacity 544 paper feed method capacity 540 paper jams 507 Paper Size Settings System S...

Page 613: ...l numbers on the background of copies 92 printing iFax 117 printing multiple sets at the destination machine 147 printing secure print documents 354 357 printing stored documents 353 Priority Send 141 Private Charge Print 226 353 problem solving 423 processing documents scanned with different settings as one job 98 profile 543 Programming 370 Promote Job 351 Proportional 63 201 Protocol Settings S...

Page 614: ... Sample Print 358 Sample Set 100 225 Sample Set System Settings 290 Save Cancelled Faxes System Settings 309 Save in System Settings 334 Save Undelivered Faxes System Settings 309 Saved Faxes Auto Delete System Settings 309 saving the scanned data 177 Scan 233 Scan Defaults System Settings 302 scan density 196 Scan File Transfer Report System Settings 278 Scan Mode Settings 376 Scan Mode Settings ...

Page 615: ...203 specifying a scan ratio 136 specifying a scan size 199 specifying a scanning ratio 201 specifying a scanning resolution 197 specifying destination using the keyboard screen 126 specifying destinations 109 specifying finishing options 79 specifying iFax Profiles 152 specifying Send Priority 141 specifying Send Time 141 Specifying the iFax Subject 145 specifying the orientation of loaded documen...

Page 616: ...er cartridge 38 406 Toner cartridge 25K 406 toner cartridge replacing 407 Top Page then Bottom 198 touch screen 46 Transfer Protocol 187 Transfer Protocol System Settings 304 334 Transmission Interval System Settings 309 Transmission Report 381 Transmission Report Cancelled System Settings 277 Transmission Report Undelivered 381 Transmission Report Undelivered System Settings 277 Transmission Repo...

Page 617: ... 342 User ID System Settings 339 User ID Characters System Settings 342 User Name 189 User Name System Settings 334 340 using F Code transmission 150 using remote mailbox 147 W warm up time 538 Watermark 92 225 Watermark System Settings 274 WebDAV 177 238 weight 540 X Xerox Standard Accounting System Settings 346 ...

Page 618: ......

Page 619: ...ApeosPort II 5010 4000 3000 DocuCentre II 5010 4000 User Guide DE3803E2 1 Edition 1 July 2007 Fuji Xerox Co Ltd Copyright 2007 by Fuji Xerox Co Ltd ...

Reviews: