22
⚠
WARNING:
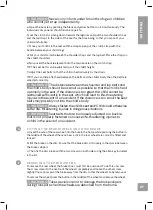
After fitting, check the locking mechanism by pulling
both wheels in the direction of release! The wheels must not be able
to be pulled out without pressing the button. Wheels that are not
completely locked can come loose during travel, which can lead to ac-
cidents with life-threatening injuries.
⚠
WARNING:
The right tires are essential! Use only the tires supplied
and keep them properly maintained. Inflate the tires to 2-2,4 bar. I. and
check the pressure before each use. Do not use higher pressure tires
as this will make the trailer bouncy and pro- ne to tipping over when
lightly loaded. We recommend only tires with road tread. Do not use
off-road tires.
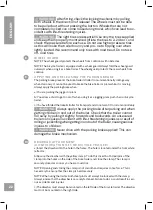
WHEEL GUARD
NOTE: The wheel guard protects the wheels from collisions with obstacles.
NOTE: The bicycle trailer is equipped with a wheel guard. Always fold the wheel guard
outwards when using it as a bike trailer. The wheel guard protects the rear wheels from
collision.
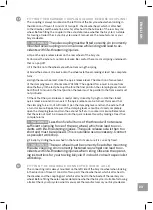
APPLYING AND RELEASING THE PARKING BRAKE
The parking brake prevents the bike trailer/stroller from unintentionally rolling away
when stationary. It cannot be used to brake the bike trailer or pram while it is moving.
Always apply the parking brake when:
a) You are parking the jogger or pram.
b) You allow a child to get on or off when using it as a jogging pram, pushchair or bicycle
trailer.
c) You have folded the trailer/stroller for transport and do not want it to roll uncontrollably.
⚠
WARNING:
Always apply the parking brake after parking and when
getting children in and out of the trailer. Check that the trailer cannot
roll away by pulling it slightly forwards and backwards. An unsecured
trailer can cause an accident with life-threatening injuries as a result of
rolling or jackknifing when getting in and out of the trailer, causing serious
injuries to children.
⚠
WARNING:
Never drive with the parking brake applied! This can
damage the brake mechanism.
DRAWBAR AT TACHMENT
(CONFIGURATION OF THE BICYCLE TRAILER)
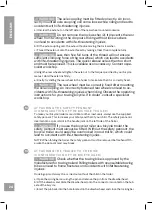
a) Insert the drawbar into the hole in the frame. The hole is located under the front white
reflector.
b) Secure the drawbar with the yellow clamp. To do this, insert both steel pins of the
clamp into the holes on the side of the bike trailer and close the clamp. The clamp is
securely closed as soon as you hear a loud click.
NOTE: Opening and closing the clamp is not smooth and requires some force. This is
necessary to ensure that the clamp is held securely.
NOTE: When using the trailer, both steel pins must always be locked with the clamp.
Always ensure that the drawbar is securely fastened. Failure to do so could result in seri-
ous accidents and injuries.
c) The drawbar must always be mounted on the left side of the bicycle trailer. The drawbar
must not be mounted on the right side.
8
9
10
ENGLISH
Summary of Contents for BOOSTER2
Page 2: ...POLSKI 9 ENGLISH 20 ESK 31 DEUTSCH 42...
Page 3: ...2 1 1...
Page 4: ...3 2 a ab b c e d c d e 3...
Page 5: ...4 4 5 6 7 8 f a a b e...
Page 6: ...5 9 10 11 12 a a bc b c d e...
Page 7: ...6 13 14 15 16 d a a b c...
Page 8: ...7 17 18 b a a c b b c d e f 1...
Page 20: ...19...
Page 31: ...30...
Page 42: ...41...
Page 54: ...53...


