21
ENGLISH
⚠
WARNING:
Never carry infants under 6 months of age or children
who cannot yet sit up independently.
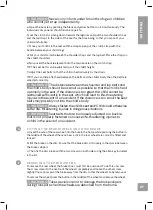
a) Open the buckle by pressing the black and yellow buttons on it simultaneously. The
individual components should now be separate.
b) Let the crotch strap hang down towards the legroom and put the two shoulder straps
and the lap straps to the sides of the seat for the time being, so that you can seat your
child comfortably.
c) Once your child is in the seat with the straps open, put the crotch strap with the
buckle between your child's legs.
d) Put your child's arms between the shoulder straps and the lap belt. Place the straps on
the child's shoulders.
e) Now insert the buckle elements into the main buckle on the crotch strap.
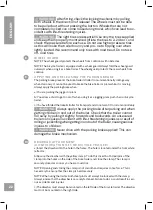
TIP: The seat belts can be adjusted to suit the child's height.
f) Adjust the seat belts so that the child is held securely by the straps.
TIP: If you can slide a flat hand between the belts and the child's body, then the belts are
adjusted correctly.
⚠
WARNING:
The distance between the shoulder and lap belts and
the child's body should be as small as possible so that the child is held
optimally in the seat. If the distance is too great, the child cannot be
restrained sufficiently in the seat, which can lead to life-threatening
injuries in the event of an accident. If the distance is too small, the seat
belts may possibly cut into the child's body.
⚠
WARNING:
Always fasten the child's seat belt! Child could otherwise
suffer life-threatening injuries in dangerous situations.
⚠
WARNING:
Seat belts that are too loosely adjusted or a buckle
that is not properly fastened can cause life-threatening injuries to
a child in the event of an accident.
FIT TING THE REAR WHEELS AND DISC BRAKE
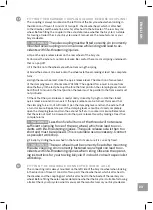
a) Insert the axle of the rear wheel into the hole in the frame while pressing the button in
the middle of the wheel. When you hear a click, the rear wheels are correctly fitted and
locked.
b) Put the brake on the disc. Ensure that the brake disc sits loosely in the space between
the brake callipers.
c) Then fix the disc brake with the two screws on both sides using the allen key included
in the kit.
REMOVING THE REAR WHEELS
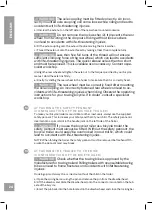
To remove the rear wheel, the brake shoes must first be unwound. To do this, unscrew
the screw closer to the centre of the wheel completely and loosen the other screw
slightly. You can now pivot the brake away from the disc so that the wheel can be removed.
To remove the wheel, press the button in the middle of the wheel and remove the wheel.
⚠
WARNING:
Take special care not to damage the brake calipers
during transport when the wheels are detached from the frame.
6
7
Summary of Contents for BOOSTER2
Page 2: ...POLSKI 9 ENGLISH 20 ESK 31 DEUTSCH 42...
Page 3: ...2 1 1...
Page 4: ...3 2 a ab b c e d c d e 3...
Page 5: ...4 4 5 6 7 8 f a a b e...
Page 6: ...5 9 10 11 12 a a bc b c d e...
Page 7: ...6 13 14 15 16 d a a b c...
Page 8: ...7 17 18 b a a c b b c d e f 1...
Page 20: ...19...
Page 31: ...30...
Page 42: ...41...
Page 54: ...53...


