50
②
Click (
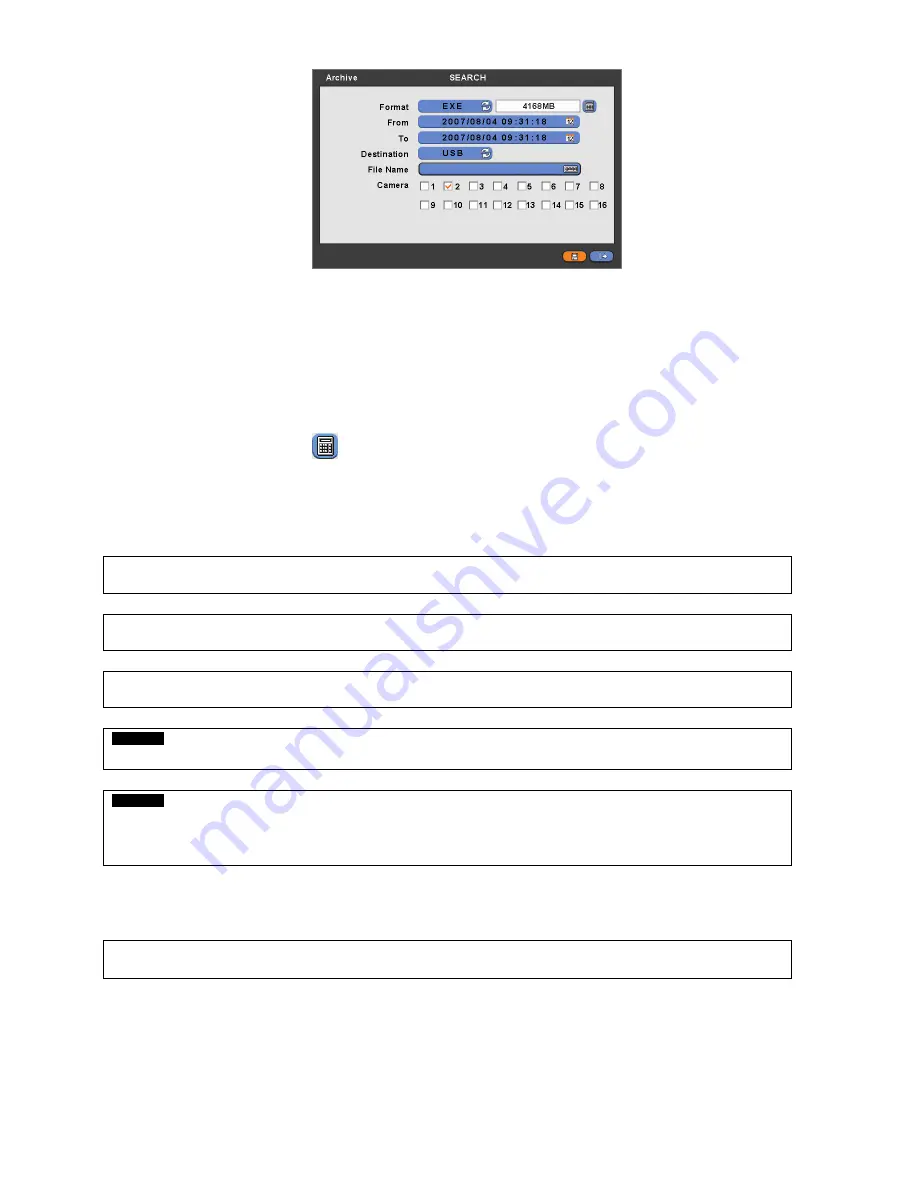
) Format frame to select EXE or JPEG. Choose EXE for storing moving images; and JPEG for still images.
③
Click (
) the keyboard display on the right-hand side of FROM frame to set the storage start time.
④
Click (
) the keyboard display on the right-hand side of TO frame to set the storage end time.
⑤
Click (
) Destination frame to select a storage device out of USB and CD/DVD-RW.
⑥
Click (
) the keyboard display on the right-hand side of File Name frame to input a file name. You do not need to input
extension (exe, jpeg). Please note that the file is not going to be stored unless you input a name.
⑦
Check
a square box next to a camera with the video you want to store. You can archive multichannel at the same time.
⑧
Click (
) the Calculator button
on the rightmost side of Fomat line to check the data capacity for backup.
The capacity will show only for EXE Archive.
⑨
Click (
) Start button. Then, Progress bar will appear and the storage process proceeds.
⑩
If the storage is done properly, Archive Success message will pop up.
Please choose ‗OK‘ to confirm. If the storage fails,
Archive Fail message will pop up. In this case, you must try again.
5.6
Color Control and Position
Please click (
)
Color /Alarm
in SEARCH menu, and the following input box will appear.
(NOTE)
THIS FUNCTION IS ENABLED ONLY WHEN
LIVE MODE
AND
1 CHANNEL MODE
CAUTION
WHILE BACKUP, PLEASE DO NOT DETACH STORAGE DEVICE OR POWER OFF THE DVR. OTHERWISE, IT MAY CAUSE
PERMANENT DAMAGE TO THE DVR OR THE STORAGE DEVICE. IN SUCH CASE, YOU MUST REBOOT THE DVR. IF THE
DVR DOES NOT OPERATE PROPERLY, YOU MIGHT NEED FILE SYSTEM RECOVERY PROGRAM OR YOU MUST FORMAT
HDD.
CAUTION
PLEASE DO NOT USE THE SPACE IN BACKUP
‘S FILE.
(NOTE)
PLEASE DO NOT CHANGE THE SETTINGS BY DVR OR CMS, WHILE BACKUP.
(NOTE)
PLEASE LIMIT THE BACKUP SIZE TO 2GB OR LOWER. OTHERWISE, DATA BACKUP WILL NOT BE EXECUTED.
(NOTE)
PLEASE DO NOT USE JPEG FORMAT SELECTING WHILE ARCHIVING IN LIVE MODE.


