background image

Configuring Your Firewall 

User Guide 

123


ZoneAlarm Firewall 

Zone Labs produces several computer security packages including ZoneAlarm Pro and ZoneAlarm. Though 

there are differences in the UI, they are largely the same. Like other PC firewall products, Zone Labs provides 

both automatic and manual configuration interfaces. By default, ZoneAlarm will automatically prompt you to 

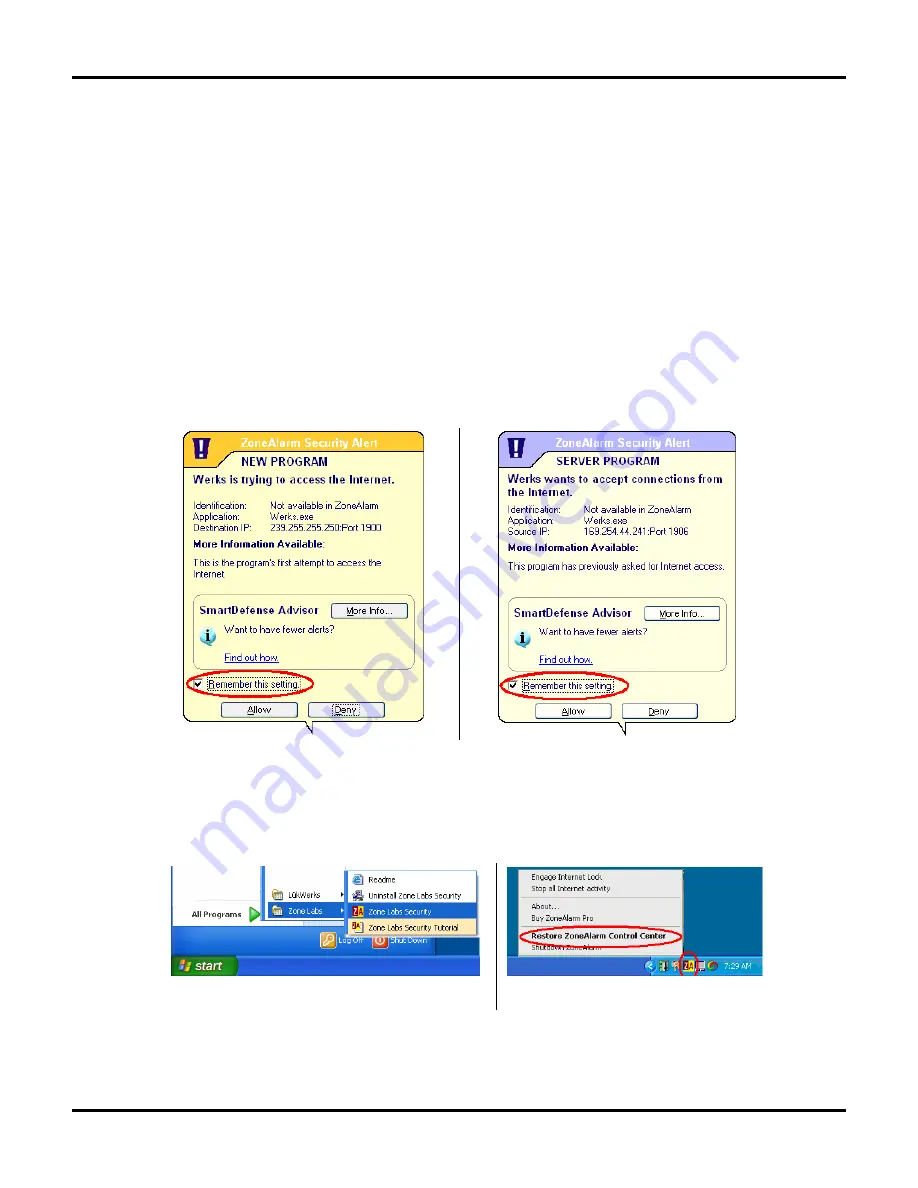
allow Command Center.exe to both access the Internet and to act as a server. Follow these instructions to 

ensure ZoneAlarm does not interfere with the operation of WiLife. 

E

NABLE 

C

OMMAND 

C

ENTER 

A

UTOMATICALLY


When you first start Command Center, Zone Alarm will automatically provide you with a ZoneAlarm Security 

Alert, asking you whether you want to block Command Center. You should always choose 

Allow

 when the 

program name is Command Center.exe and the publisher is WiLife. 

1)


Run Command Center. 


Check “Remember this setting” and click the Allow button on both the “New Program” and “Server 

Program” dialogs. 


E

NABLE 

C

OMMAND 

C

ENTER 

M

ANUALLY


In some cases, you may need to manually configure ZoneAlarm. This process is not difficult. Follow these steps 

to complete the manual firewall setup: 

1)


Open the ZoneAlarm control center either from the Start menu or by right-clicking on the ZoneAlarm 

icon in the Windows Task bar.  


Summary of Contents for V2.5

Page 1: ...User s Guide V2 5 Logitech Digital Video Security System...

Page 2: ...ject to national state and or local laws respecting copyright right of publicity and privacy Before using this system and cameras you should become familiar with the pertinent laws regulations and com...

Page 3: ...ssion of Logitech WiLife WiLife Command Center and WiLife Online are registered trademarks or trademarks of Logitech Microsoft NET Framework Microsoft Windows Windows Me Windows XP Windows Vista are r...

Page 4: ...WiLife User Guide ii...

Page 5: ...Support 17 Tip of the Day 17 USING THE COMMAND CENTER 18 Title Bar Controls 18 Hiding Command Center Screen Controls 19 Main Feature Buttons 19 Live View 20 Live Video Windows 20 Choose a Multiple Ca...

Page 6: ...te a Camera 50 Recording Tab Options 50 Learn About Motion Detection 50 Review the Recording Dialog 51 Manage Motion Detection Zones 51 Set Motion Detection Sensitivity 52 Schedule Recording Time 52 M...

Page 7: ...t Event 86 Deleting a Recording or Alert Event 87 USING ONLINE VIEWING 88 How Do I Access My WiLife Online Account 89 Viewing Video in Direct vs Relayed Mode 89 Online Viewing From a PC 90 Logging int...

Page 8: ...b Mail 134 EarthLink 5 0 134 HotMail 134 Yahoo Mail 135 GMail 135 Microsoft Outlook 2003 135 Microsoft Outlook Express 6 135 Eudora 135 Mozilla Thunderbird 1 5 135 Opera M2 136 SPECIFICATIONS 137 Syst...

Page 9: ...rity system This system is perfect for the pre wired home or small business who wants a powerful networked video security system Using WiLife Indoor IP Cameras and powered Ethernet the WiLife Pro syst...

Page 10: ...r first design goals was to deliver a system that you could set up in 15 minutes without having to use special tools drill holes run wires or configure networking equipment It is important to us that...

Page 11: ...ou to turn your existing wiring into a powerful network capable of delivering rich live video from around your property to your PC and from there anywhere you need it This illustration best describes...

Page 12: ...imbedded computer that actively encodes adjusts and manages your video feed WiLife Cameras are the smartest surveillance cameras available Because our cameras are so powerful they provide you with ri...

Page 13: ...nter can manage full motion video from six concurrent cameras providing you with stunning live views from every camera while simultaneously recording any motion or scheduled events Additionally the Wi...

Page 14: ...and cell phone access High resolution color video To access the video you first create a WiLife Online user account at www wilife com This is part of the normal process of registering your WiLife sys...

Page 15: ...ceiling using the Desktop Mount or Wall Mount Indoor IP Camera Used with the WiLife Pro Video Security System the Indoor IP Camera connects to your LAN network through the WiLife Power Injector using...

Page 16: ...s you should know about using this unit 1 Do not plug the power supply unit into a surge suppressor a UPS or some other filtering unit It can be plugged into a regular extension cord or non surge powe...

Page 17: ...face between the PC and the power line data link It communicates with the PC via the USB The PC sends commands to the cameras to configure and control them It receives status from these units as well...

Page 18: ...utomatically turn on in the dark The light they produce is not visible to the human eye but can be seen by the camera Remember to verify that the illuminator and camera are in alignment pointed at the...

Page 19: ...ng Online Video Sharing Password System Lock This chapter introduces you to the Setup and its comprehensive set of configuration options Here you will learn how to setup Setting Application Options ca...

Page 20: ......

Page 21: ...r Once Command Center has been setup all you need to do is plug in the cameras and you are on your way to using your security system The Command Center application automatically discovers all the came...

Page 22: ...2 768 1024 1024 Video Card MB 32 32 64 128 128 256 Display Resolution 1024 x 768 or higher 32 bit color Hard Drive MB 150 MB for program and a minimum of 10 GB for video recording Operating System Mic...

Page 23: ...Receiver USB Cable 8 ft WiLife Outdoor Camera Power cord plug Cable Clamps Post Overhang Wall Mount Window Decals SPY STARTER KIT CONTENTS Command Center Installation CD Quick Start Guide USB Receive...

Page 24: ...LETING THE COMMAND CENTER INSTALL WIZARD Follow the on screen instructions of the Command Center Install wizard Click the Next button to advance through the installation process One of the early steps...

Page 25: ...emote viewing on Internet connected machines What is remote viewing It is the ability to access live video from your cameras from anywhere in the world using a Windows Media enabled Internet browser o...

Page 26: ...to adjust the focus if necessary Once you have focused your camera select a new location for the camera and use one of the convenient mounting options to place your camera on a desktop window or wall...

Page 27: ...will prompt you to Allow or Block access to the network by Command Center You should always choose Allow when the program reads Command Center ATTENTION If you are using Norton Firewall or Norton Inte...

Page 28: ...ast from a window s reflections Use the desktop stand to place your camera on any flat surface such as a table desk counter cabinet or shelf Use the wall mount to fasten the camera high on the wall or...

Page 29: ...cally recognize the camera within 1 2 minutes Once the camera appears you can change its configuration set a name or adjust the picture options See the chapter on Setting System Options for informatio...

Page 30: ...iest to take your camera back to your PC to do this work saving you the trouble of walking back and forth The following graphic illustrates how to gently twist the camera to adjust the focus CAUTION T...

Page 31: ...sthelp com cgi bin wilife cfg php enduser std_alp php or by phone at 888 GOWILIFE 888 469 4543 For customers within the United States and Canada Tip of the Day The WiLife Command Center displays a Tip...

Page 32: ...ve View allows you to monitor and manage the live camera feeds The Search View allows you to find view and manage recorded video segments The title bar and the main feature buttons SETUP GO TO LIVE VI...

Page 33: ...ggle between hide controls and normal mode Hide Show Command Center controls Main Feature buttons Digital PTZ Clock and Camera Activity Panel Main Feature Buttons These three buttons control some of t...

Page 34: ...e camera is recording the status message reads Live Rec in place of just Live Choose a Multiple Camera View Command Center allows you to select between 3 viewing modes single camera quad camera and si...

Page 35: ...les you to get out of the building before alerts are actually armed Select a delay time of zero if you want arming to be immediate Arm Name of Event Early The Alerts Scheduler Front Control Panel will...

Page 36: ...F Camera has been disabled in Live view No recording will take place Click to turn ON BLANK No camera exists for this number Switch Cameras On and Off At times you may want to easily turn cameras off...

Page 37: ...ted with the latest firmware the WiLife Command Center will inform you via a warning message when you attempt to use the feature Simply click OK to update the camera Upon updating the firmware your up...

Page 38: ...of the file represents the camera name and date However you can change the filename Command Center also remembers the last file type you selected the directory you saved the last image to and the qual...

Page 39: ...r use the increase decrease arrow buttons to select the desired number The easiest way to change camera numbers is to click and drag a camera s image on top of another camera s image This automaticall...

Page 40: ...HIFT U UPnP Search Sends a command to request that the cameras announce their presence to aid in camera discovery by Command Center CTRL SHIFT H HIDE WILIFE Hides WiLife and optionally password locks...

Page 41: ...recording using the Recording Scheduler See Recording Options in the Application Setup chapter for more details Review Stored Video Segments The Playback Navigation window provides fast access to reco...

Page 42: ...e time focus 1 minute time focus 5 second time focus NAVIGATING WITH RED TIMELINE A vertical red time line shows the current position of playback To navigate click and drag on the time line to the lef...

Page 43: ...f the video for a camera for example click the green button next to the camera name What do the colored camera names mean Yellow camera names represent cameras that are enabled for Playback mode Gray...

Page 44: ...se mode like Stop CTRL SHIFT P TOGGLE PLAY PAUSE Toggles between Play and Pause modes INCREASE MAGNIFICATION Increase time line magnification shorter time span also works for on NumPad REDUCE MAGNIFIC...

Page 45: ...menu This menu allows you to perform some operations that are not available from any other screen These choices include options for managing segments uploading video segment to WiLife Online account p...

Page 46: ...the video clip and choose Unprotect Video Segment The video segment will now display in the navigation window like other unprotected video clips colored green Protect and Upload Video Segments Store...

Page 47: ...the screen displays the exact amounts in megabytes of space total amount of account storage space 100 MB total used 8 13 MB and total still available 91 8 MB as illustrated in the graphic below DESCR...

Page 48: ...eo segment 4 Click NO to close the window without deleting the video segment Navigation Timeline Note You can also right click on a green or red colored video segment in the timeline and select the op...

Page 49: ...Edit button The Edit E mail Recipient window displays with the address you want to modify showing in the text field 3 Modify the address and then click OK The modified address is added to the list REM...

Page 50: ...cient path through your local routers to your remote device You connect to your video feed by going to www wilife com and logging into your WiLife Online account using your username and password or PI...

Page 51: ...ding these options see the topic Alerts Scheduler Front Control Panel Disable All Notifications Enable or disable all notification options Mute All Sounds Enable or disable all sounds Exit Close down...

Page 52: ...and Center follow these steps Click on the Command Center icon in the system tray Choose Exit from the menu Remember that clicking the close box only closes the Windows interface and Command Center wi...

Page 53: ...or kids off the entire Command Center or individual features while you are away Lock access using your private system password Digital Pan Tilt Zoom Online Connection Monitoring Scan and zoom within...

Page 54: ...by receiving email and mobile phone messages whenever your WiLife Command Center or cameras go offline or online With this feature you can Have your own personal security supervisor Be informed of co...

Page 55: ...Using Command Center Applications User Guide 41...

Page 56: ...Play stored files from anywhere in the world at any time Share selected video clips with friends family and even local law enforcement Manage the stored video files remotely HOW IT WORKS 1 From the Pl...

Page 57: ...allows you immediate access and ability to Share fun videos Help substantiate or refute a claim Help solve a crime Create your very own security minded community with friends neighbors co workers etc...

Page 58: ...ure uses smart search functionality allowing you to not only save and store multiple custom searches but change them as well Add more search criteria to saved searches In fact add flags or highlights...

Page 59: ...nclude Check box to allow multiple video clip selection Play button to play a single file Play checked files More icon on list retrieves thumbnail title description or other available information abou...

Page 60: ...chase i e WiLife Platinum If you have more than one site they will all be listed in the Choose Subscription section and a dropdown field will exist for each site Once you choose your subscription serv...

Page 61: ...uired Payment and Billing Information fields and then click Continue with Order 7 The cart now displays your billing information displaying an Edit link that allows you to edit the information if you...

Page 62: ...dditionally you may view information and statistics regarding the cameras network and system Command Center Setup Tabs Setup is divided into five tabs Camera Recording E mail Remote and Advanced To fu...

Page 63: ...rtically when camera is mounted upside down Mirror Image Check to flip image horizontally like a mirror Advanced Options Set advanced options for the camera See the Advanced Options topic below for de...

Page 64: ...e camera password name position etc allowing you to move your camera to other needed locations around your home or office In all the Command Center anticipates that you will return the camera to the s...

Page 65: ...en zone You can also simply press the Delete key Enable Entire Image Click to set the entire image as one complete zone Default Schedule Recording Time Click button to open the Recording Alerts Schedu...

Page 66: ...amera to only detect the motion of large objects a person or car A high number will increase the sensitivity allowing you to capture the motion of small objects like pets or even a passing cloud In ou...

Page 67: ...video files The gray calculation shows the percent of the maximum allocated in use Discarding From Discarding From shows the date of the oldest file and the one Command Center will delete if it needs...

Page 68: ...on 1 6 to select the camera for which you are managing alerts E mail Cell Phone Setup Select the type of alert action you want a camera to send when it detects motion The options include do nothing se...

Page 69: ...ver name account name account password e mail address and added the e mail addresses in the Send E mail to list press the TEST button to send a test message to each of the addresses When you click the...

Page 70: ...s radio button 6 Enter the desired email address in the available field 7 Click OK The email address is added to the Recipients panel on the Email and Cell Phone Alerts Setup screen Note You can enter...

Page 71: ...on the Alerts tab 3 Click on the button Email and Cell Phone Setup 4 In the Recipients panel highlight the email address or cell phone number you want to remove 5 Click the REMOVE button The email ad...

Page 72: ...on in the system tray Desktop notifications are set up on the Advanced Alerts tab See Setting Desktop Notifications for details Here are three examples of the notifications that will appear on the des...

Page 73: ...Setting System Options User Guide 59 Setting Desktop Notifications The following graphic shows and describes the fields applicable to desktop notification functionality...

Page 74: ...ve MB 150 MB for program and a minimum of 10 GB for video recording Operating System Microsoft Windows Vista Microsoft Windows XP Home Edition XP Professional or XP Media Center Edition USB One availa...

Page 75: ...Magician iMate SmartFlip SP5 SP5m K JAM JASJAR Microsoft Flextronics Peabody Motorola Q i930 CN620 MPx MPx100 MPx220 Neonode N1 02 XDA XPhone Orange SPV C600 C550 Palm Treo 700w Pantech PH S8000T Qoo...

Page 76: ...se the features of WiLife Platinum WiLife Platinum The WiLife Platinum section displays the status of Platinum and the used available ratio of online video storage Click the View Stored Videos link to...

Page 77: ...viewing Connected Command Center is connected and available for remote viewing Disconnecting Command Center is disconnecting from remote viewing There are also indicators that will display in the eve...

Page 78: ...No Registered Product Service Response Disk Full Service Response Limit Reached Service Response Not Implemented etc STREAMING STATUS INDICATORS The Streaming Status field specifies whether or not som...

Page 79: ...s each field Field Name Description E mail Your e mail address doubles as your account name Password We recommend you create a password using at least 7 characters one of them being a number Punctuati...

Page 80: ...Policy Click this checkbox after you have read the Terms of Use page and Privacy Page This checkbox must be marked to complete your registration 6 When you have completed filling out the form click N...

Page 81: ...cking Disconnect To disable Online Viewing 1 Click on the Setup button 2 Click on the Online tab 3 Click Disconnect Connecting WiLife Online Viewing Setup Online Tab Clicking Connect 1 Enable WiLife b...

Page 82: ...system password is the key that locks unlocks key features Check for Updates Search our online update service for new releases of software or camera firmware Update Camera Update cameras with the most...

Page 83: ...AMERAS button The Wizard displays 3 Enter the number of cameras you expect the Wizard to find For these instructions we want Command Center to find 2 cameras In the Connection Method section tell Comm...

Page 84: ...covered will display with active LED marks Un discovered cameras will display with gray LEDs 7 When Command Center has successfully found the number of cameras you told it to look for it will display...

Page 85: ...Setting System Options User Guide 71 8 When you have completed the wizard the last screen of the Wizard displays Click Finish to close...

Page 86: ...cations links between cameras the USB receiver and the Command Center When the Command Center has a password unauthorized access to your cameras and video is prevented This fact is especially true for...

Page 87: ...Deleting a Video File The user will be asked for a password when they attempt to delete a video file WAIT X MINUTES TO LOCK Each time the user successfully enters the password Command Center auto aut...

Page 88: ...the Setup Advanced tab and click the Update Camera button The Software Manager Wizard opens and checks for newer versions of the software If the Software Manager finds a newer version you will be pro...

Page 89: ...that new firmware is available it will prompt you to update your cameras As a result you do not need to worry about manual checking for new camera updates Rebuild Video Segment List Setup Advanced Vi...

Page 90: ...on This is a rarely needed and used tool It searches the current video path e g the default C WiLife video for any video files that are not currently associated with a camera This is possible if you h...

Page 91: ...etails pane on the right side of the window displays information about the items that you select in the category tree USING SYSTEM TOOLS The System Information screen offers tools that helps technical...

Page 92: ...ndwidth test cameras motion detection and email notifications These details are used by WiLife technical support staff to better troubleshooting problems Also create a diagnostics report to send to Wi...

Page 93: ...ip caused an e mail or cell phone alert Command Center will flag the video segment This flag is stored in the wmv file s metadata and can be used as a search criterion on the Online Search and Playbac...

Page 94: ...e with WiLife Platinum Creation of scheduled recording events is available with or without Platinum MENU OPTIONS Use the menu options to help you quickly manage your scheduled events Options Descripti...

Page 95: ...rties Screen Overview The Schedule Event Properties dialog screen displays whenever you first create or edit a specific schedule event You can also get here by right clicking on an event or by double...

Page 96: ...interval or the last To create a No Show Detection Event 1 Click the Alerts Scheduler Front Control Panel View Schedule The Recording and Alerts Schedule Screen displays 2 On the Scheduler calendar cr...

Page 97: ...You can also edit camera properties by clicking on the Edit button Use the illustration below as a guideline for completing the screen Arm Event Early Properties The arming an event early feature is...

Page 98: ...g this means that even if you have qualified motion events and scheduled alert events no alerts will be sent In other words this is the master Stop switch for any alert that may be active Note This op...

Page 99: ...dule Screen is also accessible through Setup Recording tab SCHEDULE RECORDING TIME 2 On the Scheduler calendar click and drag from the desired start time to a stop time where you release the mouse but...

Page 100: ...displays Note You can also open this screen by right clicking on a desired time block and select the option New Recording Event Off 3 In the Name field enter the desired name for the event 4 Enter th...

Page 101: ...hedule The Recording and Alerts Schedule Screen displays Note The Recording and Alert Schedule Screen is also accessible through Setup Recording tab SCHEDULE RECORDING TIME 2 Right click on the desire...

Page 102: ...Center cannot find a direct path we direct the video feed through WiLife s network to you We call this mode Relay Mode In this mode there is a three minute time limit If Command Center finds a direct...

Page 103: ...Direct vs Relayed Mode DIRECT MODE If you are viewing video Direct Mode you are in the best possible mode However the Internet may still block video for a number of reasons If you do not see video af...

Page 104: ...Online Viewing feature however offers more options that help enhance your experience We will discuss those in the following section as well The layout of the section s topics are as follows Log in to...

Page 105: ...r your login name and password See Logging into Your WiLife Online Account for instructions 2 On the My Cameras page click on the camera icon or the camera s name which displays beneath the camera ico...

Page 106: ...lays 3 Click View All Because you are viewing the video feed from all of your cameras the viewing panel will be divided up into squares each square displaying the video for one of the cameras The illu...

Page 107: ...wing example shows the Video Viewing Window consists of a viewing panel additional camera icons options to View All or Cycle through all cameras options to change the size of the viewing panel and a s...

Page 108: ...your broadband speed for WiLife Command Center and your download speed for your browser will give you the best video quality and reliability The page allows you to specify your Internet connection sp...

Page 109: ...ssword log back into your WiLife Online Account using this temporary password 2 Click on Change Password The Change Password page displays as shown in this graphic 3 In the Current Password field ente...

Page 110: ...login name and password 2 Click on My Account 3 Click Change Login 4 In the Current E mail field enter your current e mail address 5 In the New E mail field enter the e mail address that you want to u...

Page 111: ...sonal Preferences View and edit your personal web site preferences including your name business name and whether or not WiLife may contact you with important information and new product announcements...

Page 112: ...or deactivate WiLife Platinum for this site You can also change subscription plan Mark this checkbox when you want to remove a Location or a Camera A Location or Camera is not removed until you click...

Page 113: ...l be removing cameras for or removing the whole site 3 Click the wrench icon next to the site line The Manage Sites and Cameras page displays as shown in the graphic below To remove the entire locatio...

Page 114: ...elds FIRST TIME PDA VIEWING If you are logging into WiLife Online for the first time you will see the landing page The landing page has three options Login link WiLife Online button Live Demo button H...

Page 115: ...the Command Center system With handheld devices there is a time limit of 3 viewing minutes When the time expires you are welcome to reconnect and view video again For some handheld devices you will se...

Page 116: ...r by checking if the status lights have power Verify that the camera power supply and the USB receiver are plugged directly into a power outlet and not a power strip or UPS Ensure the Ethernet cable b...

Page 117: ...umber of motion zones My camera is not following my recording schedule Ensure the camera ON OFF button on the main screen is ON Verify that your computer clock is correct Check your recording schedule...

Page 118: ...into a power outlet near your PC See the section on Focusing and Aiming the Camera in the Getting Started chapter of this documentation for more information Change the image resolution from QVGA 320 x...

Page 119: ...1 Exit Command Center from the task tray icon 2 Click My Computer from the Start menu 3 In the address field enter the path C Documents and Settings All Users Application Data WiLife WiLife 4 Select a...

Page 120: ...s Command Center seems to run slowly Command Center is a 21st century application and is tuned for use on modern PCs Though we provide minimum system requirements for running Command Center you may fi...

Page 121: ...green LEDs on the right hand side to read the following table LED Description Top Green Flashes when the camera captures a video frame Middle Green Flashes when the camera encodes a video frame Botto...

Page 122: ...ceiver Because the USB Receiver gets its power from the USB port these lights will be on even when you have not plugged the receiver into an outlet LED Description Top Green Flashes when it detects a...

Page 123: ...e network resources and WiLife automatically configures most routers for direct remote viewing While firewalls are useful in protecting access to your PC they hinder the performance of the WiLife Comm...

Page 124: ...ple routers hardware firewalls and software firewalls in between the PC running WiLife Command Center and the Internet then they all must be configured to allow the traffic needed for direct remote vi...

Page 125: ...lly provide you with a Windows Security Alert asking you whether you want to block Command Center You should always choose Unblock when the program name is Command Center and the publisher is WiLife E...

Page 126: ...r in the Programs and Services list rare you will need to choose Add Program and find Command Center either in the list of programs or Browse to it at C Program Files WiLife Command Center exe From th...

Page 127: ...Center 1 Run Command Center to allow Norton to display Program Control dialog If Norton displays the Program Control dialog choose Permit Always In any case continue to the next steps Open Norton Int...

Page 128: ...e GENERAL button On the General Rules Screen scroll down to the rule UPNP Port 1900 Block Rule Click on the Modify button and change the rule from Block to Permit Leave the rule checked and then click...

Page 129: ...he setting as Allow always and click OK Validate the Setup We expect these settings will configure Command Center completely for Norton 2006 However we recommend that you follow these steps to ensure...

Page 130: ...ter Norton Internet Security 2007 Depending on the version and installation options Norton Internet Security 2007 may not automatically request your permission to Allow the WiLife Command Center werks...

Page 131: ...e WiLife Command Center werks exe to the program list 5 Add Werks exe to the programs list with Allow set as the access option Typically Werks exe is installed at c program files WiLife Command Center...

Page 132: ...et AntiVirus to allow Command Center AntiVirus still blocks that traffic These instructions assist you in temporarily disabling Worm Protection until the WiLife Cameras have received an address Note T...

Page 133: ...mmand Center only needs the feature turned off temporarily 5 In the Command Center Software open the Setup program click on the Advanced tab and click on the Find My Cameras button Follow the instruct...

Page 134: ...Configuring Your Firewall User Guide 120 Norton 360 1 Open Norton 360 2 From the main screen click on the menu option Tasks and Settings 3 In the Settings section click Change Advanced Settings...

Page 135: ...rewall Program Rules tab scroll through the list of Programs and find the WiLife Command Center 6 Click on it so that it is highlighted Then in the Access dropdown field select Custom 7 Click Modify s...

Page 136: ...Configuring Your Firewall User Guide 122 Communications Any Protocol TCP and UDP 8 After updating these settings click Ok 9 Exit Norton 360...

Page 137: ...ife ENABLE COMMAND CENTER AUTOMATICALLY When you first start Command Center Zone Alarm will automatically provide you with a ZoneAlarm Security Alert asking you whether you want to block Command Cente...

Page 138: ...you will need to click the ADD button to manually add Command Center to the list In the Add Program dialog enter the path to Command Center which by default is C Program File WiLife Command Center exe...

Page 139: ...ept to Allow WiLife network access at installation time the McAfee Security firewall will block your cameras Follow these instructions to ensure access 1 Open McAfee Security Center 2 On the Home wind...

Page 140: ...play in the Program Details panel as shown in the graphic above In the Action panel click the option Grant Full Access 6 From the Firewall panel click on the option System Services 7 In the System Ser...

Page 141: ...t to Grant or Block Internet access You should always choose GRANT ACCESS when the program name is Command Center exe 1 Run Command Center 2 Check Remember this setting and click the Allow button on b...

Page 142: ...Allow Full Access along with other networked applications 5 You have now successfully configured McAfee but remember that you may have more than one firewall application running on your PC You need to...

Page 143: ...k traffic Unlike most firewalls BlackICE does NOT automatically prompt users for permission to allow Command Center to access the cameras and Internet ENABLE COMMAND CENTER WITH BLACKICE UI If you hav...

Page 144: ...ept Duration of Rule Forever and click Add 5 Click OK to close each of the open dialogs 6 You have now successfully configured BlackICE but remember that you may have more than one firewall applicatio...

Page 145: ...Notepad by double clicking on the file 3 Find the Manual UDP low REJECT section and add these lines ACCEPT 169 254 0 0 169 254 255 255 0 65536 UPnP 2005 10 05 02 44 06 PERPETUAL 2000 unknown ACCEPT 17...

Page 146: ...Command Center on the Allow List If Command Center is not displaying video follow these instructions to resolve it 1 Open the Windows Live OneCare system The Common Tasks screen displays as shown in...

Page 147: ...s and Protocols tab 5 In the Ports and Protocols section locate the Universal Plug and Play Xbox 360 UDP 1900 checkbox and select it so that it is marked Then hit the Apply button The video from your...

Page 148: ...pam by opening either folder clicking in the checkbox next to the alert message and going to the Checked Items dropdown field and selecting the option Move to Inbox Add Contact EarthLink 5 0 EarthLink...

Page 149: ...messages or to add a sender to your Safe Senders List right click on an alert message Click either Add Sender to Safe Senders List Microsoft Outlook Express 6 Outlook Express 6 does not have built in...

Page 150: ...ble click on Spam To get a WiLife alert message out of this folder right click on the alert message and then select the Not Spam option You can also highlight the message and then select the Not Spam...

Page 151: ...or 2 0 port 2 0 recommended Media Player Microsoft Windows Media Player 9 or later Intel Pentium 4 CPU speed Dual core and AMD processors deliver similar performance at lower clock speeds Microsoft Vi...

Page 152: ...electable 150 400 and 750 kbps Color Depth 10 bits Lens Focus User adjustable Viewing Angle 80 diagonal Pan Angle 50 manual Firmware Updates Selectable Manual or Automatic Communications to power supp...

Page 153: ...to brightness Resolution Selectable 320 X 240 or 640 X 480 pixels Frame Rate Selectable 5 10 or 15 frames second Bit Rate Selectable 150 400 and 750 kbps Color Depth 10 bits Lens Focus Preset Viewing...

Page 154: ...tts OPERATING ENVIRONMENT The DVC 810i Camera meets requirements for indoor use and is not qualified for outdoor or other extreme environments Temperature Range Operating 32 F to 93 F 0 C to 34 C Stor...

Page 155: ...and setup your surveillance system Networking specification HomePlug Power line 1 0 Data Rate 14 Mbps maximum 5 Mbps typical Data Encryption 56 bits standard DES Security Key Coded user defined passwo...

Page 156: ...Drill Size Pilot Hole Depth Softwood 1 6 mm 1 16 1 2 cm 1 2 0 Hardwood 2 0 mm 5 64 1 2 cm 1 2 Wallboard use anchor 5 0 mm 3 16 2 3 cm 7 8 Pre drill pilot holes before securing the camera to the surfac...

Page 157: ...therwise attempt to discover the source code algorithms or architecture of the Software You shall not export the Software or Product in violation of United States export laws Using the Product for ill...

Page 158: ...LIERS FROM ANY AND ALL LIABILITY TO YOU FOR ANY DAMAGES CLAIMS OF COST OR ANY LOST INCOME OR SAVINGS ARISING FROM OR RELATED TO THE SOFTWARE OR ITS USE THESE LIMITATIONS AND EXCLUSIONS APPLY TO THE EX...

Page 159: ...LY DISCLAIMS ANY AND ALL IMPLIED WARRANTIES INCLUDING WITHOUT LIMITATION WARRANTIES OF MERCHANTABILITY AND FITNESS FOR A PARTICULAR PURPOSE IF WILIFE CANNOT LAWFULLY DISCLAIM OR EXCLUDE IMPLIED WARRAN...

Page 160: ...ng warranty service If the product is still not functioning properly after making use of these resources access the online website www wilife com support for instructions on how to obtain warranty ser...

Page 161: ...separation between the equipment and receiver Connect the equipment to an outlet on a circuit different from that which the receiver is connected Consult the dealer or an experienced radio TV technici...

Page 162: ...nditions When the AC plug is damaged If liquid has been spilled into the system If the system has been exposed to rain or water If the system does not operate normally by following the operation instr...

Page 163: ...the WiLife components are exposed to significant physical shocks the WiLife enclosures could break open exposing sharp enclosure edges and sharp internal component edges In the event of enclosure bre...

Page 164: ...t To do this touch and hold a grounded metal object for a minimum of two seconds If storing this equipment for a prolonged period of time return it to its original shipping container If this equipment...

Page 165: ...de 151 To protect your privacy be sure to set a unique password via the WiLife software Doing this encrypts your camera data and makes the output unreadable by neighboring HomePlug systems which may b...

Page 166: ...User Guide 152...

Reviews: