1726 North Ballard Road - Appleton, WI 54911 - 920.991.9082
Technical Support 800.238.8739 - [email protected]
PTM30112-G
12/07/2012
W
E
CRUSH
HAZARD
CUTTING
HAZARD
CRUSH
HAZARD
CRUSH
HAZARD
FALLING
HAZARD
CRUSH
HAZARD
PINCH
HAZARD
PUNCTURE
HAZARD
F
RA
MELE
SS
CAR
ASS
EMBLY
S
E
R
IE
S
:
015 - 016 - 018 - 115 - 116 - 118
C
A
B
B
A
SLING
WALL
FLOOR
CLEARANCE
Step
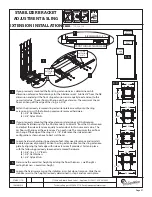
Walls on all cars except the Designer hang past the car fl oor. Before fastening fl oor to sling be sure to
allow enough clearance between car fl oor and sling upright.
Step
Drill (4) holes minimum (If sling extensions are provided, drill 6 - 8 holes depending on extension con-
fi guration) and bolt fl oor to sling using provided hardware (Verify clearance between car fl oor and all
hoistway walls. Refer to fi eld drawings for details).
Step
Insert wall
B [or rail wall]
with fasteners onto fl oor
A
pins and slide into place.
Note
: Do not allow the wall to tilt forward or backward as this may cause damage.
Step
Carefully place the gate pocket
C
with dowels into fl oor
at the same time connecting the fasteners
between
B
&
C
.
4
5
6
7
4
5
6
7
S
upport walls during assembly. Tilting forwards or backwards on dowels could result in damage to the
walls and/or fasteners and prevent proper assembly of car.
D
o not allow walls to slide off the fl oor this
may cause harm to yourself and the walls.
Page 33


