background image

2.3.1.1 Assembling new fittings

For metallic (SST or MP35N) fitting and tubing assemblies with ferrules not previously assembled
or set to tubing, you must mark the compression screw and connection port and ensure that the
two marks line up when you tighten them.

Warning: 

To avoid eye injury, use eye protection when performing this procedure.

Notice: 

To prevent contaminating system components, wear clean, chemical-resistant,

powder-free gloves when performing this procedure.

Required tools and materials

• Chemical-resistant, powder-free gloves

• Protective eyewear

• 1/2-inch open-end wrench

• 1/4-inch open-end wrench – for tightening or loosening stainless steel (gold-plated) fittings

with two-piece ferrules

• Column gripping tool – for holding the column while tightening or loosening the dual-threaded

fitting

• Permanent marker

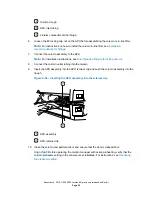
To assemble the new fittings:

1.

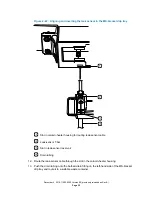
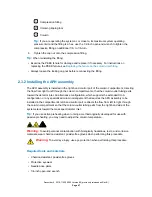
Insert the end of a tube into the hexagonal end of the compression screw.

2.

Insert the tube into the larger end of the ferrule.

3.

Insert the tube into the connection port.

4.

Rotate the compression screw, clockwise, into the connection port until the screw is finger-
tight.

5.

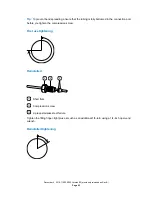
Using a permanent marker, mark the compression screw at the 12-o’clock position.

6.

Mark the connection port at the 9-o’clock position.

7.

Ensure that the tubing makes contact with the bottom of the connection port, and then use
the 1/4-inch open-end wrench to rotate the compression screw clockwise 3/4-turn until the
two marks line up.

December 4, 2019, 715005052 Version 02 (previously released as Rev.B)

Page 40

Summary of Contents for ACQUITY CH-A

Page 1: ...ACQUITY Column Heater Active Overview and Maintenance Guide 715005052 Version 02 previously released as Rev B Copyright Waters Corporation 2019 All rights reserved...

Page 2: ...its use For the most recent revision of this document consult the Waters website www waters com Trademarks ACQUITYTM is a trademark of Waters Corporation ACQUITY ArcTM is a trademark of Waters Corpora...

Page 3: ...n Contacting medium Information Internet The Waters website includes contact information for Waters locations worldwide Visit www waters com Telephone and fax From the USA or Canada phone 800 252 4752...

Page 4: ...diation emissions notice Changes or modifications not expressly approved by the party responsible for compliance could void the user s authority to operate the equipment This device complies with Part...

Page 5: ...dian safety requirements Environmentally friendly use period China RoHS indicates the number of years from the date of manufacture until the product or components within the product are likely to be d...

Page 6: ...at least five standards to generate a standard curve The concentration range for standards must include the entire range of QC samples typical specimens and atypical specimens Quality control Routinel...

Page 7: ...accordance with CISPR 11 Industrial Scientific and Medical ISM instrument requirements Group 1 products apply to intentionally generated and or used conductively coupled radio frequency energy that is...

Page 8: ...ety advisories iv Operating the device v Applicable symbols v Audience and purpose vi Intended use of the CH A vi Calibrating vi Quality control vi EMC considerations vii Canada spectrum management em...

Page 9: ...Installing the Column Module Switch Box 60 2 5 Column compartment configuration and control 64 2 5 1 Specifying the preheater setting 64 2 5 2 Enabling the leak sensor 64 2 5 3 Controlling the column...

Page 10: ...ed protection 92 A 5 Warnings that apply to all Waters instruments and devices 92 A 6 Warnings that address the replacement of fuses 96 A 7 Electrical symbols 98 A 8 Handling symbols 99 B Specificatio...

Page 11: ...column Note An optional passive column stabilizer device is available as an alternative configuration to support existing chromatographic methods not suitable for active preheating The CH A column co...

Page 12: ...n mount the column heater assembly on an external bracket on the right hand side of the chassis reducing the distance to the inlet probe of a mass spectrometer For information about installing the CH...

Page 13: ...t CH A module in extended column compartment installation 1 1 Major components The following figure shows the major components of a CH A module Figure 1 3 Compartment interior December 4 2019 71500505...

Page 14: ...ata see eCord technology The column heater module does not have its own power supply it draws power from the sample manager Thus the column heater automatically powers on when you power on the sample...

Page 15: ...tography data software Figure 1 4 Typical APH assembly 1 knurled compression fitting with back locking PEEK ferrule 2 locking cap nut APH circuit board APH inlet tubing SST sleeve Long flat compressio...

Page 16: ...gasket Column stabilizer retainer The column stabilizer s passive design lends itself to lower flow rate applications It is designed to support HPLC or UPLC methods that were originally developed for...

Page 17: ...used for each chromatographic run and records the following information The name of the sample set or sample list run on the column Number of injections onto the column Number of samples injected ont...

Page 18: ...the chromatography data software 2 1 Column compartment installation The CH A module assembly comprises a rear enclosure that installs onto the sample manager s chassis and the column heater that ins...

Page 19: ...avoid damaging the electronic components of the sample manager and the column heater always power off the sample manager before connecting or disconnecting the column heater s interconnect cable 1 Po...

Page 20: ...connector on the CH A interconnect cable inside the rear enclosure is firmly connected to the D sub receptacle on the rear of the column heater Important Use the flat blade screw driver to secure the...

Page 21: ...t to right into the sample manager s upper drip tray Tip For column compartment leak detection when the CH A is installed onto the system stack you must install the leak sensor in the sample manager s...

Page 22: ...tment if present detach the column heater from the CH A rear enclosure and verify that the rear enclosure is properly secured to the sample manager via the CH A to SM retainer bracket Requirement To s...

Page 23: ...e of the column heater 5 Using the 1 4 inch open end wrench disconnect the long flat compression screw end of the APH assembly from port 6 of the sample manager s injection valve Figure 2 4 Removing A...

Page 24: ...ubing routed behind the column compartment door 10 If fitted optionally detach the leak sensor connector from the front of the sample manager Important For column compartment leak detection when the C...

Page 25: ...he right hand side of the column compartment behind the eCord receptacle Figure 2 8 TORX screw behind the eCord receptacle TORX screw on right hand side of column heater eCord receptacle 13 Gently pul...

Page 26: ...the column heater Figure 2 10 Rear view of column heater showing D sub receptacle D sub receptacle on rear of column heater 15 Coil the interconnect cable inside the CH A rear enclosure and set the co...

Page 27: ...is not installed onto the sample manager s top cover proceed to Installing the MS extension bracket and column heater housing and follow steps 17 to 27 to install the retainer bracket onto the sample...

Page 28: ...2 13 Installing the retainer bracket on the sample manager chassis CH A to SM retainer bracket Sample manager s top cover TORX screw Cutout in bracket 21 As shown in the figure above position the brac...

Page 29: ...ager s rear panel The CH A rear enclosure s front left hand foot is seated in the cutout of the CH A to SM retainer bracket Figure 2 14 Securing the CH A to the sample manager Sample manager s rear pa...

Page 30: ...er mounting hardware Required tools and materials T20 TORX driver Column heater MS bracket kit Leak sensor optional Drain tubing Table 2 1 MS bracket kit major components Component Appearance Column h...

Page 31: ...2 Tab on MS extension bracket Slot inside CH A rear enclosure 2 While holding the MS extension bracket inserted in the left hand side of the housing route the CH A interconnect cable with 25 pin conne...

Page 32: ...A rear enclosure Bracket tab Cutout in CH A chassis Threaded opening for TORX screw CH A interconnect cable routed through bracket slot 4 Install the TORX screw in the tab and using the T 20 TORX driv...

Page 33: ...ight of the column heater housing up or down to align it with the mass spectrometer inlet perform these steps a Remove the two TORX screws that secure the hinge to the MS extension bracket Figure 2 19...

Page 34: ...from the height adjustment bracket and then reattaching it using different holes 9 From the MS bracket kit obtain the MS bracket drip tray and two T20 TORX screws 10 Attach the MS bracket drip tray to...

Page 35: ...r T bar Slot in leak sensor reservoir Drain tubing 12 Route the leak sensor cable through the slot in the column heater housing 13 Push the drain tubing onto the barbed drain fitting on the left hand...

Page 36: ...materials Chemical resistant powder free gloves Protective eyewear 4 mm open end wrench T20 TORX driver To install the CH A in the extended position 1 Verify that the CH A interconnect cable is route...

Page 37: ...at holds the tab on the left hand rear side of the column heater Then press the right hand side of the column heater into the housing Tighten the TORX screw to secure the tab Figure 2 24 Guiding the e...

Page 38: ...tubing and reinstall the column components 14 Connect the column outlet tubing to the column and to the mass spectrometer inlet according to the instructions provided with the instrument 2 3 Column co...

Page 39: ...rtment plumbing connections consult the topics in this section for detailed instructions about assembling and tightening the various fittings used to connect the column compartment to the system These...

Page 40: ...ed fittings with two piece ferrules Column gripping tool for holding the column while tightening or loosening the dual threaded fitting Permanent marker To assemble the new fittings 1 Insert the end o...

Page 41: ...crew Two piece stainless steel ferrule Tighten the fitting finger tight plus an additional 3 4 turn using a 1 4 inch open end wrench Tip To prevent band spreading ensure that the tubing is fully botto...

Page 42: ...less steel gold plated fitting with short flats and 2 piece stainless steel ferrule V detail First use Short flats Compression screw 2 piece stainless steel ferrule Tighten the fitting finger tight pl...

Page 43: ...compression screw First use tightening Reinstalled Short flats Compression screw 2 piece stainless steel ferrule Tighten the fitting finger tight plus as much as an additional 1 6 turn using a 1 4 in...

Page 44: ...e that the tubing is fully bottomed in the connection port before tightening the fitting 2 3 1 5 PEEK fitting with PEEK ferrule and stainless steel lock ring First use or reinstalled Compression screw...

Page 45: ...ssion fitting 2 locking cap nut Back locking PEEK ferrule Figure 2 29 Column stabilizer outlet fitting first use or reinstalled 1 hex compression fitting 2 locking cap nut Back locking PEEK ferrule De...

Page 46: ...portant To prevent band spreading ensure that the tubing bottoms in the connection port before you tighten the compression fitting 3 Finger tighten the compression fitting into the inlet of the column...

Page 47: ...he detector inlet An alternative configuration which supports the extended CH A configuration or any specialized column arrangement that requires the APH assembly to be installed in the compartment s...

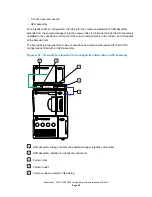
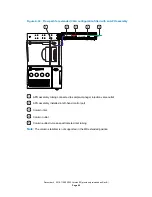
Page 48: ...tes at the detector inlet The figures below represent the tubing connections and components required for both CH A configurations fitted with an APH assembly Figure 2 32 Flow path for standard CH A co...

Page 49: ...nected to sample manager injection valve outlet APH assembly installed in left hand control port Column inlet Column outlet Column outlet to mass spectrometer inlet tubing Note The column stabilizer i...

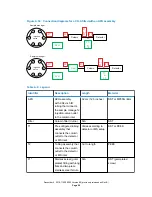
Page 50: ...he sample manager s injection valve outlet to the column inlet 32 cm 12 5 inches SST or MP35N Bio Filter Column filter in line N A SST T1 Pre configured tubing assembly that connects the column outlet...

Page 51: ...n compartment door 3 Open the fluidics compartment door of the sample manager 4 Remove the O ring retainer from the inlet end of the APH inlet tubing and connect the inlet tubing to port 6 of the samp...

Page 52: ...Connect the column outlet tubing into the column 9 Insert the APH assembly into the APH retainer clip and push the column assembly into the trough Figure 2 36 Inserting the APH assembly into the reta...

Page 53: ...must change the column preheater setting in the console to Active disabled For instructions see Specifying the preheater setting Warning To prevent burn injuries set the column temperature to Off and...

Page 54: ...lumn stabilizer inlet tubing connected to sample manager injection valve outlet Column stabilizer mounted in column compartment trough Column inlet Column outlet Column outlet to detector inlet tubing...

Page 55: ...tabilizer assembly that connects the sample manager s injection valve outlet to the column inlet 32 cm 12 5 inches SST Filter Column filter in line N A SST T1 Pre configured tubing assembly that conne...

Page 56: ...obile phase 2 Open the fluidics compartment door of the sample manager 3 If the APH assembly is installed using the 1 4 inch open end wrench disconnect the APH assembly from port 6 of the sample manag...

Page 57: ...mple manager injection valve Note For installation instructions see Assembling new fittings 8 Route the column stabilizer inlet tubing behind the hinge of the fluidics compartment door in the sample m...

Page 58: ...g cap nut on the column stabilizer before assembling the column or in line filter Note For instructions on how to install the column in line filter see Installation recommendations for fittings 14 Con...

Page 59: ...ample manager and then power on the sample manager Notice To avoid damaging the electronic components of the sample manager and the column heater always power off the sample manager before connecting...

Page 60: ...ials Flat blade screwdriver T20 TORX driver Column Module Switch Box kit To install the Column Module Switch Box Notice To avoid damaging the electronic components of the sample manager and the column...

Page 61: ...ews Left T20 TORX screw Center T20 TORX screw 5 Replace the center T20 TORX screw with the longer T20 TORX screw provided in the Column Module Switch Box kit 6 Position the mounting bracket screw slot...

Page 62: ...onnector into the D sub receptacle labeled 30 cm on the switch box and using the flat blade screwdriver tighten the two retaining screws to secure the connector c Insert the SM FTN interconnect cable...

Page 63: ...figuration that matches your desired fluidics configuration and click OK A warning dialog box appears to notify you that the configuration change will initiate an automatic restart of the console c Cl...

Page 64: ...onfigured but not detected appears To avoid this condition before removing the APH assembly change the console s column preheater setting to Active disabled To specify the preheater setting 1 From the...

Page 65: ...the variance 2 6 Responding to a leak sensor alarm After approximately 1 5 mL of liquid accumulates in the leak sensor reservoir an alarm sounds indicating that the leak sensor detected a leak Warning...

Page 66: ...ake the repairs necessary to stop it 7 Locate the leak sensor that triggered the alarm according to the CH A configuration For a standard stack mounted CH A configuration with leak detection the leak...

Page 67: ...rners of the leak sensor reservoir 12 Align the sensor s T bar with the slot in the side of the leak sensor reservoir and slide the leak sensor into place 13 In the console select Sample Manager from...

Page 68: ...esses for Waters locations worldwide Visit www waters com When you contact Waters be prepared to provide the following information Error message if any Nature of the symptom Serial number of the syste...

Page 69: ...cessary Replace the column in line filter unit frit During scheduled routine maintenance or as needed Clean the instrument with a soft lint free cloth or paper dampened with water As necessary 3 3 Spa...

Page 70: ...pecified threshold You can minimize unexpected failures and unscheduled downtime during important work For information explaining how to specify maintenance warnings consult the Waters console Help 3...

Page 71: ...let tubing from the detector inlet 5 Disconnect the eCord fob from its receptacle on the right hand side of the CH A 6 Using the T20 TORX driver remove the TORX screw from the right hand side of the c...

Page 72: ...ated on the rear left hand side of the column heater Figure 3 3 Leak sensor receptacle on the rear left hand side of the column heater Receptacle for the leak sensor connector 10 Set the column heater...

Page 73: ...nsor T bar Slot in leak sensor reservoir 12 Remove the leak sensor cable from the slot in the column heater housing 13 Grasp the leak sensor by its serrations and pull upward on it to remove it from i...

Page 74: ...tab on the left hand rear side of the column heater and then press the right hand side of the column heater into the housing Tighten the TORX screw to secure the tab Figure 3 5 Guiding the eCord tab i...

Page 75: ...rtment and its components to cool for 60 minutes before touching them Monitor the column compartment s internal temperature to ensure that all components are cool Warning To avoid personal contaminati...

Page 76: ...mbly before removing the column assembly 6 Place the column gripping tool onto the column 7 While holding the column with the column gripping tool loosen the 1 knurled compression fitting and remove t...

Page 77: ...the column compartment s internal temperature to ensure that all components are cool Warning To avoid personal contamination with biologically hazardous toxic and corrosive materials wear chemical res...

Page 78: ...line filter and column outlet tubing in their entirety from the compartment Figure 3 8 APH assembly and column components installed in column compartment 1 knurled compression fitting 2 locking cap nu...

Page 79: ...compartment door in the sample manager and into the slot that leads to the column trough 13 Loosen the 2 locking cap nut on the APH before assembling the column or in line filter Note For instruction...

Page 80: ...ace it Required tools and materials Needle nose pliers New APH retainer clip To replace the APH retainer clip 1 Using needle nose pliers gently compress the top and bottom sides of the old APH retaine...

Page 81: ...e touching them Monitor the column compartment s internal temperature to ensure that all components are cool Warning To avoid personal contamination with biologically hazardous or toxic compounds wear...

Page 82: ...11 Replacing the column stabilizer assembly Before replacing the column stabilizer assembly in the CH A ensure that you obtained the correct replacement assembly for the length of columns that you int...

Page 83: ...1 Stop any running mobile phase 2 Open the fluidics compartment door of the sample manager 3 Use the 1 4 inch open end wrench to disconnect the column stabilizer inlet tubing from port 6 of the sampl...

Page 84: ...lumn trough Figure 3 13 Routing the column stabilizer inlet tubing Column trough Column stabilizer inlet tubing Fluidics compartment door hinge 12 Close the fluidics compartment door 13 Pull the colum...

Page 85: ...r is clasped shut Note Before operating the column heater with the column stabilizer you must change the preheater setting in the console to Active disabled For instructions see Specifying the preheat...

Page 86: ...ap nut from fitting 1 knurled compression fitting 2 locking cap nut 2 Slide the 1 knurled compression fitting off the tubing Figure 3 16 Sliding fitting off tubing 1 knurled compression fitting Tubing...

Page 87: ...6 Slide the 1 knurled compression fitting and ferrule onto the tubing Figure 3 18 Sliding fitting and ferrule onto tubing Tubing 1 knurled compression fitting Note If it is a captive ferrule the ferr...

Page 88: ...wipe the instrument or device Do not spray or otherwise apply water directly onto any equipment surface Warning To avoid personal injury use eye and hand protection during the cleaning process Requir...

Page 89: ...s of injury or property damage resulting from the failure of individuals to comply with any safety precaution when installing repairing or operating any of its instruments or devices The following sym...

Page 90: ...ruments and devices fitted with nonmetallic tubing Warning To avoid injury from bursting nonmetallic tubing heed these precautions when working in the vicinity of such tubing when it is pressurized We...

Page 91: ...ng This warning applies to Waters instruments and devices that can process biohazards corrosive materials or toxic materials Warning To avoid personal contamination with biologically hazardous toxic o...

Page 92: ...rs instruments and devices When operating this device follow standard quality control procedures and the equipment guidelines in this section Warning Changes or modifications to this unit not expressl...

Page 93: ...l sulfoxide cause nonmetallic tubing to swell which greatly reduces the rupture pressure of the tubing Avertissement Manipulez les tubes en polym re sous pression avec precaution Portez syst matiqueme...

Page 94: ...zzare tubi eccessivamente logorati o piegati Non utilizzare tubi non metallici con tetraidrofurano THF o acido solforico o nitrico concentrati Tenere presente che il cloruro di metilene e il dimetilso...

Page 95: ...THF Methylene chloride Dimethyl sulfoxide THF This warning applies to Waters instruments fitted with nonmetallic tubing or operated with flammable solvents December 4 2019 715005052 Version 02 previou...

Page 96: ...modalit non previste dal produttore pu compromettere la protezione offerta dall apparecchiatura Advertencia el usuario deber saber que si el equipo se utiliza de forma distinta a la especificada por...

Page 97: ...r on the instrument or device Warning To protect against fire replace fuses with those of the type and rating indicated in the Replacing fuses section of the Maintenance Procedures chapter Avertisseme...

Page 98: ...ption Electrical power on Electrical power off Standby Direct current Alternating current Alternating current three phase Safety ground Frame or chassis terminal connection Fuse Functional ground Inpu...

Page 99: ...ls affixed to the packaging in which instruments devices and component parts are shipped Symbol Description Keep upright Keep dry Fragile Use no hooks Upper limit of temperature Lower limit of tempera...

Page 100: ...mbly column in line filter column and column outlet tubing Inside column compartment via access door Number of columns One 150 mm column maximum with guard One 150 mm column maximum with column in lin...

Page 101: ...ure Protection Normal IPX0 IPX0 means that no Ingress Protection against any type of dripping or sprayed water exists The X is a placeholder that identifies protection against dust if applicable B 4 C...

Reviews: