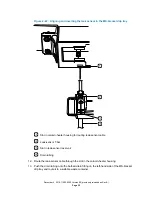
Figure 2–2: Installing the retainer bracket onto the sample manager's top cover
CH-A-to-SM retainer bracket
Sample manager's top cover
TORX screw
Cutout in bracket
4.
As shown in the figure above, position the retainer bracket so that the openings in the
bracket align with the openings in the sample manager's top cover, and the cutout in the
bracket faces the sample manager's rear panel.
5.
Insert the TORX screw into the threaded opening, and then tighten it using the T20 TORX
driver to secure the retainer bracket to the sample manager's top cover.
6.
Turn over the CH-A and inspect its underside to ensure that the 25-pin connector on the
CH-A interconnect cable inside the rear enclosure is firmly connected to the D-sub
receptacle on the rear of the column heater.
Important:
Use the flat-blade screw driver to secure the 25-pin connector to the D-sub
receptacle on the rear of the column heater.
7.
Carefully place the CH-A onto the sample manager's top cover.
8.
Align the CH-A on the sample manager chassis to these specifications:
• The two studs on the sample manager's rear panel extend through the two slots in the
CH-A back plate.
• The opening in the center of the CH-A back plate aligns with the threaded opening in
the center of the sample manager's rear panel.
• The CH-A rear enclosure's front, left-hand foot is seated in the cutout of the CH-A-to-
SM retainer bracket.
December 4, 2019, 715005052 Version 02 (previously released as Rev.B)
Page 20


