


22. Insert the TORX screw through the opening in the bracket and into the threaded opening in
the sample manager's top cover, and then tighten it using the T20 TORX driver to secure
the retainer bracket to the sample-manager chassis.
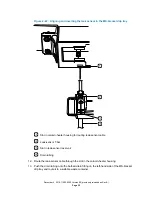
23. Carefully place the CH-A rear enclosure onto the sample manager's top cover.
24. Align the CH-A rear enclosure on the sample manager chassis to these specifications:
• The two studs on the sample manager's rear panel extend through the two slots in the
CH-A back plate.
• The opening in the center of the CH-A back plate aligns with the threaded opening in
the center of the sample manager's rear panel.
• The CH-A rear enclosure's front, left-hand foot is seated in the cutout of the CH-A–to–
SM retainer bracket.
Figure 2–14: Securing the CH-A to the sample manager
Sample manager's rear panel studs extended through slots in the CH-A back plate
Opening in the CH-A back plate aligned with the threaded opening in the center of
the sample manager's rear panel
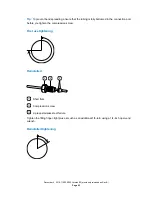
25. Reinstall the TORX screw with washer through the CH-A back plate and into the threaded
opening in the sample manager's rear panel.
26. Using the T20 TORX driver, tighten the screw to secure the CH-A rear enclosure to the
sample manager's rear panel.
27. Replace any system modules that were removed during installation and the solvent tray
above the CH-A rear enclosure.
December 4, 2019, 715005052 Version 02 (previously released as Rev.B)
Page 29


