


3.
Press the right-hand side of the MS-extension bracket into the rear enclosure cutout until it
seats.
Important:
Ensure that the CH-A interconnect cable remains in the slot as you guide the
tab into the cutout. If the cable slips out of the slot, it can prevent the bracket from seating
fully into the rear enclosure.
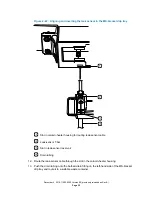
Figure 2–17: Seating the bracket tab into the CH-A rear enclosure
Bracket tab
Cutout in CH-A chassis
Threaded opening for TORX screw
CH-A interconnect cable routed through bracket slot
4.
Install the TORX screw in the tab and, using the T-20 TORX driver, tighten it slightly.
5.
Using two TORX screws, attach the short side of the hinge assembly to the bracket.
6.
Using two TORX screws, attach the long side of the hinge assembly to the column-heater
housing.
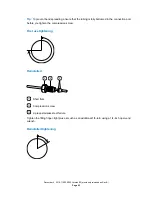
Figure 2–18: Attaching the hinge to the MS-extension bracket and column-heater
housing
December 4, 2019, 715005052 Version 02 (previously released as Rev.B)
Page 32


